Tools & materials you'll need
Affiliate linksAs an Amazon Associate FixlyGuide earns from qualifying purchases — at no extra cost to you. Prices and availability are accurate as of publication and subject to change.
Quick Answer
For drywall holes up to 4 inches in diameter, a simple patch kit provides a lasting repair. Unlike just spackling, a kit ensures structural integrity, preventing the patch from cracking or falling out, and blends seamlessly with the existing wall for a professional finish.
The Problem
A small hole in your drywall, whether from a misplaced picture hook, an accidental bump, or a doorknob gone wild, can be an eyesore. While tempting to just glob on some spackle, this approach almost always fails for holes larger than a nail pop. Without proper backing and reinforcement, the spackle will likely crack, sag, or even fall out over time, leaving you with an even uglier reminder of the damage. The real problem isn't just filling the hole; it's ensuring the repair is strong enough to last and invisible once painted.
How It Works
Drywall, or gypsum board, consists of a gypsum plaster core pressed between two sheets of heavy paper. It's strong under compression but brittle and lacks tensile strength. This is why a hole, even a small one, creates a weak point. When you apply spackle or joint compound directly to an open hole, there’s nothing behind it to adhere to except the very edge of the existing drywall. As the compound dries and shrinks, or if the wall experiences any minor vibrations, this unsupported patch will inevitably crack or detach.
A drywall patch kit, especially one with a mesh-backed metal or fiberglass screen, works by creating a new, stable surface for the joint compound to adhere to. The mesh provides structural support, bridging the gap of the hole. The adhesive on the patch secures it to the existing drywall, effectively extending the surface. When you apply joint compound over this reinforced patch, it bonds to the mesh and the surrounding drywall, creating a seamless, stable repair. The multiple thin coats of compound, feathered out at the edges, gradually build up the surface to be flush with the wall, making the repair disappear under paint. Sanding between coats ensures a smooth, imperceptible finish.
Step-by-Step Fix
1. Prepare the Area — Clean, trim, and ready the hole for patching.
- Safety First: Always wear safety glasses when cutting or sanding drywall to protect your eyes from dust and debris.
- Carefully remove any loose or ragged bits of drywall or paper around the hole. A utility knife can be used to trim the edges smooth, creating a clean opening. Use a damp cloth to wipe away any dust or grime from the area immediately surrounding the hole. A clean surface ensures good adhesion for the patch.
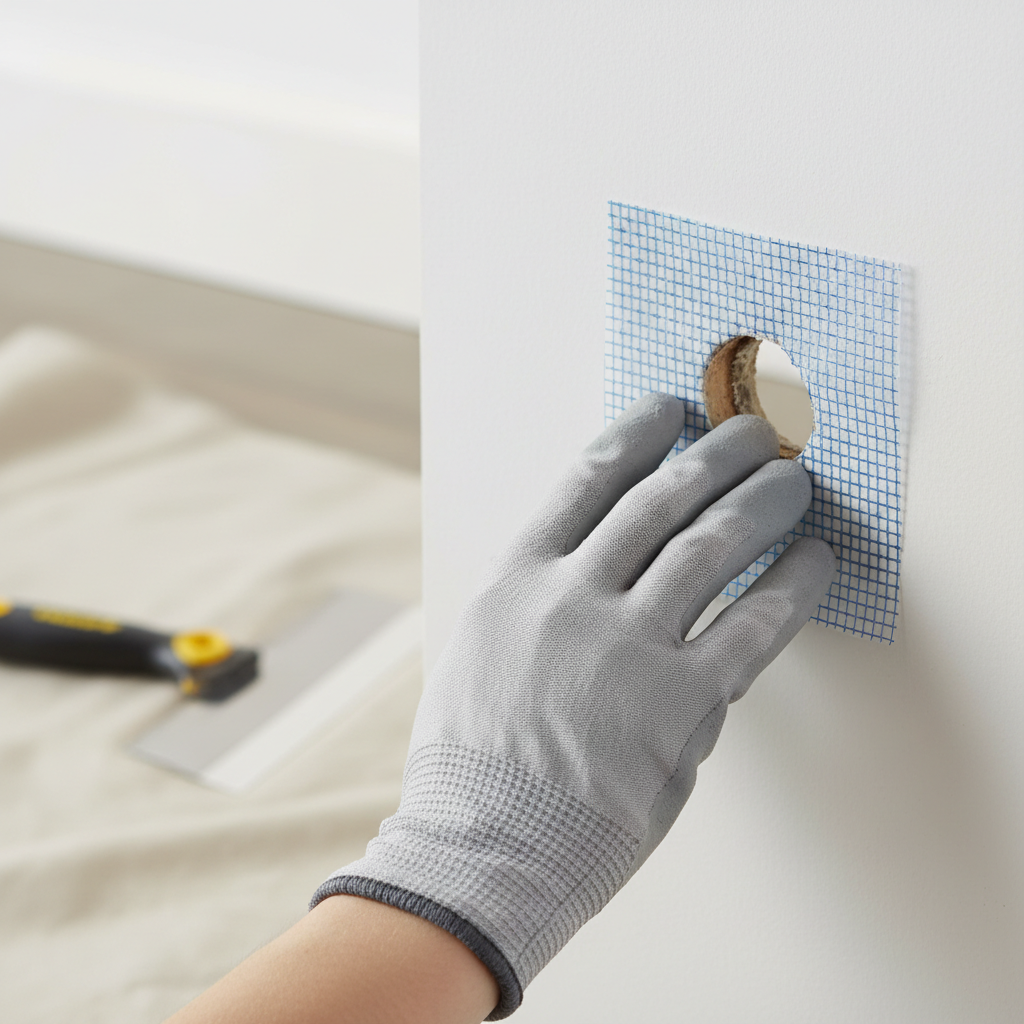
2. Apply the Self-Adhesive Patch — Center and firmly press the patch over the damage.
- Unpeel the backing from your self-adhesive drywall patch. Center the patch over the hole, ensuring it completely covers the damaged area with a slight overlap onto the undamaged drywall. Press firmly around the entire perimeter of the patch to ensure it adheres securely to the wall. The mesh should be taut across the opening.
3. Apply the First Coat of Joint Compound — Spread a thin, even layer, feathering the edges.
- Using a 6-inch drywall knife, scoop a small amount of joint compound onto the blade. Apply a thin, even layer of compound over the entire mesh patch, working from the center outwards. Aim to fill the mesh squares without caking on too much material. Feather the edges of the compound, spreading it thinner and thinner as you move away from the patch. This helps the repair blend into the existing wall.
- Tool Tip: A wider knife (8-inch or 10-inch) can help feather edges more effectively on subsequent coats.
4. Let it Dry and Sand Smooth — Ensure full dryness before light sanding.
- Allow the first coat of joint compound to dry completely. This can take 4-24 hours depending on humidity, compound thickness, and brand. The compound will lighten in color when dry. Once dry, lightly sand the patched area with 150-grit sandpaper or a sanding sponge. The goal is to smooth out any ridges or imperfections, not to remove all the compound. Wipe away sanding dust with a damp cloth.
5. Apply Second Coat of Joint Compound — A wider, thinner coat to further blend the repair.
- Apply a second, slightly wider and thinner coat of joint compound over the first. Extend this coat about 1-2 inches beyond the edges of the first coat, feathering the edges even more thinly. This helps to further smooth the transition from the repair to the original wall. Again, ensure the coat is even and free of lumps.
6. Dry, Sand, and Repeat (if needed) — Achieve a perfectly flush and smooth finish.
- Allow the second coat to dry completely, then sand lightly with 220-grit sandpaper until smooth. Wipe clean. Feel the patch with your hand – it should be entirely flush with the surrounding wall. If you still see or feel a slight hump or depression, apply a third, very thin, and wide coat, extending it further out, then dry and sand again. Perfection takes patience.
7. Prime the Patch — Seal the new surface for consistent paint absorption.
- Once the patch is perfectly smooth and dust-free, apply a thin coat of drywall primer. This is a crucial step that prevents “flashing,” where the patch absorbs paint differently than the surrounding wall, leading to a visible dull or shiny spot. Allow the primer to dry completely according to the manufacturer's instructions.
8. Paint the Wall — Apply final paint coats for an invisible repair.
- Once the primer is dry, apply two coats of your wall paint, allowing adequate drying time between coats. For best results, paint the entire wall from corner to corner to avoid subtle color variations that can make your patch visible.
Common Causes
- Door Knob Impacts: One of the most frequent culprits. A doorknob without a wall bumper can repeatedly strike the drywall, eventually causing a hole.
- Picture Hanging Mishaps: Attempting to hang heavy items without proper anchors, or repeatedly repositioning pictures, can leave behind small holes or tear the drywall.
- Accidental Punctures: Moving furniture, playful children, or even a slip with a tool can result in unexpected holes.
- Mounting Failures: Shelves, TVs, or other fixtures that rip out of the wall due to improper installation or excessive weight.
- Roughhousing or Play: Kids' games, indoor sports, or pets can inadvertently create small impact holes.
Common Mistakes
- Using Only Spackle for Anything Larger Than a Nail Hole: Spackle is designed for very minor imperfections. For actual holes, it lacks the structural integrity needed for a lasting repair, leading to cracks and failure.
- Applying Too Much Joint Compound at Once: Thick coats take forever to dry, are harder to sand smooth, and are more prone to shrinking and cracking. Thin, multiple coats are always better.
- Not Feathering the Edges: Failing to spread the joint compound thinly at the edges of each coat creates a noticeable hump or ridge, making the patch stand out, especially under certain lighting.
- Skipping the Sanding Between Coats: Each coat of compound will have slight imperfections. Skipping sanding means these flaws are magnified with each subsequent layer, resulting in a bumpy finish.
- Not Priming the Patch: New joint compound is very porous and will absorb paint differently than the painted drywall around it. Without primer, the repair will often “flash” or look dull compared to the rest of the wall, even after multiple coats of paint.
- Ignoring Loose Bits of Drywall: If you don't clean and trim the hole, any loose paper or crumbling gypsum will prevent the patch from adhering properly or create bumps under the compound.
Cost & Time Breakdown
| Task | DIY Cost | Pro Cost | Time |
|---|---|---|---|
| Materials (patch kit, compound, sandpaper, primer, brushes) | $15–$30 | Included in labor | — |
| Drywall repair (parts & labor for small hole) | — | $75–$150 per hole | 1–2 hours (active) |
| Painting (small area) | $0 (if you have paint) | $50–$100 (if color matching) | 30–60 minutes (active) |
| Total | $15–$30 | $75–$250 | 2–4 hours (total project time including drying) |
Tips & Prevention
- Install Door Stops: For holes caused by doorknobs, ensure all doors have proper wall-mounted or baseboard-mounted door stops to prevent future damage.
- Use Proper Anchors: When hanging anything on drywall, use appropriate drywall anchors (toggle bolts, self-drilling anchors) for the weight of the item. Never rely solely on a screw into the drywall itself.
- Measure Before Cutting: If you're cutting into drywall for any reason (e.g., installing a new outlet), always measure twice and cut once to avoid accidental extra holes.
- Protect Walls During Moves: When moving furniture, especially large items, cover walls with moving blankets or cardboard to prevent scrapes and punctures.
- Keep Spare Paint: Hold onto leftover paint from your walls. Even a small amount in a sealed container can be a lifesaver for patching and touch-ups.
- Check for Moisture: Before patching any hole, especially if it's in an unusual spot, check for signs of moisture or water damage around the hole. A soft, spongy feel or discoloration could indicate a hidden leak that needs professional attention first.
When to Call a Professional
While patching a small hole is a straightforward DIY task, there are times when calling a professional makes sense. If the hole is larger than 4-6 inches in diameter, or if there are multiple large holes, a professional drywaller can ensure a seamless repair that integrates perfectly with your existing wall, often with less effort and better results than a DIY attempt. You should also call a pro if the damage involves structural elements, an outside wall with potential insulation damage, or if you suspect water damage or mold growth around the hole. Professionals have the tools and expertise to handle larger patches, match textures, and ensure the integrity of your wall, saving you time and potential headaches from complicated repairs.
Related Articles
Keep troubleshooting with these hand-picked guides from FixlyGuide:
- The 1 Common Drywall Patching Mistake (and The Right Way to Fix a Hole) — Discover the biggest mistake homeowners make when patching drywall holes and learn the correct, long-lasting method for seamless repairs.
- The 7 Critical Mistakes Almost Everyone Makes When Painting a Room — Unlock the secrets to a flawless, professional-looking paint job by avoiding common pitfalls and mastering essential techniques for perfect…
- The 7 Mistakes That Ruin a Perfect Paint Job (and How to Fix Them) — Painting a room like a pro isn't just about technique—it's about avoiding common pitfalls that lead to streaks, drips, and uneven finishes.…
- The 7 Mistakes That Ruin a Paint Job (Before You Even Open the Can) — Proper wall preparation is the unseen foundation of a flawless interior paint job, preventing issues like peeling, uneven finishes, and vis…
- The #1 Mistake Homeowners Make Installing Floating Shelves (and How to Fix It) — Discover the crucial error many DIYers make when mounting floating shelves into drywall and learn the simple steps to ensure a secure, sag-…
- The #1 Mistake Homeowners Make After Finding Missing Shingles (And How to Fix It Right) — Discover the crucial steps to take after a storm rips shingles from your roof, ensuring a proper, lasting repair and preventing costly futu…
Recommended for DIYers & woodworkers
Sponsored
The Top 20 Tools for Workshops of Any Budget
No stationary machines or power tools required — plus 3 fundamental tools that can't be bought at any price.
Get the free guide
Ted's Woodworking — The #1 Woodworking Resource
Detailed instructions, dimensioned drawings, materials & cutting lists, and 3D schematics for every skill level.
See the plansSponsored: links above are affiliate links. FixlyGuide may earn a commission on qualifying purchases — at no extra cost to you.
Frequently asked questions
Can I just use spackle for a small hole?+
Spackle is only suitable for very minor imperfections like nail pops or hairline cracks. For any hole larger than a quarter-inch, spackle alone will not provide enough structural support and is likely to crack, sag, or fall out over time. Always use a drywall patch kit for holes up to 4 inches.
How long does a drywall patch take to dry?+
The drying time for joint compound depends on the thickness of the application, humidity levels, and the specific product. Each coat typically takes 4-24 hours to dry completely. It's crucial to ensure each layer is fully dry before sanding or applying the next coat to prevent cracking.
Do I need to prime the drywall patch before painting?+
Yes, priming the patched area is a critical step. New joint compound is very porous and will absorb paint differently than the surrounding painted wall, leading to an uneven finish or 'flashing.' Primer creates a uniform surface for the paint, ensuring a seamless, consistent color.
What if my patch is still visible after painting?+
If your patch is still visible, it's usually due to inadequate sanding, not feathering the edges enough, or skipping the priming step. Ensure the repair is perfectly flush with the wall (feel it with your hand) before priming. You might need to add another very thin layer of compound, sand meticulously, re-prime, and then repaint the entire wall from corner to corner to blend it seamlessly.


Discussion
Loading comments…