Tools & materials you'll need
Affiliate linksAs an Amazon Associate FixlyGuide earns from qualifying purchases — at no extra cost to you. Prices and availability are accurate as of publication and subject to change.
Quick Answer
Baseboards typically separate from walls due to the natural expansion and contraction of wood with changing humidity levels, a process known as 'seasonal movement.' Minor house settling can also contribute. The quickest and most effective homeowner fix involves re-securing the loose sections with finishing nails, often coupled with a bead of construction adhesive for a stronger hold, and then concealing the gaps with a flexible caulk.
The Problem
Walk into almost any home, and if you look closely enough, you might spot them: those tell-tale gaps between the baseboard and the wall. It’s an incredibly common issue, often mistaken as a sign of shoddy installation or serious structural problems. While it can be an eyesore, creating crevices that collect dust and disrupt the clean lines of a room, it's rarely a structural emergency. More often, it’s a symptom of your home breathing with the seasons, the wood molding subtly expanding and contracting as humidity rises and falls. These movements, over time, can pull the baseboard away from its anchor points, whether they're tiny nails, glue, or a combination. The result is a gap – sometimes hairline, sometimes wide enough to slip a credit card into – that can vary in prominence throughout the year. Understanding this natural phenomenon is the first step to a lasting repair.
How It Works
To really understand why your baseboards are behaving like divas, you need to grasp a few fundamental principles of building materials and physics. Most baseboards are made of wood, medium-density fiberboard (MDF), or a composite. These materials, especially wood, are hygroscopic, meaning they absorb and release moisture from the air. When humidity is high (think summer), wood takes on moisture, causing it to swell and expand. When humidity is low (like in winter, particularly with indoor heating), wood dries out, shrinks, and contracts. This expansion and contraction is called 'seasonal movement.'
Imagine a long strip of baseboard glued and nailed to your wall. As it expands, it pushes against constraints. As it contracts, it pulls away. If the fasteners aren't strong enough to resist this constant tug-of-war, or if the adhesive loses its grip over many cycles, the baseboard will eventually separate, creating noticeable gaps. Walls themselves also experience slight movements. Houses are not static; they settle minutely over decades, concrete slabs can shift, and framing lumber can creep. These movements, even just a fraction of an inch, can translate into stresses on rigidly attached baseboards, forcing them away from the drywall.
Painters caulk, often used to seal the top edge of baseboards during painting, is designed to be flexible, accommodating some of this movement. However, if the movement is significant, or the caulk is old and brittle, it will crack and fail, revealing the underlying gap. Nails, even if driven into studs, can loosen their grip over time due to the repetitive stress. When you combine these factors – the baseboard's natural tendency to move, the wall's subtle shifts, and the aging of fasteners and sealants – it becomes clear why baseboard separation is such a ubiquitous homeowner headache.
Step-by-Step Fix
1. Clear the Area & Inspect – Remove furniture and thoroughly inspect the separated sections.
Before diving in, clear any nearby furniture and vacuum the floor line thoroughly to remove dust and debris. Gently push and pull on the separated baseboard sections to assess how loose they are and how much gap exists. Look for old nails that have pulled out or cracked caulk. This initial inspection will help you determine the best approach and the extent of the repair.
2. Prepare the Surface – Clean and prep the wall and baseboard for optimal adhesion.
Use a utility knife to carefully score and remove any old, cracked caulk from the top edge of the baseboard and the wall. A putty knife can help scrape away stubborn bits. Wipe down the wall and the top edge of the baseboard with a damp cloth to remove dust, dirt, and grease. Allow the surfaces to dry completely. Good adhesion is critical for success, especially if you plan to use construction adhesive.
3. Pry the Baseboard Slightly (If Needed) – Create access for construction adhesive if the gap is tight.
For stubborn gaps where the baseboard is still somewhat attached but won't sit flush, a thin pry bar can be useful. Carefully insert the pry bar behind the baseboard, protecting the wall with a thin piece of wood or cardboard, and gently pull the baseboard away just enough to create a small gap. You only need about 1/8 to 1/4 inch of space to apply a bead of adhesive. This step is optional if your gaps are already wide enough.
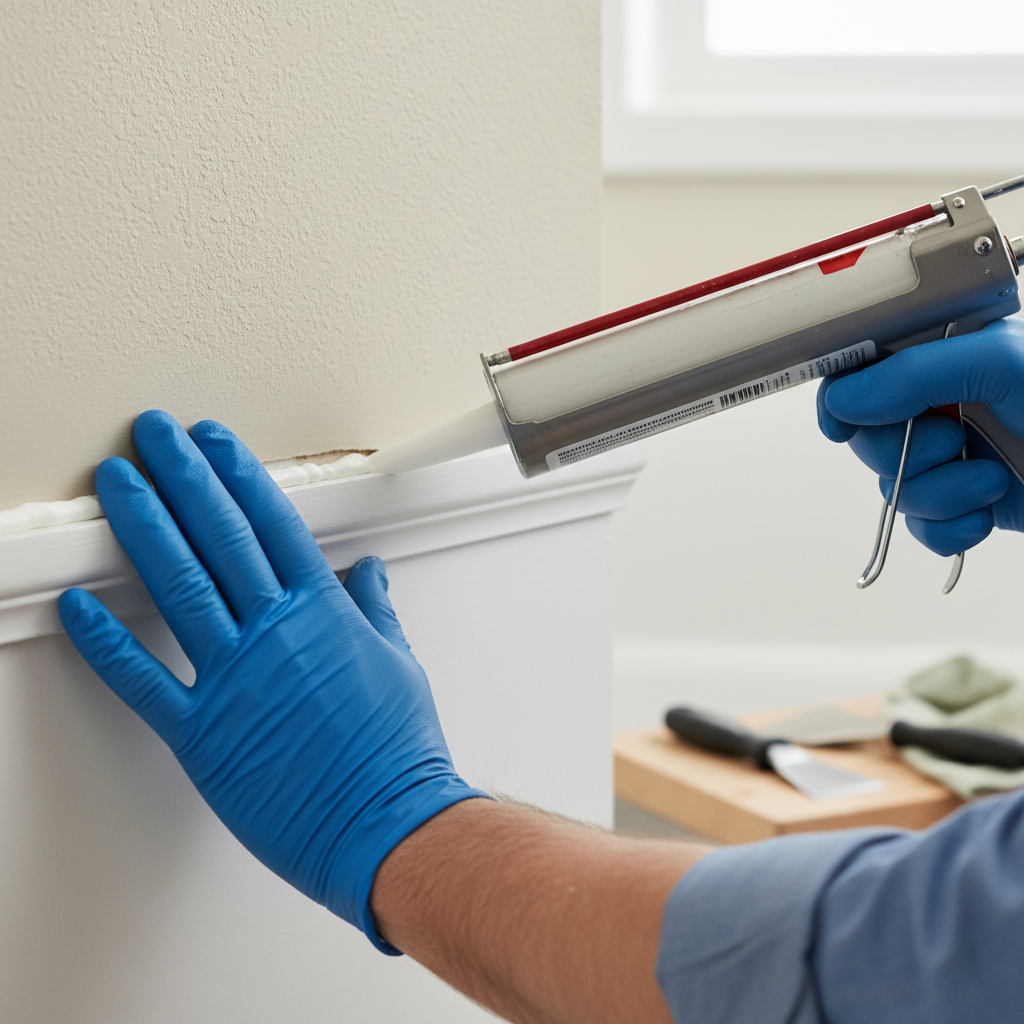
4. Apply Construction Adhesive – For long-lasting hold, use a flexible construction adhesive.
Cut the tip of your construction adhesive tube at a 45-degree angle, creating a 1/4-inch opening. Load it into your caulk gun. With steady pressure, apply a continuous, wavy bead of construction adhesive to the back of the baseboard where it will contact the wall. Alternatively, if the gap is wide enough, you can apply the adhesive directly to the wall behind the baseboard. Don't go overboard; too much adhesive will squeeze out and create a mess. A zigzag pattern works well for good coverage.
Safety Note: Wear gloves when working with construction adhesive to avoid skin contact. Ensure good ventilation in the work area.
5. Re-secure with Finishing Nails – Use a nail gun or hammer to firmly re-attach the baseboard.
Press the baseboard firmly back against the wall, ensuring the bottom edge is flush with the floor (or carpet). Using a stud finder, locate wall studs along the section you are re-attaching. This is crucial for a strong hold. Drive 1.5-inch to 2-inch finishing nails through the baseboard into the studs using a nail gun (preferred for speed and discretion) or a hammer. Space nails every 16–24 inches. If you can’t hit a stud, angle the nails slightly up or down to create a stronger grip in the drywall or base plate. Use a nail set to recess the nail heads just below the surface of the wood.
- If using a hammer: Use a small block of wood and a level to protect the baseboard surface when hammering.
- If the plaster/drywall is crumbling: Consider using longer nails and angling them, or patch the wall section first if the damage is severe.
6. Fill Nail Holes & Minor Imperfections – Prepare for a smooth finish by concealing fasteners.
Once the baseboard is securely in place, use a small amount of wood putty or spackle to fill the recessed nail holes. Apply it with a putty knife, ensuring it's flush with the baseboard surface. For very minor gaps that remain between the baseboard and the wall (especially after the adhesive has cured), you can also use wood putty to smooth them out. Allow the putty to dry completely, then lightly sand with 220-grit sandpaper until smooth.
7. Caulk the Top Edge – Create a seamless, flexible seal with paintable caulk.
Load a tube of paintable acrylic latex caulk with silicone into your caulk gun. Cut the tip at a 45-degree angle, creating a small 1/8-inch opening. Apply a thin, continuous bead of caulk along the entire top edge where the baseboard meets the wall. Immediately after applying a section (about 2-3 feet), run a wet finger or a caulk tool along the bead to smooth it out and feather it into the wall and baseboard surfaces. Wipe away any excess caulk with a damp cloth before it dries.
- Choose the right caulk: Paintable acrylic latex caulk with silicone is best for flexibility and easy cleanup. Clear caulk can be used if you're not planning to paint.
8. Paint (If Necessary) – Finish the job with a fresh coat of paint for a flawless blend.
Once the wood putty and caulk are completely dry (check product instructions for curing times, typically 24-48 hours), you can touch up the baseboards with paint. Use painter's tape to create clean lines if needed, though with a steady hand, it's often not required. Apply two thin coats of paint for the best finish, allowing proper drying time between coats.
Common Causes
- Seasonal Humidity Fluctuations: The leading culprit. Wood and wood products naturally expand and contract with changes in ambient moisture, pulling away from fasteners over time. Homes with humidifiers or dehumidifiers that aren't consistently maintained can exacerbate this.
- House Settling: All houses settle to some degree, especially newer constructions. This can cause slight shifts in walls and floors, which in turn place stress on rigidly attached baseboards, forcing them to separate.
- Insufficient or Improper Fasteners: If baseboards were installed with too few nails, nails that were too short, or nails that missed wall studs, they won't have enough holding power to resist seasonal movement. Using only adhesive, or an old, brittle adhesive, without nails, also makes separation more likely.
- Drywall Delamination: In rare cases, the drywall paper backing might delaminate around the fasteners, losing its grip on the nails. This is more common in older homes with water damage or very humid environments.
- Poor Initial Installation: Sometimes, installers don't adequately clean surfaces before applying adhesive, or they don't hold the baseboard firmly in place while fasteners are secured, leading to a weak bond from the start.
Common Mistakes
- Using Only Caulk for Large Gaps: Caulk is a sealant, not an adhesive or structural fastener. Trying to bridge large gaps (over 1/8 inch) with caulk alone will result in it cracking and peeling as the baseboard continues to move. Address the underlying looseness first.
- Not Nailing into Studs: Nailing only into drywall provides very little holding power. Always use a stud finder and aim for the studs to ensure a strong, long-lasting attachment. If a stud isn't accessible, angle two nails towards each other to create a stronger grip in the drywall.
- Forgetting to Apply Adhesive: While nails provide initial holding, construction adhesive creates a much stronger and more durable bond that resists the constant tug of seasonal movement. Skipping this step often leads to the problem recurring sooner.
- Over-applying Caulk: Applying too much caulk creates a mess and makes it harder to achieve a clean, professional-looking bead. A small, consistent bead that you smooth immediately is always better.
- Not Cleaning Surfaces: Dust, old paint flakes, and grime prevent construction adhesive and caulk from bonding properly. Always clean and dry the surfaces meticulously before applying any new materials.
- Ignoring the Root Cause: Simply filling gaps with caulk without addressing the loose baseboard itself is a temporary fix. It's crucial to re-secure the baseboard to the wall for a lasting repair.
Cost & Time Breakdown
| Task | DIY Cost | Pro Cost | Time |
|---|---|---|---|
| Materials (adhesive, nails, caulk, putty) | $20–$50 | Included | N/A |
| Prep (cleaning, removing old caulk) | $0 | Included | 20–40 mins |
| Re-secure baseboards | $0 | Included | 30–60 mins |
| Finishing (filling, sanding, caulking) | $0 | Included | 45–90 mins |
| Painting touch-ups | $0–$10 | Included | 30–60 mins |
| Total | $20–$60 | $150–$350+ | 2–4 hours |
Tips & Prevention
- Maintain Stable Humidity: Using a whole-house humidifier in dry winter months and a dehumidifier in humid summer months can significantly reduce the seasonal movement of wood and prevent baseboard separation. Aim for 35-55% relative humidity indoors.
- Inspect Annually: Make a habit of checking your baseboards once a year, particularly during seasonal transitions. Address small gaps promptly before they become major issues. Early intervention is key.
- Choose Flexible Caulk: When painting or resealing, always opt for a high-quality acrylic latex caulk with silicone. This blend offers superior flexibility, allowing it to stretch and contract with minor movements without cracking.
- Proper Fastener Spacing: If you're installing new baseboards, ensure nails are driven into studs every 16 inches and supplemented with construction adhesive for the strongest hold.
- Acclimate Materials: If installing new baseboards, allow the wood or MDF to acclimate to your home's indoor humidity for a few days before installation. This reduces the shock of environmental change and minimizes initial movement.
- Monitor for Other Issues: While common, severe or rapid separation, especially if accompanied by buckling floors, drywall cracks, or uneven door/window operation, could indicate more serious structural settling. Don't ignore these additional warning signs.
When to Call a Professional
While repairing separated baseboards is a manageable DIY task for most homeowners, there are specific situations where professional help is warranted. If you notice extensive baseboard separation across multiple rooms, accompanied by other structural warning signs like significant cracking in drywall above windows or doors, uneven floors, doors and windows that stick, or noticeable shifting in the foundation, it's time to call a structural engineer. These symptoms suggest a deeper issue than simple wood movement. Similarly, if the baseboards are separating due to significant water damage, leading to rot or mold behind the trim, a professional will be needed to assess and repair the water source and any affected framing. For homeowners uncomfortable using power tools or working with adhesives and caulk, a handyperson or finish carpenter can efficiently and cleanly resolve the problem, ensuring a professional finish without the risk of damaging walls or trim during the repair process.
Related Articles
Keep troubleshooting with these hand-picked guides from FixlyGuide:
- The #1 Reason Your Baseboards Are Pulling Away (It's Not What You Think) — Discover why your baseboards are separating from the wall, often due to humidity changes, and learn how to fix them securely with common to…
- The 3 Hidden Reasons Your Baseboards Are Pulling Away (And How to Fix It Right) — Discover the real reasons your baseboards are separating from the wall and learn how to fix them permanently with this comprehensive guide.
- The 3 Hidden Reasons Your Baseboards Are Pulling Away (And How to Fix It FAST) — Don't ignore separating baseboards—they’re not just an eyesore. Learn the surprising culprits behind the gaps and how to permanently fix th…
- The 3 Hidden Reasons Your Baseboards Are Pulling Away (And How to Fix It Right) — Don’t just nail it back! Discover the real reasons your baseboards are separating from the wall and how to achieve a lasting repair.
- The Tiny Gap That Wastes Energy: Why Your Baseboards Pull Away (And the Simple, Permanent Fix) — Baseboards separating from walls are a common issue, often indicating underlying problems with moisture or house settling, but are typicall…
- The Secret Reason Your Chimney Leaks During Rain (It's Not Always the Obvious Culprit) — A leaking chimney during rain can be a frustrating mystery, but often the root cause isn't what you think, leading to costly misdiagnosis.
Recommended for DIYers & woodworkers
Sponsored
The Top 20 Tools for Workshops of Any Budget
No stationary machines or power tools required — plus 3 fundamental tools that can't be bought at any price.
Get the free guide
Ted's Woodworking — The #1 Woodworking Resource
Detailed instructions, dimensioned drawings, materials & cutting lists, and 3D schematics for every skill level.
See the plansSponsored: links above are affiliate links. FixlyGuide may earn a commission on qualifying purchases — at no extra cost to you.
Frequently asked questions
Why do baseboards separate from the wall?+
Baseboards primarily separate due to the natural expansion and contraction of wood or MDF with changing humidity levels (seasonal movement), and sometimes minor house settling. Insufficient or improperly placed fasteners can also contribute.
Can I just caulk the gaps?+
While caulk can seal small cracks for aesthetic purposes, it's not a structural fix. For lasting results, you need to re-secure the loose baseboard sections with nails and construction adhesive before caulking. Otherwise, the caulk will likely crack again.
What kind of nails should I use to reattach baseboards?+
Use 1.5-inch to 2-inch finishing nails or brad nails. These are thin and have small heads that are easy to conceal. For the strongest hold, always try to drive nails into wall studs.
How often should I check my baseboards?+
It's a good idea to annually inspect your baseboards, especially during seasonal transitions (e.g., fall and spring). Addressing small gaps early prevents them from becoming larger, more noticeable problems.
When should I call a professional for baseboard separation?+
If the separation is widespread across your home, accompanied by other significant signs of structural settling (like large drywall cracks or sticking doors), or if there's water damage and rot, call a professional. Otherwise, it's typically a DIY project.


Discussion
Loading comments…