- Ignoring Wall Studs: Failing to anchor the system into studs is the most dangerous mistake. The weight of clothes can easily rip anchors out of drywall, causing the entire system to collapse.
- One-Size-Fits-All Shelf Height: Using fixed, non-adjustable shelves. Your storage needs will change; adjustable shelving allows the system to adapt, whether you acquire more bulky sweaters or slim sandals.
- Wasting the Top Foot: Not installing a high shelf (around 84 inches) for long-term storage. This "attic" space is perfect for luggage, extra bedding, or seasonal items.
- Forgetting Floor Space: Leaving the floor as a dumping ground. Plan for specific items on the floor, like a shoe rack, a basket for accessories, or neatly stored boots. Don't let it become clutter.
- Choosing the Wrong Material: Using thin particleboard or inadequately supported wire shelving that will sag over time. Opt for 3/4-inch plywood, melamine, or a quality steel wire system with supports every 16-24 inches.
General remodeling · Renovation planning
| Project category | General remodeling |
|---|---|
| Problem type | Renovation planning |
| Trade required | General contracting |
| Urgency | Planned project |
| Safety risk | Low safety risk |
| DIY suitability | Pro recommended |
| Cost category | Major investment |
| Typical timeline | Design and permitting often 2–4 months before work starts |
| Contractor type | General contractor |
Repair option
Phase the work and fix the building envelope first.
Replacement option
Full renovation with permits, design, and a general contractor.
Common causes
- Space no longer fits how the household lives
- Resale preparation
- Deferred maintenance stacking up
Relevant tools:project cost estimatorcompare quoteshome improvement material prices
Published June 20, 2026Last updated August 17, 2026
Tools & materials you'll need
Affiliate linksAs an Amazon Associate FixlyGuide earns from qualifying purchases — at no extra cost to you. Prices and availability are accurate as of publication and subject to change.
Quick Answer
To maximize a closet, you need to think vertically. A typical 6-foot closet can double its storage by dividing it into zones: a double-hang section for shirts and pants, a tall-hang section for dresses, and a central tower of adjustable shelves for folded items and shoes. This layout strategy moves beyond a single rod and shelf to utilize every square foot.
The Problem
The standard American closet is a masterclass in inefficiency. Builders often install a single coated-wire or wood shelf with a closet rod running beneath it, typically positioned about 66 inches from the floor. This single-rod layout leaves a vast, underutilized chasm of space—often 3 to 4 feet—between the hanging clothes and the floor. The top shelf, usually 12 inches deep, becomes a cluttered graveyard for forgotten boxes and items you can't easily see or reach. You're effectively using only a narrow band of the closet's total volume. This design fails to account for the different lengths of various clothing types, forcing you to hang shirts and pants with the same vertical clearance as long coats, wasting the space underneath the shorter items. For a standard 6-foot (72-inch) reach-in closet, this translates to dozens of cubic feet of squandered storage potential, leading to cramped hanging space, clothes piled on the floor, and the frustrating feeling that you have nothing to wear because you can't find anything.
How It Works
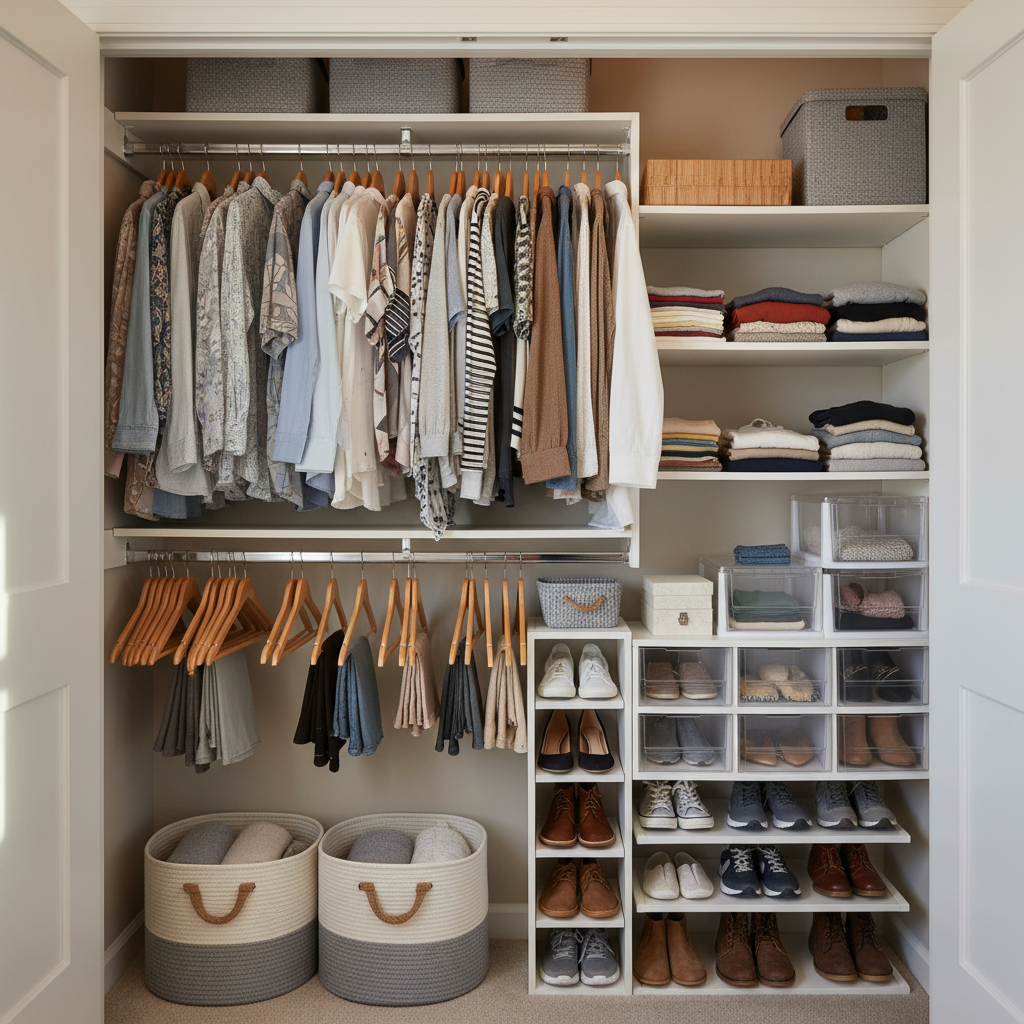
Modern closet shelving layouts maximize space by creating specific zones tailored to your wardrobe. The core principle is "stacked storage," moving away from the single-rod model to a multi-layered system. The most powerful tool in this approach is the double-hang rod. By placing one rod at a height of 80-82 inches and a second rod at 40-42 inches, you can hang two rows of shorter items like shirts, blouses, folded pants, and jackets in the same vertical space that one row previously occupied. In a 6-foot closet, dedicating 48 inches of horizontal width to a double-hang zone instantly doubles that section's capacity.
Next to this, a "tall-hang" zone, typically 24 inches wide, provides the necessary vertical space (around 66-70 inches) for longer garments like dresses, suits, and coats. This segmentation prevents the wasted space seen in single-rod systems.
The final piece is a central shelving tower, often made of wood, melamine, or adjustable wire components. This tower, usually 24 inches wide, serves as the hub for folded items—sweaters, jeans, t-shirts—which take up less space when stacked than when hung. Adjustable shelves are key, allowing you to customize the height for different items, from bulky sweaters to slim t-shirts. Integrated shoe cubbies or slanted shoe shelves can be incorporated into the base of the tower, getting shoes off the floor and making them visible. Some systems even allow for a built-in hamper in the lowest section, concealing laundry while keeping it organized. By combining these three zones—double-hang, tall-hang, and a shelving tower—you can create a custom closet shelving layout that fits your specific wardrobe and utilizes nearly 100% of the available volume.
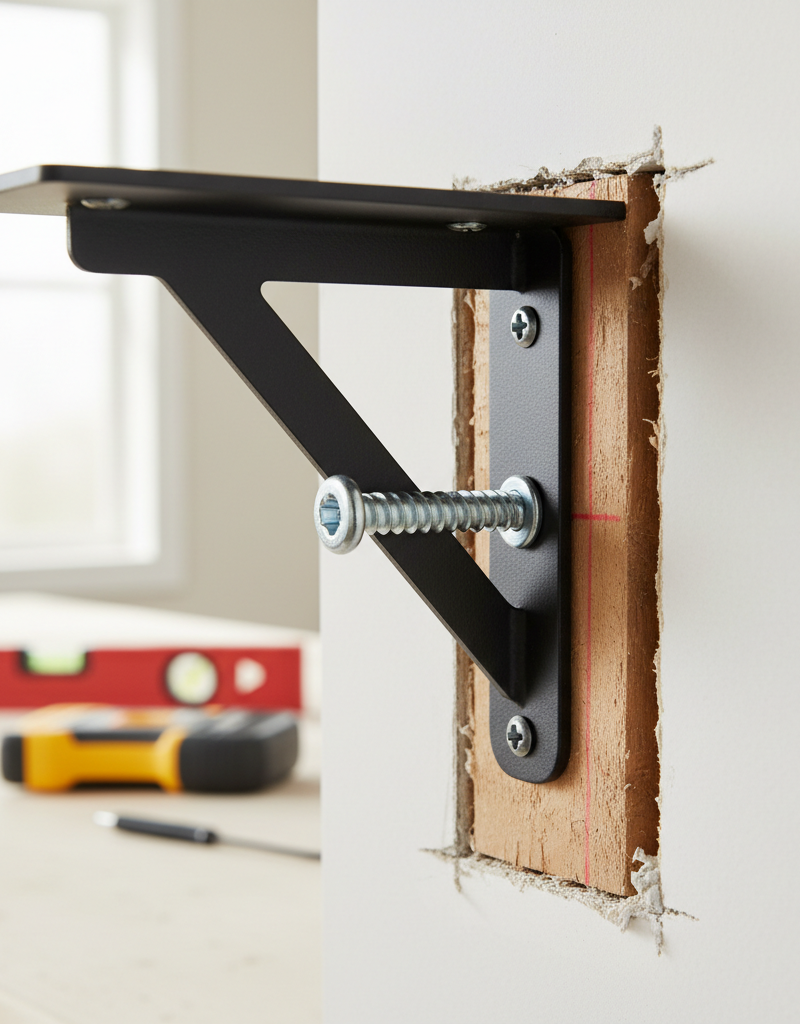
Safety Note: When installing any shelving system, it is critical to locate and secure mounting brackets directly into wall studs. A fully loaded closet can weigh hundreds of pounds. Use a quality stud finder and verify locations. If studs are not available, use appropriately rated drywall anchors (e.g., toggle bolts rated for at least 75 lbs each), but direct stud-mounting is always superior. Always wear safety glasses when drilling or cutting.
Step-by-Step Guide to a 6-Foot Closet Makeover
This guide assumes a standard 6-foot (72-inch) wide reach-in closet with an 8-foot ceiling height.
-
Empty and Prep the Closet — First, remove all clothing, shoes, and stored items. Take down the old rod and shelf. Patch any holes with spackle, let it dry completely, and then sand smooth. It's a good idea to apply a fresh coat of paint now for a clean, bright starting point.
-
Measure and Plan Your Zones — With the closet empty, take precise measurements: wall-to-wall width, depth, and total height. For our 72-inch closet, we'll plan three zones: a 24-inch tall-hang section on the left, a 24-inch shelving tower in the middle, and a 24-inch double-hang section on the right. This balanced approach provides flexibility.
-
Install the Central Shelving Tower — We’ll start with the central structure. Whether using a pre-made kit or building from plywood, assemble the 24-inch wide tower. Secure it to the back wall. Use your stud finder to locate the studs within that 24-inch span. Drive 2.5-inch screws through the tower's back support rail (or through L-brackets) directly into at least two studs. Ensure the unit is plumb (perfectly vertical) using a level.
-
Set Up the Top Shelf — Install a continuous shelf running across the top of all three zones, typically at a height of 84 inches. This shelf provides long-term storage for lesser-used items. Secure the shelf brackets into studs every 16-24 inches. This top shelf will unify the system and provide stability.
-
Install the Tall-Hang Rod — In the 24-inch section designated for tall hanging, install a closet rod socket or bracket on the side of the shelving tower and another on the closet sidewall. The standard height for a single rod is 66 inches from the floor. This provides ample space for long dresses and coats.
-
Install the Double-Hang Rods — In the remaining 24-inch section, it’s time to double your space. Install the top rod at a height of 80-82 inches and the bottom rod at 40-42 inches. Ensure there is at least 39 inches of vertical clearance for each rod. Again, one end will attach to the shelving tower and the other to the closet sidewall.
-
Customize Your Shelving — With the main structure in place, insert your adjustable shelves into the central tower. Group like items together to determine the optimal shelf height. Set shelves about 12-14 inches apart for bulky sweaters, 8-10 inches apart for shoes, and 6-8 inches for t-shirts or accessories.
-
Integrate Shoe Storage — Use the bottom 2-3 feet of your shelving tower for shoes. You can use flat shelves or angled shoe shelves for better visibility. A typical 24-inch shelf can hold 3-4 pairs of shoes. For a larger collection, consider adding a second shoe rack on the floor below your tall-hang section.
-
Plan for Hampers — If desired, leave the lowest section of your central tower open (roughly 24-30 inches of vertical space) and place one or two slide-out or freestanding hampers. This keeps laundry off the floor and out of sight.
-
Add Lighting and Accessories — Great lighting is transformative. Install a battery-powered LED tap light or a hardwired closet light (consult an electrician if needed). Add hooks on any available sidewall space for belts, scarves, or bags to make use of every last inch.
Common Mistakes
- Ignoring Wall Studs: Failing to anchor the system into studs is the most dangerous mistake. The weight of clothes can easily rip anchors out of drywall, causing the entire system to collapse.
- One-Size-Fits-All Shelf Height: Using fixed, non-adjustable shelves. Your storage needs will change; adjustable shelving allows the system to adapt, whether you acquire more bulky sweaters or slim sandals.
- Wasting the Top Foot: Not installing a high shelf (around 84 inches) for long-term storage. This "attic" space is perfect for luggage, extra bedding, or seasonal items.
- Forgetting Floor Space: Leaving the floor as a dumping ground. Plan for specific items on the floor, like a shoe rack, a basket for accessories, or neatly stored boots. Don't let it become clutter.
- Choosing the Wrong Material: Using thin particleboard or inadequately supported wire shelving that will sag over time. Opt for 3/4-inch plywood, melamine, or a quality steel wire system with supports every 16-24 inches.
- Not Measuring Your Clothes: Taking generic height measurements instead of measuring your actual wardrobe. Measure the length of your longest dress and the drop of your shirts to ensure your chosen zone heights will work.
Cost & Time Breakdown
| Task | DIY Cost Estimate | Professional Installation Cost | DIY Time Estimate |
|---|---|---|---|
| Basic Wire Shelving System | $150 - $300 | $400 - $700 | 3 - 5 hours |
| Melamine/Laminate Tower Kit | $300 - $600 | $700 - $1,200 | 4 - 8 hours |
| Custom Wood (Plywood) Build | $400 - $800+ | $1,500 - $3,000+ | 10 - 20 hours |
| Demolition & Prep (Patch/Paint) | $50 - $100 | Included in labor | 2 - 4 hours |
| Professional Design Help | N/A | $100 - $500 (consultation) | N/A |
Tips & Prevention
- Declutter First: Before you design your new closet shelving layout, purge your wardrobe. You can't organize clutter. Be ruthless about what you keep, donate, or discard.
- Use Quality Hangers: Switch to slim, non-slip velvet hangers. They save a surprising amount of rod space compared to bulky plastic or wood hangers and prevent clothes from falling to the floor.
- Think in Categories: As you reload the closet, group everything by category (shirts, pants, dresses) and then by color. This makes finding items instantaneous and maintaining order much easier.
- Install Shelf and Drawer Dividers: Use acrylic or bamboo dividers on your shelves and in drawers to keep stacks of clothing from toppling over and merging into one another.
- Seasonal Swap-Out: Use that high top shelf. Store off-season clothing in labeled bins or vacuum-sealed bags to free up prime real estate on your main rods and shelves.
- Light It Up: Good lighting makes a closet feel bigger and more organized. Consider motion-activated LED strip lighting along the inside of the door frame or under shelves for a high-end feel.
When to Call a Professional
While a basic wire or kit installation is a manageable DIY project for many homeowners, there are specific scenarios where hiring a professional closet designer or carpenter is the better choice. If your closet has unusual dimensions, sloped ceilings, or other architectural quirks, a pro can design a truly custom solution that a standard kit can't accommodate. If you lack the time, tools (like a circular saw, level, or quality stud finder), or confidence to securely mount a heavy system, calling a pro will ensure the job is done safely and correctly, preventing potential damage or injury from a collapsed unit. Furthermore, if you are planning a high-end, built-in system with custom cabinetry, drawers, and integrated lighting, the expertise of a finish carpenter is invaluable for achieving a polished, professional result. They can maximize the space with a precision that DIY kits often can't match and can be worth the investment for a primary bedroom walk-in or a closet you use daily.
What should this project cost?
Enter your project details for a realistic cost range before you call anyone.
Cost depends heavily on which system turns out to be the source.
- Regional adjustment
- National average
- Labor share (typical)
- ~$1,620
- Quotes to collect
- 3 written estimates
Educational estimate based on national averages — not a binding quote. Always confirm with written local estimates.
Get the print-ready PDF of this guide
A clean, ad-free, printable version you can keep on your phone or pin to the workshop wall. Free with a FixlyGuide account.
- Print-optimized layout
- Tools, materials & every step included
- Saved to your account
Recommended for DIYers & woodworkers
Sponsored
The Top 20 Tools for Workshops of Any Budget
No stationary machines or power tools required — plus 3 fundamental tools that can't be bought at any price.
Get the free guide
Ted's Woodworking — The #1 Woodworking Resource
Detailed instructions, dimensioned drawings, materials & cutting lists, and 3D schematics for every skill level.
See the plansSponsored: links above are affiliate links. FixlyGuide may earn a commission on qualifying purchases — at no extra cost to you.
Frequently asked questions
What is the best height for closet rods?+
For a double-hang system, place the top rod at 80-82 inches and the bottom rod at 40-42 inches. For a single-hang rod for long coats and dresses, the standard height is 66 inches from the floor.
Are wire or wood shelves better for a closet?+
It depends on budget and use. Wire shelving is more affordable and offers better ventilation, but items can fall through and it can sag if not properly supported. Wood or melamine shelving offers a solid, high-end look, prevents sagging, and is better for storing small items, but it's more expensive and requires more effort to install.
How much space do you need between shelves?+
This is entirely dependent on what you're storing. A good starting point is 12-14 inches for bulky sweaters, 8-10 inches for shoes on a flat shelf, and 6-8 inches for neatly folded t-shirts or accessories. Adjustable shelves are highly recommended.
How can I add more storage to a small closet without replacing the whole system?+
You can add a second rod below your existing one using hanging rod doublers. You can also add a small dresser or cubby unit on the floor underneath your hanging clothes. Over-the-door shoe racks and hanging fabric shelf organizers are also great, low-cost options.

Discussion
Loading comments…