Tools & materials you'll need
Affiliate linksAs an Amazon Associate FixlyGuide earns from qualifying purchases — at no extra cost to you. Prices and availability are accurate as of publication and subject to change.
Quick Answer
Empty coffee cans are far more than just trash; they're rigid, inexpensive containers waiting for a second life. From organizing your garage to adding decorative flair, these humble cans can be transformed into essential tools for a clutter-free home. With a little creativity, you can harness their robust structure and convenient sizes to tackle everything from art supplies to kitchen staples, saving money and reducing waste in the process.
The Problem
Our homes are constantly accumulating small items: craft supplies, loose hardware, office sundries, garden seeds, and the endless stream of pens and pencils. Without proper storage, these items quickly devolve into messy piles, cluttering drawers, countertops, and workshops. This disorganization wastes time (searching for lost items), money (buying duplicates), and creates visual noise that contributes to stress. Many commercial storage solutions are expensive, made from flimsy plastic, or simply don't fit the unique needs of a DIYer. Throwing away perfectly good coffee cans after their contents are consumed just adds to landfill waste, missing an opportunity for practical, free organization.
How It Works
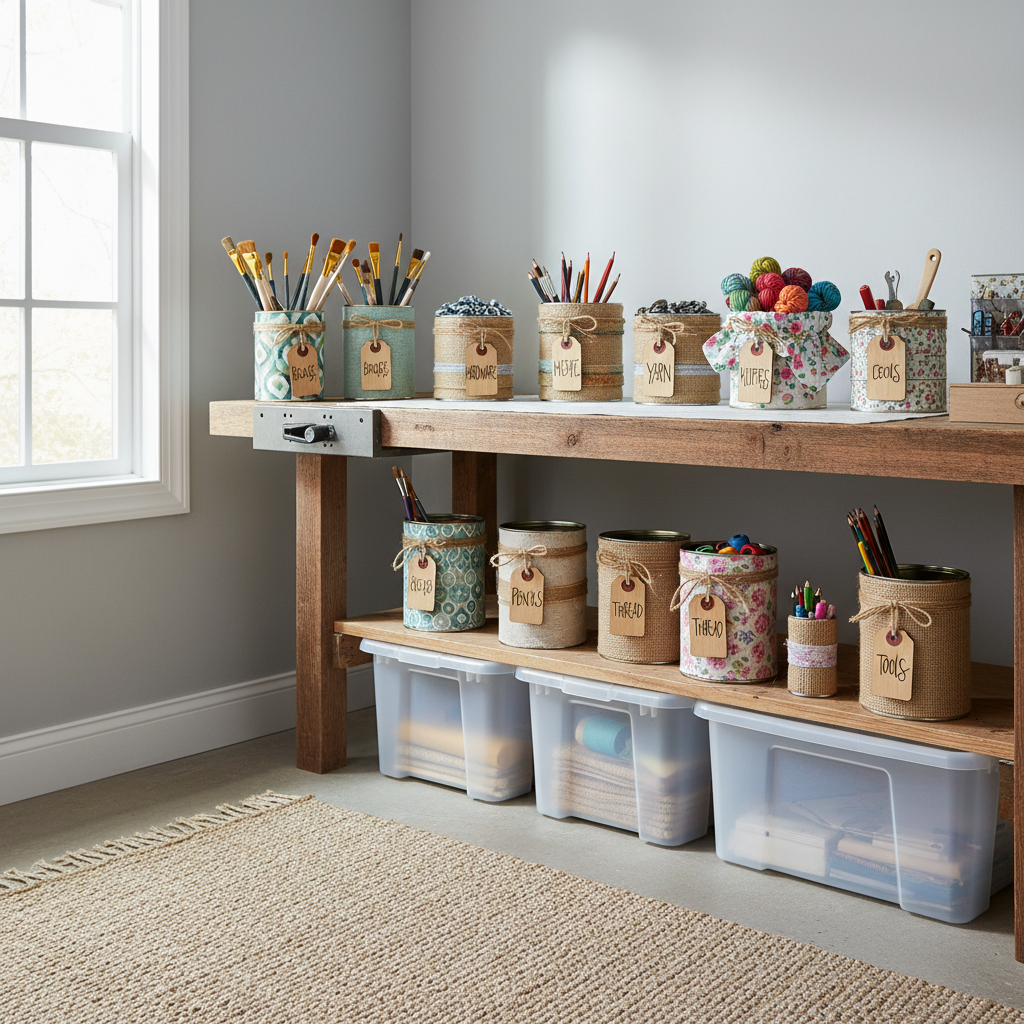
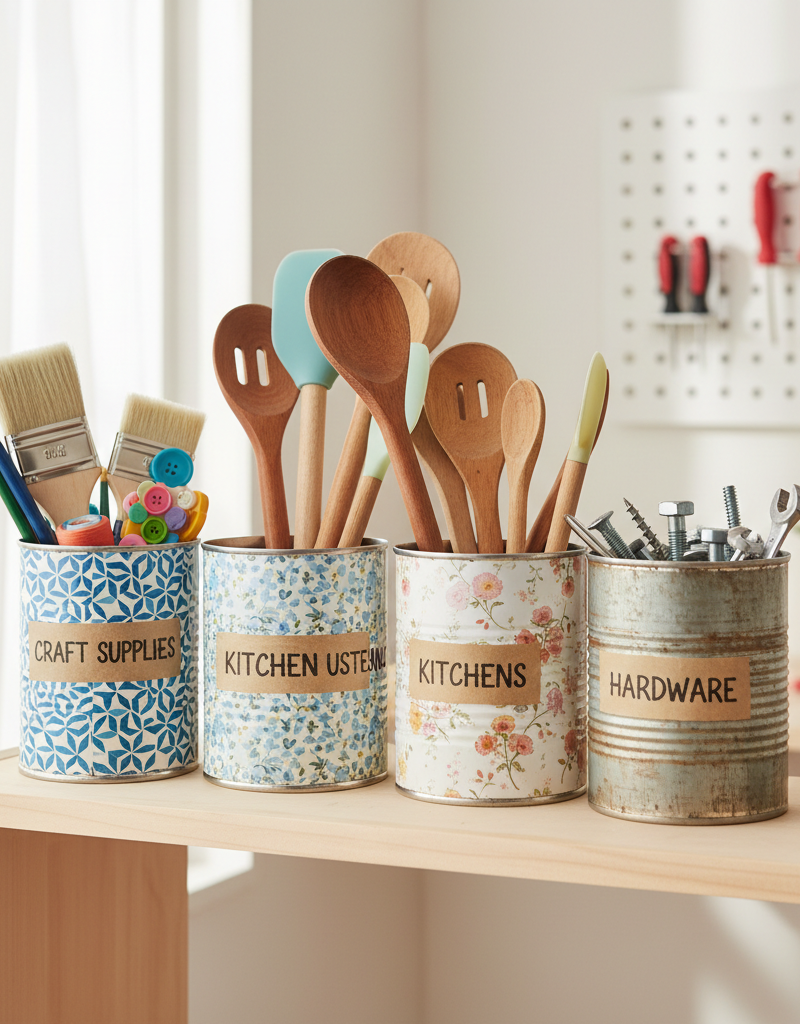
Coffee cans, typically made from tin-plated steel, offer several key advantages for repurposing. Steel is durable, resistant to crushing, and provides a barrier against pests and moisture (though not airtight). Their cylindrical or rectangular shapes are surprisingly efficient for stacking and fitting into tight spaces. The various sizes, from regular to large bulk coffee cans, cater to a wide range of storage needs. For instance, smaller cans are perfect for buttons, nails, or paperclips, while larger ones can hold paintbrushes, garden tools, or even act as an emergency supply kit. The lids, often plastic, provide a snug-enough seal to keep contents contained and dust-free. The smooth surface of the cans makes them easy to clean, paint, or cover with fabric or paper, allowing for endless customization to match any decor. Understanding these inherent qualities — durability, versatile sizing, and ease of modification — is the foundation for transforming them from waste into valuable organizational assets.
Step-by-Step Fix
Step 1: Clean and Prepare Your Cans — Thump out residual coffee grounds, then scrub cans with warm, soapy water. Dry thoroughly to prevent rust.
- Safety Note: Be careful of sharp edges, especially with older metal cans. If there are any burrs, lightly sand them down or apply a layer of masking tape. Ensure cans are completely dry before use; any moisture can cause rust or damage to stored items.
Step 2: Smooth Any Rough Edges — If metal edges remain sharp after opening, use a metal file or sandpaper to dull them down. For plastic lids, trim any stray plastic with shears.
- This step is crucial for safety, especially if children will interact with the repurposed cans.
Step 3: Choose Your Transformation — Decide how you want to use each can. Consider its size, location, and the items it will hold. Do you need a simple organizer or something more decorative?
- Tip: Brainstorm uses based on your current clutter hotspots: craft room, garage, kitchen pantry, office desk.
Step 4: Simple Storage Solution — For basic storage, simply place items into the clean, dry can. Label the can clearly with a marker or label maker.
- For durability: Before labeling, apply a coat of clear spray sealant to the can's exterior if it will be exposed to moisture or heavy handling.
Step 5: Decorative Covering — To enhance aesthetics, cover the can with contact paper, fabric, rope, or paint. Use strong adhesive for fabric or rope, ensuring a smooth finish.
- If using paint: Lightly sand the can first, then apply a metal primer for better adhesion and durability. Use spray paint for an even finish, applying multiple thin coats.
- For fabric: Cut fabric slightly larger than the can's height and circumference. Apply spray adhesive to the can, then carefully roll the can onto the fabric, smoothing out any bubbles. Trim excess.
Step 6: Create a Herb Garden or Planter — Drill several small drainage holes (1/4 inch) in the bottom of the can for proper water runoff. Add a layer of gravel, then potting soil and your chosen plant or seeds.
- Best for: Herbs, succulents, or small flowering plants. Ensure the can is thoroughly cleaned to remove any coffee residue that could affect plant growth.
Step 7: Desk Organizer Caddy — Glue several cans of varying sizes together onto a sturdy base (like a piece of wood or strong cardboard) to create a multi-compartment desk organizer.
- Pro Tip: Arrange cans before gluing to find an optimal configuration. Use strong epoxy or construction adhesive for a lasting bond.
Step 8: Luminary or Lantern — Punch decorative patterns into the can with a hammer and nail. Place a battery-operated LED tea light inside for a safe, ambient glow.
- Safety Warning: Never use real candles unless the can is specifically designed for high heat and has adequate ventilation. Battery-operated lights are much safer for these DIY projects.
Common Causes
- Excessive Discarding of Useful Materials: Many homeowners routinely throw away items like coffee cans, cardboard tubes, and glass jars, not realizing their potential for repurposing and organization. This is often due to a lack of awareness about creative reuse options. The
Related Articles
Keep troubleshooting with these hand-picked guides from FixlyGuide:
- The 5 Essential Tools Every New Gardener Needs (And 3 You Can Skip) — Starting a garden doesn't require a huge investment in tools; savvy new gardeners can thrive with just a few key items and save money by kn…
- The Secret to Lush Raised Beds? It's Not Just About How You Water — Smart irrigation for raised garden beds isn't just about automation; it's about delivering the right amount of water precisely when your pl…
- The 9 Sneaky Filters Stealing Your Home's Efficiency (And How to Fix It) — Unseen or neglected filters throughout your home can secretly inflate utility bills, degrade air quality, and lead to expensive appliance b…
- The 4-Hour — Transform your garden into a self-sufficient oasis with smart strategies for watering, weeding, and pest control, minimizing your effort.
- The Hidden Reason Your GFCI Trips (It's Not Always a Faulty Outlet) — A continuously tripping GFCI outlet is a critical safety warning, often indicating moisture, a faulty appliance, or a wiring problem that r…
- The 3 Hidden Mistakes That Make Your Deck Sealer Fail (And How to Fix Them) — Properly sealing your wood deck protects it from the elements, but common mistakes often lead to early failure. Learn how to reseal your de…
This article was independently written by FixlyGuide based on the source topic.
Frequently asked questions
Are coffee cans safe for food storage (after cleaning)?+
While thoroughly cleaned coffee cans are generally safe for dry, non-perishable food items like pasta, rice, or crackers, they are not airtight. For long-term food storage or items that require an airtight seal, it's best to use food-grade containers specifically designed for that purpose to prevent spoilage or pest infestation.
How do I remove coffee smell from the cans?+
After washing with soap and water, you can try several methods to eliminate lingering coffee odors. Placing crumpled newspaper inside the dry can for a few days, wiping the interior with white vinegar, or leaving the open can in direct sunlight for a day can all help absorb and dissipate the scent. Be sure the can is completely dry before sealing or using.
Can I paint plastic coffee can lids?+
Yes, you can paint plastic coffee can lids. For best results, lightly sand the surface of the lid with fine-grit sandpaper (around 220-grit) to create a 'key' for the paint. Then, apply a plastic-specific primer, followed by acrylic or spray paint suitable for plastic. Multiple thin coats will yield a smoother, more durable finish than one thick coat.

Discussion
Loading comments…