
Tools & materials you'll need
Affiliate linksAs an Amazon Associate FixlyGuide earns from qualifying purchases — at no extra cost to you. Prices and availability are accurate as of publication and subject to change.
Quick Answer
Many common composting issues, like a smelly pile or slow decomposition, stem from imbalances in carbon-to-nitrogen ratios, lack of aeration, or improper moisture levels. By understanding these core principles and making simple adjustments, homeowners can easily correct these problems and create a healthy, productive compost pile.
The Problem
You've decided to embrace the eco-friendly, soil-enriching practice of composting, but your backyard pile isn't cooperating. Perhaps it's emitting an unpleasant odor, attracting pests, or simply refusing to break down into that beautiful, dark 'black gold' you've heard so much about. These frustrating problems often lead homeowners to abandon composting altogether, missing out on the incredible benefits it offers for garden health and waste reduction. The reality is, a successful compost pile isn't just a haphazard collection of kitchen scraps and yard waste; it's a carefully balanced ecosystem. When one element is off—be it the mix of 'greens' and 'browns,' the amount of air, or the moisture content—the entire process stalls or turns sour. Identifying and correcting these underlying imbalances is key to transforming a struggling compost pile into a thriving one.
How It Works
Composting is essentially controlled decomposition, a natural process orchestrated by billions of microorganisms. These microscopic workers—bacteria, fungi, and actinomycetes—are the unsung heroes, breaking down organic matter into nutrient-rich humus. For these decomposers to thrive, they need four fundamental ingredients: carbon, nitrogen, oxygen, and water.
Carbon, often referred to as 'brown' materials, provides the energy source for these organisms. Think dead leaves, straw, wood chips, and shredded paper. Nitrogen, or 'green' materials, supplies the proteins necessary for microbial growth and reproduction. This comes from fresh grass clippings, kitchen scraps (fruit and vegetable peels), coffee grounds, and manure. A crucial aspect is maintaining the correct carbon-to-nitrogen (C:N) ratio, ideally around 25-30 parts carbon to 1 part nitrogen. Too much carbon, and decomposition slows to a crawl; too much nitrogen, and the pile becomes anaerobic and smelly.
Oxygen is vital for aerobic decomposition, the process that generates heat and breaks down materials efficiently without foul odors. Turning the compost pile introduces oxygen, preventing compaction and the proliferation of anaerobic bacteria, which produce unpleasant sulfurous compounds. Lastly, moisture is essential. The microorganisms need water to transport nutrients and facilitate their metabolic processes, but too much water displaces air, leading to anaerobic conditions, while too little water dehydrates the microbes, halting decomposition.
A properly balanced compost pile will heat up, often reaching temperatures between 120°F and 160°F. This heat is a byproduct of the intense microbial activity and is crucial for killing weed seeds and pathogens. As materials break down, the volume of the pile reduces significantly, eventually yielding a dark, crumbly, earthy-smelling product: finished compost, ready to enrich your garden soil.
Step-by-Step Fix
1. Assess Your Pile's Symptoms — Identify the core issue.
Before you can fix your compost, you need to understand what's going wrong. Is it stinky? Not heating up? Too wet or too dry? These symptoms point to specific imbalances. A rotten egg smell usually indicates too much nitrogen and/or not enough air, while a slow-to-decompose, cold pile often means too much carbon or insufficient moisture. A truly successful compost pile should smell earthy, like a forest floor after a rain.
2. Check the Carbon-to-Nitrogen Balance — Adjust your greens and browns.
Most common compost problems stem from an improper C:N ratio. Aim for roughly two to three parts 'brown' materials (carbon-rich) to one part 'green' materials (nitrogen-rich) by volume. If your pile is smelly or soggy (too much nitrogen), add more brown materials like shredded dry leaves, straw, or wood chips. If decomposition is slow and the pile is not heating up (too much carbon), incorporate more green materials such as fresh grass clippings, food scraps, or coffee grounds. Chop larger items into smaller pieces to speed up decomposition.
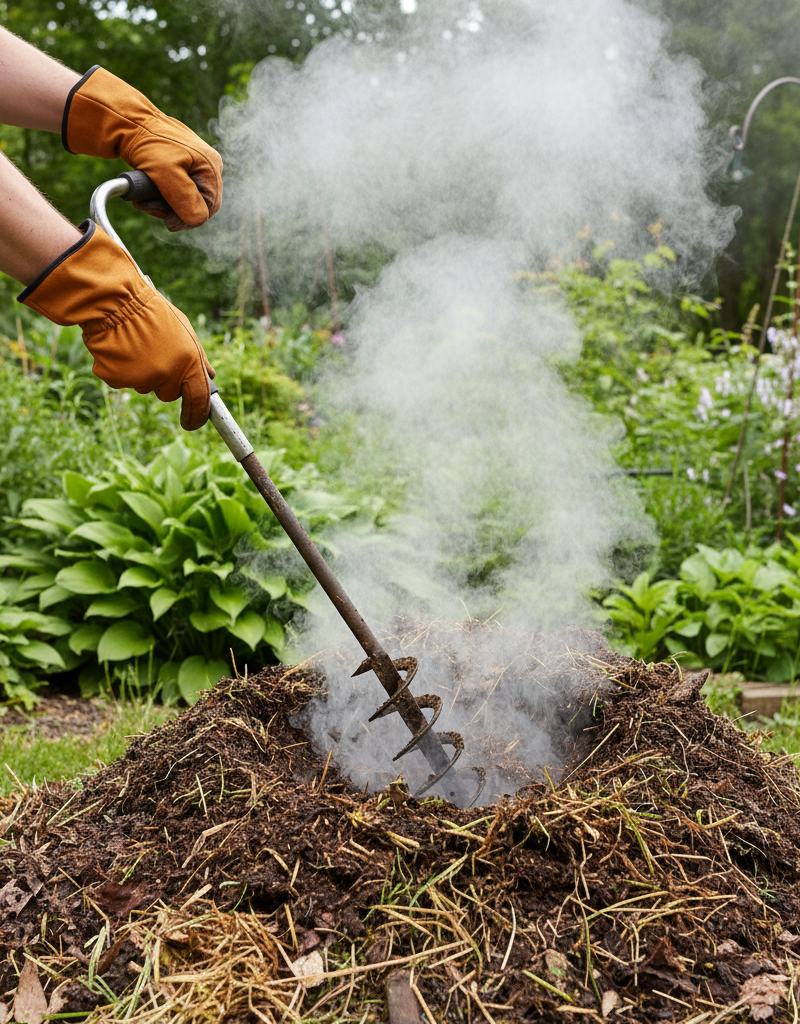
3. Ensure Proper Aeration — Turn and oxygenate your pile regularly.
Lack of oxygen is a primary cause of foul odors and slow decomposition. Turn your compost pile every few days or at least once a week. Use a pitchfork or a compost aerator to thoroughly mix the materials, bringing the outer, cooler material to the center and introducing air. A good turning will often cause the pile's temperature to rise. If turning is difficult, the pile might be too compacted or wet; add more coarse brown materials like wood chips to create air pockets.
4. Adjust Moisture Levels — Water or dry as needed.
Your compost pile should feel like a wrung-out sponge—damp but not saturated. If it's too dry, decomposition will slow or stop. Use a garden hose to lightly moisten the pile as you turn it. If it's too wet and soggy, add dry brown materials like shredded newspapers, cardboard, or sawdust to absorb excess moisture. Covering your pile during heavy rain can also help prevent it from becoming waterlogged. Ensure adequate drainage at the base of your pile to prevent standing water.
5. Break Down Large Materials — Shred and chop for faster results.
Larger pieces of organic matter take significantly longer to decompose. Before adding materials to your pile, chop or shred them into smaller pieces, ideally no larger than 1-2 inches. This increases the surface area available for microbial activity, speeding up the entire composting process. Use a shredder for leaves and branches, or simply chop kitchen scraps with a knife.
6. Monitor Temperature (Optional but Recommended) — Track microbial activity.
A compost thermometer can give you valuable insight into what's happening inside your pile. A healthy, active pile will reach temperatures between 120°F and 160°F. If your pile isn't heating up, it's a strong indicator of an imbalance (usually too much carbon or too little nitrogen/moisture) or lack of aeration. Adjust your ingredients and turning schedule accordingly until you see temperature increases after turning.
7. Exclude Problematic Materials — Keep out what doesn't belong.
Certain materials should be avoided in a backyard compost pile to prevent pests, odors, and potential pathogens. Do not add meat, bones, dairy products, oils, greasy foods, pet waste, or diseased plants. These items decompose slowly, attract rodents and flies, and can harbor harmful bacteria. Stick to fruit and vegetable scraps, coffee grounds, eggshells, yard waste, and shredded paper for best results.
8. Maintain a Consistent Routine — Regular additions and turning.
Composting is an ongoing process. Regularly add new materials in layers, alternating greens and browns. A consistent turning schedule (every 3-7 days) will keep the pile aerated and actively decomposing. Don't overload the pile with a huge batch of fresh greens all at once, as this can throw off the C:N ratio and lead to anaerobic conditions. Instead, try to add smaller amounts more frequently.
Common Causes
- Incorrect Carbon-to-Nitrogen Ratio: This is by far the most frequent issue. Too many nitrogen-rich 'greens' (like fresh grass clippings) without enough carbon-rich 'browns' (like dry leaves) leads to a slimy, smelly, anaerobic mess. Conversely, too many browns and not enough greens results in a dry, slow, inactive pile that takes forever to break down.
- Insufficient Aeration: Microbes need oxygen! A compost pile that isn't turned regularly becomes compacted, cutting off air circulation. This forces anaerobic bacteria to take over, producing unpleasant odors like ammonia or rotten eggs and significantly slowing decomposition.
- Improper Moisture Levels: A pile that's too dry will stop decomposing because the microorganisms cannot function without water. Conversely, a pile that's waterlogged or too wet displaces oxygen, leading to anaerobic conditions and a smelly, stagnant pile.
- Too Large or Too Small Material Size: Large pieces of organic matter (e.g., whole banana peels, unbroken branches) have less surface area for microbes to work on, making the decomposition process very slow. If materials are too small and finely ground, they can compact too easily, reducing airflow.
- Exclusion of Essential Microorganisms: While most organic matter naturally contains composting microbes, sometimes a 'starter' can help kickstart a new, sluggish pile. This could be a scoop of finished compost, garden soil, or even store-bought compost starter.
- Pest-Attracting Additions: Adding meat, dairy, oily foods, or pet waste not only creates foul odors but also attracts unwanted pests like rodents, flies, and raccoons, disrupting the composting process and creating a nuisance.
Common Mistakes
- Adding Too Many Fresh Grass Clippings at Once: While rich in nitrogen, a thick layer of fresh grass clippings quickly compacts and creates an anaerobic, smelly layer. Instead, mix thin layers of grass clippings with plenty of dry brown materials.
- Ignoring Particle Size: Throwing in large chunks of food waste or woody branches without breaking them down significantly slows decomposition. Always chop or shred materials into smaller pieces to speed things up.
- Not Turning the Pile Regularly: A static pile will quickly run out of oxygen, leading to anaerobic conditions and a cold, slow process. Consistent turning is crucial for aeration and mixing and distributing microbes and moisture.
- Letting the Pile Dry Out Completely: Microbes need moisture to survive and thrive. A pile that looks consistently dry will have stalled decomposition. Check the moisture and water thoroughly if it feels too dry.
- Adding Problematic Food Scraps: Meat, bones, dairy, and oily foods should never go into backyard compost. They putrefy, attract pests, and can harbor dangerous pathogens.
- Expecting Instant Results: Composting takes time. While hot composting can yield results in a few weeks to months, passive cold composting can take a year or more. Patience is key, and understanding the process helps manage expectations.
Cost & Time Breakdown
| Task | DIY cost | Pro cost | Time |
|---|---|---|---|
| Initial bin setup (DIY bin) | $0–$50 | N/A | 1–3 hours |
| Initial bin setup (store-bought) | $80–$300 | N/A | 15–60 minutes |
| Gathering materials | $0 (waste) | N/A | Ongoing |
| Turning/aerating pile | $0 (DIY) | N/A | 10–20 min/week |
| Adjusting C:N/moisture | $0–$20 | N/A | 10–30 min/fix |
| Compost thermometer | $15–$30 | N/A | Optional |
Tips & Prevention
- Layer Your Additions: Always try to add 'greens' and 'browns' in alternating layers. This helps maintain the C:N balance and prevents compaction of any single material type.
- Keep a Balanced 'Diet': Think of your compost pile as having a balanced diet. Don't add a huge batch of only grass clippings one week. Store dry leaves or straw to have on hand to balance out wet, nitrogen-rich additions.
- Moisture is Key, But Not Too Much: The pile should always be consistently damp, like a wrung-out sponge. If rain is scarce, water your pile. If it's too wet, add more dry brown materials.
- Chop and Shred: Smaller pieces break down faster. Take the extra minute to chop kitchen scraps or shred leaves and newspaper before adding them.
- Location, Location, Location: Place your compost pile in a well-drained spot, preferably in partial shade to prevent it from drying out too quickly in direct sun. Keep it away from your house to avoid potential pest issues.
- Monitor and Observe: Regularly check your pile's smell, temperature (if using a thermometer), and moisture. These indicators tell you what adjustments are needed.
When to Call a Professional
For most backyard composting issues, a professional isn't necessary. The process is largely self-correcting once you understand the basic principles. However, if you are experiencing a persistent rodent or pest infestation that you cannot control, despite following all guidelines regarding what not to compost, you might consider consulting a local pest control professional. Additionally, if you are contemplating a very large-scale composting system or encountering persistent drainage issues or structural problems with a custom-built, large composting setup, a landscape designer or an agricultural extension service in your area might offer valuable advice. For the typical homeowner, addressing the C:N ratio, aeration, and moisture will resolve 99% of composting problems.
Related Articles
Keep troubleshooting with these hand-picked guides from FixlyGuide:
- The 3 Compost Pile Mistakes Even Experienced Gardeners Make — Avoid common pitfalls and build a thriving backyard compost pile with the right mix of greens, browns, and proper aeration for nutrient-ric…
- The #1 Mistake Killing Your Compost Pile (and How to Fix It in 10 Minutes) — Discover the most common error homeowners make with compost piles and a simple 10-minute fix to get yours thriving.
- Thatched Lawn Secret: Why Brown Spots Bloom AFTER Watering (and the $15 Fix) — Brown spots appearing after watering your lawn often point to underlying thatch issues, hindering water absorption and nutrient delivery.
- The 3 Mulching Mistakes That Are Secretly Killing Your Plants — Discover the three common mulching errors that inadvertently harm your garden plants and learn how to apply mulch correctly for thriving, h…
- The #1 Mistake Killing Your Summer Lawn (It's Not What You Think) — Uncover the surprising truth behind your yellow summer lawn and learn how to fix the most common, yet overlooked, culprit: overwatering.
- Is Your Gutter Sagging After Every Storm? The Hidden Flaw Most Homeowners Miss — Discover the overlooked reason your gutters sag after every storm and learn the lasting fix that most homeowners miss.
Frequently asked questions
Why does my compost pile smell bad?+
A foul odor, especially like rotten eggs or ammonia, usually indicates an anaerobic pile. This is typically caused by too much nitrogen-rich 'green' material (like fresh grass clippings) without enough 'browns' (carbon-rich) and/or not enough aeration. Turn the pile to introduce oxygen and add more dry, brown materials like shredded leaves or straw.
Why isn't my compost pile breaking down or heating up?+
If your compost pile isn't heating up or decomposing, it's likely too dry, has too much 'brown' material (carbon), or lacks sufficient nitrogen or aeration. Ensure the pile is damp like a wrung-out sponge, add more 'greens' like kitchen scraps or grass clippings, and turn it regularly to introduce oxygen.
What should I avoid putting in my compost pile?+
Never add meat, bones, dairy products, oils, greasy foods, or pet waste to a backyard compost pile. These items can attract pests, create foul odors, and potentially harbor harmful pathogens. Also avoid diseased plants, as the pathogens can survive and spread.
How often should I turn my compost pile?+
For active, hot composting, aim to turn your pile every 3-7 days. This introduces oxygen, mixes the materials, and helps maintain even decomposition and high temperatures. If you're cold composting, turning less frequently (e.g., once a month) is acceptable, but decomposition will be slower.
How do I know when my compost is ready?+
Finished compost will be dark brown or black, crumbly, and have an earthy, pleasant smell. You shouldn't be able to identify the original materials (except for perhaps small pieces of wood or eggshells). The temperature will also have returned to ambient levels.


Discussion
Loading comments…