
Tools & materials you'll need
Affiliate linksAs an Amazon Associate FixlyGuide earns from qualifying purchases — at no extra cost to you. Prices and availability are accurate as of publication and subject to change.
Quick Answer
The most frequent and frustrating culprit behind a dryer that takes ages to get clothes dry is a restricted or clogged dryer vent. Lint, debris, and even animal nests can accumulate in the vent system, severely limiting the airflow essential for efficient drying. This isn't just an inconvenience; it can lead to higher energy bills, excessive wear on your appliance, and even pose a serious fire hazard. The good news is that for many homeowners, this is a relatively straightforward DIY fix, involving a thorough cleaning of the lint trap, the flexible vent hose behind the dryer, and the rigid ductwork leading to the outside of your home.
The Problem
You load your dryer, select your settings, and hours later, your clothes are still damp. Or perhaps you notice your laundry room becoming excessively hot and humid during dryer cycles. These are classic signs that your dryer isn't performing as it should. Beyond the sheer inconvenience and the added time this tacks onto your chores, a slow dryer is costing you money in increased energy consumption. The dryer has to work harder and longer to achieve its goal, using more electricity or gas in the process. More critically, a clogged vent traps heat, leading to overheating and creating a significant fire risk due to lint's highly flammable nature. Ignoring this problem can also lead to premature wear and tear on your dryer's heating element, motor, and other components, shortening its lifespan.
How It Works
To understand why a clogged vent is such a major issue, it helps to grasp how a dryer actually dries clothes. It's not just about spinning and heat. A dryer operates on a simple but effective principle: heat, tumbling, and airflow.
First, a heating element (electric dryer) or a gas burner (gas dryer) generates hot air. This hot air is then blown into the drum, where wet clothes are continuously tumbled. As the hot air circulates, it picks up moisture from the damp fabrics. This moisture-laden air then needs a clear path to be expelled from the dryer and out of your home. This path is the dryer vent system, consisting of the lint trap, the flexible transition hose directly behind the dryer, and the rigid ductwork that typically runs through a wall or ceiling to an exterior vent hood.
Proper airflow is absolutely critical. If the vent system is clear, the moist, warm air is efficiently pushed out, allowing fresh, dry heated air to replace it. This continuous exchange of air is what facilitates evaporation and removes the humidity from your clothes.
When the vent becomes clogged, that moist air has nowhere to go. It stays trapped inside the dryer drum and ductwork, creating a humid environment. This high humidity prevents further evaporation from your clothes, making them dry excruciatingly slowly, if at all. The heating element or gas burner cycles on and off more frequently and for longer periods, struggling to raise the temperature in the already humid air. The dryer's temperature sensors detect the buildup of heat and may trigger safety cut-offs, extending drying times even further. This constant struggle not only wastes energy but also puts immense strain on the dryer's internal components, especially the heating element and the blower motor, which have to work harder to try and force air through the obstruction. Understanding this cycle helps underscore why maintaining a clear vent is paramount for both performance and safety.
Step-by-Step Fix
1. Prioritize Safety – Always Disconnect Power — Before troubleshooting or cleaning any appliance, always unplug it from the wall outlet or trip its dedicated circuit breaker. For gas dryers, also turn off the gas supply valve.
- Safety Note: Never work on an appliance without ensuring it's completely de-energized. For gas dryers, the gas shut-off valve is usually a quarter-turn valve on the gas line behind the machine.
2. Clean the Lint Trap Thoroughly — The lint trap is your first line of defense against clogs. Remove the lint screen and clean it after every load. For deeper cleaning, wash it with hot, soapy water and a brush once a month to remove fabric softener residue that can create a film and restrict airflow.
- If this doesn't work: Even a seemingly clean lint trap can have invisible residue. Hold it up to a light source; if you can't see through it clearly, it needs a deep clean.
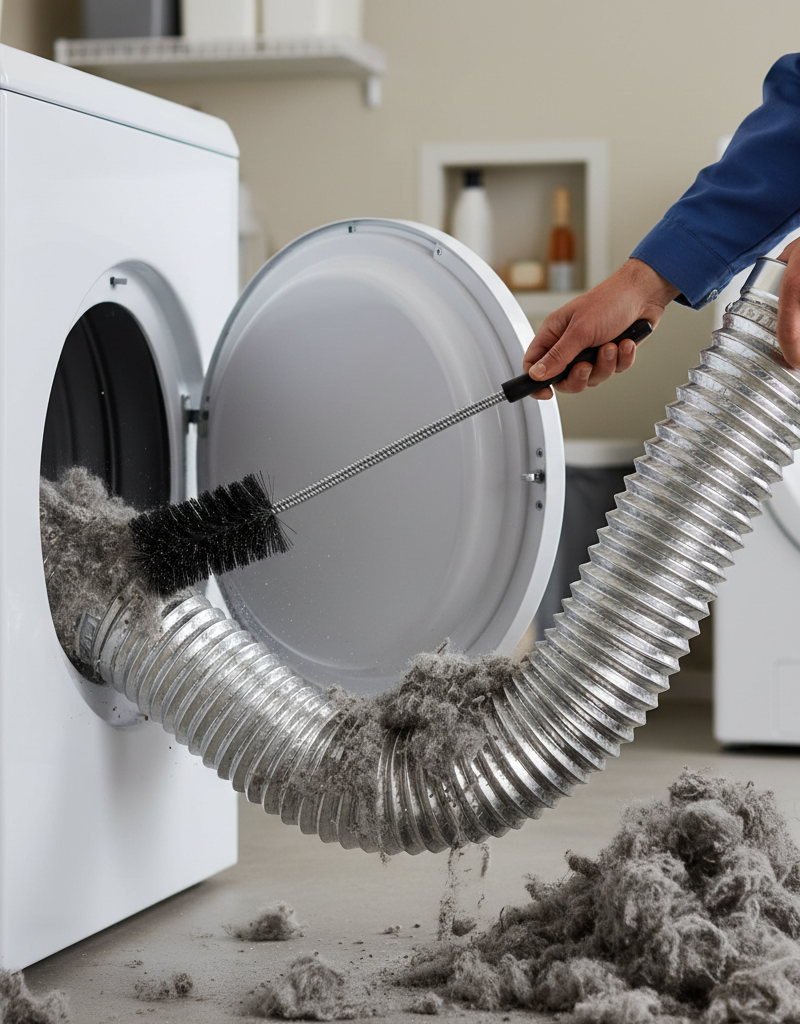
3. Inspect and Clean the Transition Duct — This is the flexible hose connecting your dryer to the wall vent. Pull your dryer away from the wall, disconnect the hose from both ends (dryer and wall), and inspect it for lint accumulation, kinks, or damage.
- Tools: Screwdriver or nut driver to loosen hose clamps.
- Process: Reach into both the dryer's exhaust port and the wall vent opening with a gloved hand or a shop vac nozzle to remove any accessible lint. Use a dryer vent brush for deeper cleaning.
- If you find damage: Replace plastic or foil accordion-style hoses with rigid or semi-rigid metal ducting for better airflow and fire safety.
4. Clean the Exterior Vent Hood — Go outside and locate the dryer vent hood, usually on an exterior wall. Check for lint buildup, animal nests (especially birds or rodents), or blockages around the flap or louvers.
- Safety: Wear gloves. Be mindful of working at heights if your vent is on a second story; use a sturdy ladder.
- Process: Use a brush, shop vac, or your hand to clear any obstructions. Ensure the flap opens and closes freely.
5. Clean the Main Dryer Ductwork (The Long Run) — This is often the most overlooked part. While the dryer is still pulled out, feed a dryer vent cleaning brush kit into the wall vent opening. Gradually extend the brush as you push it through the ductwork towards the exterior.
- Tools: Dryer vent cleaning brush kit (often includes flexible rods).
- Process: Move the brush back and forth, rotating it to dislodge lint. You might need to go outside and push the brush in from the exterior vent as well, working from both ends to ensure a thorough clean.
- Expect a mess: Have a shop vac running at the exterior vent opening (or at the wall opening if cleaning from outside) to suction up dislodged lint.
6. Check for Proper Dryer Placement — Once cleaned, reconnect the transition duct, ensuring it's securely fastened at both ends with clamps. Push the dryer back into place, leaving at least 4-6 inches of space between the dryer and the wall to prevent crushing the hose.
- Important: Avoid kinking or compressing the transition hose. This restricts airflow as much as lint does.
7. Test the Airflow — After everything is reconnected, turn the dryer on an air-fluff or low-heat cycle. Go outside to the vent hood and feel the airflow. It should be strong and steady.
- No airflow? Recheck for kinks or missed clogs. If still no powerful airflow, there might be a deeper, more inaccessible clog or an issue with the dryer's blower motor (a job for a professional).
8. Verify Load Size and Type — Overloading the dryer or mixing heavy items (towels, jeans) with light items (t-shirts) can significantly extend drying times because hot air can't circulate effectively.
- Solution: Dry similar fabric weights together and avoid cramming the drum full. Leave space for clothes to tumble freely.
9. Check Your Washing Machine's Spin Cycle — An often-missed cause of long drying times is wet clothes coming out of the washing machine. If your washer's spin cycle isn't extracting enough water, your dryer has to work extra hard.
- Diagnostic: Clothes should feel damp, not dripping wet, after the wash cycle. If they're saturated, troubleshoot your washing machine's spin cycle or choose a higher spin speed setting.
10. Inspect for Other Dryer Malfunctions (If Vent Cleaning Fails) — If, after a thorough vent cleaning and ensuring proper load sizes, your dryer still struggles, you might have a failing heating element, a malfunctioning thermostat, or a broken igniter (gas dryers). These require professional diagnosis and repair.
- Pro Tip: If the dryer runs but produces no heat, it's very likely the heating element (electric) or igniter (gas). If it produces some heat but not enough, thermostats or thermal fuses could be culprits.
Common Causes
- Clogged Lint Trap: The most basic and common cause. Residue from fabric softener can create a film on the screen, even if it looks clean.
- Blocked Transition Duct: The flexible hose behind the dryer easily kinks or gets crushed when the dryer is pushed too close to the wall. Lint also accumulates rapidly in the ridges.
- Obstructed Exterior Vent Hood: Lint, leaves, spiderwebs, and especially bird or rodent nests can completely block the outside flap, trapping all exhaust air.
- Long or Improperly Routed Ductwork: An excessively long vent run (over 25 feet, or 35 feet for gas dryers, subtracting 5 feet for each 90-degree elbow) or too many bends significantly reduces airflow, regardless of cleanliness.
- Overloading the Dryer: Stuffing too many clothes into the drum prevents proper tumbling and air circulation, leading to uneven and prolonged drying.
- Washer Not Spinning Properly: If clothes are too wet coming out of the washing machine, the dryer has a much heavier load of moisture to extract.
- Failing Heating Element or Igniter: An electric dryer's heating element can burn out, or a gas dryer's igniter can fail, resulting in no heat or insufficient heat.
- Malfunctioning Thermostat or Thermal Fuse: These safety devices can trip or fail, cutting off heat prematurely or causing the dryer to overheat and shut off.
- Poor Laundry Sorting: Mixing heavy textiles like denim and towels with lighter shirts and delicates means the lighter items will overdry and potentially shrink while the heavier items remain damp.
Common Mistakes
- Only Cleaning the Lint Trap: While essential, the lint trap is just the beginning. The entire vent system needs regular attention.
- Using Plastic or Foil Vent Hoses: These accordion-style hoses are prone to kinking, crushing, and are a fire hazard. Always upgrade to rigid or semi-rigid metal ducts.
- Not Disconnecting Power: Forgetting to unplug the dryer (or shut off both power and gas for gas dryers) is a major safety oversight before performing any maintenance.
- Ignoring the Exterior Vent: Many homeowners forget to check the outside vent, where birds and rodents love to build nests, creating significant blockages.
- Overlooking Washer Performance: Blaming the dryer when the washer isn't extracting enough water is a common diagnostic error. Test your washer's spin cycle first.
- Forgetting to Check for Kinks: Reconnecting the dryer vent hose carelessly can easily create a kink that restricts airflow as much as a lint clog. After pushing the dryer back, reach behind to ensure the hose isn't crimped.
Cost & Time Breakdown
| Task | DIY Cost | Pro Cost | Time |
|---|---|---|---|
| Lint Trap Cleaning | $0 | N/A | 1 minute (per load) |
| Transition Duct & Exterior Vent Clean | $10–$25 (brush kit) | Typical part of full vent clean | 30–60 minutes |
| Full Dryer Vent Line Cleaning | $10–$25 (brush kit) | $120–$200 | 1–2 hours |
| Replacing Dryer Vent Hose | $20–$50 | $150–$250 (incl. labor) | 15–30 minutes |
| Diagnosing Faulty Dryer Part (DIY) | $0 | $100–$150 (diagnostic fee) | 30–60 minutes |
| Replacing Heating Element (DIY) | $60–$150 (part) | $200–$400 (part + labor) | 1–2 hours |
Tips & Prevention
- Clean Lint Trap Every Load: Make it a habit. It takes seconds and is the single most effective preventative measure.
- Deep Clean Lint Trap Monthly: Wash with hot, soapy water to remove softener residue.
- Inspect and Clean Vent Hoses Bi-Annually: Twice a year, pull out your dryer and clean the transition hose and the exterior vent hood.
- Professionally Clean Vent Annually: For long vent runs, or if you have pets that shed heavily, consider an annual professional vent cleaning.
- Use Rigid Metal Ductwork: If you have plastic or foil accordion-style hoses, replace them with smooth-walled rigid or semi-rigid metal for optimal airflow and fire safety.
- Avoid Overloading: Give clothes room to tumble and allow air to circulate freely.
- Sort Laundry by Fabric Weight: Dry similar items together to ensure uniform drying and prevent lighter items from over-drying.
- Check Washer's Spin Cycle: Ensure your washing machine is extracting as much water as possible before clothes go into the dryer.
- Monitor Drying Times: If you notice a gradual increase in drying time, it's an early warning sign of a developing clog.
When to Call a Professional
While vent cleaning is a common DIY task, certain situations warrant calling a licensed appliance repair technician. If, after thoroughly cleaning your entire vent system and ensuring proper laundry practices, your dryer still takes too long to dry, struggles to heat, gets unusually hot to the touch, or produces a burning smell, it's time to call a pro. Issues like a faulty heating element, a broken igniter (for gas dryers), a malfunctioning thermal fuse, a failed thermostat, or a problematic blower motor are beyond the scope of most homeowners and require specialized tools and diagnostic expertise. Additionally, if your dryer vent runs through complex ductwork in inaccessible areas of your home, or if you suspect an internal dryer component is failing, a professional can safely diagnose and repair the issue, ensuring your dryer operates efficiently and safely.
Related Articles
Keep troubleshooting with these hand-picked guides from FixlyGuide:
- The #1 Mistake Homeowners Make When Their Dryer Stops Drying (And How to Fix It Free) — If your dryer is taking too long to dry clothes, the most common culprit is a clogged vent, which can be easily fixed with simple tools.
- The #1 Mistake Homeowners Make When Their Ice Maker Stops (And the Easy Fix) — Is your refrigerator ice maker on strike? Often, a simple oversight or minor clog is the culprit, easily fixable with basic tools.
- The #1 Mistake Homeowners Make When Their Dryer Stops Drying (It's Not the Lint Trap) — A common, easily overlooked issue often causes dryers to take too long to dry clothes: a clogged dryer vent, restricting airflow and drying…
- The #1 Reason Your Fridge Ice Maker Stops—And the 20-Minute Fix — Uncover the most common culprit behind a non-producing ice maker and learn how to implement a quick, effective fix in about 20 minutes.
- The 3 Hidden Reasons Your Dryer Takes Forever – And the Easy Fixes — If your dryer is taking too long to dry clothes, the culprit is often reduced airflow, which can be easily resolved with a few simple check…
- The #1 Gutter Mistake You're Making (And 3 Hidden Causes of Overflow) — Overflowing gutters in heavy rain are often a sign of a deeper issue than just debris, leading to potential foundation damage and costly re…
Frequently asked questions
Why would my dryer suddenly start taking a long time to dry?+
The most common reason for a sudden increase in drying time is a blockage in the dryer vent system. This can be lint buildup in the transition hose, the main ductwork, or the exterior vent hood, restricting airflow and trapping moisture.
How often should I clean my dryer vent?+
You should clean your dryer's lint trap after every load. The flexible transition hose and exterior vent hood should be cleaned every six months. The main dryer ductwork should be cleaned at least once a year, or more frequently if you have pets or a large family.
Can a clogged dryer vent be a fire hazard?+
Yes, absolutely. Lint is highly flammable, and a clogged dryer vent traps heat inside the dryer and ductwork. This excess heat, combined with accumulated lint, is a leading cause of household fires. Regular cleaning is crucial for safety.
What tools do I need to clean my dryer vent?+
You'll typically need a screwdriver or nut driver for hose clamps, a shop vacuum, and a specialized dryer vent cleaning brush kit with flexible rods. Gloves and safety glasses are also recommended.


Discussion
Loading comments…