
Tools & materials you'll need
Affiliate linksAs an Amazon Associate FixlyGuide earns from qualifying purchases — at no extra cost to you. Prices and availability are accurate as of publication and subject to change.
Quick Answer
Is your gas stove burner clicking away but failing to ignite, or perhaps not even clicking at all? The most frequent culprit behind a malfunctioning gas burner that won't light is a dirty or obstructed igniter. Over time, spilled food, grease, and even cleaning solutions can accumulate on and around the igniter and the burner ports, blocking the spark or preventing gas flow. A quick, targeted cleaning of these components usually restores the burner to full function within minutes.
The Problem
You've prepped your ingredients, placed your pan on the stove, and turned the knob, but nothing happens – or worse, you hear the ominous clicking without a flame. This frustrating scenario almost always points to an issue with the ignition system or the gas delivery to that specific burner. While a complete lack of gas to the stove is possible (check other burners first!), it's far more common for a single burner to misbehave due to localized debris or a minor electrical hiccup. Ignoring the issue can lead to uneven cooking, reliance on fewer burners, or the annoying need to use a separate lighter every time you want to cook.
How It Works
Understanding how your gas stove burner ignites helps in diagnosing the problem. When you turn a burner knob to the 'light' or 'on' position, two primary things occur simultaneously: gas begins to flow from the supply line through a valve to the burner head, and an electrical igniter (a small ceramic rod with a metal tip) located near the burner ports begins to spark. This spark is a tiny electrical arc that jumps from the igniter tip to the metal of the burner. When the flowing gas comes into contact with this spark, it ignites, creating the flame you cook with. If the igniter is covered in grime, grease, or food particles, the electrical current cannot create a strong enough spark or the spark path is blocked. Similarly, if the tiny holes (ports) in the burner cap or base are clogged, gas can't mix properly with air to create an ignitable mixture, or it can't reach the spark. Most modern gas stoves use a 'spark ignition' system, where each burner has its own igniter. When you turn a single knob, often all the igniters on the stovetop will click simultaneously, but only the chosen burner's gas valve opens.
Step-by-Step Fix
Safety First — Always unplug your gas stove from the electrical outlet or trip its circuit breaker before performing any work. If you smell gas at any point, immediately turn off the gas supply valve (usually behind the stove or in your basement) and open windows. Do not proceed until the gas smell dissipates. If it persists, call a professional.
-
Prep the Area — Before you start, gather your tools. Ensure the cooktop is cool to the touch. Unplug the stove from the wall outlet or flip the circuit breaker at your service panel. This is a critical safety step to prevent accidental shocks or gas ignition during cleaning.
-
Remove Grates and Caps — Lift off the burner grates and then gently remove the burner caps and burner heads (the metal rings that sit over the igniter). Pay attention to how they are assembled so you can put them back correctly. Some burner caps are specific to certain burners.
-
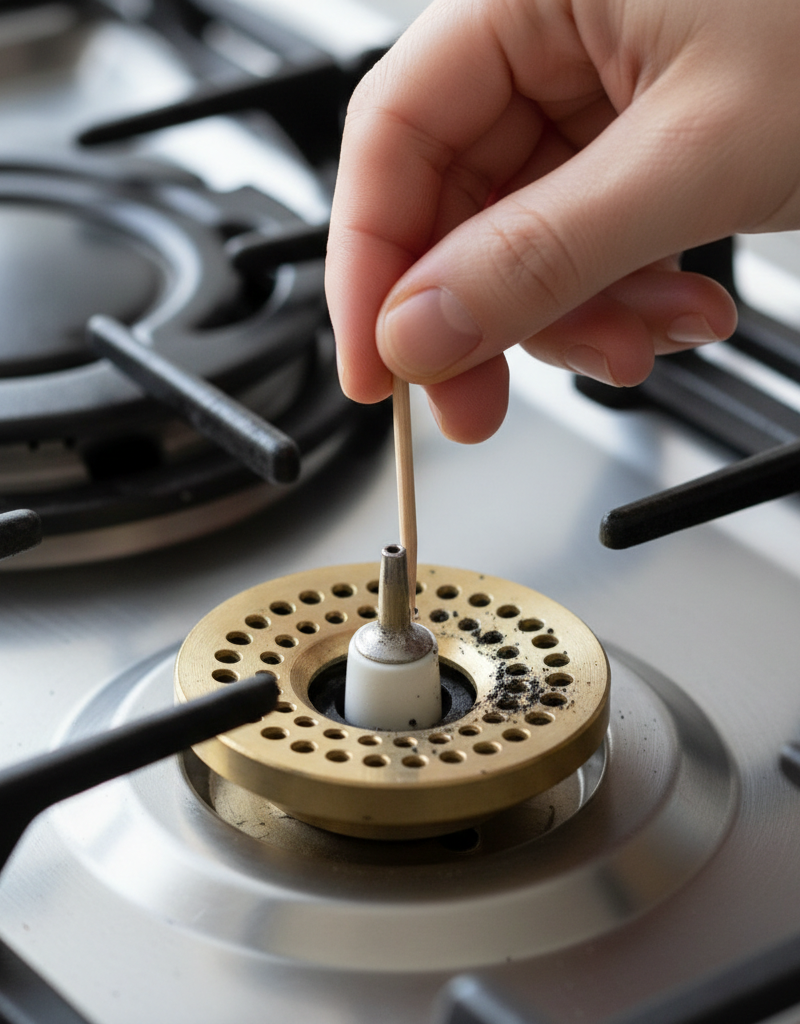
Inspect for Debris — Carefully examine the igniter (the small, off-white ceramic post with a metal tip usually positioned slightly off-center from the gas opening) and the gas ports around the burner head. Look for any visible food particles, grease buildup, spilled liquids, or corrosion. This is your primary suspect.
- If you see moisture: Allow everything to air dry completely for several hours, or use a hairdryer on a cool setting. Moisture can prevent sparking.
-
Clean the Igniter — Using a dry toothbrush, a firm cotton swab, or a small piece of fine-grit sandpaper (very gently!), clean the ceramic igniter post and its metal tip. The goal is to remove any residue that might be blocking the spark. Be gentle; the ceramic can be fragile. Avoid harsh chemical cleaners, which can leave residues that interfere with ignition.
-
Clear Burner Ports — Use a straightened paperclip, a small needle, or a toothpick to carefully clear out the tiny holes (ports) around the edges of the burner head where the flame emerges. Food debris and grease often clog these. Make sure not to enlarge the holes. You can also wipe down the entire burner head with a damp cloth and a mild detergent, ensuring it's completely dry before reassembly.
- If the holes are severely clogged: You may need to soak the burner heads in warm, soapy water for 30 minutes, then scrub with a brush. Rinse thoroughly and allow to completely dry before reinstalling.
-
Check for Loose Connections (Advanced) — If cleaning doesn't work and you're comfortable with it, you can carefully check the wiring underneath the cooktop. This usually involves lifting the cooktop surface (consult your stove's manual for specific instructions). Look for any loose wires connected to the igniter. Only do this if you are comfortable with basic electrical inspection and have unplugged the stove. If you see frayed or burnt wires, or suspect a faulty igniter, it's best to call a professional.
-
Reassemble and Test — Once everything is clean and completely dry, carefully reassemble the burner heads, caps, and grates in the reverse order of removal. Plug the stove back in or reset the circuit breaker. Turn on the burner you were having trouble with. It should now ignite promptly.
- If it still doesn't light: Double-check that the burner cap is seated correctly. An improperly seated cap can prevent gas from flowing or the spark from reaching the gas. If the issue persists, move to troubleshoot other potential causes or call a professional.
Common Causes
- Food Spills & Grease Buildup: The most frequent offender. Pasta water boiling over, sauces splattering, or cooking oil can easily fall into the igniter area or clog burner ports.
- Cleaning Product Residue: Overspraying cleaning solutions near the igniters can leave a film that prevents sparking.
- Moisture: Water from cleaning or spills can temporarily short out the igniter, preventing it from sparking. It usually resolves itself once dry.
- Clogged Burner Ports: Small food particles or carbonized grease can block the tiny holes in the burner head, preventing gas from reaching the spark source or flowing evenly.
- Loose or Faulty Igniter Wire: Less common, but a wire leading to the igniter can become loose or corroded, interrupting the electrical current.
- Cracked Igniter: The ceramic igniter itself can crack or break, making it unable to generate a spark. This sometimes happens if a heavy pot is dropped on it.
Common Mistakes
- Ignoring Safety: Forgetting to unplug the stove or turn off the gas before working is a serious safety hazard. Always address safety first.
- Being Impatient with Drying: Reassembling the burner while components are still damp can prevent ignition and even cause a short circuit. Ensure everything is thoroughly dry.
- Using Harsh Abrasives or Chemicals: Using steel wool or strong chemical cleaners on igniters can damage them or leave behind residues that worsen the problem. Stick to gentle methods.
- Enlarging Burner Port Holes: Using a drill bit or forcing a large object into the burner ports can permanently damage the burner, leading to uneven flames or gas leaks. Use a fine needle or paperclip.
- Not Checking Other Burners: If all burners fail to light, the problem isn't a single igniter; it's more likely the gas supply, power to the stove, or a main ignition module. Always check other burners to narrow down the problem.
- Improper Burner Cap Placement: The burner cap must sit perfectly flat and correctly aligned on the burner base for proper gas flow and ignition. Misaligned caps are a surprisingly common cause of no-light issues.
Cost & Time Breakdown
| Task | DIY Cost | Pro Cost | Time |
|---|---|---|---|
| Clean igniter & burner ports | $0 | N/A | 5–15 minutes |
| Replace single igniter | $15–$50 | $100–$250 | 30–60 minutes |
| Replace igniter wiring | $5–$15 | $80–$200 | 30–60 minutes |
| Replace burner head/cap | $20–$80 | $90–$200 | 15–30 minutes |
| Professional diagnostic call | N/A | $75–$150 (trip) | 30–60 minutes |
Tips & Prevention
- Regular Cleaning: Make cleaning your burner grates, caps, and the cooktop surface a regular part of your kitchen chores, especially after spills. This is the single best preventative measure.
- Don't Over-Boil: Use appropriately sized pots and watch liquids carefully to prevent boil-overs, which are a major source of igniter and port clogs.
- Wipe Down Immediately: If a spill occurs, clean it up as soon as the cooktop is cool enough to touch. Dried-on food is much harder to remove.
- Gentle Cleaning Products: Use mild dish soap and water for routine cooktop cleaning. Avoid abrasive chemicals or scouring pads directly on igniters.
- Check for Cracks: Periodically inspect the ceramic igniter posts for any signs of cracks or damage. Replace them if you find any, as they can lead to erratic sparking.
- Proper Cap Placement: Always ensure burner caps are seated correctly after cleaning or cooking. A slight misalignment can cause problems.
When to Call a Professional
While cleaning a dirty igniter is a straightforward DIY task, there are specific situations where calling a licensed appliance technician or plumber is essential for safety and effective repair. If you smell gas and cannot identify its source or turn off the main gas supply, evacuate and call your gas company immediately. If cleaning the igniter and burner ports doesn't resolve the issue, and you've confirmed other burners are working and the gas supply to the stove is active, the problem might be a faulty igniter itself, a broken wire underneath the cooktop, or a more complex issue with the stove's internal igniter module or gas valve. These repairs often require specialized tools, knowledge of electrical systems, and working with gas lines, which can be dangerous for an untrained individual. Similarly, any issues involving multiple burners failing simultaneously, a persistent gas odor without a visible flame, or if you aren't comfortable lifting the cooktop to inspect wiring, warrant professional intervention. Professionals can safely diagnose and replace faulty components, ensuring your stove operates safely and efficiently.
Related Articles
Keep troubleshooting with these hand-picked guides from FixlyGuide:
- The #1 Mistake Homeowners Make When a Gas Burner Won't Light (And the Easy Fix) — Before you call a technician, discover the most common, overlooked reason your gas stove burner isn't lighting and how to fix it yourself i…
- The 3 Hidden Reasons Your Gas Burner Won't Light (Beyond a Clog) — Before you call a technician, discover the most common culprits behind a gas stove burner that refuses to ignite and learn how to fix them…
- The 3 Hidden Reasons Your Gas Burner Won't Light (Beyond a Clogged Pilot) — Before you call a technician, learn the common culprits behind a gas stove burner that refuses to light, from simple clogs to ignition comp…
- The #1 Mistake Homeowners Make When a Gas Burner Won't Light (And the Easy Fix) — A gas stove burner that won't light is a common issue, often due to a clogged igniter or burner port, which homeowners frequently misdiagno…
- The Surprising Culprit Behind Your Wobbling Ceiling Fan (It's Not Always Loose Screws) — A wobbling ceiling fan is annoying and potentially dangerous. Learn how to diagnose and fix the most common causes, from imbalanced blades…
- The #1 Mistake When Your Dishwasher Won’t Drain (And How to Fix It in 20 Minutes) — Discover the most common reason your dishwasher isn't draining and how to troubleshoot and fix it yourself in under half an hour.
Get the print-ready PDF of this guide
A clean, ad-free, printable version you can keep on your phone or pin to the workshop wall. Free with a FixlyGuide account.
- Print-optimized layout
- Tools, materials & every step included
- Saved to your account
Frequently asked questions
Why is my gas burner clicking but not lighting?+
The most common reason for a gas burner clicking but not lighting is a dirty or obstructed igniter. Food debris, grease, or moisture covering the igniter's ceramic tip can prevent a strong enough spark from igniting the gas. Clogged burner ports can also prevent gas from reaching the spark efficiently.
Can I use water to clean my gas stove igniter?+
It's best to use a dry brush, cotton swab, or fine-grit sandpaper to clean the igniter. While you can use a damp cloth to clean burner caps and heads, ensure the igniter and all components are *completely* dry before reassembling and reconnecting the stove. Moisture can short out the igniter and prevent it from sparking.
How often should I clean my gas stove burners?+
Regular cleaning, especially after spills, is recommended. A thorough cleaning of burner caps, heads, and igniters every 1-3 months, depending on usage and cooking habits, can prevent igniter issues. Immediate cleanup of spills is key to prevention.


Discussion
Loading comments…