
Tools & materials you'll need
Affiliate linksAs an Amazon Associate FixlyGuide earns from qualifying purchases — at no extra cost to you. Prices and availability are accurate as of publication and subject to change.
Quick Answer
Flickering lights in a single room are most often caused by issues localized to that room's electrical circuit, such as a loose light bulb, a failing light switch, a faulty light fixture, or a compromised electrical outlet. Less commonly, but still possible, are issues with insufficient power draw from appliances on the same circuit or even intermittent loose connections in the wiring itself. Most of these problems can be diagnosed and fixed by a homeowner with basic electrical knowledge, but severe or persistent flickering may indicate a deeper problem requiring a licensed electrician.
The Problem
You're relaxing in your living room, only to be constantly distracted by the irritating dance of flickering lights above you. But here's the kicker: the lights in the hallways, kitchen, and bathroom are all burning bright and steady. This peculiar symptom—lights flickering exclusively in one room—is a common and unsettling problem for homeowners. It suggests the issue isn't with your main electrical service or the broad distribution of power throughout your house, but rather a specific, isolated fault within that single room's circuit. Ignoring it isn't an option, as flickering lights can indicate anything from a simple loose connection to a more serious electrical hazard that could lead to overheating or fire.
How It Works
Your home's electrical system is a network of circuits, each designed to deliver power to specific areas or appliances. Power flows from your utility company to your main electrical panel, where it's distributed to individual circuits protected by circuit breakers. Each circuit typically serves several outlets, lights, and sometimes switches in a particular area, like a single room. When you flip a light switch, you complete a circuit, allowing electricity to flow from the breaker panel, through the switch, to the light fixture, and then back to the panel via the neutral wire.
For a light to burn steadily, it requires a continuous and stable flow of electricity at the correct voltage. Any interruption or fluctuation in this flow, no matter how brief, will manifest as flickering. This can happen for several reasons: a loose connection might intermittently break the circuit; a faulty component, like a switch or bulb, might not be able to maintain a consistent connection; or too many high-draw devices on a single circuit might momentarily overwhelm it, causing a slight dip in voltage. Because the flickering is confined to one room, it narrows the scope of the problem to the specific components and wiring within that room's circuit, making systematic troubleshooting possible.
Step-by-Step Fix
Safety First: Before attempting any electrical work, always turn off the power to the affected room's circuit at your main electrical panel. Test the circuit with a non-contact voltage tester to ensure it's de-energized.
-
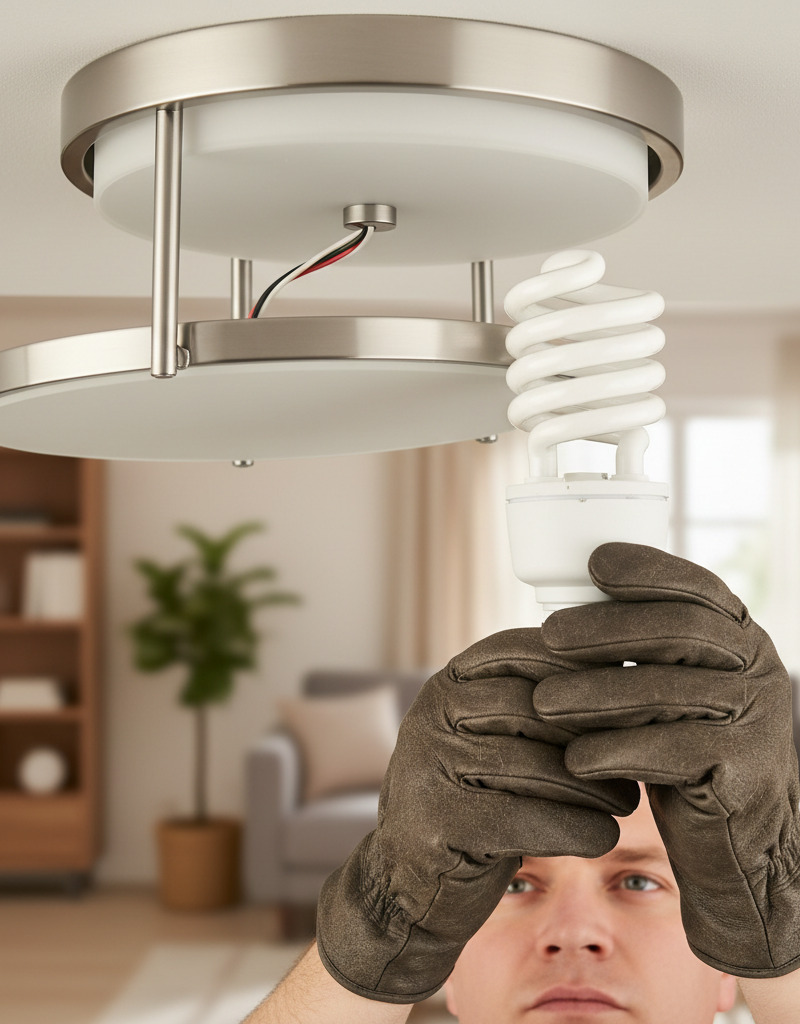
Check the Light Bulb – Start with the simplest culprit.
- Turn off the light switch and ensure the circuit breaker is OFF.
- Carefully remove the flickering bulb. Inspect the bulb's base for any signs of damage, blackening, or a loose filament. Also, check the socket's tab inside the fixture; if it's flat, it might not be making good contact with the bulb's base. You can gently bend it up slightly with a wooden or plastic stick (NEVER metal, even if power is off).
- Try screwing in a new, known-good light bulb. Ensure it's screwed in firmly, but don't overtighten.
- Restore power and test. If the flickering stops, you've found your fix.
-
Inspect the Light Fixture or Lamp – Often a source of intermittent issues.
- With power STILL OFF at the breaker, carefully lower or open the light fixture. For table or floor lamps, unplug them.
- Inspect all visible wire connections within the fixture's junction box (for ceiling/wall fixtures) or at the lamp's socket. Look for loose insulation, frayed wires, or corroded terminals. Gently tug on each wire; if any feel loose, they need to be re-secured.
- If you find loose screw terminals, tighten them. If you find wire nuts, remove them, twist the wires together more securely (clockwise), and then re-twist the wire nut tightly back on.
- Check the porcelain or plastic socket for cracks, burn marks, or corrosion. Damage here often requires replacing the entire socket or fixture.
- Restore power and test.
-
Test and Replace the Light Switch – Switches wear out over time.
- Turn off power to the circuit at the breaker. Remove the switch plate cover.
- Carefully pull the switch out from the electrical box (without disconnecting wires yet). Visually inspect the connections: look for loose or corroded wires at the screw terminals or push-in connectors. Tighten any loose screws.
- Use a multimeter to test the switch's continuity if you're comfortable. With power off, set the multimeter to resistance (Ohms). Connect probes to the two main terminal screws. When the switch is in the 'on' position, you should read near zero ohms. In the 'off' position, you should read infinite resistance. Erratic readings indicate a faulty switch.
- If you suspect the switch is faulty, disconnect the wires (making sure to note which wire goes to which terminal, especially if it's a three-way switch) and replace it with a new one of the same type and rating.
- If this doesn't work: Consider that the issue might be further down the line or at an outlet.
-
Examine Nearby Outlets – Related circuits can cross-contaminate.
- With power OFF, unplug everything from all outlets in the affected room.
- Carefully remove the faceplates and pull out each outlet from its electrical box. Look for loose wires, signs of arcing (burn marks), or corrosion. Tighten any loose screws.
- Often, wires are pushed into the back of outlets. These 'stab-in' connections are notorious for becoming loose over time. It's best practice to move these wires to the side screw terminals, ensuring a more secure connection.
- Replace any outlets that show damage or have consistently loose connections, even after tightening.
- Restore power and test.
-
Check for Overloaded Circuits – Too many devices, not enough power.
- Create a list of all devices, appliances, and lights plugged into or operating on the flickering room's circuit. This might involve temporarily turning off the circuit breaker and checking which devices lose power.
- If the flickering occurs only when a specific high-wattage appliance (like a vacuum cleaner, hair dryer, or space heater) is turned on, the circuit might be overloaded. The temporary voltage dip can cause lights to flicker.
- Try moving high-draw appliances to a different circuit if possible, or limit the number of high-wattage devices operating simultaneously on that circuit.
-
Inspect Wiring at the Junction Box (Advanced) – Requires more expertise.
- Pro Callout: If you've tried everything above and the flickering persists, or if you're unsure about inspecting junction boxes, it's time to call a licensed electrician.
- For homeowners comfortable with more advanced electrical work: identify any junction boxes in the room or on the circuit (e.g., in the attic, basement, or behind access panels). With power OFF, open the boxes and inspect all wire nuts and connections for looseness, corrosion, or signs of arcing. Re-tighten or replace any suspicious connections.
Common Causes
- Loose Light Bulb: The simplest and most common cause. The bulb isn't fully screwed in, or the contact tab in the socket is flattened.
- Faulty Light Switch: Internal components of switches can wear out, leading to intermittent connections.
- Loose Wiring in Fixture or Outlet: Over time, vibrations or temperature changes can cause connections at screw terminals or behind wire nuts to loosen.
- Failing Light Fixture Socket: The socket itself can be damaged by heat, age, or overtightening bulbs, leading to poor connection.
- Circuit Overload: Too many high-wattage devices on a single circuit can draw too much current, causing a temporary voltage drop that manifests as flickering.
- Old or Damaged Wiring: Especially in older homes, insulation can degrade, or wires can be nicked, leading to intermittent contact or resistance.
Common Mistakes
- Ignoring Safety: Forgetting to turn off the power at the breaker before working on any electrical component is extremely dangerous. Always verify with a non-contact voltage tester.
- Overtightening Bulbs: Screwing bulbs in too tightly can flatten the contact tab in the socket or internal damage the bulb, ironically causing poor contact or premature failure.
- Using Stab-In Connectors: While common, the back-stab wiring method in outlets and switches is less secure than screw terminals and frequently leads to loose connections over time. Always prefer screw terminals.
- Assuming a Faulty Bulb is the Only Issue: While often the culprit, stopping at just changing the bulb without further investigation if the problem returns can leave underlying issues unaddressed.
- Ignoring Loose Connections: Simply wiggling a wire and seeing the light flicker isn't a fix; it's a diagnostic sign. Loose connections must be properly secured to prevent arcing and potential fire hazards.
- Overlooking the Entire Circuit: Focusing only on the flickering light itself and neglecting other outlets or fixtures on the same circuit can lead to missing the true source of the problem, especially if it's a shared connection point.
Cost & Time Breakdown
| Task | DIY Cost | Pro Cost | Time |
|---|---|---|---|
| Replace Light Bulb | $5–$20 | N/A | 1–2 minutes |
| Tighten Fixture Wires | $0 | N/A | 10–20 minutes |
| Replace Light Switch | $10–$30 | $100–$250 | 30–60 minutes |
| Replace Electrical Outlet | $5–$25 | $100–$250 | 30–60 minutes |
| Diagnose/Secure Junction Box | $0 (tools only) | $150–$400+ | 1–2 hours+ |
| Electrician Full Diagnostic | N/A | $200–$600+ | 1–3 hours+ |
Tips & Prevention
- Regular Bulb Checks: Periodically check all light bulbs for tightness and replace any that show signs of dimming or flickering early.
- Use Quality Components: When replacing switches, outlets, or fixtures, opt for reputable brands and components that offer screw terminals rather than push-in connections where possible.
- Load Management: Be mindful of how many high-wattage appliances are plugged into a single circuit. If you frequently trip breakers or notice flickering when certain appliances run, redistribute your electrical load.
- Inspect Outlets Annually: For older homes, consider a yearly inspection of outlets and switches to check for loose connections or signs of wear.
- Proper Installation: If DIYing, always follow manufacturer instructions precisely for installing fixtures, switches, and outlets. Ensure all wire connections are tight and secure.
- Watch for Warning Signs: Beyond flickering, look for burning smells, charring around outlets/switches, or buzzing sounds from electrical components. These indicate serious issues needing immediate professional attention.
When to Call a Professional
While many single-room flickering light issues are DIY-friendly, certain situations mandate calling a licensed electrician. If, after checking bulbs, fixtures, and switches, the flickering persists, it's a strong indicator of a deeper wiring problem that could be dangerous. This includes issues like loose connections within walls or junction boxes you can't access, damaged Romex cabling, or overloaded circuits requiring breaker or wiring upgrades. Any signs of burning smells, smoke, or visible charring around outlets or switches are immediate red flags requiring professional intervention. If multiple lights throughout the house flicker, or if the flickering coincides with power company work in your area, your issue might be with the main service coming into your home—another clear sign to call an electrician or your utility provider. Finally, if you ever feel uncomfortable or unsafe performing any electrical diagnostic or repair, stop immediately and call a professional. Your safety is paramount.
Related Articles
Keep troubleshooting with these hand-picked guides from FixlyGuide:
- Why Does Only One Room Have Flickering Lights? The Real Culprit Isn't Always the Bulb — Flickering lights in a single room often point to a localized issue, ranging from a loose bulb to a faulty switch or wiring problem.
- Why Does Only One Room Have Flickering Lights? The Real Culprit — Flickering lights in a single room often point to a localized electrical issue, frequently a loose connection in a light fixture or switch.
- Why Does Only One Room Have Flickering Lights? The Real Culprit — Flickering lights in a single room often point to a localized electrical issue, frequently a loose connection, easily diagnosed and repaire…
- Why Does Only One Room Have Flickering Lights? The Real Culprit — Flickering lights in a single room often point to a localized electrical issue, not a whole-home problem, making diagnosis and repair simpl…
- Why Does Only One Room Have Flickering Lights? The Real Culprit — Flickering lights in a single room often point to a localized electrical issue, frequently a loose connection, rather than a whole-house pr…
- The 4 Hidden Reasons Your Doorbell Rings for No One — Phantom doorbell rings can be baffling, but often point to common, fixable issues with wiring, transformers, or the button itself.
Get the print-ready PDF of this guide
A clean, ad-free, printable version you can keep on your phone or pin to the workshop wall. We'll also send occasional weekly tips matched to your home situation.
- Print-optimized layout
- Tools, materials & every step included
- Unsubscribe anytime
Frequently asked questions
Why do my lights only flicker in one room and not the others?+
Flickering lights confined to one room usually indicate a localized electrical issue within that specific room's circuit. Common culprits include a loose light bulb, a faulty light switch, a problematic light fixture, or a loose connection in an electrical outlet on the same circuit. It's less likely to be a main service problem if other rooms are unaffected.
Can a bad light bulb cause flickering?+
Yes, absolutely. A loose light bulb, a bulb with a damaged filament, or one that's simply nearing the end of its lifespan can easily cause flickering. Always start your troubleshooting by replacing the flickering bulb with a new, known-good one.
Is flickering light dangerous?+
Intermittent flickering can sometimes be an early warning sign of a more serious underlying electrical issue, such as loose wiring or an overloaded circuit, which could potentially lead to arcing, overheating, and fire hazards. While a simple bad bulb usually isn't dangerous, persistent or unexplained flickering should be investigated to rule out safety risks.
How do I know if my circuit is overloaded?+
If your lights only flicker when a high-wattage appliance (like a vacuum, hair dryer, or space heater) is turned on in the same room or on the same circuit, it's a strong indication of an overloaded circuit. Another sign is frequently tripping a circuit breaker when multiple devices are in use.
When should I call an electrician for flickering lights?+
You should call an electrician if, after checking bulbs, fixtures, switches, and outlets, the flickering persists. Also, call a pro immediately if you smell burning, see smoke, hear buzzing from outlets/switches, or if the flickering is widespread throughout the house or coincides with utility issues. Safety is paramount.


Discussion
Loading comments…