
Tools & materials you'll need
Affiliate links- AmazonCalcium chloride ice melt10-20 lbs
- AmazonOld nylon stockings or pantyhoseTo hold de-icer
- AmazonExpandable spray foam (low-expansion)For sealing attic air leaks
- AmazonSilicone caulk and caulk gunFor smaller attic air leaks
- AmazonInsulation baffles (ventilation chutes)If soffit vents are blocked by insulation
As an Amazon Associate FixlyGuide earns from qualifying purchases — at no extra cost to you. Prices and availability are accurate as of publication and subject to change.
Quick Answer
Ice dams are destructive winter phenomena caused by a specific sequence of heat loss and freezing. Warm air escaping from your home melts snow on the upper roof, which then flows down to the unheated eaves. Here, the water refreezes, forming a barrier that traps additional melting snow behind it. The most effective long-term solutions involve addressing the root cause: heat loss and inadequate attic ventilation. For immediate, safe removal, homeowners can use roof rakes or chemical de-icers like calcium chloride, but always prioritize personal safety over speed.
The Problem
That beautiful blanket of fresh snow on your roof can quickly turn into a significant hazard and a costly repair bill if ice dams form. These thick ridges of ice typically develop along the eaves of your roof, preventing meltwater from draining properly. Instead, this water backs up under your shingles, seeping into your attic, walls, and even ceilings. The signs are often clear: icicles cascading from your gutters, water stains on interior ceilings or walls, and in severe cases, sagging drywall or peeling paint. Left unaddressed, ice dams can rot roof decking, damage insulation, ruin drywall, encourage mold growth, and even tear off gutters. The real problem isn't just the ice; it's the hidden water damage that follows, often silently, until it becomes a much larger, more expensive issue.
How It Works
Understanding ice dams starts with understanding how your home interacts with winter weather, specifically the delicate balance of heat and cold on your roof. Here's a simplified breakdown:
-
Heat Loss from Inside Out: Your home naturally generates heat to stay warm. A perfectly insulated and sealed attic would keep all this heat inside, preventing it from reaching the underside of your roof deck. However, most homes have some level of heat loss. This heat can penetrate your attic in several ways: poorly sealed attic bypasses (gaps around plumbing stacks, electrical wires, recessed lights, and even attic hatches), insufficient insulation, or poorly installed ductwork that leaks warm air. This warm air rises to the attic space.
-
Roof Temperature Gradient: As this warm air rises and meets your roof decking, it warms portions of the roof from the inside. Meanwhile, the outer edges of the roof (the eaves) extend beyond the heated living space and are often not heated from below. These eaves remain at ambient outdoor temperatures, typically below freezing during winter.
-
Snow Melt and Refreeze Cycle: When snow falls on a roof with this temperature gradient, the snow over the warmer parts of the roof melts. This happens even if the ambient air temperature is below freezing, as the heat conducted through the roof deck is enough to turn solid snow into liquid water. This meltwater then flows down the roof slope, underneath the pristine layer of snow, until it reaches the colder eaves. Upon encountering the freezing eaves, the water refreezes, forming a small ridge of ice. This small ridge acts as a dam.
-
The Dam Grows: As more snow melts from above and flows down, it pools behind this initial ice dam. With nowhere to go, this pooled water also refreezes, adding to the height and thickness of the dam. This vicious cycle continues, with each new layer of ice acting as a bigger barrier, forcing more water to back up the roof slope. This trapped water, often still liquid and seeking the path of least resistance, then seeps under shingles, through nail holes, and into your home's structure.
-
Role of Gutters and Valleys: While gutters don't cause ice dams, they can exacerbate the problem once a dam begins. An existing ice dam can totally fill a gutter, turning it into a solid block of ice, making future removal more difficult. Valleys, which naturally collect more snow and meltwater, are also prime locations for larger, more problematic ice dam formation due to the concentrated flow of water.
Understanding these steps highlights that ice dams are not just about heavy snow or cold temperatures, but rather a failure in your home's thermal envelope and attic ventilation system. Addressing these underlying issues is key to long-term prevention.
Step-by-Step Fix
Safety Note: Working on a snowy, icy roof is inherently dangerous. Always use extreme caution. If possible, work from a sturdy ladder and never attempt to walk on an icy roof. Consider hiring a professional for jobs that seem too risky or if you are uncomfortable with heights.
1. Assess the Damage — Identify the extent of the ice dam and any interior water infiltration.
Before taking action on the roof, check your home's interior. Look for water stains on ceilings, walls, or around window frames, particularly on upper floors. Note the locations and severity. Mild staining might indicate recent or limited water intrusion, while bubbling paint or sagging drywall suggests ongoing, significant issues. This assessment helps you understand the urgency and potential underlying damage.
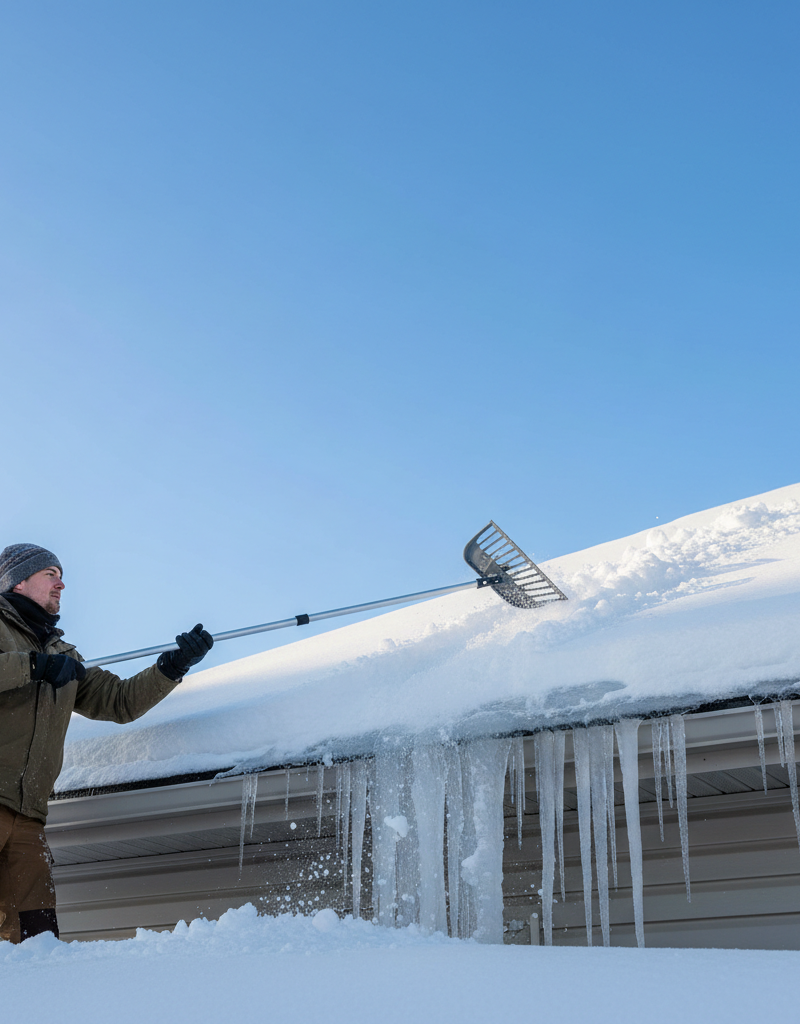
2. Clear Snow from the Eaves — Use a roof rake to gently remove loose snow from the lower roof sections.
- Tools: Roof rake (with an extension pole), sturdy ladder (if needed for lower sections).
- Process: From the ground or a stable ladder, use a roof rake to pull down approximately 3-5 feet of snow from the eaves. Angle the rake so that the plastic edge (not metal) comes into contact with the roof. Do not scrape aggressively, as this can damage shingles. The goal is to create a 'cold edge' where new snow won't accumulate and meltwater can flow freely off the roof, preventing new dam formation.
- Safety: Ensure the area below is clear of people or pets. Avoid power lines. Do not use metal rakes directly on shingles as they can scratch or tear them.
3. Create Drainage Channels (Temporary) — Apply a calcium chloride-based de-icer to melt channels through the ice dam.
- Materials: Calcium chloride ice melt (not rock salt!), old nylon stocking or pantyhose, small scoop.
- Process: Fill an old nylon stocking with calcium chloride pellets and tie it closed. Carefully place these stockings across the ice dam, perpendicular to the eave, spaced every 2-3 feet. The calcium chloride will slowly melt through the ice, creating channels for trapped water to escape. This method works by lowering the freezing point of the water. Avoid using rock salt (sodium chloride) as it can damage roofing materials, plants, and concrete.
- Safety: Do not climb onto an icy roof. Apply from a ladder or by gently tossing the filled stockings from a safe position. Wear gloves to protect your hands from de-icer. Be aware that meltwater can refreeze into slick spots on the ground.
- If this doesn't work: For very thick dams in extremely cold temperatures, the melting process might be slow. You may need to replace the stockings after several hours or try a gentle chipping method (see step 4) after some melting has softened the ice.
4. Gently Chip Away Ice (Extreme Caution) — Only if other methods fail and with utmost care, chip small sections of ice.
- Tools: Plastic or rubber mallet, plastic putty knife, safety glasses.
- Process: This should be a last resort and only attempted from a secure ladder where you can reach the ice dam without stepping on the roof. Using a plastic or rubber mallet, lightly tap a plastic putty knife along the edge of the ice dam. Aim to break off small, manageable pieces. Never use an axe, chisel, or sharp metal tool, as these can severely damage shingles and gutters. Focus on creating a path for water rather than removing the entire dam.
- Safety: DO NOT, under any circumstances, get on an icy roof. Falling from a roof can result in severe injury or death. Wear fall protection if you are a trained professional or working with one. Ensure no one is below you when chipping ice.
5. Consider Professional Steam Removal — For large, stubborn, or hazardous ice dams, hire a professional.
- Pro Callout: If ice dams are extensive, are causing significant interior leaks, or if you are uncomfortable with DIY methods, call a professional. They use specialized steam equipment that safely melts ice without damaging the roof.
- Benefits: Steam removal is highly effective, fast, and does not involve harsh chemicals or aggressive chipping, making it safer for your roof and surrounding landscaping.
6. Address Interior Leaks — Mitigate water damage inside your home immediately.
- Process: If you have active leaks, place buckets to catch water. For ceiling stains, gently pierce the center of the stain with a small nail or screwdriver to allow trapped water to drain into a container. This prevents a larger section of the ceiling from collapsing. Use fans and dehumidifiers to dry out affected areas thoroughly as soon as the source of water is stopped. Remove wet insulation or drywall to prevent mold growth.
- Materials: Buckets, fans, dehumidifier, (optional) small nail/screwdriver.
7. Inspect and Improve Attic Insulation — Ensure adequate and unbroken insulation to prevent heat loss.
- Process: Once the current ice dam crisis is averted, the critical long-term step is to inspect your attic. Look for areas where insulation is sparse, compressed, or missing, particularly near exterior walls and over living spaces. The recommended R-value for attics varies by climate zone but often ranges from R-49 to R-60. Add batt or blown-in insulation to achieve proper coverage and depth. A well-insulated attic minimizes heat transfer from your living space to the roof deck.
- Tools: Measuring tape, work light, protective gear (dust mask, gloves, long sleeves).
8. Seal Attic Air Leaks — Block pathways for warm, moist air to enter the attic space.
- Process: Even with perfect insulation, air leaks are a huge culprit. Go into your attic with a flashlight and seal all penetrations from the living space below. Common culprits include: electrical wiring holes, plumbing vents, chimney chases, poorly sealed attic hatches, and gaps around recessed light fixtures. Use expandable spray foam for larger gaps and silicone caulk for smaller cracks. Pay close attention to the top plates of interior walls, where significant air leakage often occurs.
- Materials: Expandable spray foam (low-expansion type for smaller gaps), silicone caulk, caulk gun, utility knife.
9. Verify Attic Ventilation — Ensure a continuous flow of cold air through your attic.
- Process: Proper attic ventilation is crucial for keeping your roof deck cold. This typically involves a system of soffit (intake) vents and ridge or gable (exhaust) vents. Check that soffit vents are not blocked by insulation. Use baffles (ventilation chutes) to keep insulation from blocking airflow from the soffits. Ensure exhaust vents are clear and unobstructed. The goal is to have a continuous flow of outside air entering low (soffits), moving across the underside of the roof deck, and exiting high (ridge), keeping the roof surface as close to the outdoor temperature as possible.
- Tools: Work light, measuring tape, staple gun (for baffles).
10. Clean and Maintain Gutters — Remove leaves and debris to ensure proper drainage.
- Process: While gutters don't cause ice dams, clogged gutters can worsen them by preventing meltwater from draining, forcing it to back up. In late fall, after all the leaves have fallen, thoroughly clean your gutters and downspouts. Ensure water can flow freely through them. Consider installing gutter guards if debris buildup is a persistent problem, but be aware that some guards can also accumulate ice.
- Tools: Ladder, sturdy gloves, small trowel or scoop, garden hose.
Common Causes
- Inadequate Attic Insulation: This is the most prevalent cause. If your attic lacks sufficient insulation, heat from your living space readily transfers to the roof deck, warming the snow above and initiating the melt-freeze cycle. Even small patches of missing or compressed insulation can create warm spots.
- Poorly Sealed Air Leaks: Gaps and cracks in your home's ceiling and attic floor allow warm, moist air to bypass insulation and flow directly into the attic. Common culprits include penetrations for electrical wires, plumbing pipes, recessed lighting, and unsealed attic hatches. This warm air then heats the roof deck from below.
- Insufficient Attic Ventilation: A properly ventilated attic works with insulation to maintain a consistently cold roof surface. If soffit vents are blocked by insulation or if there isn't enough exhaust ventilation (ridge, gable, or static vents), warm air gets trapped, heating the underside of the roof.
- Exhaust Vents Terminating in Attic: Bathroom fans, kitchen range hoods, and dryer vents should always exhaust directly to the outdoors, not into the attic. Exhausting warm, humid air into the attic significantly raises its temperature and can lead to condensation and ice dam issues.
- Snow Coverage: While not a cause in itself, heavy snow acts as an insulating blanket, exacerbating the effect of heat loss from below by trapping heat on the roof, making it melt faster.
- Complex Rooflines: Architectural features like valleys, dormers, and multiple roof planes can be more prone to ice dam formation because they create areas where snow accumulates more deeply or where heat transfer is more uneven.
Common Mistakes
- Using Rock Salt (Sodium Chloride): This is a critical mistake. Rock salt is highly corrosive and can damage asphalt shingles, gutters, fasteners, and nearby landscaping. It can also discolor concrete. Always use calcium chloride, which is less harmful to materials and the environment.
- Aggressively Chipping or Chopping Ice: Hitting ice dams with an axe, chisel, or shovel is a surefire way to damage your roof. You can easily tear shingles, gouge the roof deck, or puncture the roof's waterproofing membrane, leading to even worse leaks. If you must chip, use plastic tools gently.
- Getting on an Icy Roof: This is incredibly dangerous. Icy roofs offer no traction and falls from even a single story can be fatal. If you cannot safely reach the ice dam from a stable ladder or the ground with a roof rake, call a professional. Your safety is not worth the risk.
- Ignoring the Root Cause: Simply removing an ice dam without addressing why it formed is a temporary fix. The dam will almost certainly return. The real solution lies in improving attic insulation and ventilation to eliminate the conditions for formation.
- Blocked Soffit Vents: Homeowners often unknowingly block soffit (eave) vents with insulation when adding more to their attic. This strangles the intake of cold air, rendering your ventilation system ineffective. Always install insulation baffles to maintain a clear path for airflow.
- Running Heat Cables Incorrectly: While heat cables can prevent ice dams, they are an energy-intensive and often costly solution. If installed, they need to be placed correctly in a continuous, overlapping pattern along the eaves and into the gutter. Incorrect installation can still lead to dams or even overheat roof surfaces. They are a band-aid, not a fix for underlying heat loss.
Cost & Time Breakdown
| Task | DIY Cost | Pro Cost (Est.) | Time (Active) |
|---|---|---|---|
| Roof Raking Snow | $40–$80 (rake) | $150–$300 | 20–40 min |
| Calcium Chloride Application | $20–$40 (de-icer) | $0 (part of pro) | 10–20 min |
| Attic Air Sealing | $50–$150 | $400–$1,000 | 4–8 hours |
| Adding Attic Insulation | $300–$1,000 | $1,000–$3,000 | 6–16 hours |
| Professional Ice Dam Removal | — | $500–$2,000+ | 1–4 hours |
| Gutter Cleaning | $0–$10 (gloves) | $100–$250 | 1–2 hours |
Tips & Prevention
- Regular Attic Inspections: Once a year, preferably in the fall, visually inspect your attic. Look for signs of moisture, mold, or compressed/displaced insulation. Ensure all vents (soffit, ridge, bathroom fan exhausts) are clear.
- Seal All Penetrations: This is arguably the most impactful preventative measure. Spend a day in your attic with a can of spray foam and caulk, methodically sealing every gap and hole that leads into the living space below, especially around recessed lighting, wiring, and plumbing stacks. This directly stops warm air from reaching your roof.
- Adequate Insulation Depth: Ensure your attic insulation meets or exceeds current R-value recommendations for your climate zone. For most northern climates, this means a depth of 12-18 inches of fiberglass or cellulose insulation.
- Maintain Proper Ventilation: Verify that your soffit vents are unobstructed (use baffles!) and that your attic has sufficient exhaust ventilation (ridge vents are generally superior to static or gable vents for continuous airflow).
- Keep Gutters Clean: In late fall, after leaves have dropped, thoroughly clean your gutters and downspouts to ensure they can effectively drain meltwater from the roof. This won't prevent ice dams but prevents them from being exacerbated.
- Check Exhaust Vents: Confirm that all bathroom, kitchen, and dryer vents terminate directly outdoors, not in the attic. This prevents warm, moist air from increasing attic temperatures and humidity. Ensure these ducts are insulated.
When to Call a Professional
If your ice dams are extensive, very thick, or difficult to reach safely, it is always best to call a licensed professional. Specifically, contact a professional if you notice significant interior water damage (like large ceiling stains, bubbling paint, or sagging drywall), as this indicates a potentially compromised roof structure or extensive interior water intrusion that requires immediate expert assessment. You should also call a pro if you cannot safely remove snow and ice from your roof from the ground with a roof rake, or if you do not feel comfortable working on ladders in winter conditions. Professionals have specialized steam equipment that can remove ice dams quickly and safely without damaging your roof, and they can also perform comprehensive attic inspections to diagnose and fix underlying insulation and ventilation issues that cause ice dams to form in the first place. Addressing the root cause is far more effective and less damaging in the long run than repeated, risky DIY removal efforts.
Related Articles
Keep troubleshooting with these hand-picked guides from FixlyGuide:
- The $30 Secret to Banishing Ice Dams From Your Roof (Before They Destroy It) — Learn safe and effective methods to remove ice dams from your roof and prevent costly damage to your home's structure and interior.
- The #1 Mistake Homeowners Make with Ice Dams (and How to Fix It SAFELY) — Most homeowners approach ice dam removal incorrectly, creating more damage or safety risks. Learn the right, safe methods to protect your r…
- The 3 Hidden Reasons Your Roof Gets Ice Dams (and the Only Safe Way to Remove Them) — Discover the real causes of ice dams and the safest, most effective methods for removal, preventing costly roof and water damage this winte…
- The $20 Trick That Melts Ice Dams (and Saves Your Roof) — Discover a surprisingly simple, budget-friendly method to safely remove ice dams and prevent costly roof damage to your home.
- The $30 Trick to Melting Ice Dams (Before They Destroy Your Roof) — Discover how to safely remove ice dams from your roof instantly with common household items, preventing costly damage. Stay safe while tack…
- Is Your Gutter Sagging After Every Storm? The Hidden Flaw Most Homeowners Miss — Discover the overlooked reason your gutters sag after every storm and learn the lasting fix that most homeowners miss.
Recommended for DIYers & woodworkers
Sponsored
The Top 20 Tools for Workshops of Any Budget
No stationary machines or power tools required — plus 3 fundamental tools that can't be bought at any price.
Get the free guide
Ted's Woodworking — The #1 Woodworking Resource
Detailed instructions, dimensioned drawings, materials & cutting lists, and 3D schematics for every skill level.
See the plansSponsored: links above are affiliate links. FixlyGuide may earn a commission on qualifying purchases — at no extra cost to you.
Frequently asked questions
What causes ice dams to form on a roof?+
Ice dams form when heat from your home escapes into the attic, warming the roof deck and melting snow. This meltwater then flows down to the cold eaves and refreezes, creating a barrier that traps more water, which can back up under shingles.
Is it safe to chip away ice dams with a hammer or axe?+
No, it is highly unsafe and can severely damage your roof. Aggressive chipping with sharp tools can rip shingles, gouge the roof deck, and compromise its waterproofing. Use only gentle methods like calcium chloride or a plastic mallet with a plastic putty knife, and only if you can do so safely from a ladder.
Can proper attic insulation prevent ice dams?+
Yes, proper attic insulation is one of the most critical steps in preventing ice dams. It keeps heat from escaping your living space and warming the roof deck, which is the primary cause of snow melt and subsequent ice dam formation.
How do you safely remove an ice dam from a roof?+
The safest DIY methods include using a roof rake to remove snow from the eaves and placing calcium chloride-filled stockings across the ice dam to melt channels. For large or stubborn dams, professional steam removal is the safest and most effective option.
Do heat cables prevent ice dams?+
Heat cables can prevent ice dams by melting channels for water, but they are an energy-intensive, costly band-aid solution. They do not address the root cause of heat loss and poor ventilation. Proper insulation and ventilation are far more effective long-term solutions.


Discussion
Loading comments…