
Tools & materials you'll need
Affiliate linksAs an Amazon Associate FixlyGuide earns from qualifying purchases — at no extra cost to you. Prices and availability are accurate as of publication and subject to change.
Quick Answer
Ice dams are destructive forces that can lead to significant water damage inside your home if not addressed properly. The safest and most effective DIY method for immediate relief involves creating melt channels through the ice dam using calcium chloride ice melt contained within pantyhose or a similar permeable material. This allows trapped water to drain, preventing further backup and potential leaks. Always prioritize safety and consider professional help for extensive or high-up ice dams.
The Problem
That beautiful blanket of snow on your roof can quickly become a homeowner's nightmare when ice dams form. These thick ridges of ice typically develop along the eaves of your roof, preventing melting snow from draining properly. Instead, the water backs up, often under shingles, and can seep into your attic, walls, and ceiling, leading to stained drywall, peeling paint, warped floors, and even structural damage. The sheer weight of large ice dams can also damage gutters and fascia boards. Many homeowners, in a panic, resort to destructive methods like chipping away at the ice with a shovel or hammer, or using rock salt, both of which can cause far more harm than good to their roofing materials.
How It Works
Understanding the mechanics of ice dam formation is key to preventing them and addressing them safely. It all starts with uneven roof temperatures. Warm air from your living space rises and, if not properly insulated and air-sealed, escapes into your attic. This warm air heats the underside of your roof deck, especially in the central areas. Snow on these warmer parts of the roof melts and flows downward as liquid water. However, when this water reaches the colder edges of your roof – typically the eaves which extend beyond the exterior walls and aren't warmed by the attic – it refreezes because the ambient air temperature is below freezing. This continuous cycle of melting and refreezing builds up a literal dam of ice. As more snow melts, the liquid water becomes trapped behind this ice barrier, forming a pool. Rather than flowing off the roof, this standing water then pushes its way under your shingles, through nail holes, and into your home. Adequate attic insulation and ventilation are crucial in preventing this heat transfer and maintaining a consistently cold roof surface, thereby preventing ice dam formation in the first place.
Step-by-Step Fix
Safety First — Always use extreme caution when working on a roof, especially one covered in snow and ice. Consider having a helper, wear appropriate footwear with good traction, and use a sturdy ladder. If the roof pitch is steep, or the ice dam is extensive and difficult to reach safely, consider calling a professional.
-
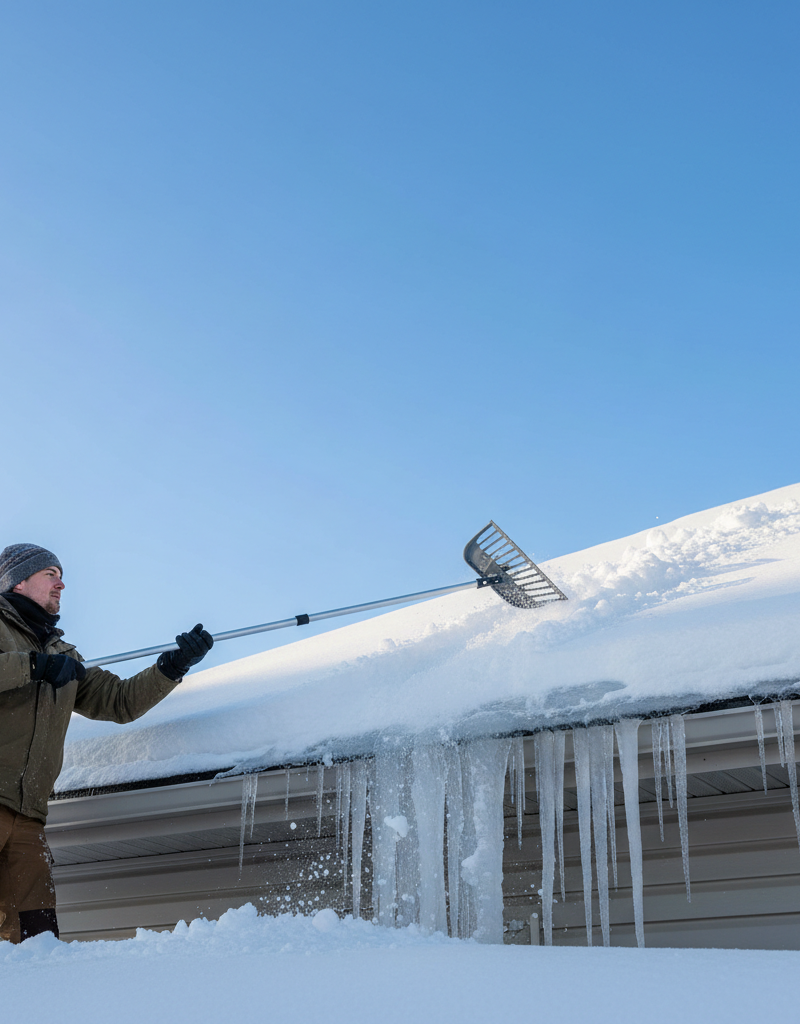
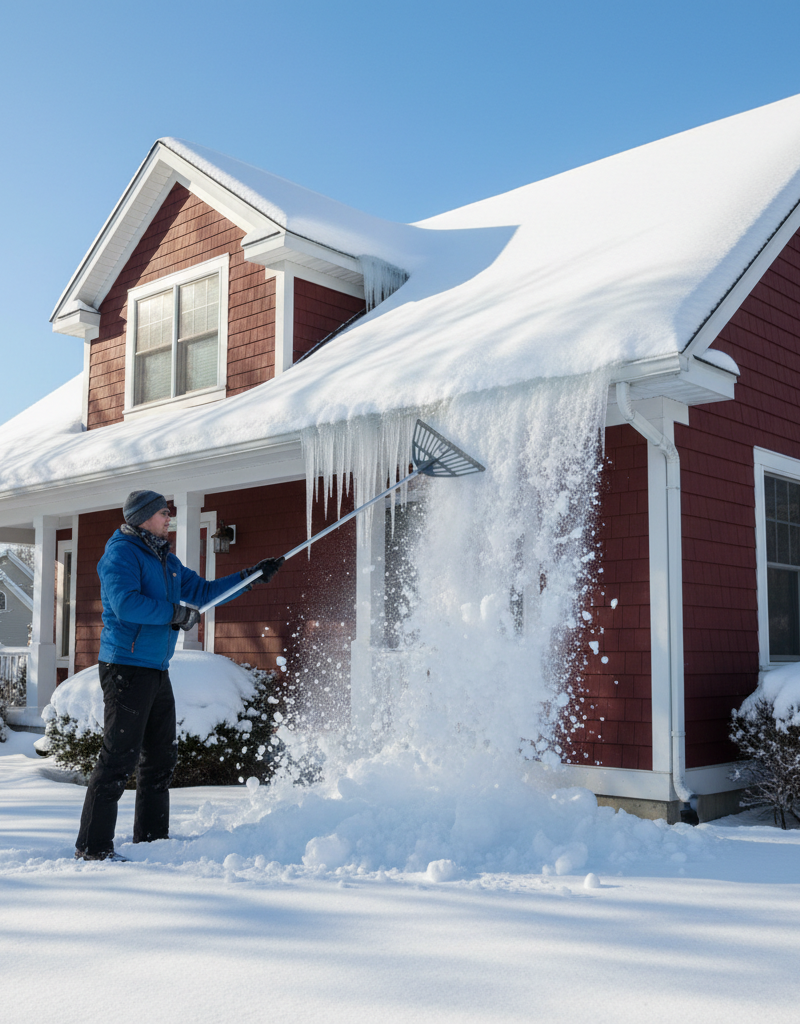
Clear a Path – Remove loose snow from the roof near the ice dam
- Using a roof rake (a long-handled tool with a small rake head), carefully pull down as much loose snow as you can reach from the ground, especially the snow directly uphill from the ice dam. Avoid standing directly under falling snow and ice. Do not try to chip or scrape ice off with the rake.
- If this doesn't work: For higher areas, a safe, sturdy ladder placed on firm, level ground may be needed. Always have a spotter when using a ladder.
-
Prepare the Ice Melt Socks – Fill old pantyhose with calcium chloride ice melt
- Take an old pair of pantyhose, knee-high stocking, or even a tube sock. Fill it with calcium chloride ice melt (not rock salt, which can damage shingles). Tie off the end to create a long, sausage-like sock filled with the melting agent.
- Safety Note: Wear gloves when handling calcium chloride, as it can be irritating to skin.
-
Position the Melt Socks – Place the filled pantyhose across the ice dam
- Carefully lay the filled pantyhose across the ice dam, perpendicular to the eave, so that it rests directly on the ice and contacts your shingles. Position it approximately 6-12 inches uphill from the very edge of the dam.
- The goal is for the slow-release calcium chloride to melt a channel through the ice, allowing trapped water to drain off the roof.
-
Allow Time to Work – Let the ice melt do its job naturally
- Depending on the thickness of the ice dam and the outdoor temperature, it can take several hours for a channel to form. Avoid the temptation to continually check or reposition the socks, and certainly do not chip or pry at the ice.
- You should see water beginning to flow through the created channel eventually. This indicates the dam is being breached and water is draining.
-
Repeat if Necessary – Address multiple sections of long ice dams
- If you have a very long ice dam, you may need to place several ice melt socks at intervals of 3-5 feet to create multiple drainage channels. This is more effective than trying to melt the entire dam at once.
-
Clear Gutters (If Safe) – Remove any ice accumulation in gutters after initial melting
- Once the immediate threat of water backup is addressed by creating a channel, and if it's safe to do so, carefully remove any detached pieces of ice or snow from your gutters. This will prevent re-freezing there. Do NOT attempt to chip ice out of gutters if it's firmly frozen.
-
Monitor and Prevent – Watch for refreezing and consider long-term solutions
- After removing an ice dam, monitor your roof for new accumulation or signs of refreezing. The best long-term solution is to address the underlying cause (attic heat loss). Ensure adequate insulation and ventilation in your attic.
- If this doesn't work: If ice dams repeatedly form despite your best efforts, it's a strong indicator of significant insulation or ventilation issues, and professional assessment is warranted.
Common Causes
- Poor Attic Insulation: Insufficient insulation in the attic allows heat from the living space below to rise and warm the roof deck. This is the primary driver of ice dams.
- Inadequate Attic Ventilation: Proper ventilation (soffit and ridge vents working together) helps keep the attic air temperature closer to the outside air temperature, preventing the roof deck from heating up unevenly.
- Air Leaks: Gaps and cracks around light fixtures, plumbing vents, access hatches, and unsealed top plates allow warm, moist air from the house to directly enter the attic and warm localized areas of the roof.
- Clogged Gutters: While not a direct cause, gutters full of leaves, debris, or existing ice can exacerbate ice dam problems by preventing proper drainage even if a small melt channel forms.
- Sudden Temperature Fluctuations: When heavy snowfall is followed by periods of above-freezing temperatures during the day and sub-freezing temperatures at night, conditions are ripe for ice dam formation.
Common Mistakes
- Chipping Away at Ice: Using a hammer, chisel, or shovel to chip or hack at ice dams is incredibly risky. You can easily damage shingles, gutters, and underlying roof structures, leading to costly repairs.
- Using Rock Salt (Sodium Chloride): While rock salt technically melts ice, it is highly corrosive and can damage asphalt shingles, concrete, and vegetation below. It also leaves behind a white residue that can be unsightly.
- Applying Heat with Torches or Heat Guns: Directing open flames or intense heat to ice dams is extremely dangerous. It can ignite roofing materials, cause severe burns, and is ineffective over large areas.
- Ignoring the Underlying Problem: Simply removing an ice dam without addressing the cause (poor insulation/ventilation) means it will likely return with the next major snowfall.
- Over-relying on De-icing Cables: While de-icing cables can help in specific, limited areas, they are energy-intensive and don't solve the root cause of heat loss. They are a band-aid, not a fix, and can sometimes fail or even contribute to issues if not installed correctly.
- Standing on an Icy Roof Without Safety Gear: Attempting to work on a snow- and ice-covered roof without proper fall protection, sturdy footwear, and a spotter is a major safety hazard and should be avoided.
Cost & Time Breakdown
| Task | DIY Cost | Pro Cost | Time |
|---|---|---|---|
| Roof rake (if needed) | $40–$80 | Included in service | 0 |
| Calcium chloride ice melt | $15–$30 | Included in service | 0 |
| Old pantyhose/socks | $0 | Included in service | 0 |
| Subtotal for materials | $15–$110 | $0 | 0 |
| Immediate ice dam treatment | $0 (DIY labor) | $300–$800 | 1–3 hours |
| TOTAL for acute fix | $15–$110 | $300–$800 | 1–3 hours |
| Insulation & ventilation (long term) | $500–$2,000 | $2,000–$6,000+ | 1–3 days |
Tips & Prevention
- Check and Improve Attic Insulation: Aim for at least R-38 (about 10-14 inches) of insulation in your attic for most climates. Ensure it's evenly distributed and not compressed.
- Seal Air Leaks: Use caulk and expanding foam to seal any gaps or penetrations in your attic floor that allow warm air to escape into the attic. Common culprits include around vent pipes, electrical wires, and attic hatches.
- Ensure Proper Attic Ventilation: Verify that your soffit vents are not blocked by insulation and that you have adequate ridge or gable vents to create a continuous airflow, keeping the attic cool.
- Clean Gutters Regularly: Keep gutters free of leaves and debris, especially before winter, to ensure water can drain freely once it reaches the gutters.
- Use a Roof Rake Proactively: After heavy snowfalls, use a roof rake to pull down several feet of snow from the eaves before ice dams can form. This removes the
Related Articles
Keep troubleshooting with these hand-picked guides from FixlyGuide:
- The $30 Trick to Melting Ice Dams (Before They Destroy Your Roof) — Discover how to safely remove ice dams from your roof instantly with common household items, preventing costly damage. Stay safe while tack…
- The #1 Mistake Homeowners Make Removing Ice Dams (And 3 Safer Fixes) — Discover the safest and most effective ways to remove ice dams from your roof, avoiding common mistakes that can cause severe damage to you…
- The $30 Secret to Banishing Ice Dams From Your Roof (Before They Destroy It) — Learn safe and effective methods to remove ice dams from your roof and prevent costly damage to your home's structure and interior.
- The $30 Secret to Banishing Ice Dams Without Damaging Your Roof — Discover how a simple, inexpensive trick can safely eliminate dangerous ice dams from your roof and prevent costly damage to your home.
- The $20 Trick That Melts Ice Dams (and Saves Your Roof) — Discover a surprisingly simple, budget-friendly method to safely remove ice dams and prevent costly roof damage to your home.
- The #1 Overlooked Reason Your Chimney Leaks (It Rots Your Roof!) — Discover the surprising, often-missed culprit behind your leaky chimney and how this common issue can silently damage your home.
Get the print-ready PDF of this guide
A clean, ad-free, printable version you can keep on your phone or pin to the workshop wall. Free with a FixlyGuide account.
- Print-optimized layout
- Tools, materials & every step included
- Saved to your account
Recommended for DIYers & woodworkers
Sponsored
The Top 20 Tools for Workshops of Any Budget
No stationary machines or power tools required — plus 3 fundamental tools that can't be bought at any price.
Get the free guide
Ted's Woodworking — The #1 Woodworking Resource
Detailed instructions, dimensioned drawings, materials & cutting lists, and 3D schematics for every skill level.
See the plansSponsored: links above are affiliate links. FixlyGuide may earn a commission on qualifying purchases — at no extra cost to you.
Frequently asked questions
What causes ice dams on a roof?+
Ice dams form when heat from your home escapes into the attic, warming the roof deck and melting snow. This meltwater then refreezes as it reaches the colder eaves, forming a barrier that traps more water behind it.
Is rock salt safe to use on ice dams?+
No, rock salt (sodium chloride) is highly corrosive and can severely damage asphalt shingles, gutters, and the vegetation below your roof. Always use calcium chloride ice melt, which is gentler on materials.
Can I chip ice dams off my roof?+
Chipping ice dams with tools like hammers or shovels is strongly discouraged as it can cause significant damage to your shingles, gutters, and underlying roof structure, leading to costly leaks and repairs.
How can I prevent ice dams from forming?+
The most effective prevention involves ensuring your attic has adequate insulation and proper ventilation. This keeps the roof deck consistently cold, preventing snow from melting and refreezing unevenly. Sealing air leaks into the attic is also crucial.
When should I call a professional for ice dam removal?+
You should call a professional if ice dams are extensive, difficult or dangerous to reach, if you have a steep roof pitch, or if water is actively leaking into your home. Professionals have specialized steam equipment and safety gear to remove dams without damaging your roof.

Discussion
Loading comments…