
Tools & materials you'll need
Affiliate linksAs an Amazon Associate FixlyGuide earns from qualifying purchases — at no extra cost to you. Prices and availability are accurate as of publication and subject to change.
Quick Answer
Removing ice dams safely requires a two-pronged approach: first, clear the snow that feeds the dam using a roof rake from the safety of the ground. Second, create drainage channels through the ice dam itself using calcium chloride ice melt strategically placed in old pantyhose or socks. Never chip at ice dams with a shovel, chisel, or axe, as this almost guaranteed leads to roof damage and potential leaks. Avoid climbing onto a slippery roof, especially in freezing temperatures and icy conditions.
The Problem
Few winter sights are as alarming as a thick, glistening ice dam clinging to your eaves. These icy behemoths aren't just an aesthetic nuisance – they're a serious threat to your home's integrity. An ice dam forms when snow on your roof melts due to heat escaping from your attic or living space, then refreezes as it reaches the colder overhangs and gutters. This continuous cycle builds a wall of ice that prevents subsequent melting snow from draining off the roof. The trapped water then backs up, often under shingles and into your attic, walls, and ceilings. This can lead to costly water damage, stained ceilings, mold growth, compromised insulation, and even structural issues over time. Beyond the damage, the weight of a large ice dam can stress gutters and fascia, potentially tearing them right off your house. The danger of trying to remove them improperly – by climbing onto a slick, icy roof – is equally severe, leading to thousands of emergency room visits each year for falls.
How It Works
Understanding how ice dams form is crucial for effective prevention and removal. It all starts with uneven roof temperatures. During winter, heat from your home's interior, primarily from unsealed attic bypasses (like recessed lights, plumbing stacks, or attic hatches) or poorly insulated attics, rises and warms the underside of your roof deck. This heat conducts through the roofing materials, warming the snow on the upper parts of your roof. Even a few degrees above freezing is enough to melt the snow closest to the roof surface.
As this meltwater flows down the roof, it eventually reaches the eaves – the parts of the roof that extend beyond the exterior walls. These areas are much colder because they don't have conditioned living space directly beneath them and are exposed to the ambient outdoor temperature from both above and below. When the meltwater hits this frigid zone, it refreezes, forming a ridge of ice. As more snow melts and refreezes, this ridge of ice grows, creating a dam. Once the dam is established, water from subsequent melting snow collects behind it. This ponded water has nowhere to go. Under gravitational pressure and capillary action, it can seep under your shingles, through nail holes, and down into your attic, wall cavities, and eventually your ceilings. The process repeats as long as there's snow on the roof and a temperature differential between the main roof and the eaves, leading to the rapid growth of large, destructive ice dams.
Step-by-Step Fix
1. Prioritize Safety First — *Before doing anything else, assess the conditions.
- Stay Grounded: Never climb onto a snow-covered or icy roof. The risk of falls is extremely high and can result in serious injury or death.
- Identify Hazards: Note any power lines near the eaves. Maintain at least a 10-foot distance from power lines with any tools.
- Work with a Partner: If possible, have someone else present who can assist or call for help if needed.
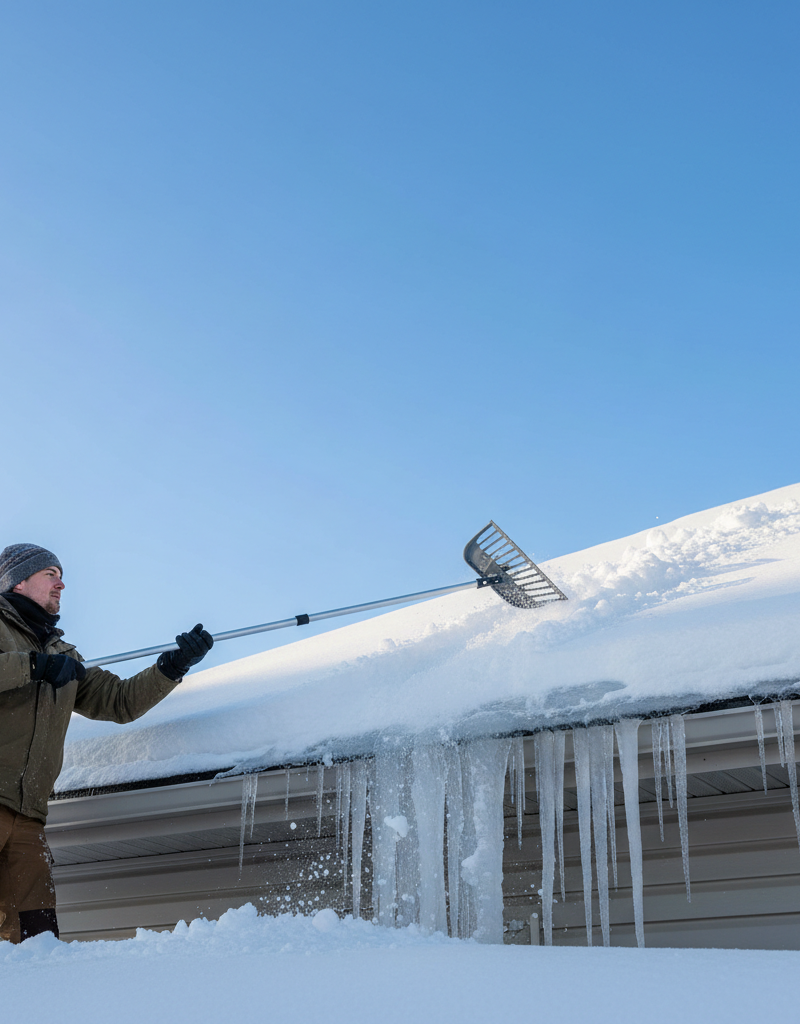
2. Clear Snow with a Roof Rake — *Remove the fuel for the ice dam.
- Gather Your Tools: You'll need a lightweight, long-handled roof rake, preferably one with rollers or soft edges to protect shingles.
- Work from the Ground: Stand on a stable surface, like your driveway or a patio, never on a ladder unless absolutely necessary and properly secured.
- Remove Snow Safely: Gently pull snow down from the roof, focusing on the lower 3–6 feet, extending up from the eaves where the ice dam has formed. Clear the snow around the dam, but do not try to chip at or remove the ice dam itself with the rake.
- Keep Gutters Clear: If reachable, carefully remove any large chunks of snow or ice from your gutters with gloved hands to aid drainage once the dam melts.
3. Prepare Calcium Chloride Channels — *Create pathways through the ice.
- Choose the Right Melt: Use calcium chloride ice melt, not rock salt (sodium chloride), which can damage roofs, plants, and concrete. Avoid products with urea as the primary ingredient, as they are less effective.
- Gather Soft Containers: Find old pantyhose, tube socks, or pillowcases. These will hold the ice melt and prevent direct contact with the roof or gutters, reducing potential damage.
- Fill the Containers: Pour 1–2 cups of calcium chloride crystals into each container. Tie a knot at the end to secure the crystals.
4. Position the Ice Melt — *Strategically place the pantyhose to melt tunnels.
- Ladder Safety: If using a ladder for placement, ensure it's securely set on firm, level ground, extended at least 3 feet above the eaves, and angled correctly. Have a spotter if possible.
- Place Perpendicularly: Carefully lay the filled pantyhose across the ice dam, so they run from the gutter edge up onto the roof above the dam. Space them about 2–3 feet apart. The idea is to melt channels through the dam, allowing trapped water to drain.
- Avoid Overuse: Don't apply large quantities of loose ice melt directly to the roof or gutters. This can cause staining, prematurely age shingles, or damage metal components.
5. Monitor and Repeat (If Necessary) — *Observe the melting process.
- Allow Time: The ice melt will gradually create channels. This can take several hours, or even a day, depending on the thickness of the ice dam and outdoor temperatures.
- Check Drainage: Once channels appear, ensure water is actively draining through them and off the roof. You may need to gently clear accumulated snow or ice from the base of the channels at ground level periodically.
- Reapply if Needed: If the dam is particularly thick or new snow falls, you might need to reposition existing pantyhose or place additional ones.
6. Consider Long-Term Solutions — *Address the root cause of ice dams.
- Improve Attic Insulation: Ensure your attic has adequate insulation (R-49 to R-60 in most cold climates) to prevent heat from escaping into the attic space.
- Seal Air Leaks: Caulk and seal all penetrations into your attic from the living space below (e.g., around light fixtures, plumbing vents, electrical boxes, and attic hatches) to stop warm air from entering the attic.
- Enhance Attic Ventilation: Proper attic ventilation (balanced intake and exhaust vents) creates a continuous airflow that keeps the attic space cold, matching the outdoor temperature. This prevents the snow on the roof from melting prematurely.
- Gutter Maintenance: Keep gutters clean of leaves and debris throughout the year to ensure they can drain properly when meltwater flows into them.
Common Causes
- Poor Attic Insulation: This is the most prevalent cause. Inadequate insulation allows heat from your living space to readily transfer into the attic, warming the roof deck above freezing. Building codes and standards have evolved, and many older homes simply lack the R-value needed for modern energy efficiency and ice dam prevention.
- Air Leaks into Attic: Even with good insulation, warm air can bypass it through unsealed gaps. Common culprits include unsealed penetrations around chimneys, plumbing vents, electrical conduits, recessed lighting, attic hatches, and gaps where walls meet the attic floor. This 'convective heat transfer' is highly effective at warming specific areas of the roof.
- Inadequate Attic Ventilation: Proper ventilation is crucial for keeping your attic cold, ideally at ambient outdoor temperatures. A lack of balanced intake (soffit) and exhaust (ridge, gable, or static) vents means warm, moist air gets trapped in the attic, warming the roof deck and melting snow.
- Clogged Gutters: While not a direct cause of the initial ice dam formation, clogged gutters exacerbate the problem. Debris-filled gutters can hold standing water, providing a starting point for ice to build up and creating a larger, more persistent dam once meltwater arrives.
- Sudden Temperature Fluctuations: Periods of heavy snowfall followed by a brief warm-up, and then a rapid drop in temperature, create ideal conditions for ice dam formation even on well-insulated and ventilated homes. The initial melt creates water that refreezes quickly.
- Snow Accumulation: Simply put, heavy snow loads provide more material for ice dams to form. The deeper the snow, the more potential meltwater can accumulate behind a dam.
Common Mistakes
- Chipping, Hacking, or Pounding Ice Dams: This is the most damaging mistake. Using axes, shovels, chisels, or hammers directly on an ice dam will inevitably damage roof shingles, gutters, and underlying roof decking. This creates points of entry for future leaks, even after the ice dam is gone. You could also accidentally strike hidden electrical wiring or plumbing.
- Using Rock Salt (Sodium Chloride): Standard rock salt is highly corrosive and can damage asphalt shingles, corrode metal gutters, harm surrounding vegetation (shrubs, grass), and pit concrete walkways. Always use calcium chloride, which is safer for these materials.
- Applying Hot Water: While seemingly intuitive, pouring hot water on an ice dam is a temporary fix at best. The water will quickly refreeze, potentially creating a new, larger, and more dangerous ice layer. It also creates a slip hazard around your home and can overwhelm your gutters with rapid melt, potentially causing further issues.
- Climbing on an Icy Roof: This poses an extreme risk of falling and serious injury. Slippery roofs, especially when covered in snow and ice, are not safe to walk on. Always work from the ground using a roof rake or a securely stabilized ladder for placing ice melt.
- Ignoring the Root Cause: Simply removing ice dams without addressing the underlying issues (like poor insulation or ventilation) is a continuous battle. The dams will simply reform with the next snowfall, leading to recurring damage and effort.
- Using Heating Cables Improperly: While roof heating cables can prevent ice dams, improper installation or leaving them on continuously can be a fire hazard and lead to very high electricity costs. They are a band-aid solution, not a fix for the underlying heat loss problem, and should be installed by a professional.
Cost & Time Breakdown
| Task | DIY cost | Pro cost | Time |
|---|---|---|---|
| Roof rake & ice melt | $40–$100 | N/A | 1–2 hours |
| Attic insulation upgrade | $500–$2,000 | $1,500–$5,000+ | 1–3 days |
| Seal attic air leaks | $20–$100 | $200–$600 | 2–4 hours |
| Improve attic ventilation | $100–$500 | $500–$2,000+ | 1 day |
| Professional ice dam removal* | N/A | $500–$3,000+ | 2–8 hours |
*Note: Professional ice dam removal typically uses steam, which is the safest and most effective method for large or stubborn dams without damaging the roof.
Tips & Prevention
- Clear Snow Promptly: After a substantial snowfall (4-6 inches or more), use a roof rake to remove snow from the lower 3-6 feet of your roof. This is the single most effective proactive measure a homeowner can take.
- Regular Attic Check-up: Annually, typically in early fall, inspect your attic. Look for signs of moisture, mold, or areas where insulation is compressed or missing. Check for unsealed gaps where light or air might be entering from below.
- Ensure Balanced Ventilation: Make sure soffit vents (intake) are not blocked by insulation and that ridge/gable vents (exhaust) are clear. Good airflow is key to a cold attic.
- Maintain Gutters: Keep gutters and downspouts free of leaves, twigs, and other debris throughout the year. Clogged gutters can contribute to ice dam formation and cause water to overflow.
- Seal and Insulate Attic Hatch: Your attic hatch or pull-down stairs can be a huge source of heat loss. Weatherstrip and insulate it properly to create an airtight seal.
- Watch for Warning Signs: Be vigilant for icicles forming beyond the edge of your gutters (a sign of water escaping), water stains on interior ceilings, or unusually warm spots on your roof during winter.
- Consider a Professional Energy Audit: If ice dams are a persistent problem, a home energy auditor can pinpoint exact areas of heat loss using thermal imaging, providing targeted solutions.
When to Call a Professional
While DIY ice dam removal for smaller dams is manageable, there are distinct situations when calling a professional is not just advisable, but essential. If a large ice dam has already formed and is causing significant water intrusion into your home (evidenced by ceiling stains, dripping water, or wet insulation in the attic), the immediate priority is to stop the water damage. Professionals use specialized steam equipment that safely cuts through ice dams without damaging your roof, a method far superior to any DIY approach for large dams. If the dam is so large that it's stressing your gutters, causing them to pull away from your fascia, or if you notice structural cracking, a pro can assess the weight load and safely mitigate the issue. Lastly, if your roof pitch is very steep, or if the dam is in an area that is difficult or unsafe to reach from the ground with a roof rake or a properly secured ladder, avoid the risk of injury and contact a licensed and insured ice dam removal specialist. Look for companies that explicitly state they use steam removal, as this is the safest method for your roofing materials.
Related Articles
Keep troubleshooting with these hand-picked guides from FixlyGuide:
- The $30 Trick to Melting Ice Dams (Before They Destroy Your Roof) — Discover how to safely remove ice dams from your roof instantly with common household items, preventing costly damage. Stay safe while tack…
- The #1 Mistake Homeowners Make with Ice Dams (and How to Fix It SAFELY) — Most homeowners approach ice dam removal incorrectly, creating more damage or safety risks. Learn the right, safe methods to protect your r…
- The $30 Secret to Banishing Ice Dams Without Damaging Your Roof — Discover how a simple, inexpensive trick can safely eliminate dangerous ice dams from your roof and prevent costly damage to your home.
- The $20 Trick That Melts Ice Dams (and Saves Your Roof) — Discover a surprisingly simple, budget-friendly method to safely remove ice dams and prevent costly roof damage to your home.
- The 3 Hidden Reasons Your Roof Gets Ice Dams (and the Only Safe Way to Remove Them) — Discover the real causes of ice dams and the safest, most effective methods for removal, preventing costly roof and water damage this winte…
- The #1 Mistake Homeowners Make After Finding Missing Shingles (And How to Fix It Right) — Discover the crucial steps to take after a storm rips shingles from your roof, ensuring a proper, lasting repair and preventing costly futu…
Recommended for DIYers & woodworkers
Sponsored
The Top 20 Tools for Workshops of Any Budget
No stationary machines or power tools required — plus 3 fundamental tools that can't be bought at any price.
Get the free guide
Ted's Woodworking — The #1 Woodworking Resource
Detailed instructions, dimensioned drawings, materials & cutting lists, and 3D schematics for every skill level.
See the plansSponsored: links above are affiliate links. FixlyGuide may earn a commission on qualifying purchases — at no extra cost to you.
Frequently asked questions
Is it safe to chip away at ice dams?+
No, it is extremely dangerous and almost guaranteed to damage your roof. Using tools like shovels, axes, or chisels to chip at ice dams can break or crack shingles, dent gutters, and create pathways for future water leaks. It also poses a high risk of slipping and falling from the roof.
What kind of ice melt should I use on my roof?+
Always use calcium chloride ice melt. Avoid rock salt (sodium chloride) as it can corrode metals, damage shingles, and harm plants. Calcium chloride is less corrosive and more effective at lower temperatures, making it safer for your roof and surrounding landscaping.
Can ice dams be prevented?+
Yes, prevention is key. The most effective methods involve improving attic insulation to prevent heat loss through the roof, sealing air leaks from your living space into the attic, and ensuring proper attic ventilation to keep the roof deck cold. Regularly clearing snow from the lower portion of your roof with a roof rake also helps significantly.
When should I call a professional for ice dam removal?+
You should call a professional if the ice dam is very large, causing significant water damage or structural stress, if your roof is too steep or unsafe to access, or if you prefer to avoid the risks and effort of DIY removal. Professionals use specialized steam equipment for safe and effective removal.
Why do ice dams form?+
Ice dams form when heat escapes from your home's interior into the attic, warming the snow on the main part of the roof, causing it to melt. As this meltwater flows down to the colder eaves (overhangs), it refreezes, creating a ridge of ice that blocks further drainage. This trapped water then backs up under shingles and can leak into your home.


Discussion
Loading comments…