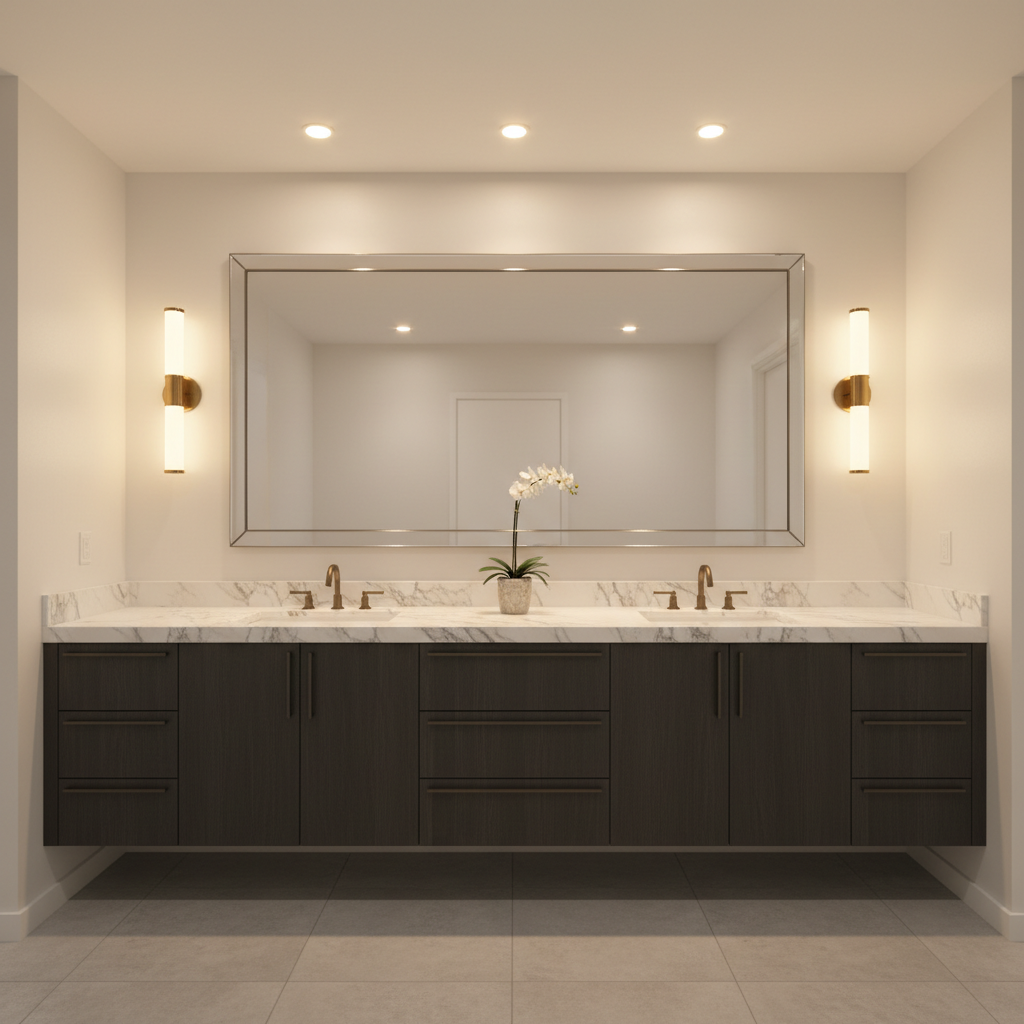
- Installing only downlights: Relying solely on recessed cans, especially over the vanity, creates the dreaded "monster lighting" effect, casting deep shadows under your eyes, nose, and chin.
- Placing vanity lights too high or too wide: Mounting sconces too high or too far apart fails to properly illuminate the sides of your face, undermining the entire purpose of task lighting.
- Ignoring the CRI: Choosing bulbs with a low Color Rendering Index (below 80) will make colors look dull and inaccurate. Your makeup might look perfect in the bathroom, but completely wrong in natural daylight.
- Forgetting a shower light: A dark shower is a safety hazard and feels claustrophobic. Failing to install a wet-rated light here is a major missed opportunity for a functional upgrade.
- Using the wrong type of dimmer: Not all dimmers are compatible with LED fixtures. Using an older incandescent dimmer with LEDs will often result in flickering, buzzing, and a dramatically shortened bulb lifespan.
General remodeling · Renovation planning
| Project category | General remodeling |
|---|---|
| Problem type | Renovation planning |
| Trade required | General contracting |
| Urgency | Planned project |
| Safety risk | Low safety risk |
| DIY suitability | Pro recommended |
| Cost category | Major investment |
| Typical timeline | Design and permitting often 2–4 months before work starts |
| Contractor type | General contractor |
Repair option
Phase the work and fix the building envelope first.
Replacement option
Full renovation with permits, design, and a general contractor.
Common causes
- Space no longer fits how the household lives
- Resale preparation
- Deferred maintenance stacking up
Relevant tools:project cost estimatorcompare quoteshome improvement material prices
Published June 20, 2026Last updated August 17, 2026
Tools & materials you'll need
Affiliate linksAs an Amazon Associate FixlyGuide earns from qualifying purchases — at no extra cost to you. Prices and availability are accurate as of publication and subject to change.
Quick Answer
A successful bathroom lighting plan layers three types of light: ambient (general illumination), task (for grooming), and accent (to highlight features). For the most functional and flattering light, combine ceiling fixtures, vanity sconces mounted at face height, and shower-rated lights, paying close attention to color temperature (3000K-4000K), CRI (90+), and dimmers for full control.
The Problem
That single, sad-looking fixture centered on your bathroom ceiling is a relic of outdated design, and it's failing you in multiple ways. It casts harsh, unflattering shadows down your face, making everyday grooming tasks like shaving or applying makeup a game of guesswork. This "shadow-casting" effect is often the primary reason you look tired or drawn-out in the mirror—it's not you, it's the bad lighting. Furthermore, a single light source creates a room with unevenly lit zones: a bright glare in the center and dim, murky corners. This is especially dangerous in a wet environment like a bathroom, where poor visibility can lead to slips and falls. Finally, without proper task lighting around the vanity, you're forced to lean in awkwardly, straining to see, which can lead to everything from an uneven shave to poorly blended makeup. A poorly lit bathroom isn't just a cosmetic issue; it's a functional and safety hazard.
How It Works (150-250 words)
A layered bathroom lighting plan treats the room like a stage, using different light sources to fulfill distinct roles, creating a space that is both beautiful and highly functional. This strategy is built on three core layers. First is Ambient Light, the room's general, overall illumination. This is your foundational layer, often provided by a central ceiling fixture, recessed cans, or a flush mount. It fills the room, bounces off surfaces, and makes the space navigable. Second, and most crucial for a bathroom, is Task Light. This is the focused, bright light you need for grooming. The key here is to illuminate your face from the front, not from above. This is achieved with vertical fixtures or sconces on either side of the mirror, mounted at face level to eliminate shadows. The third layer is Accent Light (and its cousin, decorative light). This layer adds depth and character. It could be a small recessed light aimed at a piece of art, LED strips tucked into a cove, or a stylish chandelier. By combining these layers and controlling them with dimmers, you gain complete command over the mood and function of your bathroom—from a bright, energizing space for your morning routine to a warm, spa-like retreat in the evening. The secret is not more light, but smarter light.
Step-by-Step
1. Map Your Layers — Before you buy a single fixture, grab a pencil and paper. Sketch your bathroom's layout, including the vanity, toilet, and shower/tub. Mark where you need each of the three layers: Ambient (the main circulation paths), Task (the vanity), and Accent (any architectural features or dark corners). For a 5' x 8' bathroom, a common plan is one central ambient fixture, two vanity sconces for task lighting, and one or two recessed cans for the shower/tub zone.
2. Select Ambient Fixtures — For your general lighting, choose a fixture that complements your ceiling height and room size. A decorative flush-mount or semi-flush-mount fixture works well for standard 8-foot ceilings. For taller ceilings, you might consider a small chandelier or pendant. Alternatively, a grid of 4-inch recessed LED cans can provide excellent, evenly distributed ambient light. Plan for approximately 1 watt of LED light per square foot for this layer.
3. Position Vanity Task Lighting — This is the most critical step for flattering light. The goal is to cross-illuminate your face, erasing shadows. Install vertical sconces on the walls flanking your mirror. The center of each fixture should be roughly at eye level, which is typically 60-66 inches from the finished floor. They should also be about 30-36 inches apart to cast even light across your whole face. If wall space is a limitation, a single horizontal fixture mounted above the mirror is a secondary option, but aim for one that's at least 24 inches wide to avoid casting shadows under your chin.
4. Choose Shower & Tub Lighting — Lighting your shower or tub area is a must for safety and functionality. You absolutely must use fixtures specifically rated for wet or damp locations. Look for UL-rated "Wet Location" recessed cans. A single 4-inch or 6-inch can with a frosted or lensed trim is usually sufficient for a standard shower stall. Position it towards the back wall to illuminate your body and the plumbing controls, not directly overhead where you'll be standing.
5. Pick the Right Bulbs — The fixture is only half the story. For the most accurate color rendering, critical for makeup application and judging skin tone, select LED bulbs with a Color Rendering Index (CRI) of 90 or higher. For color temperature, aim for a neutral to cool white, between 3000K and 4000K. Anything lower will feel yellow and dingy; anything higher will feel like a sterile, clinical environment. Most modern LED fixtures have these specs listed clearly on the box.
6. Install Dimmers on Everything — Control is key. Install separate dimmer switches for each lighting layer (ambient, vanity, shower). This allows you to adjust the intensity for any situation. You can have bright, invigorating light for your morning routine, then dim the vanity and ambient lights down to a soft, relaxing glow for a bath. Use dimmers specifically rated for LED bulbs to avoid flickering or humming.
7. Run New Wiring (The Hard Part) — SAFETY FIRST: Before starting any electrical work, shut off the power to the bathroom at the circuit breaker. Confirm the power is off using a non-contact voltage tester. Running new wiring for sconces or recessed lights will likely involve cutting into drywall. You'll need to run new 14/2 NM-B (Romex) electrical cable from your switch box location or a suitable power source to each new fixture location. This requires knowledge of local electrical codes, including how to properly secure cables and use approved electrical boxes.
8. Cut Holes & Mount Fixtures — For recessed lights, use the provided template to trace the opening on your ceiling and cut it out with a drywall saw. For sconces, you'll need to install an electrical junction box securely anchored to a wall stud. Follow the manufacturer's instructions to wire and mount each fixture. Make all connections securely with wire nuts (e.g., connect white wires to white, black to black, and the bare copper ground to the fixture's ground screw).
9. Patch, Prime, and Paint — After the wiring and fixtures are in place, you'll have some drywall repair to do. Patch any holes you made, sand the patches smooth, prime them, and then paint your ceiling and walls. This is the finishing touch that makes the new fixtures look like they've always been there.
10. Final Test and GFCI Check — Turn the power back on at the breaker. Test each fixture and dimmer switch. It's crucial that all outlets and lighting circuits in a bathroom are protected by a Ground-Fault Circuit Interrupter (GFCI). This is often handled by a GFCI outlet at the beginning of the circuit or a GFCI breaker. Test the GFCI by pressing the "TEST" button (the circuit should de-energize) and then "RESET".
Common Mistakes
- Installing only downlights: Relying solely on recessed cans, especially over the vanity, creates the dreaded "monster lighting" effect, casting deep shadows under your eyes, nose, and chin.
- Placing vanity lights too high or too wide: Mounting sconces too high or too far apart fails to properly illuminate the sides of your face, undermining the entire purpose of task lighting.
- Ignoring the CRI: Choosing bulbs with a low Color Rendering Index (below 80) will make colors look dull and inaccurate. Your makeup might look perfect in the bathroom, but completely wrong in natural daylight.
- Forgetting a shower light: A dark shower is a safety hazard and feels claustrophobic. Failing to install a wet-rated light here is a major missed opportunity for a functional upgrade.
- Using the wrong type of dimmer: Not all dimmers are compatible with LED fixtures. Using an older incandescent dimmer with LEDs will often result in flickering, buzzing, and a dramatically shortened bulb lifespan.
- Neglecting code requirements: Bathrooms have strict electrical code requirements due to the presence of water. All fixtures in the shower/tub area must be wet-rated, and all circuits must be GFCI protected.
Cost & Time Breakdown
| Task | DIY Cost | Pro Cost | Time |
|---|---|---|---|
| Planning & Design | $0 | $150 - $400 | 2-4 hours |
| Vanity Sconces (2) | $150 - $500 | $450 - $1,000+ | 3-5 hours |
| Recessed Shower Can | $75 - $200 | $300 - $600 | 2-4 hours |
| Central Ambient Fixture | $100 - $400 | $250 - $700 | 2-3 hours |
| Wiring & Switches | $50 - $150 | $300 - $800 | 4-8 hours |
| Drywall Repair & Paint | $40 - $80 | $200 - $500 | 3-6 hours |
Tips & Prevention
- Use LEDs for everything: Modern LED fixtures and bulbs are the gold standard. They are incredibly energy-efficient, have long lifespans (often 15,000-50,000 hours), and offer the best range of color temperatures and high-CRI options.
- Put each layer on a separate switch: Wire your ambient, task, and shower lights to separate dimmer switches. This gives you maximum flexibility to tailor the light for the specific activity, whether it's a quick trip in the middle of the night or a detailed grooming session.
- Consider a toe-kick light: For a truly elevated plan, install a low-voltage LED strip light under your vanity cabinet. Controlled by a motion sensor, it provides the perfect low-level light for safe navigation at night without blinding you.
- Don't forget the mirror: If you're using a single light bar above the mirror, choose one that is at least 75% of the width of the mirror to ensure light spreads to the edges of your face.
- Think about bulb style: For exposed-bulb sconces, the look of the bulb matters. Consider vintage-style Edison LEDs for a classic look or frosted globe bulbs for a soft, diffused light.
When to Call a Professional
While replacing an existing fixture is a manageable DIY project for many, a complete bathroom lighting overhaul often crosses the threshold into pro territory. You should hire a licensed electrician if: you are not 100% comfortable working with electricity, if your project involves running new circuits from the main breaker panel, or if you need to move existing switch boxes. An electrician will ensure all work is done safely and up to local code, which is paramount in a wet environment like a bathroom. They can navigate complex wiring scenarios, properly ground all fixtures, and install the necessary GFCI protection. If your plan involves significant drywall removal and relocation of plumbing or ventilation, a general contractor may be needed to coordinate the various trades. The cost of hiring a pro is a small price to pay for the peace of mind that your bathroom is not only beautiful but also fundamentally safe.
What should this project cost?
Enter your project details for a realistic cost range before you call anyone.
Mid-range remodels commonly $12,000–$22,000; small repairs often under $600.
- Regional adjustment
- National average
- Labor share (typical)
- ~$5,603
- Quotes to collect
- 3 written estimates
Educational estimate based on national averages — not a binding quote. Always confirm with written local estimates.
Recommended for DIYers & woodworkers
Sponsored
The Top 20 Tools for Workshops of Any Budget
No stationary machines or power tools required — plus 3 fundamental tools that can't be bought at any price.
Get the free guide
Ted's Woodworking — The #1 Woodworking Resource
Detailed instructions, dimensioned drawings, materials & cutting lists, and 3D schematics for every skill level.
See the plansSponsored: links above are affiliate links. FixlyGuide may earn a commission on qualifying purchases — at no extra cost to you.
Frequently asked questions
What is the best color temperature for a bathroom?+
For vanity and general lighting, a color temperature between 3000K (soft white) and 4000K (cool white) is ideal. This range provides bright, clean light that renders colors accurately without being too harsh or clinical.
What is CRI and why is it important for bathroom lighting?+
CRI stands for Color Rendering Index. It's a scale from 0 to 100 that measures how accurately a light source reveals the true colors of objects. For tasks like applying makeup, a high CRI of 90 or above is essential for ensuring the colors you see in the mirror are the same as they appear in natural daylight.
How many lumens do I need for a bathroom?+
A good rule of thumb is to aim for a total of 70-80 lumens per square foot. For a standard 5'x8' bathroom (40 sq ft), you would need around 2,800-3,200 total lumens distributed across your different lighting layers (vanity, shower, ambient).
Can I put a normal light fixture in my shower?+
No, absolutely not. Any light fixture installed inside a shower or directly over a bathtub must have a specific UL "wet-location" rating. These fixtures are sealed to prevent water intrusion, which could cause a short circuit, an electrical fire, or a serious risk of electrocution.


Discussion
Loading comments…