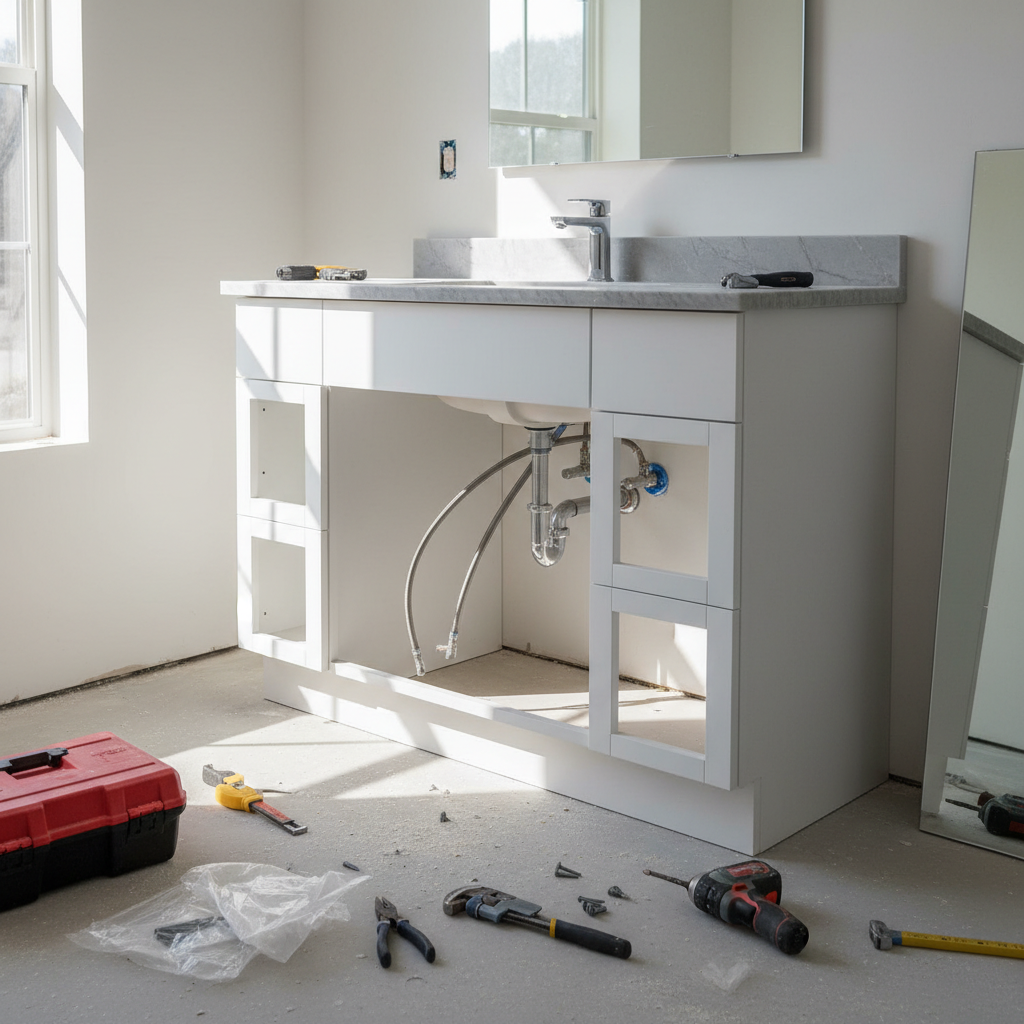
- Mismatching the Rough-In: Failing to measure the existing plumbing’s location (height and distance from the center) and buying a vanity that doesn’t align, forcing complicated and costly plumbing adjustments.
- Forgetting to Level: Skipping the critical step of leveling the cabinet with shims. This can lead to a wobbly vanity, improperly draining sink, and cabinet doors that won’t stay closed.
- Over-tightening Connections: Cranking down too hard on plastic P-trap nuts or supply line connections can crack the plastic or damage the rubber seals, ironically causing the very leaks you are trying to prevent.
- Skimping on Sealing: Not applying a proper bead of caulk around the countertop and backsplash, which allows water to seep behind the vanity, leading to wall damage and mold growth.
- Not Securing to Studs: Driving mounting screws only into drywall. The weight of the vanity top and sink requires the cabinet to be anchored firmly into wall studs to be safe and secure.
Bathroom · Bathroom remodel
| Project category | Bathroom |
|---|---|
| Problem type | Bathroom remodel |
| Trade required | General contracting |
| Urgency | Planned project |
| Safety risk | Low safety risk |
| DIY suitability | Pro recommended |
| Cost category | High cost |
| Typical timeline | Typically 2–4 weeks on site |
| Contractor type | Bathroom remodeler or licensed plumber |
Repair option
Refresh fixtures, grout, and vanity without moving plumbing.
Replacement option
Gut remodel when the pan leaks or the layout changes.
Common causes
- Dated finishes
- Failing tile or pan
- Accessibility needs
Relevant tools:project cost estimatorcompare quotes
Published June 20, 2026Last updated August 17, 2026
Tools & materials you'll need
Affiliate linksAs an Amazon Associate FixlyGuide earns from qualifying purchases — at no extra cost to you. Prices and availability are accurate as of publication and subject to change.
Replacing a bathroom vanity can feel like a monumental task, reserved for seasoned contractors. But what if a complete aesthetic and functional overhaul of your bathroom’s focal point was achievable in just a weekend? It is. This isn't just a distant dream for the ultra-handy; it's a concrete, step-by-step project that can dramatically elevate your space. From dealing with plumbing to perfectly leveling the new cabinet, we will walk through every detail, ensuring you have the confidence to tackle this transformative project. Forget the prolonged disruption and high cost of a full remodel; this single, high-impact upgrade can redefine your bathroom in just two days.
The Problem
An old bathroom vanity is more than just an eyesore; it can be a source of daily frustration and potential damage. The most obvious issue is aesthetics. Outdated styles—think cultured marble with shell-shaped sinks, golden oak cabinetry, or laminate countertops with peeling edges—can date your entire bathroom, making it feel tired and uninspired. Surface damage is also common: countertops can be stained, scratched, or cracked. The cabinet itself might be suffering from water damage, leading to warped wood, delaminating particleboard, and a musty smell that hints at mold or mildew growth underneath. Functionally, an old vanity is often a disaster. Inefficiently designed drawers and cabinets offer poor storage, contributing to countertop clutter. The sink might be too small, the faucet leaky, or the height uncomfortably low by modern standards. Beyond the visible, the plumbing underneath can be a ticking time bomb, with slow drains, corroded shutoff valves, and a P-trap that has seen better days, creating a constant risk of leaks that can damage your floor and subfloor.
How It Works
A bathroom vanity is a masterclass in functional design, brilliantly combining a sink basin, a countertop work surface, and concealed storage into a single, cohesive unit. At its core, the system operates on a simple principle: bringing fresh water in and sending used water out, all while hiding the necessary plumbing. The process begins at the wall, where two small pipes emerge: one for hot water and one for cold. These are connected to angle stops, or shutoff valves, which allow you to control the water flow to the faucet without turning off the main supply to the house. Flexible supply lines, typically made of braided steel for durability, run from these valves up to the underside of the faucet. The faucet itself is more than just a spout; it contains cartridges or valves that mix the hot and cold water to your desired temperature when you lift the handle. Once the water is used, it flows down through the sink's drain opening, which is sealed with plumber's putty to prevent leaks. This opening leads directly into the drain assembly, culminating in the P-trap. This curved pipe, shaped quite literally like the letter "P" on its side, is a crucial component. It holds a small amount of water at all times, creating a seal that blocks sewer gases from rising up the drain and into your bathroom. From the P-trap, a tailpiece connects to the main drain line hidden in the wall, carrying the waste water away. The cabinet itself provides the structural support for the countertop and sink, which can weigh over 100 pounds, and must be perfectly level and securely fastened to the wall to function correctly.
Step-by-Step
SAFETY FIRST: Before starting any work, shut off the main water supply to the bathroom. You will typically find two small handles (angle stops) under the sink, one for hot and one for cold. Turn them clockwise until they are snug. Open the faucet to drain any residual water from the lines. For safety, also place a bucket and towels under the work area to catch any spills.
-
Clear and Disconnect — Begin by completely emptying the vanity cabinet and clearing the countertop. Place a bucket directly under the P-trap. Using channel-lock pliers, loosen the two large slip nuts connecting the P-trap to the sink's tailpiece and the drain line at the wall. A small amount of water will spill out; this is normal. Once disconnected, set the P-trap aside.
-
Disconnect Water Lines — With the drain free, use an adjustable wrench to disconnect the hot and cold water supply lines from the shutoff valves. Have a small towel ready to catch any drips. If the faucet is old, you may need to use two wrenches: one to hold the valve and one to turn the nut on the supply line to prevent straining the pipe in the wall.
-
Cut the Caulk Seal — The vanity top is usually sealed to the wall with a bead of silicone caulk to prevent water from splashing behind it. Use a utility knife to carefully slice through this caulk line along the top of the backsplash and down the sides. Be patient and apply steady pressure to avoid scratching the wall paint excessively.
-
Remove the Old Vanity — Look inside the cabinet for screws securing it to the wall, typically located along a wooden rail at the back. Use a drill or screwdriver to remove these screws. Some vanities are also glued to the floor or wall. If it doesn’t budge, you may need to gently but firmly pry it away from the wall using a pry bar, with a small piece of wood to protect the wall from damage. Once free, lift the old vanity out and away.
-
Prep the Area — With the old vanity removed, you have a blank slate. This is the perfect time to clean the floor and wall where the old unit stood. You may need to do minor wall repairs, such as patching holes from the old mounting screws and touching up the paint, especially if the new vanity has a different footprint.
-
Position the New Cabinet — Bring the new vanity cabinet (without the top) into the bathroom and place it in position. Use a 4-foot level to check for levelness both front-to-back and side-to-side. If it’s not level, use wood shims to raise the low corners until the bubble is perfectly centered. This step is critical; a non-level vanity can cause the sink to drain improperly and doors to swing open.
-
Secure the Cabinet — Once the cabinet is perfectly level, secure it to the wall. Locate the wall studs using a stud finder. Drive 2.5-inch or 3-inch cabinet screws through the back rail of the vanity and into at least two studs. This provides a rock-solid installation. If you can only hit one stud, use heavy-duty drywall anchors for the other attachment points.
-
Install Faucet and Top — It is much easier to install the faucet onto the new vanity top before you place the top on the cabinet. Follow the manufacturer’s instructions to mount the faucet and drain assembly to the new sink top. Once assembled, apply a continuous bead of silicone adhesive along the top edge of the vanity cabinet, then carefully lower the top into place, pressing down firmly.
-
Connect New Plumbing — From underneath, connect the new faucet’s hot and cold supply lines to the shutoff valves, tightening them snugly with a wrench. Install the new P-trap, ensuring all slip nuts are tight but not over-torqued (hand-tight plus a quarter turn with pliers is usually sufficient). Run a thin bead of silicone caulk along the backsplash where it meets the wall.
-
Test for Leaks — Turn the water back on at the shutoff valves. Open the faucet and let the water run for a few minutes, first hot, then cold. While it’s running, carefully inspect every connection point for leaks: the supply lines at the valves, the supply lines at the faucet, and every joint on the P-trap assembly. Use a dry paper towel to wipe each joint, which will make even the smallest drip visible. Fill the sink completely and then release the stopper, watching the drain assembly closely as the large volume of water passes through.
Common Mistakes
- Mismatching the Rough-In: Failing to measure the existing plumbing’s location (height and distance from the center) and buying a vanity that doesn’t align, forcing complicated and costly plumbing adjustments.
- Forgetting to Level: Skipping the critical step of leveling the cabinet with shims. This can lead to a wobbly vanity, improperly draining sink, and cabinet doors that won’t stay closed.
- Over-tightening Connections: Cranking down too hard on plastic P-trap nuts or supply line connections can crack the plastic or damage the rubber seals, ironically causing the very leaks you are trying to prevent.
- Skimping on Sealing: Not applying a proper bead of caulk around the countertop and backsplash, which allows water to seep behind the vanity, leading to wall damage and mold growth.
- Not Securing to Studs: Driving mounting screws only into drywall. The weight of the vanity top and sink requires the cabinet to be anchored firmly into wall studs to be safe and secure.
- Ignoring the Shutoff Valves: Assuming the old angle stops will work perfectly. It’s common for old valves not to close completely or to leak once disturbed. It's best practice to replace them while the water is off.
Cost & Time Breakdown
| Task | DIY Cost Estimate | Professional Cost Estimate | Time Estimate |
|---|---|---|---|
| Vanity Removal & Disposal | $20 - $50 | $150 - $250 | 1 - 2 hours |
| New Vanity & Top Purchase | $200 - $1,500+ | $200 - $1,500+ | Varies (Shopping) |
| Faucet & Plumbing Parts | $75 - $400 | $75 - $400 | Varies (Shopping) |
| Installation & Leveling | $30 (Shims/Tools) | $300 - $600 | 3 - 5 hours |
| Plumbing Hookup | $0 | $200 - $400 | 1 - 2 hours |
| Totals | $325 - $2,000+ | $925 - $3,200+ | 1-2 Days (Weekend) |
Tips & Prevention
- Buy an All-in-One Kit: Many home improvement stores sell vanity kits that include the cabinet, countertop/sink, and sometimes even the faucet. This is often the most cost-effective solution and eliminates compatibility issues.
- Dry Fit Everything: Before securing anything, place the new cabinet and top in position to check for any obstructions or alignment issues with plumbing and walls.
- Take Photos Before: Before disconnecting a single pipe, take several clear photos of the existing plumbing setup. This can be an invaluable reference if you get confused during reassembly.
- Use Braided Steel Supply Lines: If your old vanity has rigid or plastic supply lines, upgrade to new braided stainless steel lines. They are more durable, flexible, and less prone to bursting.
- Replace the Shutoff Valves: Since you
What should this project cost?
Enter your project details for a realistic cost range before you call anyone.
Common repairs run $150–$650; repipes and water-heater replacements reach $1,500–$4,500.
- Regional adjustment
- National average
- Labor share (typical)
- ~$754
- Quotes to collect
- 3 written estimates
Educational estimate based on national averages — not a binding quote. Always confirm with written local estimates.
Get the print-ready PDF of this guide
A clean, ad-free, printable version you can keep on your phone or pin to the workshop wall. Free with a FixlyGuide account.
- Print-optimized layout
- Tools, materials & every step included
- Saved to your account
Recommended for DIYers & woodworkers
Sponsored
The Top 20 Tools for Workshops of Any Budget
No stationary machines or power tools required — plus 3 fundamental tools that can't be bought at any price.
Get the free guide
Ted's Woodworking — The #1 Woodworking Resource
Detailed instructions, dimensioned drawings, materials & cutting lists, and 3D schematics for every skill level.
See the plansSponsored: links above are affiliate links. FixlyGuide may earn a commission on qualifying purchases — at no extra cost to you.
Frequently asked questions
Do I need to turn off the main water to my house?+
Not usually. You should be able to shut off the water using the angle stop valves located directly under the sink. However, if these valves are old, frozen, or leaky, you may need to shut off the main water supply to the entire house to safely replace the valves before proceeding.
What if my new vanity's plumbing doesn't line up with the wall pipes?+
This is a common issue. For the drain, you can use flexible or offset tailpiece extenders to bridge minor gaps. For the water supply lines, longer braided steel lines offer plenty of flexibility. For major misalignments, you may need to open the wall and have a plumber move the pipes, which is a more advanced project.
How do I deal with the wall behind the old vanity being unfinished or damaged?+
This is a great opportunity for a mini-upgrade. If the new vanity's footprint is different, you will need to patch any holes, sand, prime, and paint the wall. You could also consider installing a tile backsplash or beadboard paneling for a more custom and durable finish.
Can I reuse my old faucet and P-trap?+
You can, but it's often not recommended. A new vanity is a chance for a fresh start. New faucets are more efficient and P-traps are inexpensive. Re-installing an old faucet can be difficult and old drain parts may be brittle and prone to leaking when disturbed. It's usually worth the small extra cost to replace them.
Discussion
Loading comments…