Tools & materials you'll need
Affiliate linksNo materials required.
As an Amazon Associate FixlyGuide earns from qualifying purchases — at no extra cost to you. Prices and availability are accurate as of publication and subject to change.
Quick Answer
Yes, a bathroom vanity swap can add significant value to your home, often estimated around $2,000 for a minor bathroom remodel. The key is choosing a modern, quality vanity and ensuring the plumbing connections—specifically the P-trap, supply lines, and shut-off valves—are installed correctly and without leaks. This project is achievable in a weekend with basic tools and careful attention to detail.
The Problem
The bathroom vanity isn't just a piece of furniture; it's the functional and aesthetic centerpiece of the room. When it fails, it fails spectacularly. The most common culprit is an old, builder-grade cabinet made of medium-density fiberboard (MDF) or particleboard. Exposed to years of bathroom humidity, steam, and the inevitable occasional drips, this material swells, delaminates, and essentially turns back into sawdust held together by peeling vinyl wrap. You’ll see the damage first at the base, where mopping introduces moisture, and around the sink cutout.
Beyond material failure, an outdated vanity screams its age. Think 1980s golden oak, a seashell-shaped cultured marble top with integrated yellowing sinks, or brass and porcelain handles. These styles instantly date your entire home, detracting from its perceived value during an appraisal or showing. Functionally, these older units are often just a large, dark cabinet—a black hole where toiletries get lost. They lack the drawers and smart storage solutions of modern designs. A leaky P-trap, corroded shut-off valves, or a perpetually dripping faucet are not just annoyances; they are active threats, causing slow water damage to the cabinet interior and potentially the subfloor beneath. Replacing a tired, damaged, or simply ugly bathroom vanity is one of the highest-impact upgrades you can perform in a single weekend.
How It Works
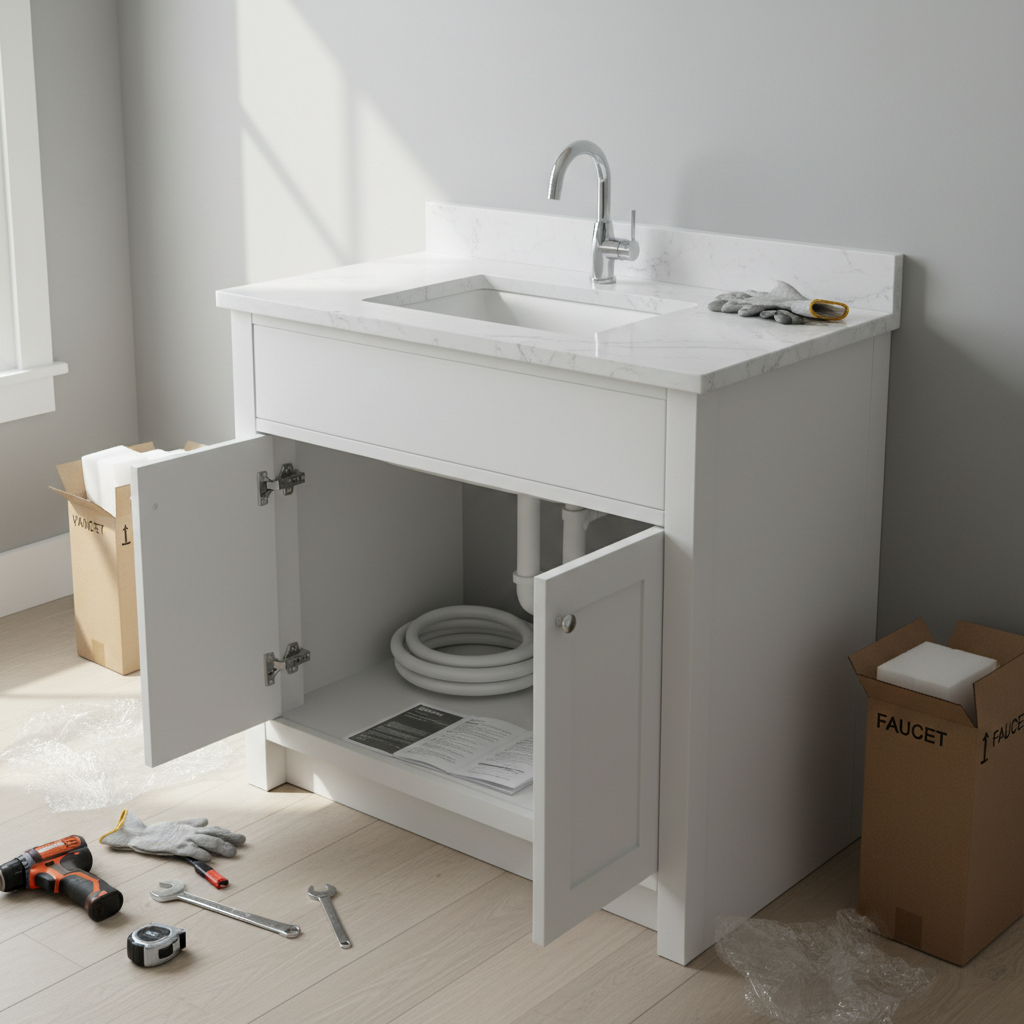
A bathroom vanity is a system of three integrated parts: the cabinet (the furniture), the countertop/sink (the worksurface), and the plumbing (the function). Understanding the plumbing is the key to a successful, leak-free installation. Water enters the system through two small pipes in your wall: one for hot, one for cold. These are connected to shut-off valves, also called angle stops. These small valves are your primary point of control, allowing you to stop the water flow to the sink without shutting off the entire house.
From these valves, flexible water supply lines (typically braided stainless steel for durability) run upward to connect to the faucet’s threaded tailpieces. When you turn the faucet handle, it opens an internal cartridge, allowing hot and cold water to mix and flow out the spout. Used water exits the sink through the drain opening, which is sealed by a flange and plumber's putty or a modern gasket. This drain connects to a tailpiece, which then flows into the P-trap. The P-trap is the crucial, U-shaped pipe under the sink. Its job is twofold: it physically traps debris to prevent clogs further down the line, and more importantly, it holds a plug of water at all times. This water plug acts as a vapor barrier, preventing unpleasant sewer gases from rising out of the drain and into your bathroom. From the P-trap, a straight arm connects to the sanitary drain stub-out in the wall, carrying the wastewater away.
Step-by-Step Fix
SAFETY: Always wear safety glasses, especially when working under the sink where debris can fall. When turning water back on, do so slowly to check for leaks before they become sprays.
-
Measure and Plan — Before you buy anything, measure everything. Use a tape measure to get the exact width, depth, and height of your existing vanity. Note the location of your water supply lines and drainpipe coming out of the wall. Measure from the floor to the center of the drainpipe and from the floor to the center of the water supply valves. Also, measure the distance between the hot and cold valves. Take this sheet of measurements and a few photos with you to the home improvement store. Choose a new vanity that fits your space and whose cabinet design won't interfere with your existing plumbing "rough-in." Standard vanity height is now 34-36 inches ("comfort height"), which is a noticeable upgrade from older 30-32 inch models.
-
Shut Off the Water — Clear everything out from under the old vanity. Locate the two oval or football-shaped handles for the shut-off valves. Turn them clockwise (righty-tighty) until they stop. Don't force them if they are stiff. Once closed, turn on the hot and cold taps of the faucet to release any remaining pressure and confirm the water is fully off. If the valves don't work or are corroded, you will need to shut off the main water supply to your entire house.
-
Disconnect the Plumbing — Place a bucket directly under the P-trap. Use channel-lock pliers to loosen the two large slip nuts on the trap—one connects it to the sink's vertical tailpiece, and the other connects it to the horizontal arm going into the wall. A small amount of water will spill out; this is normal. Next, use an adjustable wrench or basin wrench to disconnect the two water supply lines from the faucet’s threaded posts on the underside of the sink.
-
Remove the Old Vanity — Use a utility knife to carefully cut the caulk seal along the backsplash where it meets the wall. Inside the vanity cabinet, look along the top back rail for screws securing the unit to the wall. There are typically two to four of them driven into wall studs. Use a drill/driver to remove them. With the plumbing disconnected and screws removed, the vanity should be free. Gently pull it straight out from the wall. If the countertop was glued down with construction adhesive, you might need to use a pry bar between the cabinet and top to separate them first, or gently rock the entire unit to break the bond.
-
Prepare the Area — Now is your chance to create a clean slate. Scrape any old, remaining caulk off the wall with a putty knife. Clean the wall and floor thoroughly. You will likely find the wall behind the vanity is unpainted or scuffed. This is the perfect time to paint the area for a professional finish. Use spackle or joint compound to patch any holes in the drywall left by the old mounting screws or any accidental damage. Let it dry, sand it smooth, and prime before painting.
-
Set the New Vanity Cabinet — Carefully move the new vanity cabinet into position. Use a 24-inch level to check it for level side-to-side and front-to-back. If the floor is uneven, use wood or plastic shims under the cabinet to make it perfectly level. This is a critical step; an unlevel cabinet can cause the countertop to sit poorly and doors/drawers to swing open. Once level, use a stud finder to locate the studs in the wall behind the vanity and drive two or three 3-inch cabinet screws through the vanity's back support rail and into the studs to secure it firmly.
-
Install the Vanity Top and Faucet — If your vanity top is separate from the cabinet, do this step now. It is far easier to install the faucet and drain onto the top before it’s on the cabinet. Follow the manufacturer’s instructions. Typically, this involves feeding the faucet lines through the holes, tightening it from below, and installing the new drain flange and pop-up assembly. Once assembled, apply a continuous bead of 100% silicone caulk to the top edge of the vanity cabinet. With a helper, carefully lower the countertop onto the cabinet, pressing it down firmly into the silicone.
-
Connect the New Drain Plumbing — This is the most puzzle-like part of the job. Assemble your new P-trap kit. You will likely need to trim the sink tailpiece or the trap arm (the piece that goes to the wall) to get a perfect alignment. A hacksaw or PVC tubing cutter works well. The goal is a straight, un-strained connection. The rule is "measure twice, cut once." Connect all the pieces and hand-tighten the slip nuts. Then, give each nut a final quarter-turn with channel-lock pliers. Do not overtighten, as this will crack the plastic fittings.
-
Connect the New Water Supply Lines — We strongly recommend new, high-quality braided stainless steel supply lines. They are inexpensive insurance against future leaks. Ensure you have the correct length to reach from the shut-off valve to the faucet without sharp kinks. Connect the lines, remembering the plumbing mantra "hot on the left, cold on the right." The threads should turn easily by hand before you use a wrench for the final half-turn. The connection to the plastic faucet tails should be snug, but do not overtighten.
-
Check for Leaks — The moment of truth. Go back to the shut-off valves and turn the water on very slowly. As soon as you hear water flowing, stop and inspect every connection point (at the valve, at the faucet) with a dry paper towel and a flashlight. If all is dry, open the valves fully. Now, run the hot and cold water into the sink. Check the drain connections for leaks. Finally, close the sink drain, fill the basin completely, and then release the water. This large volume rush-tests all your P-trap connections for integrity.
-
Caulk and Finish — With a leak-free installation confirmed, it's time for the final touch. Apply a neat, consistent bead of kitchen-and-bath-grade silicone caulk where the backsplash meets the wall and anywhere the countertop touches a side wall. Use a caulk finishing tool or a wet finger to smooth the bead for a professional look. This prevents water from splashing down behind the cabinet. Re-install your cabinet doors and drawers if you removed them.
Common Causes
- Water Damage: The number one reason for replacement. Swollen, crumbling particleboard from a slow leak or high humidity.
- Outdated Aesthetics: A 1980s or 90s vanity with a cultured marble top and builder-grade oak finish instantly dates a bathroom.
- Chronic Leaks: A P-trap that needs constant re-tightening or corroded, dripping shut-off valves warrant a full replacement.
- Lack of Storage: A simple cabinet with no drawers is inefficient. Modern vanities offer superior, organized storage solutions.
- Preparing to Sell: A minor bathroom remodel, centered on a new bathroom vanity, offers one of the highest returns on investment for home improvement projects.
Common Mistakes
- Incorrect Measurements: Buying a beautiful vanity that is a half-inch too wide or whose drawer bank interferes with the existing drainpipe.
- Over-tightening Fittings: Cranking down on plastic P-trap nuts or the nuts on faucet tails will crack them, guaranteeing a leak. They need to be snug, not Herculean tight.
- Not Leveling the Cabinet: Failing to shim the base results in a wobbly vanity, misaligned doors, and stress on the countertop which could lead to cracking.
- Not Securing to Studs: Attaching the vanity only to drywall with anchors is not sufficient. It will feel loose and can pull away from the wall over time.
- Skipping the Pre-Install Faucet Assembly: Trying to install a faucet from underneath, crammed inside a dark vanity cabinet, is a recipe for frustration and scraped knuckles.
- Poor Caulking: A messy or incomplete caulk job not only looks bad but fails at its primary job: preventing water from getting behind the unit.
Cost & Time Breakdown
| Task | DIY Cost | Pro Cost | Time |
|---|---|---|---|
| New Vanity (Cabinet & Top) | $300 - $1,200 | Same | 1-3 hrs (shopping) |
| New Faucet | $75 - $350 | Same | 30 mins (shopping) |
| Plumbing Supplies (P-trap, lines) | $30 - $60 | Same | 15 mins (shopping) |
| Demolition & Disposal | $20 (dump fee) | $150 - $300 | 1-2 hours |
| Installation & Plumbing | $0 | $400 - $800 | 4-8 hours |
| Total | $425 - $1,630 | $975 - $2,730 | 1-2 Days |
Tips & Prevention
- Photo Documentation: Before you disconnect a single pipe, take several clear photos of the existing plumbing setup from different angles. It’s an invaluable reference.
- Choose Plywood Over Particleboard: When selecting a vanity, prioritize cabinets made from plywood over MDF or particleboard. Plywood holds up significantly better to moisture.
- Annual Valve Check: Once a year, gently turn your shut-off valves closed and then open again. This prevents them from seizing up from mineral deposits, ensuring they work when you need them most.
- Invest in a Basin Wrench: If you plan to do any amount of faucet work, this inexpensive, specialized tool is designed to reach the nuts in the tight space behind a sink.
- Keep a Drip Tray: For long-term peace of mind, place a small plastic tray or a cabinet mat on the bottom of your new vanity cabinet. It will immediately alert you to any slow drips before they can cause damage.
- Dry-Fit Everything: Before making any cuts to your new P-trap pipes, dry-fit all the pieces to ensure they line up perfectly without any tension or awkward angles.
When to Call a Professional
While a bathroom vanity swap is a manageable DIY project, there are clear signs you should call a licensed plumber. The most critical is dealing with the shut-off valves. If a valve is seized and won't turn, is corroded with visible mineral buildup, or continues to drip after being fully closed, it must be replaced. This process often involves a propane torch to sweat off the old valve and solder on a new one, or specialized tools for compression fittings. Getting this wrong can result in a catastrophic flood. Furthermore, if you discover the wall or subfloor behind or under the old vanity is soft, black, or rotted from a previous long-term leak, a carpenter or contractor should assess the structural damage before you proceed. Finally, if your new vanity has a drastically different footprint and requires moving the drain or supply lines in the wall, this is a job that requires a professional plumber to ensure it's done to code.
Get the print-ready PDF of this guide
A clean, ad-free, printable version you can keep on your phone or pin to the workshop wall. We'll also send occasional weekly tips matched to your home situation.
- Print-optimized layout
- Tools, materials & every step included
- Unsubscribe anytime
Recommended for DIYers & woodworkers
Sponsored
The Top 20 Tools for Workshops of Any Budget
No stationary machines or power tools required — plus 3 fundamental tools that can't be bought at any price.
Get the free guide
Ted's Woodworking — The #1 Woodworking Resource
Detailed instructions, dimensioned drawings, materials & cutting lists, and 3D schematics for every skill level.
See the plansSponsored: links above are affiliate links. FixlyGuide may earn a commission on qualifying purchases — at no extra cost to you.
Frequently asked questions
What if my new vanity plumbing doesn't line up with the old pipes?+
This is a common issue. For drains, you can use flexible or offset slip-joint connectors. For water lines, longer braided supply lines provide flexibility. In severe cases, a plumber may need to move the stub-out, which is a more involved job.
Can I reuse my old faucet and drain?+
Yes, you can often reuse your faucet if it's in good condition and matches the style of your new vanity top. However, drain assemblies, especially the pop-up mechanism and gaskets, are prone to wear and leaks and are very inexpensive to replace. We highly recommend installing a new drain with a new vanity.
How do I know if my shut-off valves need replacing?+
If the valve handle is difficult to turn, doesn't completely stop the water flow when closed, or shows any signs of corrosion or dripping, it should be replaced. This is a critical component for preventing water damage, and replacing them during a vanity swap is a smart preventative measure.
What's the difference between an integrated sink and an undermount sink?+
An integrated sink is part of the countertop, molded from the same piece of material like cultured marble or porcelain, offering a seamless look. An undermount sink is a separate basin that is mounted underneath the countertop, typically seen with stone or quartz tops, providing a clean edge and making it easy to wipe water directly into the sink.


Discussion
Loading comments…