Tools & materials you'll need
Affiliate links- AmazonCordless Drill1 · A model with an adjustable clutch helps prevent driving screws too deep.
- AmazonStud Finder1 · A magnetic stud finder locates the fasteners, an electronic one locates the wood.
- AmazonPutty Knives (4-inch and 6-inch)1 set · A smaller one for the first coat, a wider one for feathering.
- AmazonHammer and Nail Set1 · For sinking the original popped nail without damaging surrounding drywall.
- AmazonFine-Grit Sanding Sponge1 · 120 or 150-grit. More forgiving and easier to control than sandpaper sheets.
- AmazonSafety Glasses1 · Essential to protect your eyes from dust and debris.
- AmazonCoarse-thread drywall screws, 1-5/8 inch2 per pop · The absolute key to the repair. Do not substitute with wood screws.
- AmazonAll-Purpose Joint Compound1 tub · A small 1-quart tub is more than enough for several repairs.
- AmazonPVA Drywall Primer1 quart · Do not skip this step. It prevents the paint from 'flashing'.
- AmazonCeiling Paint1 quart · Matching the color and sheen is critical for an invisible repair.
As an Amazon Associate FixlyGuide earns from qualifying purchases — at no extra cost to you. Prices and availability are accurate as of publication and subject to change.
Quick Answer
Recurring ceiling nail pops are not a sign of bad drywall work, but of natural wood framing members (joists or trusses) shrinking and expanding with temperature and humidity changes. The wood moves, but the drywall doesn't, pushing the nail and a plug of joint compound outward. The only permanent fix is to drive drywall screws near the pop to securely re-fasten the drywall to the framing, then sink and patch the new screws and the old nail head.
The Problem
It starts as a tiny, almost imperceptible bump on your otherwise perfect drywall ceiling. You patch it, sand it, and paint it, only to see it reappear six months later. This is the frustrating reality of a ceiling nail pop. It looks like a pimple on your ceiling, a small, circular protrusion or crack, often casting an annoying little shadow that draws the eye. These blemishes make an entire room feel unkempt or poorly maintained, even if the rest of the space is immaculate.
Homeowners often blame the original drywall installer, assuming a shoddy job was done. They attack the problem with a hammer and a tub of spackling, believing that if they just sink the nail and cover it with enough compound, it will go away for good. But this approach almost never works long-term. The pop returns, sometimes looking even worse than before. This cycle of patching and repatching is time-consuming, messy, and ultimately futile because it only addresses the symptom—the popped fastener—and not the underlying cause of the movement.
How It Works
The fundamental cause of recurring nail pops, especially on the top floor ceiling of a house, is movement in the wooden framing behind the drywall. This movement is primarily caused by two powerful forces of nature acting on your home's structure: lumber drying and humidity cycles, which lead to a phenomenon known as "truss uplift."
Most modern homes are built with engineered wooden trusses for the roof and ceiling structure. These trusses are complex assemblies of 2x4s connected by metal plates. The bottom chord of the truss is what your drywall ceiling is attached to, and it's buried deep in ceiling insulation. The top chords form the roof's structure and are in the unconditioned, uninsulated attic space. In the winter, the warm, moist air inside your home keeps the bottom chords relatively stable, while the cold, dry air in the attic causes the top chords to shrink. This differential shrinking forces the truss to bow upwards, lifting the bottom chord—and the center of your ceiling—slightly off the interior wall top plates. The drywall, however, is still attached to the walls at its edges. This tension pulls the drywall away from the ceiling joists it was nailed to, forcing the nail head to "pop" out of the mud, or to push a plug of joint compound out.
In the summer, the attic becomes hot and humid, and the process reverses. The top chords expand, the truss flattens back out, but the damage is already done. The nail is now loose, ready to be pushed out again during the next cycle. This is why you may notice nail pops more in the winter than in the summer.
Older homes with traditional joist-and-rafter framing are also susceptible, though often due to a different primary cause: lumber shrinkage. If the house was framed with wood that had a high moisture content, that wood will shrink significantly over the first few years as it dries and acclimates to the home's interior environment. As a joist shrinks in width, it can't pull the shank of the nail with it, but the drywall stays put. The result is the same: the nail head effectively becomes too long for the newly shrunken space and "pops" through the surface.
Drywall nails have a series of rings on their shanks designed to resist pulling out, but they have very little power to pull the drywall panel tight against the framing. Drywall screws, with their threaded design, are far superior at securely clamping the drywall sheet to the wood framing and resisting these forces.
Step-by-Step Fix
This method addresses the root cause by adding new, secure anchor points and properly setting all fasteners before cosmetic repair.
1. Safety & Prep First — Before you get on a ladder, ensure the work area is safe. If the nail pop is near a ceiling fan or light fixture, turn off the corresponding circuit breaker. Put on safety glasses to protect your eyes from dust and debris. Set up a stable stepladder on a level surface, ensuring all four feet are firmly planted.
2. Precisely Locate the Framing — The popped nail is your guide, but you need to confirm the joist or truss location. Use a magnetic or electronic stud finder to locate the framing member on either side of the nail pop. Mark the center of the wood lightly with a pencil about 1.5 to 2 inches away from the pop on both sides.
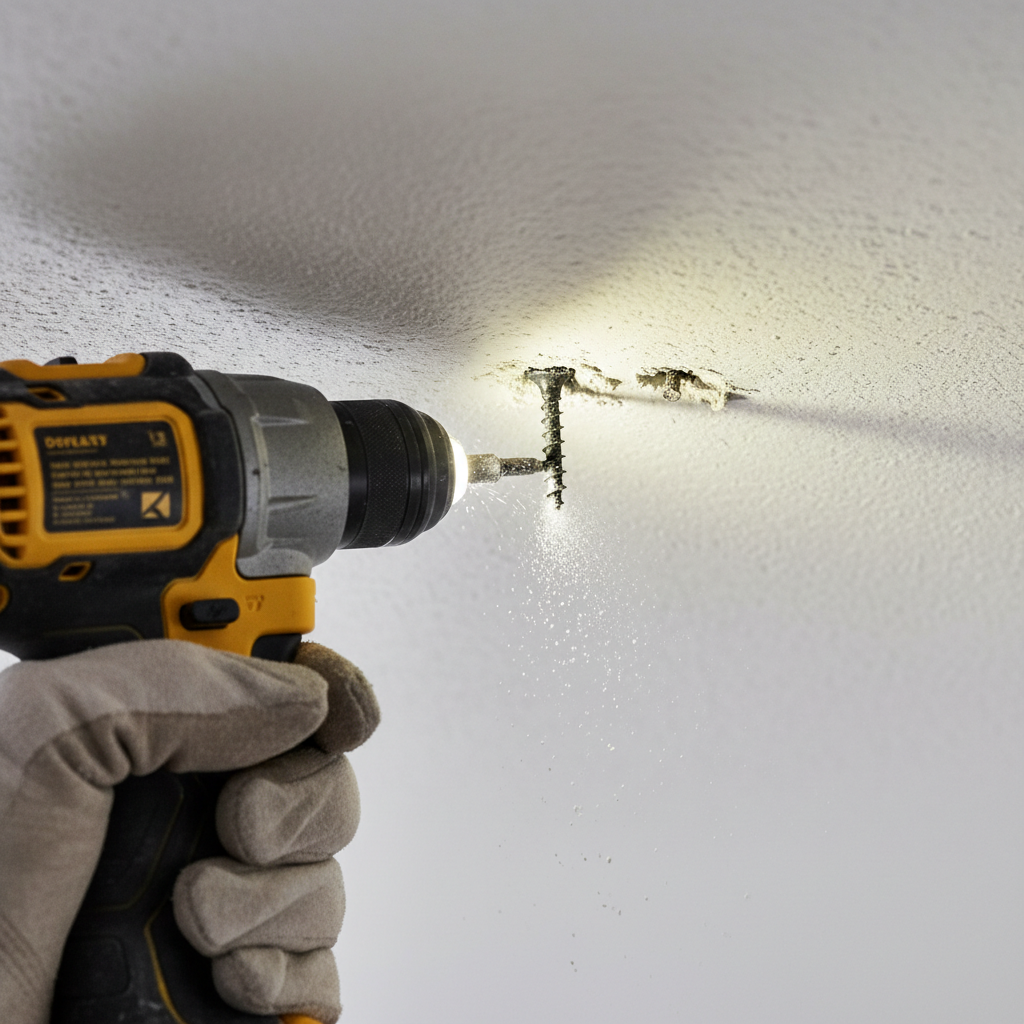
3. Drive New Drywall Screws — Take a 1-5/8 inch coarse-thread drywall screw and, using a cordless drill, drive it into one of your pencil marks. The length is critical; it’s long enough to penetrate the 1/2-inch or 5/8-inch drywall and get a deep, solid bite into the framing member. Drive a second screw on the opposite side of the pop. These two screws will now securely hold the drywall in place, preventing the movement that caused the original pop.
4. Create the Perfect "Dimple" — The goal is to set the screw head just below the surface of the drywall paper without breaking the paper. As you drive the screw, ease up on the drill speed as it gets close. The head should create a slight depression or "dimple." If you accidentally drive it too deep and break the paper, the screw loses most of its holding power; you should remove it and drive a new one an inch away.
5. Address the Original Nail — Now, deal with the popped nail. Do NOT pull it out, as this can cause a larger section of drywall and compound to break away. Instead, use a hammer and a nail set to drive the nail head firmly back into the ceiling, creating another dimple just like the ones you made with the screws.
6. Scrape and Clean the Area — Use a 4-inch putty knife to gently scrape away any loose joint compound or flaking paint from around the original pop and your two new screws. You want a smooth, solid surface for your patch. Wipe the area with a dry cloth to remove any dust.
7. Apply the First Coat of Compound — Scoop a small amount of all-purpose or topping joint compound onto a 4-inch putty knife. Apply a thin, tight coat over each of the three dimples (two screws, one nail). The goal is just to fill the depressions. Hold the knife at a low angle and press firmly to force the mud into the dimples.
8. Apply the Feathering Coat — After the first coat has dried completely (usually a few hours, but check the product label), apply a second, wider coat. This time, use a 6-inch putty knife. Center the knife over the repair area and draw it across in a single, smooth motion. Apply pressure to the outer edge of the knife to "feather" the compound, making it thinner at the edges to blend into the surrounding ceiling.
9. Apply a Final Skim Coat — Once the second coat is fully dry, inspect the patch. If it's not perfectly smooth, you may need a very thin final skim coat. Use light, broad strokes with your 6-inch knife to fill any minor imperfections or tool marks. Let this coat dry thoroughly.
10. Sand Smoothly and Lightly — Lightly sand the dried compound with a fine-grit (120- or 150-grit) sanding sponge. Do not use a power sander. Sand just enough to smooth out the patch and blend the edges. Avoid sanding so much that you scuff the paper on the surrounding drywall. A light touch is key.
11. Prime the Patch — This is a critical, often-skipped step. Wipe away all sanding dust with a damp cloth. Apply a coat of quality PVA drywall primer or a stain-blocking primer over the repaired area. Without primer, the patched spot will absorb paint differently than the rest of the ceiling, resulting in a noticeable, dull spot known as "flashing."
12. Paint to Match — After the primer is dry, you can finally paint. Use the same paint that is on the rest of the ceiling. It’s often best to paint the entire ceiling for a seamless finish, but for small repairs, you may be able to get away with dabbing paint on the spot and feathering it out with a small roller or brush.
Common Causes
- Truss Uplift: The most common cause on upper-floor ceilings. Seasonal temperature and humidity differences between the attic and the living space cause the roof truss to bow and lift the drywall off the framing.
- Lumber Shrinkage: In new construction, framing lumber with high moisture content will shrink as it dries over the first 1-3 years, leaving a gap between the drywall and the joist, causing fasteners to pop.
- High Interior Humidity: Consistently high humidity (above 55% RH) from cooking, showering, or poor ventilation can cause wood framing to swell and move, leading to pops.
- Improper Fastener Choice: Using roofing nails or other incorrect fasteners that don't have the right head shape or shank design for drywall.
- Incorrect Fastener Length: Using nails or screws that are too short to adequately penetrate the framing member, giving them very little holding power.
- Foundation Settling: While less common for isolated pops, significant or differential settling of the home's foundation can put stress on the entire building frame, manifesting as cracks and fastener pops.
Common Mistakes
- Only Hammering the Nail: Simply hammering the nail back in without adding screws does nothing to solve the underlying movement. The nail is loose and will pop again.
- Just Spackling Over the Pop: Covering the blemish with spackle is like putting a bandage on a broken arm. It hides the problem for a short time but provides no structural fix.
- Creating a "Mound" of Mud: A common DIY mistake is applying too much joint compound in a thick mound. All patches should be applied in thin, feathered layers to be visually imperceptible.
- Skipping the Primer: Failing to prime the patch will result in a dull, blotchy spot after painting, making the repair obvious.
- Sanding Too Aggressively: Oversanding can damage the paper face of the surrounding drywall, creating a fuzzy texture that is very difficult to hide with paint.
- Using the Wrong Screws: Do not use wood screws or screws with a tapered head. Use only coarse-thread drywall screws designed to hold drywall and create the proper dimple.
Cost & Time Breakdown
| Task | DIY Cost | Pro Cost | Time (DIY) |
|---|---|---|---|
| Materials (Screws, small tub of mud, primer) | $20 - $35 | (Included in Labor) | 30 mins (shopping) |
| Diagnose & Secure Pop (1-3 pops) | $0 | $150 - $250 (min.) | 20-30 mins |
| Patching & Sanding (3 coats, includes drying) | $0 | (Included in Labor) | 30 mins active, 24-48 hrs total |
| Priming & Painting (spot repair) | $0 | (Included in Labor) | 30 mins active, 2-4 hrs total |
| Total for a few pops | $20 - $35 | $200 - $400+ | ~2 days (mostly drying time) |
Tips & Prevention
- Control Indoor Humidity: Run bathroom exhaust fans during and after showers, use your kitchen range hood when cooking, and consider a whole-home dehumidifier if your RH is consistently high.
- New Construction Standard: On new builds, insist on using screws, not nails, for all drywall. Also, ask about using resilient channels or drywall clips on ceilings, which can help isolate the drywall from truss movement.
- Allow for Acclimation: In a new build, wait a full year for the framing lumber to acclimate and shrink before doing the final pristine paint job. Address any pops that appear during that first year permanently.
- Proper Attic Ventilation: Ensure your attic is well-ventilated with soffit and ridge vents. This helps regulate the temperature and humidity in the attic, reducing the severity of truss uplift.
- Caulk the Edges: A flexible, paintable caulk at the wall-ceiling joint can help absorb some of the minor movement between the wall and the floating ceiling during truss uplift, preventing cracks at the corners.
- Fix Small Problems: The moment you see a new pop, fix it correctly with screws. Don't let them accumulate, as a ceiling full of pops is a much larger cosmetic repair job.
When to Call a Professional
While fixing a few nail pops is a classic DIY job, there are times when you should call a professional drywall contractor or a structural engineer. If the nail pops are accompanied by long, running cracks in the drywall (especially cracks wider than 1/8 inch), this could be a sign of significant structural movement or foundation issues that go beyond simple truss uplift. If you see water stains or discoloration around the pops, you have a roof or plumbing leak that must be addressed immediately before any cosmetic repair is attempted.
Furthermore, if your ceilings have a heavy texture, professionally matching it after the patch can be very difficult for a DIYer. A pro has the experience and tools to blend the texture seamlessly. Finally, consider the scale: if you have dozens or hundreds of pops throughout your house (common in homes built during a housing boom), a professional crew can work much more efficiently, completing the entire job in a fraction of the time it would take a homeowner.
Recommended for DIYers & woodworkers
Sponsored
The Top 20 Tools for Workshops of Any Budget
No stationary machines or power tools required — plus 3 fundamental tools that can't be bought at any price.
Get the free guide
Ted's Woodworking — The #1 Woodworking Resource
Detailed instructions, dimensioned drawings, materials & cutting lists, and 3D schematics for every skill level.
See the plansSponsored: links above are affiliate links. FixlyGuide may earn a commission on qualifying purchases — at no extra cost to you.
Frequently asked questions
Can I just use more joint compound to fix a nail pop?+
No, just adding more compound is a temporary fix that only hides the symptom. The underlying movement of the framing will cause the pop to reappear. You must secure the drywall with screws first.
Is it better to pull the old nail out?+
No, do not pull the old nail. Pulling it can dislodge a large chunk of drywall and joint compound, creating a much bigger repair. It's better to use a nail set to drive it back in and patch over it.
Why are there so many nail pops in my new house?+
This is very common and is usually caused by the wood framing drying out. As the 'green' lumber from construction dries over the first 1-2 years, it shrinks, causing the fasteners to pop. It is a normal part of a new home settling.
Are nail pops a sign of a serious structural problem?+
Usually, no. Isolated nail pops on a ceiling are typically cosmetic and caused by truss uplift or wood shrinkage. However, if they are paired with large, active cracks, water stains, or doors and windows that no longer close properly, you should consult a professional to rule out a larger structural issue.


Discussion
Loading comments…