
Tools & materials you'll need
Affiliate linksAs an Amazon Associate FixlyGuide earns from qualifying purchases — at no extra cost to you. Prices and availability are accurate as of publication and subject to change.
Quick Answer
Resealing your wood deck is a crucial maintenance task that protects it from the elements, prevents rot, and enhances its appearance. The process involves a thorough cleaning and stripping of any old, failing sealer, making minor repairs, and then applying a fresh coat of high-quality wood sealer. The most common reasons for sealer failure are inadequate surface preparation, choosing the wrong product for your deck's exposure, and improper application techniques. Addressing these three areas will ensure a long-lasting and effective seal.
The Problem
Over time, exposure to sun, rain, snow, and daily foot traffic takes a toll on your wood deck. The protective sealer wears down, allowing moisture to penetrate the wood fibers. This leads to a host of problems: the wood can warp, crack, splinter, and eventually rot. Algae, mildew, and moss begin to grow, making the deck slippery and unsightly. Ultraviolet (UV) rays from the sun degrade the wood's lignin, turning it gray and diminishing its structural integrity. If you notice water soaking into your deck boards rather than beading up, or if the existing finish is peeling, flaking, or discolored, it's a clear sign that your deck is no longer adequately protected and it's time to reseal.
How It Works
Wood is a naturally porous material, meaning it has tiny capillaries that can absorb and wick away moisture. When left unprotected, this absorption leads to dimensional changes (swelling and shrinking) that cause cracks and warping. Wood sealers, whether they are oil-based, water-based, clear, or semi-transparent, work by creating a protective barrier on or within the wood. Most sealers contain resins and binders that penetrate the top layers of the wood, filling those capillaries and forming a water-resistant shield. They also often include UV inhibitors that block harmful sun rays, preventing the wood's lignin from breaking down. Some sealers contain mildewcides and fungicides to prevent biological growth. The effectiveness of a sealer depends on its ability to adhere well to the wood, resist abrasion, and maintain its flexibility through temperature changes. Proper surface preparation is paramount because dirt, grease, old failing sealer, and loose wood fibers prevent the new sealer from penetrating and adhering correctly.
Step-by-Step Fix
1. Clear and Inspect Your Deck — Remove all items and assess the deck's condition.
Before you begin any work, remove all furniture, planters, grills, and other objects from your deck. This gives you a clear workspace and allows you to thoroughly inspect the entire surface. Look for loose boards, protruding nails or screws, significant cracks, splintering, and areas of heavy mildew or rot. Make a note of any repairs that will be needed.
2. Make Necessary Repairs — Address any structural or surface damage before cleaning.
- Tools: Hammer, drill/driver, exterior wood screws, new deck boards (if needed).
- Tighten any loose deck boards using exterior-grade screws. Replace any damaged or rotted boards. For minor splinters, you can sand them down in the next step. If you find extensive rot, especially in support beams or joists, or large areas of soft, spongy wood, this indicates a more serious issue that may require professional assessment.
3. Clean the Deck Thoroughly — Remove dirt, grime, mildew, and old sealer for optimal adhesion.
- Tools: Deck cleaner/stripper, pump sprayer, stiff bristle brush, garden hose, pressure washer (optional).
- Safety: Wear eye protection, gloves, and long sleeves. Test the cleaner/stripper in an inconspicuous area first. Ensure no plants or shrubs are in the path of runoff.
- Sweep the deck thoroughly to remove loose debris. Using a pump sprayer, apply a dedicated deck cleaner or stripper according to the manufacturer's instructions. A stripper is necessary if your existing sealer is peeling or flaking significantly; otherwise, a good cleaner might suffice. Allow the product to dwell for the recommended time (usually 10-20 minutes), keeping the surface wet. Do not let it dry. Then, scrub the deck vigorously with a stiff bristle brush, working with the grain. Rinse thoroughly with a garden hose or a pressure washer on a low setting (no more than 1000-1200 PSI) to avoid damaging the wood. Let the deck dry completely for 48-72 hours, or until the moisture content is below 15% (you can check this with a moisture meter).
4. Sand for a Smooth Surface — Prepare the wood for better sealer penetration and a professional finish.
- Tools: Orbital sander, 60-80 grit sandpaper, dust mask.
- Once the deck is completely dry, light sanding can greatly improve the final appearance and sealer adhesion, especially if you've stripped an old finish or have rough areas. Use an orbital sander with 60-80 grit sandpaper. Sand with the grain of the wood, focusing on areas with splinters, raised grain, or remaining imperfections. After sanding, sweep or vacuum the deck to remove all dust. A clean surface is critical for the sealer to penetrate and bond correctly.
5. Apply Wood Brightener (Optional but Recommended) — Restore the wood's natural color and neutralize cleaners.
- Tools: Pump sprayer, garden hose.
- After cleaning/stripping and sanding, a wood brightener can restore the wood's natural color, especially if it appears dull or stained. It also neutralizes any remaining chemicals from cleaners or strippers, creating a more ideal pH balance for the new sealer. Apply according to product instructions, typically by spraying it on and rinsing after a short dwell time. Allow the deck to dry again for at least 24 hours.
6. Choose Your Sealer Wisely — Select the right product for your deck's wood type and exposure.
- Material: Oil-based or water-based sealer (clear, semi-transparent, or solid stain).
- If your deck is new cedar or redwood: Consider a clear or transparent sealer to highlight the natural grain. These offer less UV protection than pigmented options.
- If your deck has aged or weathered: A semi-transparent or solid stain (which functions as a sealer) will provide more UV protection and color uniformity. Oil-based penetrating sealers tend to last longer in harsh climates and provide a more natural look, while water-based options offer easier cleanup and lower VOCs. Read reviews and product descriptions carefully to choose a sealer suitable for your wood type and climate.
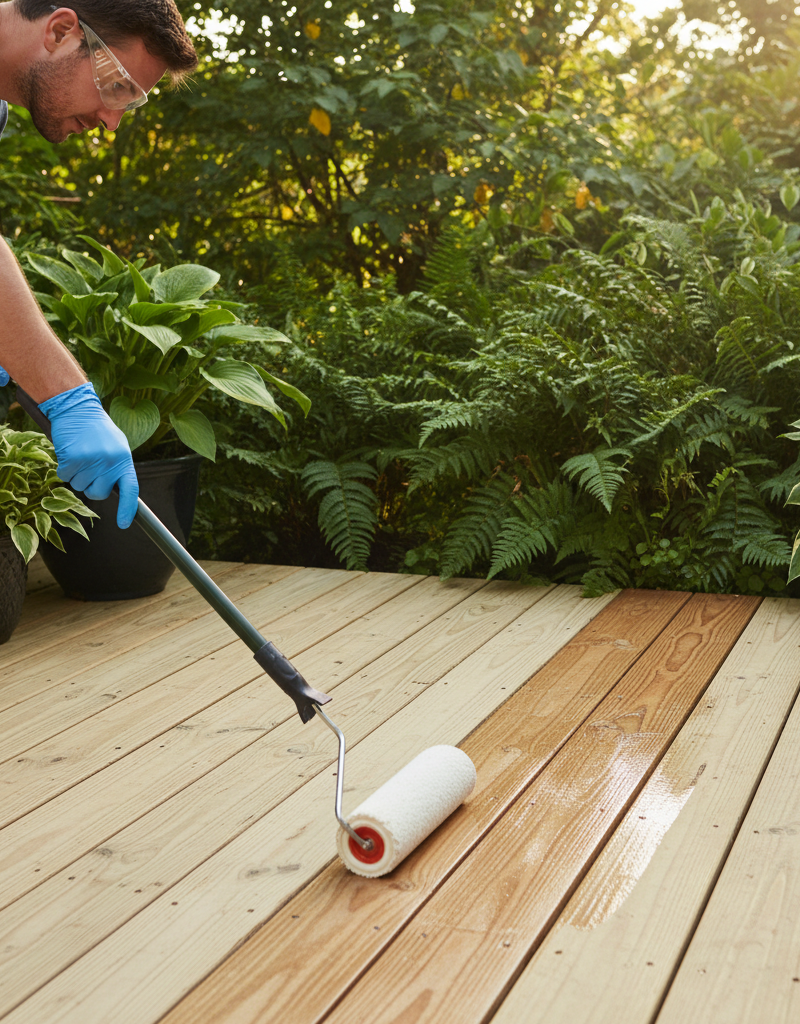
7. Apply the Sealer Evenly — Use the correct technique for optimal penetration and appearance.
- Tools: Paint brush, roller (with appropriate nap for deck sealer), paint pad applicator, paint sprayer (optional), paint tray, stirring stick.
- Safety: Work on a dry, overcast day with no rain in the forecast for at least 24-48 hours. Protect surrounding plants and house siding with tarps or painter's tape.
- Stir the sealer thoroughly before and during application. Apply sealer on a moderately warm, dry day (50-85°F / 10-30°C) with no direct sun if possible, as direct sun can cause the sealer to dry too quickly. Work in sections, applying the sealer evenly with the grain of the wood. Use a high-quality brush for spindles, railings, and tight corners. For the deck boards, a roller with a 3/8-inch nap or a paint pad applicator works well. Avoid over-applying, which can lead to pooling and shiny spots. Rollers distribute sealer quickly but can sometimes leave a thick film; a paint pad or brush allows for better control and penetration. If using a sprayer, back-brush immediately to ensure even penetration and prevent drips. Apply one thin, even coat. Most manufacturers do not recommend a second coat unless specified, as it can lead to peeling.
8. Allow for Proper Drying & Curing — Protect the deck until the sealer is fully set.
- Check the manufacturer's instructions for drying and curing times. Most sealers are dry to the touch within a few hours, but it can take 24-48 hours before the deck can withstand light foot traffic and several days to weeks to fully cure. Avoid heavy furniture, rugs, or planters on the deck until the curing process is complete. Premature exposure to moisture or heavy use can compromise the sealer's durability and appearance.
Common Causes
- Improper Surface Preparation: This is the absolute biggest reason for sealer failure. If the deck isn't thoroughly cleaned, stripped of old failing finishes, and completely dry, the new sealer cannot adhere or penetrate properly, leading to premature peeling and flaking. Leftover dirt, mildew, or chemical residue acts as a bond breaker.
- Wrong Sealer for the Wood/Climate: Not all sealers are created equal. Using an interior-grade sealer outdoors, choosing a clear finish in a high-UV environment, or applying a water-based product to an incompatible oil-based residue will lead to poor performance and short lifespan. Understanding your wood type and local weather patterns is key.
- Over-Application: Applying sealer too thickly or applying multiple coats when only one is recommended can prevent the sealer from curing properly. This results in a sticky, gummy surface that wears off quickly, peels, or creates an uneven, blotchy appearance. Sealer needs to penetrate, not just sit on top.
- Application in Poor Weather: Applying sealer in direct hot sunlight, high humidity, or when rain is imminent can severely compromise its performance. High temperatures cause the sealer to flash dry, preventing proper penetration. Rain washes away uncured sealer. Always check the forecast and manufacturer's temperature guidelines.
- Lack of Maintenance: Even the best sealer won't last forever. Skipping routine cleaning, allowing leaves and debris to sit on the deck, or foregoing annual inspections can shorten the life of the sealer and the deck itself.
Common Mistakes
- Skipping the Stripping Step: Many homeowners try to apply new sealer over an existing, failing finish. This almost guarantees that the new sealer will lift and peel along with the old, leading to wasted effort and material. Always strip away loose or compromised old finishes.
- Not Letting the Deck Dry Completely: Applying sealer to a damp deck traps moisture beneath the finish. This can lead to mold and mildew growth, poor adhesion, and premature peeling. Use a moisture meter or wait at least 48-72 hours after cleaning/rinsing.
- Using a Pressure Washer Incorrectly: While a pressure washer can be effective for cleaning, using too high a PSI or holding the nozzle too close to the wood can splinter and damage the deck fibers, creating an uneven surface that won't hold sealer well. Keep it below 1200 PSI and maintain a consistent distance.
- Applying Too Much Sealer: A common misconception is that more sealer equals better protection. In reality, over-application (especially with penetrating sealers) leads to sticky spots, uneven drying, and a film that can peel. Thin, even coats are always better.
- Ignoring Railings and Spindles: The deck floor gets the most wear, but railings and spindles are also exposed to the elements. Forgetting to clean, sand, and seal these often leads to a mismatched appearance and uneven protection across the entire deck structure.
- Not Protecting Plants and Siding: Deck cleaners, strippers, and sealers can be harmful to plants and can stain vinyl or painted siding. Always mask off adjacent surfaces and thoroughly wet down plants before, during, and after rinsing to dilute any runoff.
Cost & Time Breakdown
| Task | DIY Cost | Pro Cost | Time |
|---|---|---|---|
| Materials (Cleaner, Sealer) | $75–$200 | Included in labor | N/A |
| Tools (Sprayer, Brush, Roller) | $30–$80 | Included in labor | N/A |
| Deck Prep (Cleaning, Repairs) | $0–$50 (DIY labor) | $200–$500 | 4–8 hours active |
| Sealer Application | $0 (DIY labor) | $300–$700 | 3–6 hours active |
| Drying/Curing Time | N/A | N/A | 2–7 days passive |
Tips & Prevention
- Annual Cleaning: Even if you don't reseal every year, give your deck an annual cleaning with a mild deck cleaner to remove dirt and mildew. This prevents accumulation that can degrade your sealer.
- Regular Inspection: Inspect your deck annually after winter. Look for signs of wear, splintering, loose fasteners, and areas where water no longer beads. Address minor issues promptly.
- Reapply as Needed, Not on a Schedule: The lifespan of a deck sealer varies greatly depending on sun exposure, weather, and traffic. Test your deck annually by sprinkling water on it; if it soaks in quickly, it's time to reseal. Don't just reseal every two years if it's still performing well.
- Use High-Quality Products: Invest in good quality deck cleaners, strippers, and sealers. Cheaper products often don't last as long, requiring more frequent reapplication and work.
- Protect from Debris: Keep your deck clear of leaves, pine needles, and other organic debris, especially in shaded areas. This debris traps moisture and promotes mildew growth, which breaks down sealers.
- Consider a Semi-Transparent Stain: While clear sealers show off the wood's natural beauty, semi-transparent stains offer much better UV protection due to their pigment. This significantly extends the life of your finish, especially in sunny climates.
When to Call a Professional
While resealing a deck is a manageable DIY project, there are specific situations where calling a licensed professional is the smarter and safer choice. If your deck has significant structural damage, such as widespread rot in joists or support posts, major ledger board separation from the house, or chronic instability, a professional should assess and repair these issues before any cosmetic work begins. They have the expertise to identify underlying problems, ensure the deck meets local building codes, and perform structural repairs safely. Additionally, if your deck is exceptionally large, multi-tiered, or has intricate railings and features that make cleaning and sealing very time-consuming and difficult, a professional deck refinishing company can achieve a high-quality, uniform result more efficiently. They also have access to commercial-grade equipment and products that may not be available to the average homeowner, providing a longer-lasting finish and saving you considerable time and effort in the long run. Lastly, if you are unsure about the type of wood or existing finish on your deck, or if previous DIY attempts have resulted in blotchy or peeling finishes, a professional can correctly diagnose the issue and recommend the best course of action.
Related Articles
Keep troubleshooting with these hand-picked guides from FixlyGuide:
- How to Reseal a Wood Deck: A Step-by-Step Fix — Resealing your wood deck protects it from weather and extends its life. This guide covers how to properly prepare and apply new sealant for…
- The #1 Mistake Homeowners Make When Sealing a Deck (and How to Fix It) — Prevent costly damage and extend your deck's life by avoiding common sealing errors and following a simple, effective resealing process.
- The #1 Deck Sealing Mistake Most Homeowners Make (And How to Fix It) — Many homeowners make a critical error when sealing their decks, leading to premature wear and damage. Learn how to properly reseal your woo…
- The #1 Deck Sealing Mistake Most Homeowners Make (And How to Fix It) — Discover the most common error in deck sealing that leads to premature wear and how to correct it for lasting protection.
- The #1 Mistake That Makes Deck Boards Warp (And the Easy Fix) — Discover the most common reason deck boards warp and how a simple, proactive fix can restore your deck's appearance and longevity.
- The 3 Hidden Mistakes That Make Landscape Edging Fail (And How to Fix Them) — Discover common mistakes homeowners make when installing landscape edging and learn the correct methods to achieve a durable, professional-…
Frequently asked questions
How often should I reseal my wood deck?+
The frequency depends on your deck's exposure to sun and weather, as well as the type of sealer used. Generally, oil-based penetrating sealers may last 2-3 years, while water-based clear sealers might need reapplication annually. A good test is to sprinkle water on the deck; if it soaks into the wood instead of beading up, it's time to reseal.
What's the difference between deck cleaner and deck stripper?+
Deck cleaner is for routine maintenance and removes dirt, grime, mildew, and light stains. A deck stripper is a more aggressive chemical designed to break down and remove old, failing finishes like paint, stain, or old sealer, exposing the bare wood underneath. Use a stripper when your existing finish is peeling or severely discolored.
Can I use a regular house paint on my deck?+
No, regular house paint is not designed for the heavy foot traffic and moisture exposure that a deck experiences. It will quickly peel, crack, and wear off. Always use a product specifically formulated for decks, such as a deck stain, specialized deck paint, or clear deck sealer, which are designed to withstand outdoor conditions and abrasion.
How long does a sealed deck need to dry before use?+
Most deck sealers are dry to the touch within 2-4 hours, but proper drying and curing take much longer. You generally need to wait 24-48 hours for light foot traffic and to replace furniture. For full curing, which means the sealer has reached its maximum hardness and durability, it can take anywhere from 3 days to a few weeks, depending on the product and weather conditions.
What should I do if my deck starts peeling after I've sealed it?+
If your deck sealer starts peeling, it's almost always due to improper surface preparation or over-application. You will likely need to strip off the failed sealer, thoroughly clean and brighten the wood, and then reapply a new, thin coat of sealer, ensuring the deck is completely dry beforehand. Avoid applying too much product, as this is a common cause of peeling.


Discussion
Loading comments…