
Tools & materials you'll need
Affiliate linksAs an Amazon Associate FixlyGuide earns from qualifying purchases — at no extra cost to you. Prices and availability are accurate as of publication and subject to change.
Quick Answer
Thawing a frozen pipe safely involves identifying the frozen section, applying gentle heat using a hairdryer, heat gun on a low setting, or warm towels, and restoring water flow gradually. Crucially, avoid open flames or high heat, which can cause pipes to burst or start fires. Start with the faucet open to relieve pressure and always prioritize safety to prevent further damage or injury.
The Problem
It's a chilling winter day, and suddenly, you turn on a faucet only to be met with a trickle, or worse, no water at all. You suspect a frozen pipe, and the dread sets in. A frozen pipe isn't just an inconvenience; it's a ticking time bomb. As water freezes, it expands with incredible force—up to 10% by volume. This expansion puts immense pressure on your pipes, and if not addressed promptly and correctly, it can lead to a burst pipe, severe water damage, and thousands of dollars in repairs. The immediate problem is a blockage of ice preventing water flow, but the underlying danger is the potential for structural failure of the pipe itself. Many homeowners, in their haste to restore water, make critical mistakes that escalate the problem from a frozen pipe to a flooded home or even a house fire.
How It Works
Water pipes, typically made of copper, PEX, or PVC, are designed to carry water under pressure. When temperatures drop below freezing (32°F or 0°C) for an extended period, especially in unheated areas like basements, crawl spaces, attics, or exterior walls, the water inside these pipes can turn to ice. This is particularly true for pipes with little to no insulation or those exposed to cold drafts. As the water begins to freeze, it forms an ice plug. The key factor in pipe bursts isn't necessarily the expansion at the point of freezing, but the pressure created behind the ice plug. As more water freezes further down the line or upstream, it pushes the trapped water between the ice plug and a closed faucet or another ice plug. This hydraulic pressure can reach astonishing levels—over 2,000 pounds per square inch—far exceeding the pipe's ability to contain it, leading to a rupture. The material of the pipe matters: PEX is more flexible and can withstand some expansion, while rigid copper and PVC are more prone to bursting. Thawing too quickly with high heat can exacerbate this by creating rapid, uneven expansion, further stressing the pipe material.
Step-by-Step Fix
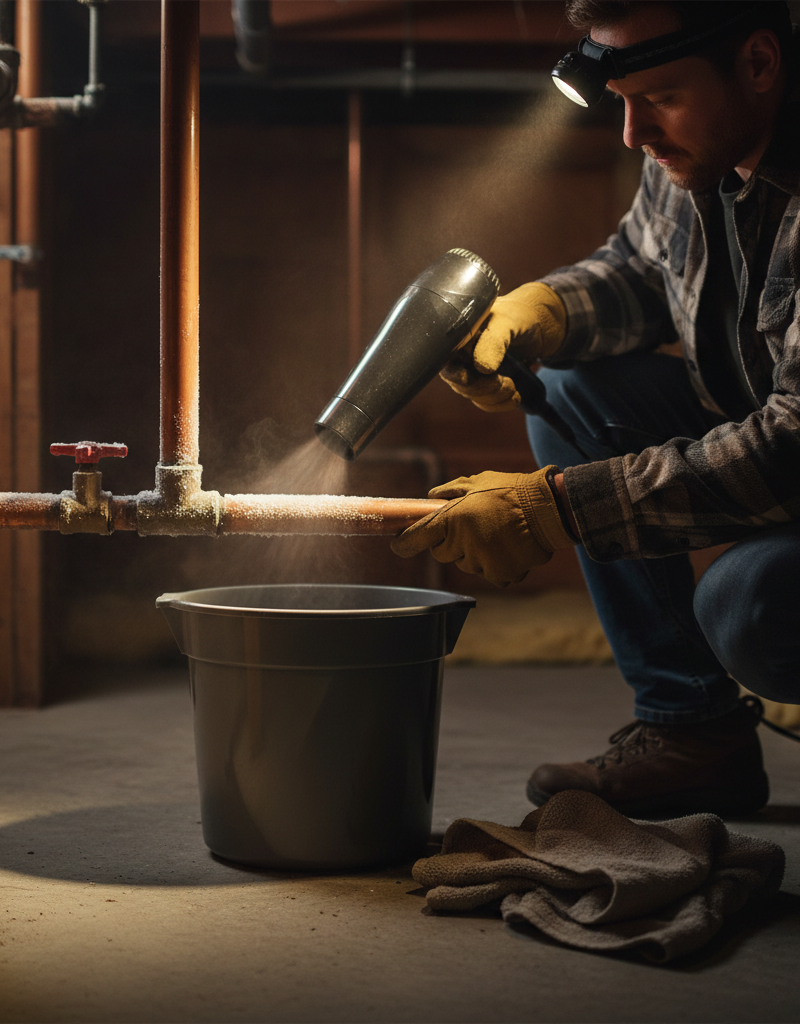
1. Locate the Frozen Section — Identify the blockage point to focus your efforts.
First, check all faucets in your home. If only one faucet or area is affected, the freeze is likely close to that outlet. Look for visible signs of frost or condensation on exposed pipes. Feel pipes with your hand; frozen sections will be colder than unfrozen ones. Listen for the sound of rushing water suddenly stopping when you run a nearby faucet. Common areas include pipes running along exterior walls, in unheated basements, crawl spaces, attics, or under sinks near exterior cabinets. If you can't see the pipe, listen for changes in sound when tapping the wall, often a duller thud where ice is present.
2. Prepare the Area for Thawing — Ensure safety and minimize potential damage.
- Open the Faucet: Before applying heat, open the faucet that the frozen pipe supplies. This allows water to flow out as the ice melts, relieving pressure in the pipe. If the pipe bursts during thawing, this also provides an immediate outlet for water, potentially reducing pressure. Set a bucket underneath if the pipe is accessible.
- Clear the Area: Remove any flammable materials, chemicals, or valuable items from around the pipe. Lay down old towels or have a wet/dry vacuum ready in case the pipe has already burst and starts leaking once thawed.
- Turn Off Main Water (Optional but Recommended): If you suspect a burst (e.g., you heard a popping sound, or see visible damage), turn off the main water supply to your house. This prevents a flood when the pipe thaws.
3. Apply Gentle, Gradual Heat — Slow and steady wins the race to prevent bursting.
-
Hairdryer: This is often the safest and most common method. Set it to a medium or high setting and move it back and forth along the frozen section, keeping it at least 6-12 inches away from the pipe to prevent overheating. Work from the faucet end back toward the main supply to push melting water out.
-
Heat Gun (LOW setting ONLY): If using a heat gun, exercise extreme caution. Set it to the lowest possible heat setting and keep it moving constantly at least 1-2 feet away from the pipe. Never allow it to sit in one spot. This is more powerful than a hairdryer and can quickly damage pipes, especially PEX or PVC.
-
Warm Towels: Soak towels in hot water (not boiling), wring them out, and wrap them around the frozen pipe. Replace with fresh warm towels every 5-10 minutes. This is a slower method but very safe for all pipe types.
-
Portable Space Heater: Place a small, electric space heater in the room where the pipe is, ensuring it's at a safe distance from anything flammable. This warms the ambient air, which can help thaw pipes within walls or ceilings. Do not point it directly at pipes.
-
If this doesn't work: If after 30-60 minutes there's no progress using a hairdryer or warm towels, or if the pipe is inaccessible within a wall, you may need a professional. Do NOT increase heat settings or use more dangerous methods.
4. Monitor for Water Flow and Leaks — Crucial step to ensure thawing and detect damage.
As the ice melts, you should hear the sound of water starting to flow through the pipe, and water will begin to come out of the open faucet. Continue applying heat for a few minutes after flow is restored to ensure the entire blockage is gone. Once water is flowing normally, carefully inspect the pipe and surrounding area for any signs of leaks. Even a small hairline crack can become a significant leak once full pressure is restored. Pay close attention to joints and previous repair areas.
- If you find a leak: Immediately turn off the main water supply to your home and contact a licensed plumber. Do not attempt to patch a burst pipe yourself with tape or sealant—these are temporary fixes that will fail under pressure.
5. Restore Water Pressure Slowly (if main cutoff was used) — Prevent bursting weakened pipes.
If you turned off your main water supply, slowly open the main shutoff valve on your home's water meter or main line. Open it only a quarter or half-turn at first. This allows the pipes to refill gradually, reducing the shock on potentially weakened sections. Check all faucets and visible pipes for leaks as the pressure returns. If no leaks are visible after a few minutes, you can fully open the main valve.
Common Causes
- Lack of Insulation: Pipes running through unheated spaces like crawl spaces, attics, garages, or exterior walls without proper insulation are highly susceptible to freezing.
- Exterior Wall Placement: Pipes located on outside walls, especially those facing prevailing winds, get significantly colder than interior pipes.
- Extreme Cold Snaps: Prolonged periods of sub-freezing temperatures, often accompanied by strong winds (wind chill), can overcome even well-insulated pipes.
- Thermostat Set Too Low: If you drop your thermostat below 55°F (13°C) when away from home, or even when sleeping, the ambient temperature in unheated areas might fall enough for pipes to freeze.
- Open Garage Doors/Crawl Space Vents: Leaving these open during cold weather exposes vulnerable pipes to freezing air.
- Hose Bibs Left Connected: Leaving a garden hose connected to an outdoor faucet (hose bib) can cause water in the pipe behind the faucet to freeze and expand back into your interior plumbing.
Common Mistakes
- Using Open Flames: Never use a propane torch, blowtorch, kerosene heater, or any open flame to thaw pipes. This is extremely dangerous, can ignite surrounding materials (insulation, wood), and can cause rapid, uneven expansion of the pipe, leading to catastrophic bursts.
- Using High Heat Immediately: Applying a heat gun on a high setting or pointing a hairdryer too close and for too long can cause rapid temperature changes in the pipe material, leading to cracks, warping, and bursts. Metals and plastics can deform or melt.
- Ignoring the Main Water Shutoff: Failing to locate and know how to operate your main water shutoff valve before thawing can turn a burst pipe into a massive flood, causing extensive damage in minutes.
- Not Opening a Faucet: Trying to thaw a pipe without opening the nearest faucet prevents pressure relief. As the ice melts, the trapped water can still be under immense pressure between the thawing ice and a closed valve, leading to a burst.
- Assuming the Pipe Didn't Burst: Many homeowners assume that because they can't see a leak during thawing, the pipe is fine. Small cracks may only become apparent once full water pressure is restored. Always inspect thoroughly.
- Fixing a Burst Pipe with Tape: Duct tape, electrical tape, or even pipe repair tape are temporary bandages. A properly repaired burst pipe requires section replacement or a permanent clamp, ideally by a professional plumber.
Cost & Time Breakdown
| Task | DIY Cost | Pro Cost | Time |
|---|---|---|---|
| Locate & Prepare | $0 | $50–$100 (part of service) | 10–20 minutes |
| Thaw with Hairdryer/Towels | $0–$10 | Included with service | 30–90 minutes |
| Post-Thaw Inspection | $0 | Included with service | 10–15 minutes |
| Minor Leak Repair (DIY) | $10–$50 (clamp/patch) | $200–$500+ | 1–2 hours (if DIY) |
| Burst Pipe Repair (Pro) | N/A | $300–$1,500+ | 2–6 hours |
Tips & Prevention
- Insulate Exposed Pipes: Wrap pipes in unheated areas (basements, crawl spaces, attics, exterior walls) with foam pipe insulation sleeves. This is a cheap and highly effective preventative measure.
- Seal Air Leaks: Caulk and weatherstrip around windows, doors, and any openings that allow cold air to reach pipes, especially in utility rooms or under sinks.
- Maintain Indoor Temperature: During cold snaps, keep your thermostat set to at least 55°F (13°C), even when you're away. Open cabinet doors under sinks on exterior walls to allow warmer room air to circulate around pipes.
- Drip Faucets: If temperatures are predicted to be severely low, allow a small trickle of cold water to drip from faucets served by pipes running through unheated areas. Moving water is less likely to freeze.
- Disconnect Hoses: Always disconnect and drain garden hoses from outdoor spigots before winter. If your hose bib is not
Related Articles
Keep troubleshooting with these hand-picked guides from FixlyGuide:
- The 3 Hidden Reasons Your Pipes Freeze (and How to Thaw Them Fast) — Discover the real culprits behind frozen pipes and learn safe, effective methods to thaw them quickly, preventing costly damage to your hom…
- The 3 Hidden Dangers of Frozen Pipes (And How to Thaw Them Safely) — Safely thawing a frozen pipe is crucial to prevent bursting, water damage, and costly repairs; acting quickly and correctly can save your h…
- The 90-Minute Hidden Danger of a Frozen Pipe (And the DIY Fix) — Thawing a frozen pipe quickly and safely is crucial to prevent bursting and extensive water damage to your home.
- The 3 Hidden Reasons Your Pipes Freeze (And How to Thaw Them Fast) — Discover the real culprits behind frozen pipes and learn a step-by-step method to safely thaw them, preventing costly damage.
- The #1 Mistake Homeowners Make Unclogging a Shower Drain (and 5 Better Ways) — Learn the safest and most effective ways to clear a clogged shower drain using common household tools and avoiding harsh chemicals.
- The #1 Mistake Homeowners Make Removing Ice Dams (And 3 Safer Fixes) — Discover the safest and most effective ways to remove ice dams from your roof, avoiding common mistakes that can cause severe damage to you…
Frequently asked questions
How do you know where a pipe is frozen?+
The easiest way to find a frozen section is to open all faucets. The pipe likely froze near the faucet that has little to no water flow. Visually inspect exposed pipes for frost or condensation, and feel for unusually cold spots. You can also listen for a dull thud when tapping the wall where a pipe is expected, as ice will produce a different sound than water-filled pipes.
How long does it take to thaw a frozen pipe?+
The time it takes to thaw a frozen pipe varies greatly depending on the pipe's location, the severity of the freeze, and the thawing method used. Gentle methods like a hairdryer or warm towels can take anywhere from 30 minutes to several hours. For larger, more stubborn freezes or pipes within walls, it could take longer, or require professional intervention.
Can a frozen pipe thaw on its own?+
Yes, a frozen pipe can thaw on its own if temperatures rise significantly above freezing. However, waiting for it to thaw naturally is risky because the pipe could already be damaged and burst once water pressure returns. It's always best to actively and safely thaw the pipe while keeping a close eye on it for leaks.


Discussion
Loading comments…