Tools & materials you'll need
Affiliate linksAs an Amazon Associate FixlyGuide earns from qualifying purchases — at no extra cost to you. Prices and availability are accurate as of publication and subject to change.
Quick Answer
To safely thaw a frozen pipe, first locate the frozen section, which is typically found in unheated areas like basements, crawl spaces, or exterior walls. Open nearby faucets to relieve pressure from the system. Apply gentle and consistent heat using a hairdryer, a heat gun on its lowest setting, or towels soaked in warm water. Avoid using open flames at all costs. Monitor the situation closely, and have your main water shut-off valve location memorized in case the pipe ruptures.
The Problem
You wake up to no water coming from a faucet, or perhaps just a trickle, on a cold morning. You might also notice a damp, icy patch on a wall, or even an audible dripping sound where there shouldn't be one. These are classic signs of a frozen pipe. When water freezes, it expands, creating immense pressure within the pipe. This pressure, if left unaddressed, can cause the pipe to burst, leading to significant water damage, costly repairs, and potential mold growth. The urgent need is to thaw the pipe safely and effectively before it ruptures, while also understanding why it froze in the first place to prevent future occurrences.
How It Works
Water, uniquely among common liquids, expands as it freezes, increasing its volume by about 9%. While this might seem small, a cubic foot of water expanding by 9% exerts thousands of pounds per square inch of pressure within the confines of a rigid pipe. This pressure isn't just from the ice plug itself; it's also from the water trapped between the ice plug and a closed faucet. As the ice forms, it creates a blockage. When more ice forms behind that blockage, the remaining unfrozen water has nowhere to go. This increase in localized pressure is what causes pipes to split, often along a seam or at a weakened point. The bursting doesn't always happen exactly where the ice forms; it can occur anywhere between the ice blockage and the nearest closed faucet, or even between two ice blockages. Metal pipes (copper, galvanized steel) can expand and contract to a certain extent, offering some resilience, but eventually, the pressure overwhelms them. Plastic pipes (PEX, PVC, CPVC) are somewhat more flexible but are also susceptible to bursting, especially PVC in very cold temperatures. The key to thawing is to apply heat gradually and evenly, allowing the ice to melt and the pressure to dissipate without causing a sudden, rapid expansion or contraction that could damage the pipe material.
Step-by-Step Fix
-
Locate the Frozen Section — Find the culprit.
- Start by checking pipes in unheated areas: basements, crawl spaces, attics, garages, under sinks against exterior walls. Look for frost on the outside of pipes or damp spots. If water isn't flowing from a particular faucet, trace the supply line back. The frozen section will likely be between the working part of the system and the non-working part.
- If you suspect the pipe is behind a wall: Listen carefully for dripping or gurgling sounds if the wall feels slightly damp or colder in one spot. Sometimes, a pinhole leak may already be present.
-
Open a Faucet — Relieve pressure and check progress.
- Once you've identified the affected pipe, open a faucet that receives water from that supply line, preferably the one furthest from the main water shut-off. This creates an escape route for melting water and steam, helping to relieve pressure building up behind the ice plug.
- Leave the faucet open while you work on thawing the pipe.
-
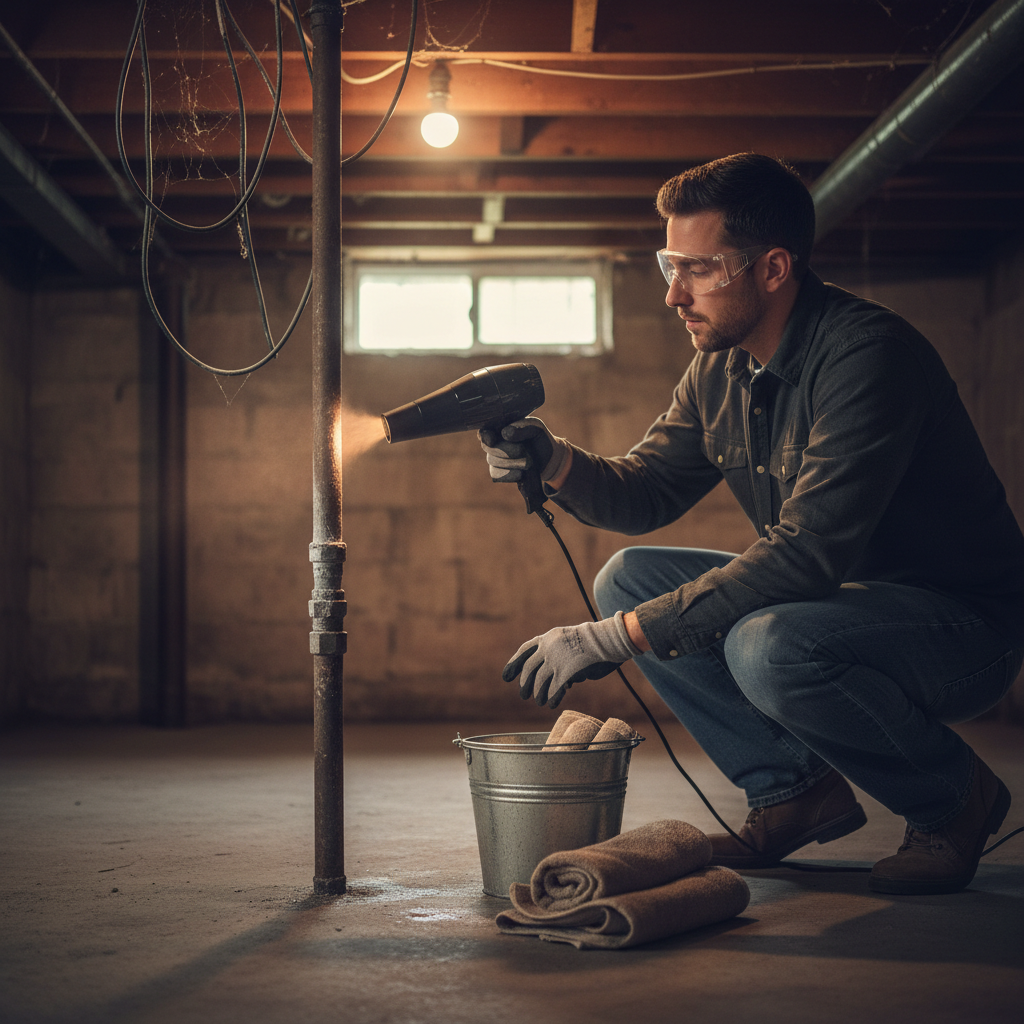
Gather Thawing Tools — Prepare your heat sources.
- Safety first! Never use an open flame device like a propane torch, kerosene heater, or blowtorch. The risk of fire or scalding is extremely high, and rapid, uneven heating can cause pipes to burst immediately.
- Recommended tools: hairdryer, heat gun (on low setting), electric heating pad, warm towels, portable space heater.
- Have a bucket and old towels ready to catch any drips if the pipe has already burst.
-
Apply Gentle, Consistent Heat — Patiently melt the ice.
- Start applying heat from the faucet end of the frozen section, working your way backward toward the area where the pipe enters the wall or floor. This allows the melting water to drain out through the open faucet.
- Hairdryer: Use a hairdryer on its highest setting, moving it back and forth along the pipe. This is generally the safest and most common method.
- Heat Gun: If using a heat gun, always set it to the lowest heat setting and keep it moving constantly. Concentrated heat can damage plastic pipes or cause metal pipes to expand too quickly.
- Warm Towels: Soak towels in hot water, wring them out, and wrap them around the frozen pipe. Replace them frequently as they cool. This is a very safe method, especially for pipes in difficult-to-reach or sensitive areas.
- Portable Space Heater: For larger areas of exposed pipe in a garage or basement, a portable space heater can warm the ambient air. Ensure it's placed safely away from flammable materials.
-
Monitor for Water Flow — Confirm the thaw.
- Keep the faucet open and continually check for water flow. As the ice melts, you'll hear gurgling, and eventually, a trickle of water will start. The flow should gradually increase until it's back to normal.
- Continue applying heat for a few minutes after water flow is restored to ensure all ice has melted.
-
Check for Leaks — Crucial post-thaw inspection.
- Once water flow is fully restored, carefully inspect the thawed section of the pipe, and any surrounding areas, for leaks. The sudden pressure change or previous freezing could have caused a crack or a loosened joint.
- Run water through the faucet for a few minutes and feel thoroughly along the pipe for dampness. Look at floors, walls, and ceilings below the pipe.
- If you find a leak: Immediately shut off your main water supply and call a licensed plumber. Do not try to patch a pipe yourself once it has burst — it's a temporary fix at best and could lead to major water damage.
-
Insulate and Prepare for Future Cold — Prevent recurrence.
- Once the pipe is thawed and confirmed leak-free, take steps to prevent it from refreezing. Wrap exposed pipes with foam pipe insulation, heat tape (following manufacturer instructions carefully), or even old blankets in a pinch.
- Keep basement and crawl space doors closed but consider opening cabinet doors under sinks on exterior walls to allow warmer air to circulate.
- In extreme cold, consider letting a small trickle of water run from vulnerable faucets overnight.
Common Causes
- Lack of Insulation: Pipes running through unheated spaces (crawl spaces, attics, garages, exterior walls) without proper insulation are highly susceptible to freezing when outdoor temperatures drop significantly. Heat simply escapes too quickly.
- Drafts and Air Leaks: Cold air infiltration from cracks or gaps in foundation walls, around window frames, or through unsealed vents can expose pipes to freezing temperatures, even if they're technically inside the building envelope.
- Thermostat Set Too Low: When you leave your home for an extended period, setting the thermostat too low (e.g., below 55°F or 13°C) can cause ambient temperatures near pipes to drop below freezing, especially in colder rooms. This is particularly risky for vacation homes.
- Poorly Sealed Utility Penetrations: Gaps where water pipes, electrical conduits, or dryer vents penetrate exterior walls allow cold air to bypass insulation and directly chill pipes located inside the wall cavity.
- Pipes Near Exterior Vents/Doors: Even well-insulated homes can have issues if a pipe runs close to an unused or poorly sealed dryer vent, an exterior hose bib, or a garage door that allows cold air to blast inwards.
- Extended Power Outages: During severe winter storms, a prolonged power outage means your heating system stops working, leading to a rapid and dangerous drop in indoor temperatures, making all pipes vulnerable.
Common Mistakes
- Using an Open Flame: This is the most dangerous mistake. Blowtorches, propane torches, or even kerosene heaters can easily ignite nearby flammable materials (insulation, wood studs) or cause extreme, rapid heating differentials that instantly burst the pipe. Never use an open flame.
- Ignoring the Frozen Pipe: Hoping it will thaw on its own is a recipe for disaster. The longer a pipe remains frozen, the higher the chance it will burst, and the more significant the eventual water damage.
- Heating Only One Spot: Concentrating heat on a single spot can cause the water to superheat or expand violently, leading to a burst. You need to apply heat gradually and evenly over the entire affected section.
- Forgetting to Open a Faucet: Opening a faucet is critical for relieving pressure. If you thaw a pipe with all valves closed, the melting water and trapped air have nowhere to go, increasing the risk of a burst.
- Not Checking for Leaks Afterwards: A pipe might thaw without immediately bursting, but a hairline fracture could develop, leading to a slow leak that causes hidden damage over time. Always inspect thoroughly.
- Using Boiling Hot Water on Pipes: While warm towels are fine, pouring boiling water directly onto plastic pipes can cause them to warp or crack due to thermal shock. For metal pipes, it's less damaging but still less effective than sustained, gentle heat.
Cost & Time Breakdown
| Task | DIY Cost | Pro Cost | Time |
|---|---|---|---|
| Thawing a single pipe | $0–$20 | $150–$400 | 20 min – 2 hours |
| Repairing a burst pipe* | $20–$50 | $300–$1,000+ | 1–3 hours (active) |
| Water damage clean up* | $100–$500 | $1,000–$5,000+ | Days to weeks |
| Insulating exposed pipes | $30–$100 | $200–$500 | 1–2 hours |
*Estimates for repairing a burst pipe and water damage cleanup can vary wildly based on the extent of the damage. A small, accessible leak might be on the lower end, while extensive water damage behind walls or to flooring would be significantly higher.
Tips & Prevention
- Insulate ALL Vulnerable Pipes: Pay special attention to pipes in unheated basements, crawl spaces, attics, garages, and those running along exterior walls. Use foam pipe insulation sleeves, which are inexpensive and easy to install.
- Seal Air Leaks: Caulk or weatherstrip around windows, doors, electrical wiring, and utility penetrations (e.g., where TV cables or dryer vents exit the house) to prevent cold air infiltration, especially on the windward side of your home.
- Maintain Indoor Temperature: Even when you're away, set your thermostat to at least 55°F (13°C) to keep interior spaces above freezing. When very cold weather is predicted, open cabinet doors under sinks on exterior walls to allow warm air to circulate around plumbing.
- Disconnect Exterior Hoses: Detach garden hoses from outdoor spigots before the first freeze. Drain and store them. If your outdoor spigot isn't frost-proof, consider turning off its dedicated interior shut-off valve and draining the line for winter.
- Run a Trickle During Extreme Cold: If you have pipes that are historically prone to freezing, consider letting cold water drip slowly from the faucet served by the vulnerable pipe during periods of extreme cold. Moving water is less likely to freeze.
- Know Your Main Water Shut-Off: Make sure every adult in the household knows where the main water shut-off valve is located and how to operate it. This is your first line of defense if a pipe bursts.
When to Call a Professional
You should call a licensed plumber immediately if you suspect a burst pipe (e.g., you see water actively leaking, a wet spot appears on a wall or ceiling, or you hear rushing water), or if you cannot locate the frozen section of the pipe. If the frozen pipe is behind a wall, ceiling, or beneath a floor, attempting to access and thaw it yourself could cause significant damage to your home's structure or electrical systems. Additionally, if the pipe is part of a complex system, or if you're unsure about the material or integrity of your plumbing, a professional can safely diagnose and repair the issue, preventing further damage and ensuring your system is up to code. They have specialized non-invasive tools to locate ice blocks and safely thaw pipes without damaging your property.
Related Articles
Keep troubleshooting with these hand-picked guides from FixlyGuide:
- The 3 Hidden Dangers of Frozen Pipes (And How to Thaw Them Safely) — Safely thawing a frozen pipe is crucial to prevent bursting, water damage, and costly repairs; acting quickly and correctly can save your h…
- The 3 Hidden Reasons Your Pipe Froze (And How to Thaw It Fast) — Thawing a frozen pipe safely requires understanding the underlying causes and applying gentle, consistent heat to prevent further damage.
- The 90-Minute Hidden Danger of a Frozen Pipe (And the DIY Fix) — Thawing a frozen pipe quickly and safely is crucial to prevent bursting and extensive water damage to your home.
- The 3 Hidden Reasons Your Pipes Freeze (and How to Thaw Them Fast) — Discover the real culprits behind frozen pipes and learn safe, effective methods to thaw them quickly, preventing costly damage to your hom…
- The 3 Hidden Reasons Your Pipes Freeze (And How to Thaw Them Fast) — Discover the real culprits behind frozen pipes and learn a step-by-step method to safely thaw them, preventing costly damage.
- Your Roof is Leaking. Now What? — A leaking roof after a storm is a homeowner's nightmare. Learn how to safely install a temporary roof tarp to prevent further water damage…
Get the print-ready PDF of this guide
A clean, ad-free, printable version you can keep on your phone or pin to the workshop wall. We'll also send occasional weekly tips matched to your home situation.
- Print-optimized layout
- Tools, materials & every step included
- Unsubscribe anytime
Frequently asked questions
How long does it take to thaw a frozen pipe?+
The time it takes to thaw a frozen pipe varies widely depending on the length of the frozen section, the diameter of the pipe, and the method of heat application. Small sections can thaw in 20-30 minutes with a hairdryer, while more extensive freezing might take several hours of continuous, gentle heating. Always monitor until full water flow is restored.
Can a frozen pipe thaw on its own?+
Yes, a frozen pipe can thaw on its own if temperatures rise significantly above freezing. However, waiting for this to happen is risky. The pipe could still burst due to internal pressure before it thaws completely, leading to costly water damage. It's always best to safely and actively thaw a frozen pipe as soon as you discover it.
What happens if a frozen pipe bursts?+
If a frozen pipe bursts, water will gush out once the ice plug melts, potentially causing severe water damage to floors, walls, ceilings, and personal belongings. This can lead to expensive repairs, mold growth, and significant disruption. Immediately shut off your main water supply if a pipe bursts and call a professional plumber.
Can I use a space heater to thaw a pipe?+
Yes, a portable space heater can be used to thaw exposed pipes in an unheated room like a basement or garage. Position it safely, ensuring it's not too close to flammable materials and is properly vented. Allow it to gradually warm the ambient air around the pipe, but do not aim it directly at a single spot on the pipe.
How cold does it have to be for pipes to freeze?+
Pipes can begin to freeze when the ambient air temperature drops below 32°F (0°C). However, the actual freezing point depends on factors like insulation, pipe material, and how long the cold temperatures persist. Pipes in unheated areas or exterior walls are most vulnerable once temperatures consistently fall to 20°F (-6°C) or lower.


Discussion
Loading comments…