Tools & materials you'll need
Affiliate linksAs an Amazon Associate FixlyGuide earns from qualifying purchases — at no extra cost to you. Prices and availability are accurate as of publication and subject to change.
Quick Answer
Many homeowners assume unpleasant well water is just a matter of sediment, but often, the true culprits are invisible contaminants like bacteria, dissolved minerals, or even agricultural runoff. A properly selected and installed whole-house well water filtration system is the most effective way to address these issues, delivering clean, safe, and great-tasting water to every tap. This guide will walk you through understanding your well water, choosing the right filtration, and maintaining your system.
The Problem
Unlike municipal water, private well water isn't treated or monitored by a public entity. This means you are solely responsible for its quality and safety. Well water can contain a wide array of contaminants, both natural and man-made, which can vary significantly even within a small geographic area. These issues manifest in various ways: cloudy or discolored water, unpleasant odors (like rotten eggs or chlorine), strange tastes (metallic, salty, or earthy), scale buildup on fixtures and appliances, and, most critically, the presence of harmful bacteria, viruses, parasites, heavy metals, or chemical pollutants that pose serious health risks. Ignoring these signs can lead to chronic health problems, damage to your plumbing and appliances, and a diminished quality of life. The challenge lies in accurately identifying what is in your water to select the most appropriate and effective filtration solution.
How It Works
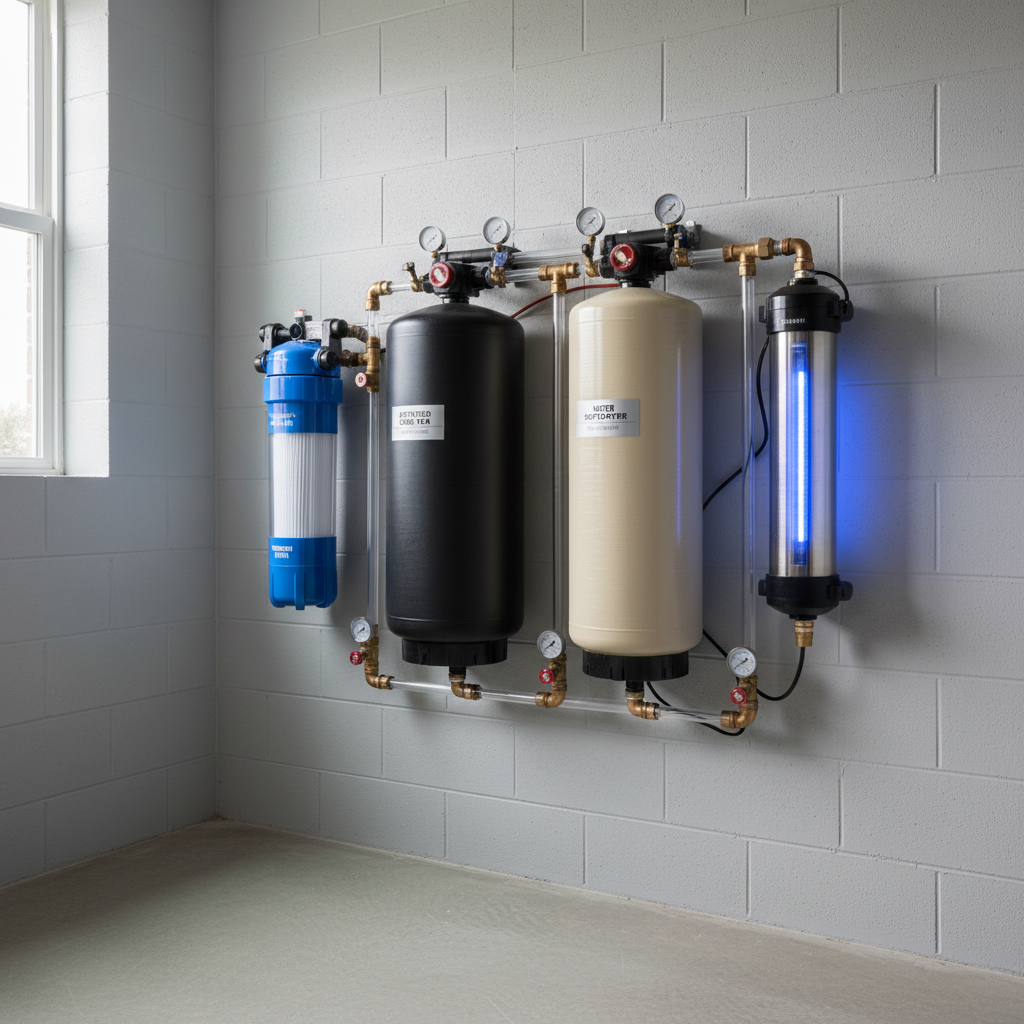
At its core, well water filtration involves passing water through various media designed to trap, neutralize, or alter contaminants. A typical whole-house system often begins with a sediment filter, which acts as a physical barrier, removing larger particles like sand, silt, and rust. This initial step is vital as it protects subsequent, finer filters from clogging prematurely. Following sediment filtration, water might then enter a carbon filter, which uses activated carbon to adsorb (attract and hold) chemicals like chlorine, volatile organic compounds (VOCs), pesticides, and some heavy metals, significantly improving taste and odor. For specific issues like hard water, a water softener exchanges hard mineral ions (calcium and magnesium) with sodium ions, preventing scale buildup. Further specialized systems exist: reverse osmosis (RO) forces water through a semi-permeable membrane, effectively removing nearly all dissolved solids, including nitrates, lead, and fluoride (often used for drinking water taps rather than whole-house due to efficiency). UV purifiers use ultraviolet light to kill bacteria, viruses, and other microorganisms by disrupting their DNA. Iron or manganese filters often employ an oxidation process, causing these dissolved metals to precipitate out of the water so they can be filtered. The specific combination and order of these filtration stages are determined by your well water's unique contaminant profile, creating a multi-barrier approach that targets different impurities at various points in the treatment process, ensuring comprehensive protection for your home's entire water supply.
Step-by-Step Fix
1. Test Your Water – Don't Guess
— Before considering any filtration system, you must get a comprehensive well water test. This is the single most important step and dictates all subsequent decisions. Collect samples according to lab instructions and send them to a certified laboratory. Test for bacteria (coliform, E. coli), nitrates/nitrites, pH, hardness, total dissolved solids (TDS), iron, manganese, and common heavy metals. If you suspect specific issues like agricultural runoff or industrial contamination, request tests for pesticides or VOCs.
- If this doesn't work: If your initial test results are inconclusive or you have persistent symptoms, consider a retest with a different lab or a more specialized panel.
2. Understand Your Results – Identify Key Contaminants
— Carefully review your water test report with a critical eye. Highlight any contaminants that exceed EPA drinking water standards or levels recommended for specific uses (e.g., laundry, bathing). Identify the primary issues: Is it hard water? High iron? Bacterial contamination? Specific chemicals? This will directly guide your choice of filtration technology.
- Safety Note: Never dismiss high levels of bacteria, nitrates, or heavy metals. These are serious health risks.
3. Choose the Right Filtration Technology – Match the Solution to the Problem
— Based on your test results, select a whole-house filtration system or combination of systems that specifically targets your identified contaminants. For example, if you have high sediment and iron, you'll start with a sediment filter followed by an iron filter. If you have bacteria, a UV purification system is essential. If you have hard water, a water softener is needed. For general improvement of taste, odor, and removal of chemicals, a large-capacity activated carbon filter is a good choice. Consult with reputable water treatment specialists if you are unsure.
- Tools/Materials: Budget for filtration units (sediment, carbon, softener, UV, etc.), appropriate fittings, PEX or copper tubing, and shut-off valves.
4. Plan Your System Layout – Optimize for Efficiency and Access
— Determine the best location for each component of your filtration system. Typically, whole-house systems are installed on the main water line after the pressure tank but before the water heater and any branches to faucets or appliances. Ensure there's adequate space for maintenance, filter changes, and future expansion. Plan for bypass valves to allow water flow during maintenance without shutting off the main supply.
- Tip: Keep the system away from freezing temperatures and direct sunlight.
5. Turn Off Water and Drain – Prepare for Installation
— Locate your well pump's main power switch and turn it off. Then, close the main water shut-off valve to your house (usually near where the well line enters). Open the lowest faucet in your house to drain the water pressure from the system, and allow any remaining water to flow out.
- Safety Note: Always de-energize the well pump before beginning any work on the water line.
6. Install Sediment Filter First – The Foundation of Clean Water
— Mount the sediment filter housing securely to a wall stud. Cut into your main water line at the planned location, ensuring clean, straight cuts. Install any necessary PEX or copper fittings, bypass valves, and then the sediment filter housing. Follow the manufacturer's instructions carefully regarding flow direction. Ensure all connections are watertight.
7. Install Subsequent Filtration Stages – Layering Protection
— Continue installing additional filtration stages (e.g., carbon filter, water softener, iron filter, UV purifier) in the correct order, following the manufacturer's instructions for each unit. Maintain proper spacing for future filter changes and ensure all connections are leak-free. Use plumber's tape or thread sealant on all threaded fittings.
- Tools/Materials: Plumber's tape or pipe thread sealant, pipe cutter, deburring tool, PEX crimping tool, or soldering torch (depending on plumbing type).
8. Flush and Test for Leaks – The Critical Check
— Once all components are installed, slowly open the main water supply valve to the house, allowing the system to fill. Check meticulously for any leaks at all connections. Once full, open a distant faucet and allow water to run for several minutes to flush out any air, carbon fines (from new carbon filters), or installation debris. Close the faucet when the water runs clear and smooth.
9. Re-energize Well Pump and Monitor – Full System Activation
— Turn the well pump's power switch back on. Monitor the system for the next few hours and days, checking for any new leaks or unusual noises. Perform another water test after a few weeks to confirm the system is effectively removing the target contaminants and that your water quality has significantly improved.
Common Causes
- Geological Factors: Natural minerals in the ground (iron, manganese, sulfur, calcium, magnesium) dissolve into groundwater, causing hardness, metallic tastes, or odors. Geological formations can also introduce naturally occurring arsenic or radon.
- Agricultural Runoff: Fertilizers, pesticides, and livestock waste can seep into groundwater, introducing nitrates, phosphates, and bacteria.
- Failing Septic Systems: Leaking or improperly maintained septic tanks can contaminate well water with pathogens like E. coli.
- Industrial Pollution: Proximity to industrial sites can introduce heavy metals, VOCs, and other chemical contaminants into the water table.
- Aging Well Infrastructure: Cracks in the well casing, a loose well cap, or a poor seal can allow surface water, insects, or small animals to enter the well, introducing bacteria or sediment.
- Seasonal Changes: Heavy rainfall can increase surface runoff, leading to temporary spikes in turbidity or bacterial contamination.
Common Mistakes
- Skipping the Water Test: Installing a filter without knowing what needs to be removed is like shooting in the dark. You might install an expensive system that doesn't address your specific issues.
- Under-sizing the System: Choosing filters that are too small for your household's water usage or flow rate leads to premature clogging, reduced effectiveness, and frequent maintenance.
- Ignoring Flow Direction: Most filters have a designated inlet and outlet. Installing them backward dramatically reduces efficiency or renders them useless.
- Forgetting Bypass Valves: Without bypass valves around your whole-house system, you'll have to shut off your entire home's water supply every time you perform maintenance or change a filter.
- Not Flushing the System: Failing to flush new filters can lead to air in the lines, initial cloudy water (especially with carbon filters), or tiny debris entering your plumbing system.
- Neglecting Scheduled Maintenance: Filters and media have a lifespan. Failing to change filters or replenish media on schedule will lead to reduced effectiveness, clogging, and potential system damage.
Cost & Time Breakdown
| Task | DIY cost | Pro cost | Time |
|---|---|---|---|
| Comprehensive Water Test | $150–$400 | $150–$400 | 15 mins (sample) |
| Sediment Filter Installation | $50–$150 | N/A | 1–2 hours |
| Carbon Filter Installation | $150–$500 | N/A | 1–2 hours |
| Water Softener Installation | $400–$1,500 | $800–$3,000 | 3–5 hours |
| UV Purifier Installation | $400–$1,000 | $700–$1,500 | 2–4 hours |
| Iron/Manganese Filter Install | $500–$2,000 | $1,000–$4,000 | 4–6 hours |
Tips & Prevention
- Annual Water Testing: Even with a filtration system, test your well water annually for bacteria and nitrates, and every few years for a broader spectrum of contaminants or if you notice changes.
- Routine Filter Changes: Adhere strictly to the manufacturer's recommended filter replacement schedule. Mark your calendar or set reminders.
- Observe Your Water: Pay attention to any changes in taste, odor, clarity, or presence of scale. These are early warning signs that your system may need attention or your source water has changed.
- Inspect Well Cap & Casing: Periodically check your well cap for a tight seal and inspect the well casing for any cracks or damage, which can allow contaminants to enter.
- Maintain Septic System: If you have a septic system, regular pumping and maintenance are crucial to prevent contamination of your well water.
When to Call a Professional
While installing individual filter components can be a DIY project for experienced homeowners, several situations warrant calling a licensed professional. If your water test reveals dangerous levels of lead, arsenic, radon, or complex chemical contamination, a specialist can design a multi-stage system that ensures effective removal and compliance with health standards. For issues requiring significant modifications to your main water line, such as re-routing pipes or tying into existing complex plumbing, a licensed plumber will ensure the installation is up to code and robust. Additionally, if your well pump or pressure tank needs to be serviced as part of the filtration system integration, a well and pump technician is essential to avoid damaging critical components. Always consult a professional for advanced filtration needs or if you're uncomfortable with any aspect of the installation process, especially involving electrical connections for UV purifiers or complex plumbing for systems like reverse osmosis that might require specific pressure and drain considerations to operate efficiently without compromising your well
Related Articles
Keep troubleshooting with these hand-picked guides from FixlyGuide:
- The Secret to Lush Raised Beds? It's Not Just About How You Water — Smart irrigation for raised garden beds isn't just about automation; it's about delivering the right amount of water precisely when your pl…
- Is That Sweet Car Smell a Secret Killer? (& 6 Other Odors to Watch For) — Unusual odors in your car aren't just unpleasant; they're often critical warnings of underlying mechanical issues that could compromise saf…
- The Hidden Reason Your AC Isn't Cooling (And Why Most Homeowners Get It Wrong) — Is your central AC blowing warm air or struggling to cool your home? The culprit is often a silent but serious issue many homeowners overlo…
- The Hidden Reason Your GFCI Trips (It's Not Always a Faulty Outlet) — A continuously tripping GFCI outlet is a critical safety warning, often indicating moisture, a faulty appliance, or a wiring problem that r…
- The Hidden Reason Your GFCI Trips (It’s Not Always a Bad Outlet) — A tripping GFCI outlet is a safety mechanism doing its job, often indicating a problem like moisture, a faulty appliance, or a wiring issue…
- The #1 Hidden Culprit Behind Your Whole-House Low Water Pressure (It's Not Your City!) — Discover the most common, often overlooked cause of low water pressure throughout your entire home and how to fix it yourself.
This article was independently written by FixlyGuide based on the source topic.
Frequently asked questions
How often should I test my well water?+
It's recommended to test your well water annually for bacteria and nitrates, and every 3-5 years for a broader range of contaminants, or immediately if you notice changes in taste, odor, or clarity.
Can a whole-house filter remove all contaminants?+
No single filter can remove all contaminants. A whole-house system is typically a combination of filters targeting specific issues identified by your water test. For extremely pure drinking water, a specialized point-of-use system like reverse osmosis may also be needed.
What's the difference between a water softener and a water filter?+
A water softener specifically addresses 'hard' water by removing minerals like calcium and magnesium, which cause scale buildup. A water filter removes a broader range of impurities like sediment, chemicals, and bacteria, improving safety, taste, and odor.


Discussion
Loading comments…