
Tools & materials you'll need
Affiliate links- AmazonNut driver setOr screwdriver set to remove condenser panels
- AmazonInsulated screwdriverCrucial for safely discharging the capacitor
- AmazonNeedle-nose pliersTo disconnect spade connectors
- AmazonDigital multimeter (optional)For testing capacitor MFD if not obviously bulging
- AmazonSmall brush or ragFor quick cleaning of debris and connections
- AmazonReplacement dual-run capacitorMatch original MFD and voltage ratings
As an Amazon Associate FixlyGuide earns from qualifying purchases — at no extra cost to you. Prices and availability are accurate as of publication and subject to change.
Quick Answer
AWhen your AC condenser fan stops spinning, the most frequent culprit is a failing run capacitor. This inexpensive, cylindrical component provides the necessary jolt of electricity to start and run both the fan motor and the compressor. If it's weak or completely dead, the fan simply won't have the power to kick on. The good news? This is a relatively easy and affordable DIY repair, often taking less than 30 minutes and costing under $30 for the part.
The Problem
Your outdoor AC unit – the condenser – houses a large fan that pulls air across the condenser coils, dissipating heat from your home's refrigerant. If this fan isn't spinning, heat can't be released, causing your AC system to fail at cooling your home. You'll likely notice warm air blowing from your vents, or no air at all, and your compressor might be running constantly, leading to overheating and potential damage. A non-spinning fan can also cause the entire unit to trip its circuit breaker, or worse, permanently damage the compressor due to excessive heat buildup. Identifying and fixing this issue promptly is crucial for preventing more expensive repairs down the line.
How It Works
To understand why your AC fan stops, it helps to know how it spins in the first place. The outdoor condenser unit contains several key components: the compressor (which pressurizes the refrigerant), the condenser coils (where heat exchange happens), and the condenser fan (which moves air over these coils). Both the compressor and the fan motor are induction motors, meaning they don't produce their own starting torque. They rely on an external electrical component to give them the initial kick needed to rotate.
This is where the dual-run capacitor comes in. It's a cylindrical component with three terminals: one marked "Herm" (for hermetic, connecting to the compressor), one marked "Fan" (connecting to the fan motor), and one marked "C" (for common, connecting to the power supply). Inside, it contains two capacitors – one for the compressor and one for the fan – though sometimes they are separate units. When your thermostat calls for cooling, voltage is sent to the capacitor. The capacitor stores an electrical charge and then discharges it rapidly to the motor windings, creating a phase shift in the alternating current. This phase shift generates a rotating magnetic field that physically pushes the motor's rotor into motion. Once the motor is spinning, the capacitor continues to provide a slight phase shift, improving efficiency and torque. If the capacitor is dead or weakened, it can't deliver that crucial starting current, and the fan motor will simply hum or sit motionless, unable to overcome its inertia. Similarly, if the fan motor itself is seized or has faulty windings, it won't spin even with a good capacitor.
Step-by-Step Fix
1. Safety First – Turn off the power
- Locate your outdoor AC unit's disconnect box, usually a small gray box mounted on the wall near the unit. Flip the switch (or pull the fuse handle) to the OFF position. For added safety, also turn off the corresponding circuit breaker for your AC unit in your home's main electrical panel. Ensure no power is flowing to the unit before proceeding. Never work on an AC unit with the power connected.
2. Access the Fan Compartment – Remove the service panel
- Using a nut driver or screwdriver, unscrew the screws holding the service panel (often a larger panel on one side of the unit) and the top grille of the condenser unit. Carefully lift the top grille, which usually has the fan motor attached to it, and move it to the side. Be careful not to strain the electrical wires connecting the fan motor. You may need to prop it up with a piece of wood or bungee cord it to something nearby.
3. Inspect for Obvious Obstructions – Check the fan blades
- With the power safely off and the fan accessible, gently try to spin the fan blades by hand. They should spin freely with minimal resistance. If they are stiff, jammed, or wobble excessively, something might be physically blocking them (twigs, leaves, debris) or the motor bearings might be seized. Clear any obstructions. If the motor is seized, it likely needs replacement – a more advanced repair.
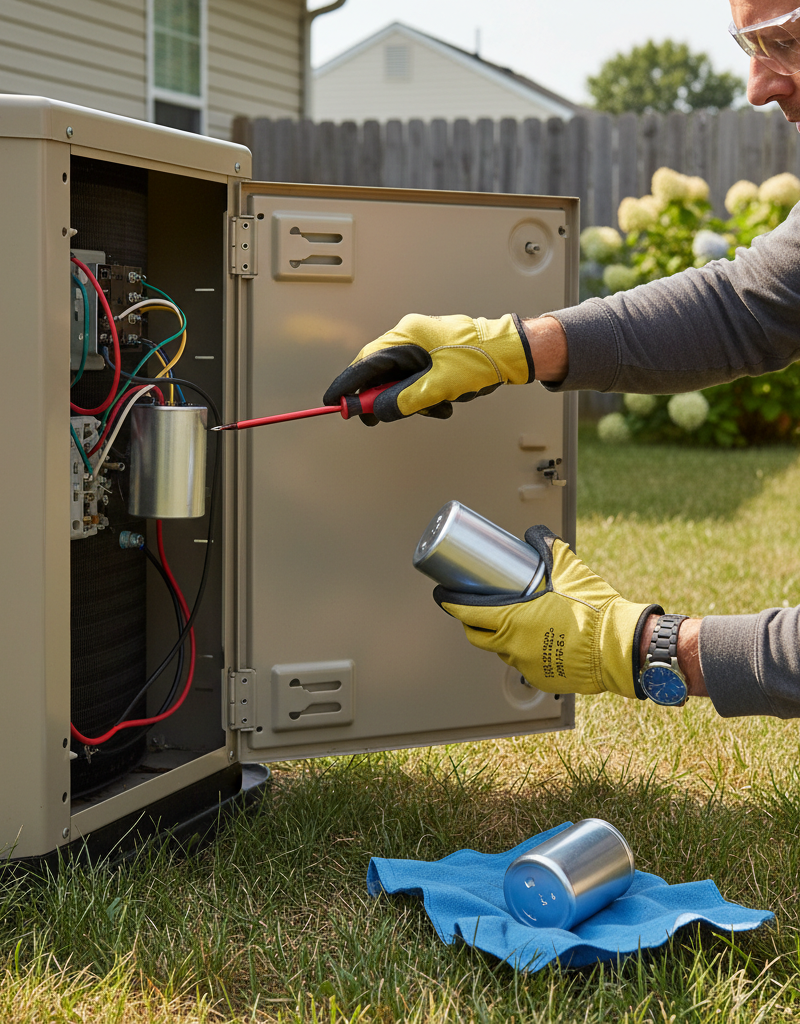
4. Locate the Capacitor – Identify the cylindrical component
- Look for a cylindrical component, usually silver or black, often located near the control board or wiring harness. It will have two or three terminals on top (Common, Fan, Herm). Note the markings on the capacitor. If it's bulging, leaking, or rusted, it's almost certainly failed.
5. Discharge the Capacitor Safely – Crucial safety step
- Warning: Capacitors can store a dangerous electrical charge even after power is disconnected. Using a screwdriver with an insulated handle, touch the metal shaft across the 'C' (common) and 'Herm' terminals simultaneously. You may see a spark or hear a pop – this is normal and indicates the capacitor is discharging. Repeat this step for the 'C' and 'Fan' terminals. Hold the screwdriver in place for several seconds for each pair. For dual capacitors, discharge all three terminals at once (C to Herm, C to Fan, and Herm to Fan if necessary).
6. Disconnect and Remove the Old Capacitor – Note wiring
- Take a clear photo of the wiring connections before you disconnect anything! This will be your map for reinstallation. Using needle-nose pliers, carefully pull the insulated spade connectors off the terminals of the old capacitor. Note which wire goes to which terminal (C, Fan, Herm). Once disconnected, loosen the clamp or screw holding the capacitor in place and remove it from the unit.
7. Match the New Capacitor – Get the right replacement
- Take your old capacitor to an HVAC supply store or order online. The critical specifications are capacitance (measured in microfarads, or µF, often written as MFD) and voltage (VAC). For example, a capacitor might be labeled "40/5 MFD 370 VAC." The first number (40 MFD) is for the compressor, and the second (5 MFD) is for the fan. The voltage rating of the new capacitor must be equal to or greater than the old one, never lower. Physically, the new capacitor should be roughly the same size to fit in the mounting bracket.
8. Install the New Capacitor – Connect wires correctly
- Carefully insert the new capacitor into the mounting bracket. Refer to your photo from Step 6 and reconnect the wires to the correct terminals (C to Common, Fan to Fan, Herm to Herm). Ensure the spade connectors are pushed on firmly.
9. Reassemble the Condenser Unit – Secure the fan and panels
- Carefully lower the top grille with the fan motor back into position. Make sure no wires are pinched. Screw the top grille and any service panels back into place securely.
10. Restore Power and Test – Check for proper operation
* Go back to your outdoor disconnect and indoor circuit breaker. Restore power to the AC unit. Set your thermostat to a cooling mode and lower the temperature significantly to ensure the AC calls for cooling. Go outside and observe the condenser fan. It should start spinning smoothly and quietly. Feel for cool air coming from the outdoor unit as it releases heat.
11. If the Fan Still Doesn't Spin – Further diagnostics
* If the fan still doesn't spin, even with a new capacitor, and it wasn't seized in Step 3, the fan motor itself is likely bad. This is a more involved repair often best left to a professional, as it requires specific motor swapping and wiring knowledge. Another possibility, though less common, is a wiring issue or a problem with the control board. If the fan hums but doesn't spin, try giving it a gentle push with a stick (NOT your hand!) while it's humming. If it starts, it's almost certainly a bad capacitor, or a motor with very weak starting windings.
Common Causes
- Failed Run Capacitor: This is by far the most common cause. Capacitors degrade over time due to heat, age, and constant cycling, eventually losing their ability to hold and release a charge.
- Seized Fan Motor Bearings: Over time, the bearings inside the fan motor can wear out or become rusted, causing the motor to seize and prevent the fan from spinning. This often presents as a stiff fan that won't spin freely by hand.
- Overheated Motor (Thermal Overload): If the fan motor's internal thermal overload trips due to excessive heat (perhaps from a clogged unit or trying to run with a bad capacitor for too long), it will temporarily shut off. It should reset automatically once cooled, but a regularly tripping overload indicates an underlying problem.
- Blocked Fan Blades: Debris like sticks, leaves, plastic bags, or even small animals can get lodged in the fan blades, preventing them from rotating.
- Faulty Contactor: The contactor is an electromechanical switch that sends power to the compressor and fan. If its contacts are pitted or stuck open, power won't reach the fan motor.
- Loose or Damaged Wiring: Vibrations or rodent damage can lead to loose or chewed wires connecting to the fan motor or capacitor, disrupting the electrical flow.
Common Mistakes
- Forgetting to Turn Off Power: This is the most dangerous mistake. Always, always, always cut power at both the disconnect and the breaker before touching any internal components.
- Not Discharging the Capacitor: A charged capacitor can deliver a painful, potentially lethal shock. Discharging it properly with an insulated screwdriver is non-negotiable.
- Incorrectly Sizing the Replacement Capacitor: Using a capacitor with the wrong MFD rating can damage your fan motor or compressor. Always match the MFD and ensure the voltage is equal to or higher.
- Incorrect Wiring: Connecting wires to the wrong terminals on a dual-run capacitor will prevent the unit from running correctly and could cause damage.
- Ignoring the Hum: If the fan hums but doesn't spin, it's a clear sign of a starting issue (usually the capacitor). Forcing the unit to run this way will quickly overheat and destroy the fan motor or compressor.
- Assuming the Fan is the Only Problem: While a non-spinning fan points directly to the fan circuit, always check other components like the contactor if replacing the capacitor and clearing obstructions doesn't work.
Cost & Time Breakdown
| Task | DIY cost | Pro cost | Time |
|---|---|---|---|
| Diagnose (visual, manual spin) | $0 | Covered in service | 5–10 minutes |
| Replacement Capacitor | $15–$30 | Included in service | 10–15 minutes |
| Fan Motor Replacement (DIY parts) | $100–$300 | $300–$600+ | 1–3 hours |
| Professional Service Call | N/A | $75–$150 (diagnostic) | 30–60 minutes |
| Full Capacitor Replacement (Pro) | N/A | $150–$350 | 30–60 minutes |
Tips & Prevention
- Regular Cleaning: Keep the area around your outdoor condenser unit clear of debris, plants, and grass clippings. Annually (or semi-annually if you live in a dusty area), turn off power and gently spray the coils from the inside out with a garden hose to remove dirt buildup that can hinder heat exchange and overwork the fan.
- Listen to Your Unit: Pay attention to unusual noises. A humming sound without the fan spinning, grinding, or squealing could indicate a failing capacitor or motor bearings.
- Monitor Cooling Performance: If your home isn't cooling as efficiently as it used to, or your AC seems to run constantly without achieving the set temperature, investigate the outdoor unit. Check the fan operation regularly.
- Proactive Capacitor Replacement: Some homeowners opt to proactively replace capacitors every 5-7 years as they are inexpensive and a common failure point. This can help prevent unexpected breakdowns during peak cooling season.
- Check Electrical Connections: During annual maintenance, with power off, inspect wiring for any signs of corrosion, fraying, or loose connections. Tighten any that seem loose.
When to Call a Professional
While a capacitor replacement is a gratifying DIY fix, there are clear instances where calling a licensed HVAC professional is the safest and most efficient path. If, after replacing the capacitor and ensuring there are no obvious obstructions, your fan still refuses to spin, the issue likely lies with the fan motor itself, the contactor, or potentially the unit's control board. Replacing a fan motor involves working with specific electrical connections, ensuring correct motor rotation, and often dealing with more complex wiring diagrams that can be daunting for the average homeowner. Furthermore, if you detect a burning smell, hear loud grinding from the unit, or if the compressor is struggling and making unusual noises, it's best to halt DIY efforts immediately. A professional can accurately diagnose internal component failures, ensure proper system pressures, and perform repairs without risking further damage to your expensive HVAC system or your personal safety.
Related Articles
Keep troubleshooting with these hand-picked guides from FixlyGuide:
- The #1 Reason Your AC Blows Warm Air (And It's Not What You Think) — A dirty air filter is often the overlooked culprit behind an air conditioner blowing warm air, hindering its ability to cool your home effi…
- The #1 Mistake Homeowners Make Installing a Smart Thermostat (and How to Fix It) — Avoid the most common pitfall when installing a smart thermostat yourself and ensure a smooth, energy-efficient setup.
- The #1 Dryer Heating Culprit Homeowners Miss (And the Cheap Fix) — Your dryer's not heating? Often, the culprit is a hidden component that's easy and inexpensive to replace if you know where to look.
- The $5 Trick to Fix a Frozen AC Fan (and Why It Stops Spinning) — A non-spinning AC condenser fan can lead to system overheating and no cold air. Often, a simple, inexpensive fix can restore function.
- The One Part That Fails When Your Freezer Works But Fridge Doesn’t ($30 Fix) — If your freezer works but the refrigerator isn't cooling, the most common culprit is a faulty evaporator fan motor or a a clogged defrost d…
- The #1 Mistake Homeowners Make When Their AC Drain Clogs (And The $5 Fix) — Discover the most common error homeowners make when tackling a clogged AC drain line and learn a simple, inexpensive solution to prevent co…
Frequently asked questions
Why is my outdoor AC fan not spinning?+
The most common reason your outdoor AC fan isn't spinning is a faulty run capacitor. This component provides the necessary electrical charge to start the fan motor. Other causes can include a seized motor, obstructions, or electrical issues.
Can I replace the AC capacitor myself?+
Yes, replacing an AC capacitor is a common DIY repair, but it requires strict adherence to safety protocols, including turning off all power and safely discharging the old capacitor before handling. Make sure to match the microfarad (MFD) and voltage ratings of the old capacitor.
What happens if my AC fan doesn't spin?+
If your AC fan doesn't spin, the condenser unit cannot dissipate heat effectively, leading to poor cooling performance, warm air from indoor vents, and the compressor overheating. Prolonged operation without the fan can severely damage the compressor, leading to very expensive repairs.
How much does it cost to replace an AC fan capacitor?+
A new AC capacitor typically costs between $15 and $30 if you do it yourself. If you hire a professional HVAC technician, the total cost for parts and labor can range from $150 to $350.
How do I know if my AC fan motor is bad or just the capacitor?+
If the fan blades are stiff and won't spin freely by hand (with power off), the motor is likely seized. If the fan hums but doesn't spin, or spins slowly after a manual push, it's almost certainly a capacitor issue. Replacing the capacitor is a good first step, as it's cheaper and easier than a motor.


Discussion
Loading comments…