Tools & materials you'll need
Affiliate linksAs an Amazon Associate FixlyGuide earns from qualifying purchases — at no extra cost to you. Prices and availability are accurate as of publication and subject to change.
Quick Answer
If your AC condenser fan isn't spinning, leading to warm air from your vents or the outdoor unit overheating, a common culprit is a failed run capacitor, a seized fan motor, or an obstruction. You can often troubleshoot and fix minor issues like obstructions or replace a faulty capacitor with basic tools in under an hour, potentially saving you hundreds on a service call. However, always prioritize safety by ensuring the power is completely disconnected before touching any components.
The Problem
Imagine the worst summer heatwave hitting, and suddenly, your AC is blowing warm air, or worse, not cooling at all. You head outside and notice the large fan on your outdoor AC condenser unit isn't spinning, even though you can hear a humming sound coming from the unit. This isn't just an inconvenience; it's a critical issue that can lead to severe damage to your air conditioning system. The condenser fan is responsible for dissipating heat from the refrigerant as it flows through the condenser coils. Without this airflow, the refrigerant can't release its heat, causing the system pressure to build, the compressor to overheat, and potentially leading to a complete system shutdown or costly compressor failure.
How It Works
Your outdoor AC unit, or condenser, has three main components: the compressor, the condenser coil, and the condenser fan. The compressor acts as the heart of the system, circulating refrigerant. As hot, high-pressure refrigerant gas leaves the compressor, it enters the condenser coil. Here, the heat needs to be released into the outside air. This is where the condenser fan comes in. Mounted on top of the unit, the fan draws air over the hot condenser coils, facilitating the transfer of heat from the refrigerant to the ambient air. As the refrigerant cools, it condenses back into a liquid state before returning to the indoor evaporator coil to absorb more heat. The fan motor, usually a single-phase AC motor, receives power directly from the main control board, often with the assistance of an electrical component called a run capacitor. This capacitor provides the initial electrical 'kick-start' (or phase shift) needed to get the fan motor spinning and then helps maintain its efficiency during operation. If the capacitor weakens or fails, the motor may hum but lack the power to start, or it might run sluggishly, leading to insufficient airflow. A working fan is crucial for the entire refrigeration cycle to function properly and efficiently.
Step-by-Step Fix
SAFETY FIRST – Before attempting any repair, ALWAYS switch off the power to your AC unit at both the thermostat and the main electrical breaker panel. Confirm power is off using a voltage tester before proceeding.
1. Inspect for Obstructions – Check the fan blades and grille for debris.
- Look for leaves, twigs, dirt, or even small animals caught in the fan blades or restrict the grille.
- Solution: Carefully remove any obstructions by hand or with a stick. Be gentle to avoid bending the blades. If caught securely, you may need to remove the top grille (after ensuring power is off).
2. Check the Fan Blades for Free Movement – Manually spin the fan blades.
- With the power still off, carefully reach down and try to spin the fan blades by hand. They should spin freely with minimal resistance.
- If stiff/stuck: This could indicate a seized motor bearing. A light lubrication with specific motor bearing oil might provide a temporary fix, but often a seized motor requires replacement.
- If freely spinning but not starting: This points more strongly to an electrical issue, likely the capacitor.
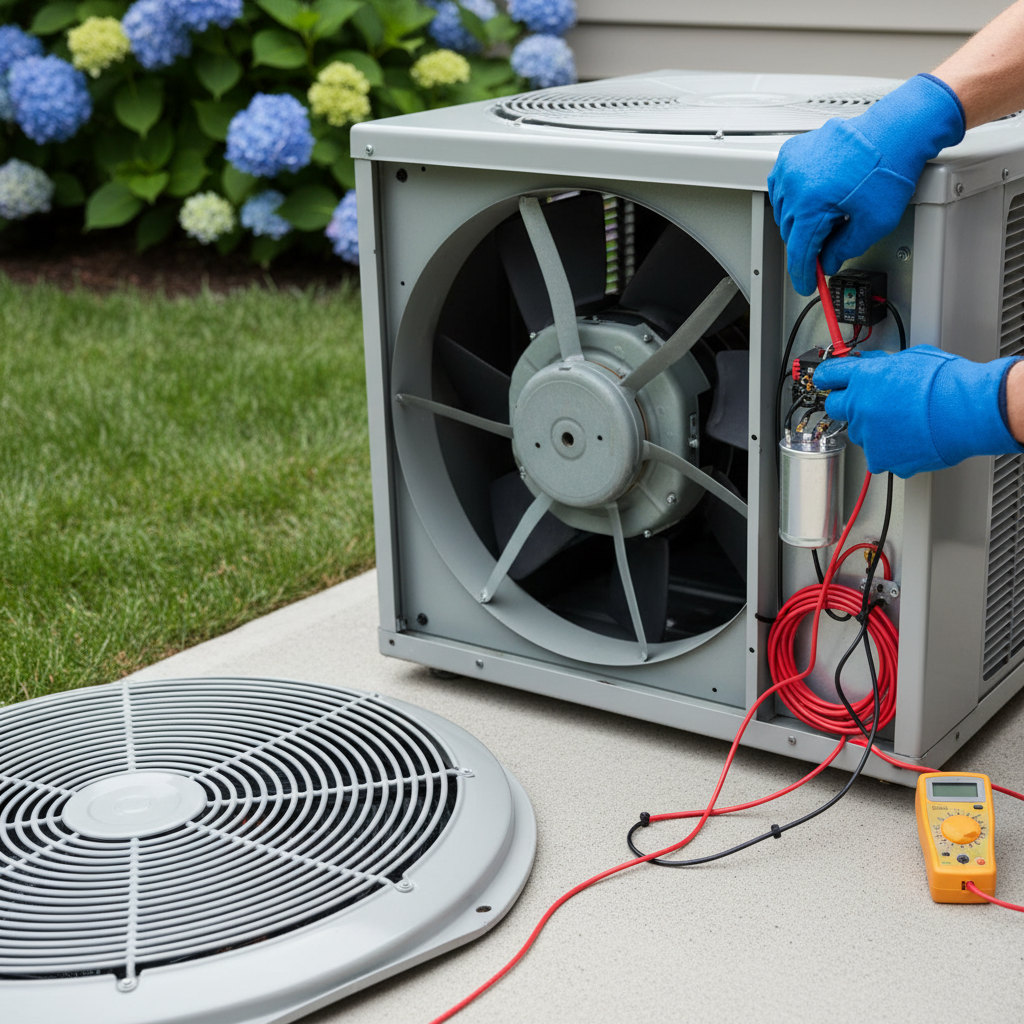
3. Examine the Run Capacitor – Look for visual signs of failure.
- Locate the capacitor inside the electrical panel of your outdoor unit (usually a cylindrical component, sometimes multi-terminal). After ensuring the power is OFF and discharging the capacitor (see safety note below), visually inspect it.
- Signs of failure: Bulging top, leaking fluid, or burn marks. These are clear indicators it needs replacement.
- Safety Note: Capacitors can store a dangerous electrical charge even after power is off. Always discharge it before touching. Use a screwdriver with an insulated handle by shorting the terminals (touching the metal shaft simultaneously to both terminals). You may see a spark. Wear electrical safety gloves.
4. Test the Capacitor (Optional but Recommended) – Use a multimeter to confirm capacitance.
- If no visual signs of damage, use a multimeter set to measure capacitance (μF or microfarads). Touch the probes to the capacitor terminals (main common and fan terminal for dual run capacitors).
- Compare to label: The reading should be within +/- 5-10% of the value printed on the capacitor label (e.g., 45/5 MFD).
- If out of range: Replace the capacitor. Even if it measures slightly within range, a weak capacitor can still cause starting issues.
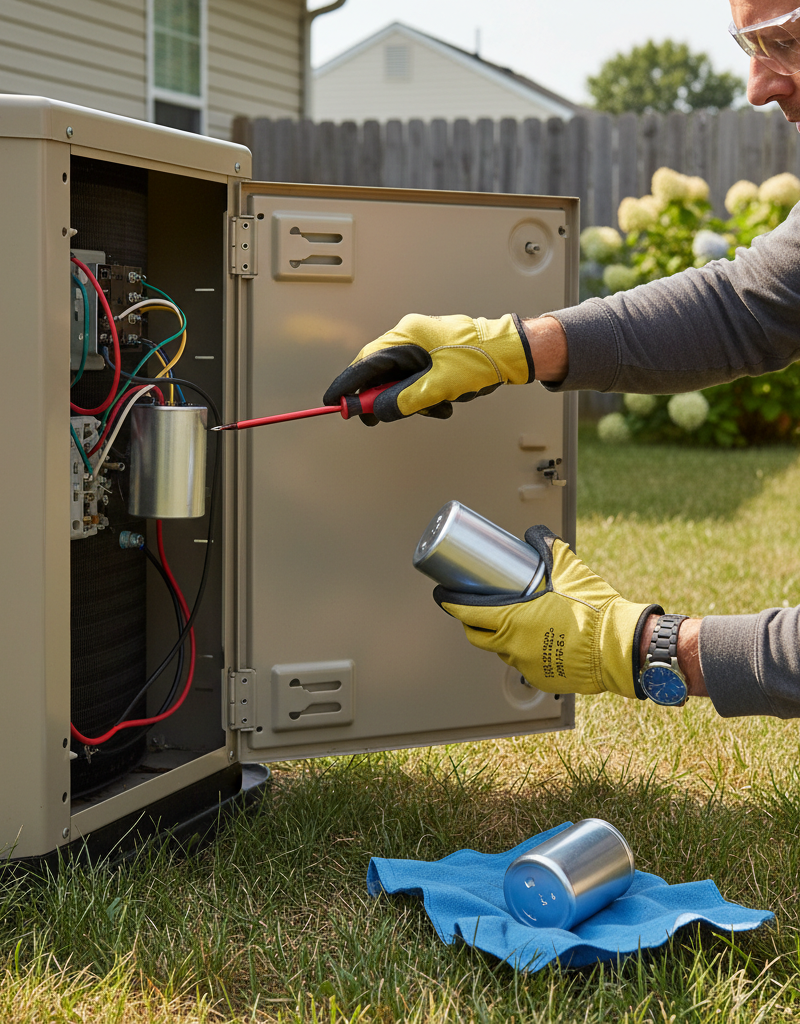
5. Replace the Capacitor – Install a new, matching capacitor.
- Note the wiring configuration before disconnecting anything. Take a photo if necessary.
- Carefully disconnect the wires from the old capacitor, noting which wire goes to which terminal (Herm/Fan, C/Common, and Heat/Compressor).
- Connect the wires to the new capacitor, ensuring they match the original configuration. Make sure the MFD ratings (e.g., 45/5 MFD) and voltage rating (e.g., 370V/440V) match or exceed the original.
- Important: Even if your unit only has a single-stage fan motor, the capacitor might be a dual-run capacitor (three terminals: C, Herm, Fan). Ensure you connect the fan motor wires correctly (usually to 'Fan' and 'C').
6. Reset the Breaker and Test – Restore power and observe.
- Once the new capacitor is installed and all covers are secured, restore power at the breaker panel.
- Listen and observe if the fan motor starts spinning normally. You should hear the fan kick on and feel air moving upwards (most condenser fans pull air up).
- If it still doesn't spin, the issue might be the fan motor itself, the contactor, or wiring.
7. Consider Fan Motor Replacement – If the capacitor isn't the issue.
- If the fan blades are stiff, the motor hums but never starts even with a new capacitor, or the motor is visibly damaged (melted wires, burning smell), the fan motor likely needs replacement.
- Note: Fan motor replacement involves more complex wiring and disconnecting/reconnecting a grounded component. While doable for an advanced DIYer, ensure you label all wires precisely and understand electrical grounding. If unsure, this is a good point to call a professional.
Common Causes
- Failed Run Capacitor: This is by far the most common cause. The capacitor degrades over time due to heat, age, and electrical surges, losing its ability to provide the necessary electrical charge to start the fan motor.
- Obstructed Fan Blades: Leaves, dust, debris, or even small animals can get lodged in the fan blades, preventing them from spinning freely.
- Seized Fan Motor Bearings: Over time, the bearings in the fan motor can wear out or lose lubrication, causing the motor to seize up. You'll notice resistance when trying to spin the blades manually.
- Faulty Contactor: The contactor is an electrical relay that sends power to the compressor and fan motor. If its contacts are pitted or stuck open, power may not reach the fan motor.
- Wiring Issues: Loose, corroded, or damaged wiring connections to the fan motor or capacitor can interrupt power supply.
- Overheated Motor: If the motor overheats (often due to prolonged run time or a partially failed capacitor), its internal thermal overload protector might trip, temporarily shutting it down. Once it cools, it might restart, indicating an underlying problem.
Common Mistakes
- Forgetting to Shut Off Power: This is incredibly dangerous. Always turn off the breaker and verify with a voltage tester before touching any component inside the unit.
- Not Discharging the Capacitor: Capacitors store a strong electrical charge. Failing to discharge it can result in a severe electric shock even when the power is off.
- Using the Wrong Capacitor: Capacitors are rated by microfarads (MFD) and voltage. Installing one with incorrect ratings can damage the fan motor or the capacitor itself.
- Bending Fan Blades: Attempting to force a stuck fan blade or carelessly removing debris can bend the delicate aluminum blades, leading to imbalance and further motor damage or reduced airflow.
- Overlooking Simple Obstructions: Sometimes the fix is as simple as removing a leaf. Don't immediately jump to complex electrical diagnoses without checking the basics first.
- Ignoring a Humming Sound: A humming sound without fan rotation almost always indicates an electrical problem preventing the motor from starting (typically the capacitor). Don't ignore it; it means power is present and trying to start the motor.
Cost & Time Breakdown
| Task | DIY Cost | Pro Cost | Time |
|---|---|---|---|
| Debris Removal | $0 | $75–$150 | 5–15 minutes |
| Capacitor Replacement | $15–$50 | $150–$350 | 30–60 minutes |
| Fan Motor Replacement | $100–$300 | $400–$800 | 1–2 hours |
| Contactor Replacement | $20–$70 | $150–$300 | 30–60 minutes |
| Wiring Repair | $5–$20 | $100–$250 | 15–45 minutes |
Tips & Prevention
- Annual Cleaning: Regularly remove leaves, grass clippings, and other debris from around and inside your condenser unit. Keep the area clear for at least two feet in all directions.
- Check Capacitor Annually: Have your AC technician check your capacitor's health during annual maintenance. A weak capacitor can be preemptively replaced before it fails completely.
- Listen for Changes: Pay attention to any unusual noises coming from your outdoor unit. A struggling fan motor or a humming sound can be early warning signs.
- Clear the Area: Ensure plants, shrubs, and fences are kept at a safe distance (at least 2 feet) from the condenser unit to allow for proper airflow.
- Professional Maintenance: Schedule professional HVAC maintenance once a year. Technicians can spot potential issues like worn bearings or soon-to-fail capacitors during their inspection.
When to Call a Professional
While replacing a capacitor or clearing debris is a manageable DIY task for many homeowners, there are clear instances when you should absolutely call a licensed HVAC professional. If, after checking for obstructions and replacing the capacitor, your fan motor still isn't spinning, or if the unit is making loud grinding noises, it's time to call in the experts. Issues related to the compressor, refrigerant leaks, or complex electrical diagnostics beyond a simple capacitor test should always be handled by a professional. Similarly, if you're uncomfortable working with electricity, even after following safety precautions, do not hesitate to contact a qualified technician. Attempting repairs beyond your skill level can lead to further damage to your expensive HVAC system, create dangerous electrical hazards, or void your warranty.
Related Articles
Keep troubleshooting with these hand-picked guides from FixlyGuide:
- The #1 Reason Your AC Blows Warm Air (And It's Not What You Think) — A dirty air filter is often the overlooked culprit behind an air conditioner blowing warm air, hindering its ability to cool your home effi…
- The One Part That Fails When Your Freezer Works But Fridge Doesn’t ($30 Fix) — If your freezer works but the refrigerator isn't cooling, the most common culprit is a faulty evaporator fan motor or a a clogged defrost d…
- The #1 Mistake Homeowners Make When Heat Pumps Stop Heating in Winter — Discover the crucial mistake most homeowners make when their heat pump struggles in cold weather and how to fix it, potentially saving hund…
- The #1 Mistake Homeowners Make Installing a Smart Thermostat (and How to Fix It) — Avoid the most common pitfall when installing a smart thermostat yourself and ensure a smooth, energy-efficient setup.
- The 4 Hidden Reasons Your Dryer Tumbles Cold (And How to Fix Them in 30 Minutes) — Your dryer tumbles, but clothes stay cold. Discover the four most common culprits behind a dryer that won't heat, and how to troubleshoot t…
- The One Trick to Silence a Humming Garbage Disposal (Without Calling a Plumber) — A humming garbage disposal is usually jammed. Learn how to quickly and safely clear the obstruction yourself with basic tools.
Frequently asked questions
Why is my AC condenser fan not spinning but humming?+
A humming sound without the fan spinning is a classic sign of a failed or weakened run capacitor. The capacitor provides the necessary electrical 'kick' to start the fan motor. Without it, the motor receives power but cannot initiate rotation.
Can I replace the AC fan capacitor myself?+
Yes, replacing an AC fan capacitor is a common DIY repair for homeowners with basic electrical knowledge and tools. However, it's crucial to always turn off power at the breaker and safely discharge the capacitor before touching it, as it stores a dangerous electrical charge.
What happens if my AC fan doesn't spin?+
If your AC fan doesn't spin, the outdoor unit cannot dissipate heat from the refrigerant. This causes the system to overheat, leading to high-pressure shutdowns, reduced cooling, and potential damage to the compressor, which is the most expensive component of your AC system.
How do I know if my AC fan motor is bad?+
Signs of a bad AC fan motor include the blades not spinning even after replacing the capacitor, difficulty spinning the blades manually (seized bearings), loud grinding noises, or a burning smell coming from the motor. A professional can conduct further electrical tests to confirm motor failure.


Discussion
Loading comments…