Tools & materials you'll need
Affiliate links- AmazonPermanent marker1 · Optional, to write installation date
As an Amazon Associate FixlyGuide earns from qualifying purchases — at no extra cost to you. Prices and availability are accurate as of publication and subject to change.
Quick Answer
The biggest HVAC mistake homeowners make is neglecting regular filter replacement. A dirty filter chokes your system, reducing efficiency by 5-15% and leading to higher energy bills, poor air quality, and potential equipment breakdowns. Most homes need a new filter every 30-90 days, but factors like pets and allergies can necessitate even more frequent changes.
The Problem
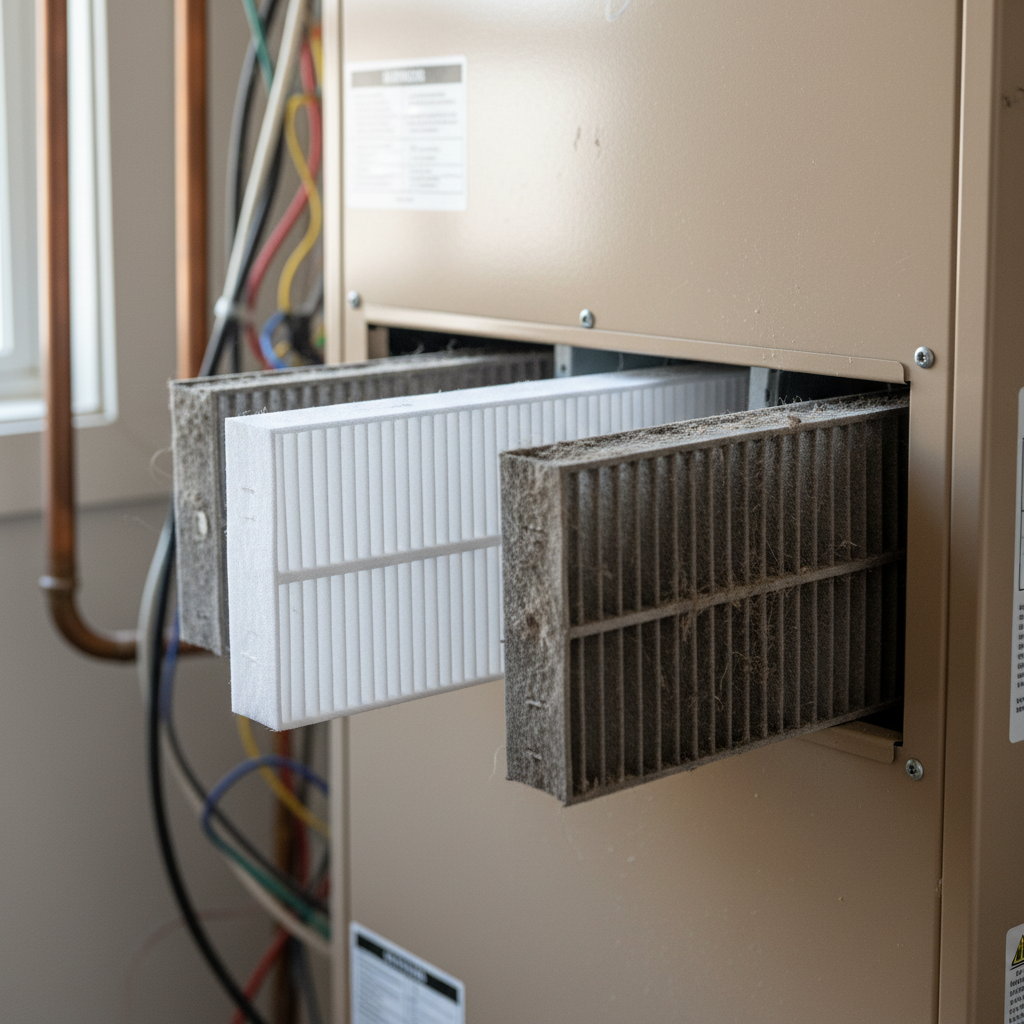
Your HVAC system is the lungs of your home, and the air filter is its primary defense against dust, pollen, pet dander, and other airborne contaminants. Over time, this filter becomes clogged with these particles, turning from a clean, permeable mesh into a thick, restrictive barrier. This restriction forces your HVAC system to work harder to pull air through, leading to several detrimental effects:
- Increased Energy Consumption: A system struggling to move air uses more electricity, directly translating to higher utility bills. Studies show that a severely clogged filter can increase energy usage by 5-15%.
- Reduced System Efficiency: The hampered airflow decreases the system's ability to heat or cool your home effectively, meaning it runs longer cycles to reach the desired temperature.
- Poor Indoor Air Quality: While a dirty filter holds contaminants, an overly clogged one can also allow some particles to bypass it, or even start to decompose trapped organic matter, releasing odors and allergens back into your home.
- Equipment Strain and Potential Breakdown: The increased workload puts stress on critical components like the blower motor and evaporator coil. Overheating, premature wear, and even complete system failure become much more likely, leading to expensive repairs.
- Frozen Evaporator Coil: Severely restricted airflow over the evaporator coil in an air conditioner can cause the coil to get too cold and freeze over. This prevents the system from cooling at all and can cause water damage from melting ice.
The often-overlooked cost of a dirty filter isn't just the few dollars for a new one; it's the cumulative impact on your wallet from higher energy bills and the potential for thousands in repair or replacement costs for your HVAC unit.
How It Works
At its core, your HVAC (Heating, Ventilation, and Air Conditioning) system operates by circulating air—either warmed or cooled—throughout your home. The air handler, often located in a closet, basement, or attic, houses a powerful blower fan. This fan draws return air from your living spaces through large ducts.
Before the air reaches the blower fan, it passes through the air filter. This filter is a crucial component designed to trap airborne particulates, protecting the sensitive internal components of your HVAC system while also improving indoor air quality. Depending on the type of filter, it might use a simple fiberglass mesh to catch larger particles (lower MERV rating) or a pleated electrostatic or synthetic material designed to capture microscopic particles like pet dander, mold spores, and even some bacteria (higher MERV rating).
Once filtered, the air moves to either the furnace's heat exchanger (for heating) or the air conditioner's evaporator coil (for cooling). In heating mode, the heat exchanger warms the air, and in cooling mode, the evaporator coil absorbs heat and humidity from the air before the now-conditioned air is pushed by the blower fan through supply ducts and out into your rooms through vents.
When the air filter becomes clogged, it obstructs this vital airflow. The blower fan, which is designed to operate under a specific airflow resistance, must work much harder to pull the same volume of air through the restricted filter. This increased effort draws more electricity and generates more heat within the blower motor, shortening its lifespan. For air conditioning systems, reduced airflow across the evaporator coil prevents proper heat exchange, causing the coil to drop below freezing temperatures and accumulate ice. This ice acts as an even greater barrier to airflow, creating a vicious cycle that can lead to system shutdown and potential damage to the compressor if not addressed promptly.
Step-by-Step Fix
Changing your HVAC filter is one of the easiest and most impactful maintenance tasks you can perform as a homeowner. Here's how to do it correctly:
-
Safety First — Turn Off Your System — Always begin by switching off your HVAC system at the thermostat. Select "Off" or "System Off." For an extra layer of safety, you can also flip the circuit breaker that controls your furnace or air handler. This prevents the system from accidentally starting up while you are working near moving parts.
- Safety Note: Never work on your HVAC unit without ensuring the power is completely off. The blower fan can start unexpectedly.
-
Locate the Filter Slot — Depending on your system, the filter will be in one of two main places. Check the return air vent in your ceiling or wall (often a large, grille-covered opening), or look at the main air handler unit itself. On the air handler, it's usually in a slot where the large return duct connects, frequently marked with an arrow indicating airflow direction. It might be behind a service panel or in a dedicated slide-out slot.
-
Note the Filter Size and Airflow Direction — Before removing the old filter, make a note of its dimensions and the arrow on its frame. The dimensions (e.g., 20x25x1) are printed on the frame. The arrow indicates the direction of airflow, which is always towards the furnace/air handler. You'll need this for your new filter.
-
Remove the Old Filter — Carefully slide the old, dirty filter out. It will likely be dark gray or black with accumulated dust and debris. Minimize shaking it to avoid releasing trapped particles into your home. Dispose of it in a trash bag immediately.
-
Choose the Right Replacement Filter — Select a new filter that matches the size and MERV rating of your previous filter, or choose a higher MERV if desired. MERV (Minimum Efficiency Reporting Value) ratings range from 1 to 20. For most residential systems, a MERV 8-11 offers a good balance of filtration and airflow without overtaxing your system. Filters with MERV 13-16 provide superior filtration but may require more frequent changes and can restrict airflow in older or undersized systems. Always consult your HVAC manual or a professional before significantly increasing MERV ratings. Avoid extreme MERV ratings (17+) unless specifically recommended by an HVAC professional for specialized applications, as they can severely restrict airflow and damage your system.
-
Insert the New Filter Correctly — Slide the new filter into the slot, ensuring the airflow arrow points in the correct direction. This is crucial; if installed backward, the filter won't perform efficiently and can even dislodge debris into your system. The arrow should point towards the furnace or air handler unit.
-
Secure the Slot (If Applicable) — If your filter slot has a cover, door, or clips, secure them firmly. A loose filter or open slot can allow unfiltered air to bypass the system.
-
Restore Power and Test — Turn the power back on at the circuit breaker (if you turned it off) and switch your thermostat back to your desired HVAC mode. Listen for any unusual noises and confirm that the system is operating normally. You should immediately notice improved airflow from your vents and potentially a reduction in cycling time.
Common Causes
- Normal Accumulation: The most common cause is simply the natural accumulation of airborne dust, dirt, dander, and other particles from daily living, which the filter is designed to capture.
- Pets in the Home: Animals shed fur and dander continuously, which significantly increases the particulate load on your HVAC filter, leading to faster clogging.
- Higher Occupancy: More people living in a home generate more skin cells, dust, and general debris, accelerating filter accumulation.
- Construction or Renovation: Nearby construction, home renovation projects, or even a dusty environment (e.g., living on a dirt road) can introduce large amounts of particulate matter into the air, quickly overwhelming a filter.
- Allergies or Respiratory Conditions: Homeowners with severe allergies or respiratory issues often opt for higher MERV filters, which, while beneficial for air quality, tend to restrict airflow more and require more frequent changes.
- Infrequent Replacement: The "set it and forget it" mentality is a common pitfall. Forgetting to change the filter regularly (every 1-3 months for most homes) is the primary reason for severely clogged filters.
Common Mistakes
- Ignoring the Airflow Arrow: Installing the filter backward is a common mistake that renders it less effective and can push debris into your system. Always ensure the arrow points towards the furnace/air handler.
- Using Too High a MERV Rating: While high MERV filters capture more particles, using one that is too restrictive for an older or undersized HVAC system can reduce airflow, strain the blower motor, and potentially lead to system failure. Always check your HVAC manual or consult a pro before upgrading significantly.
- Assuming All Filters Last 3 Months: Filter lifespan is highly variable. "Every 3 months" is a general guideline; homes with pets, smokers, or allergy sufferers might need changes every month. Visually inspect your filter regularly, especially if you notice reduced airflow or increased dust.
- Not Turning Off the System: Forgetting to power down the HVAC system before changing the filter is a significant safety hazard, risking injury from the blower fan or electrical shock.
- Buying the Wrong Size: Installing a filter that is too small leaves gaps, allowing unfiltered air to bypass the filter. A filter that is too large won't fit at all. Always double-check the dimensions (length x width x thickness) on your old filter's frame.
- Neglecting to Seal the Filter Slot: If your filter compartment has a removable cover or clips, ensure it's securely closed after insertion. An unsealed slot allows unfiltered air to enter the system.
Cost & Time Breakdown
| Task | DIY Cost | Pro Cost | Time |
|---|---|---|---|
| Filter Replacement (basic) | $5-$20 | $0 (part of service) | 5-10 minutes |
| Higher-MERV Filter | $15-$30 | $0 (part of service) | 5-10 minutes |
| Emergency Service Call (clogged filter related) | N/A | $150-$300+ | N/A |
| Blower Motor Replacement | $200-$400 (parts) | $400-$800+ (parts + labor) | N/A |
| Evaporator Coil Replacement | $500-$1000 (parts) | $1000-$2000+ (parts + labor) | N/A |
Tips & Prevention
- Regular Visual Inspection: Don't just rely on a calendar. Visually check your filter monthly. If it looks grey and coated, it's time for a change, regardless of how long it's been in there.
- Set Reminders: Use a recurring calendar reminder on your phone, mark it on a physical calendar, or even write the installation date on the filter frame itself to help you remember the next change.
- Stock Up on Filters: Buy filters in multi-packs or when they go on sale. Having replacements on hand makes it easier to change them on schedule.
- Consider Filter Type: If you have pets or allergies, consider upgrading to a higher MERV filter (8-11) but be mindful of the potential need for more frequent changes and ensuring your system can handle it.
- Maintain a Clean Home: Regularly dust, vacuum, and sweep your home to reduce the overall particulate load that your HVAC system has to filter, extending the life of your filters slightly.
- Check Ducts for Leaks: Leaky return ducts can draw in unfiltered air from attics or crawl spaces, introducing more debris into your system and through your filter. Address these leaks if found.
When to Call a Professional
While changing an HVAC filter is a simple DIY task, there are specific situations where a professional should be called. If you notice significantly reduced airflow even with a new, clean filter, or if your system is making unusual noises (grinding, squealing, banging), these could indicate a deeper problem like a failing blower motor or issues with the ductwork. If your air conditioner's evaporator coil has frozen over, and changing the filter doesn't resolve the issue, or if it re-freezes, a professional can diagnose refrigerant leaks, drainage problems, or other airflow obstructions. Any persistent issues with heating or cooling performance after a filter change, or if you are unsure about the correct MERV rating for your specific system, warrant a service call. A licensed HVAC technician can identify underlying problems that a simple filter change won't fix and ensure the safe and efficient operation of your entire system.
Related Articles
Keep troubleshooting with these hand-picked guides from FixlyGuide:
- The #1 Mistake Homeowners Make With HVAC Filters (And How Often to Really Change Them) — Discover the crucial mistake most homeowners make with HVAC filters and the specific schedule you should follow to avoid costly HVAC issues…
- That August Chill: Why Your AC Freezes Up & How to Fix It — Is your air conditioner a block of ice in the middle of a heatwave? It seems counterintuitive, but an AC that freezes up is a common August…
- Why Your Heat Pump Auxiliary Heat Won't Turn Off — Discover why your heat pump's auxiliary heat keeps running, driving up your energy bills. Learn to troubleshoot common issues and know when…
- The Secret Reason Your Thermostat Lies (and 5 Fixes That Actually Work) — If your thermostat isn't reaching its set temperature, understanding the underlying cause is key to a comfortable home and lower energy bil…
- That 'Energy-Saving' HVAC Trick Is Costing You Money — You've heard the advice: close HVAC vents in unused rooms to save on heating and cooling. But this common practice is a myth. It actually h…
- Your Insulation Isn't the Problem: Why Your Attic Still Bakes — Even with thick insulation, a hot attic signals a critical ventilation failure that could be silently damaging your roof and driving up you…
Get the print-ready PDF of this guide
A clean, ad-free, printable version you can keep on your phone or pin to the workshop wall. Free with a FixlyGuide account.
- Print-optimized layout
- Tools, materials & every step included
- Saved to your account
Frequently asked questions
How often should I change my HVAC filter?+
The general recommendation is every 30-90 days, but this can vary. Homes with pets, young children, or allergy sufferers may need a monthly change. Single occupants without pets or allergies might get away with changing it every 3-4 months. Visually inspect it monthly; if it looks dirty, change it.
What happens if I don't change my HVAC filter?+
Neglecting to change your HVAC filter leads to several problems: increased energy bills (5-15% higher), reduced heating/cooling efficiency, poor indoor air quality, and significant strain on your HVAC system's components, which can cause costly breakdowns like a damaged blower motor or a frozen evaporator coil.
What MERV rating should I use for my HVAC filter?+
For most residential homes, a MERV (Minimum Efficiency Reporting Value) rating of 8-11 provides a good balance of air filtration and airflow, effectively capturing dust, pollen, and pet dander. Higher MERV ratings (13-16) offer superior filtration but can restrict airflow in older systems, potentially causing damage. Always check your HVAC system's manual or consult a professional before using a MERV rating higher than 11.
Can a dirty HVAC filter cause my air conditioner to freeze?+
Yes, a dirty HVAC filter is one of the most common causes of a frozen air conditioner evaporator coil. A clogged filter severely restricts airflow over the coil, preventing it from absorbing enough heat from the air. This causes the coil to get too cold, dropping below freezing point, and accumulating ice. This further blocks airflow and impairs cooling.
How do I know what size HVAC filter to buy?+
The easiest way to find the correct size is to look at the dimensions printed on the frame of your old filter. It will typically be listed as three numbers: length x width x thickness (e.g., 20x25x1). Always use these exact dimensions for your replacement filter.
Is it okay to run my HVAC system without a filter?+
No, absolutely not. Running your HVAC system without a filter will allow dust, dirt, and debris to be sucked directly into the sensitive internal components of your furnace and air conditioner. This can quickly clog coils, damage the blower motor, and lead to expensive repairs or premature system failure, significantly shortening the lifespan of your unit.


Discussion
Loading comments…