
Tools & materials you'll need
Affiliate linksAs an Amazon Associate FixlyGuide earns from qualifying purchases — at no extra cost to you. Prices and availability are accurate as of publication and subject to change.
Quick Answer
Cleaning your dryer vent regularly is crucial for fire prevention and efficient dryer operation. The most effective method involves disconnecting the dryer, clearing lint from both the dryer's internal duct and the entire vent line using a specialized brush and vacuum, and inspecting for damage or blockages along the exterior vent hood. This simple maintenance task, which can be completed in about 30 minutes, significantly reduces fire risk and improves dryer performance by ensuring proper airflow.
The Problem
Every time you do a load of laundry, tiny fibers from your clothes shed and become lint. While the lint trap catches most of it, a surprising amount bypasses the filter and travels into your dryer's exhaust vent. Over time, this lint accumulates, forming a thick, highly flammable layer within the ductwork. This buildup restricts airflow, forcing your dryer to work harder and hotter to dry clothes. This increased heat, combined with the readily ignitable lint, creates a significant fire hazard. The potential consequences range from scorching clothes to a full-blown house fire, putting your property and family at risk. Beyond the fire danger, a clogged vent also leads to longer drying times, higher energy bills, and excessive wear and tear on your appliance.
How It Works
Your clothes dryer operates by drawing in ambient air, heating it with an electric heating element (or a gas burner), and then tumbling your wet clothes through this super-heated air. As the hot, moist air passes over the clothes, it picks up water molecules and lint. A powerful fan, known as a blower wheel, then pushes this hot, humid, lint-laden air out of the dryer, through the exhaust duct (the dryer vent), and ultimately to the outside of your home via an exterior vent hood. For your dryer to function efficiently and safely, this airflow must be unobstructed. The lint trap is designed to catch the majority of the lint directly inside the dryer, preventing it from entering the exhaust system. However, microscopic fibers inevitably escape the trap and are carried by the airstream into the vent pipe. This warm, moist environment encourages lint to stick to the rough surfaces of the ductwork, particularly at bends and joints, where it gradually builds up. When the vent becomes significantly clogged, the hot, moist air can't escape effectively, leading to overheating of the dryer's heating element and surrounding components. The trapped lint acts as an insulator, further increasing temperatures, and creating conditions ripe for combustion. A clear vent, conversely, allows for rapid expulsion of hot, moist air, keeping the dryer cool and operating safely.
Step-by-Step Fix
-
Safety First — Disconnect Power — Before touching any part of your dryer or its vent, ensure the appliance is completely powered down. For electric dryers, unplug the power cord from the wall outlet. For gas dryers, turn off the gas supply valve (typically a yellow handle on a flexible gas line) and then unplug the power cord. This prevents accidental startup or electrical shock.
- If you have difficulty locating or turning off the gas valve, do not proceed with a gas dryer. Call a qualified technician.
-
Move the Dryer & Access the Vent — Carefully pull the dryer away from the wall, allowing enough space to work behind it. Be mindful of any flexible gas lines or electrical cords to avoid damage. You'll need access to the exhaust duct where it connects to the back of the dryer.
- Use a helper if the dryer is heavy to prevent personal injury or damage to flooring.
-
Disconnect the Vent Hose — Locate the flexible exhaust hose connecting the dryer to the wall vent. This is typically held in place with a clamp (either a screw-type hose clamp or spring clamp). Use a screwdriver or pliers to loosen the clamp, then gently twist and pull the hose free from both the dryer's exhaust port and the wall duct.
- Inspect the flexible hose for kinks, tears, or crushing. Replace any damaged sections. Accordion-style foil vents are prone to trapping lint and crushing; consider upgrading to a rigid or semi-rigid metal duct if possible.
-
Clean the Dryer's Exhaust Port — With the hose disconnected, use your vacuum cleaner with a narrow crevice attachment to thoroughly clean the lint from inside the dryer's exhaust port. Reach in as far as you can. A dryer vent brush can also be helpful here.
- Shine a flashlight into the port to check for any remaining lint or obstructions.
-
Clean the Flexible Vent Hose — Take the flexible vent hose outside or to an area where you can easily clean it. Use a specialized dryer vent brush (often a long, flexible brush that can attach to a drill) to push through the entire length of the hose, dislodging lint. Follow up with your shop vacuum to suck out the loosened debris. Repeat until no more lint comes out.
- If the hose is heavily caked with lint or damaged, it's often more cost-effective and safer to replace it entirely.
-
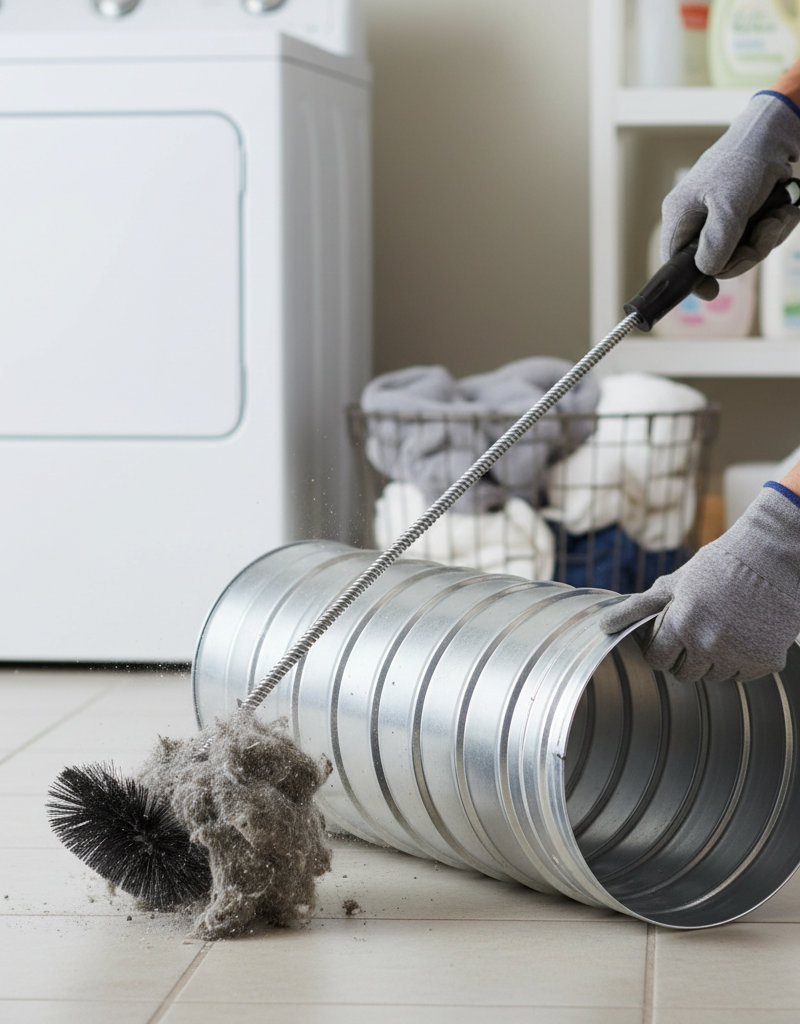
Clean the Wall Vent Duct (Inside) — This is the most critical step for fire prevention. Insert your dryer vent brush and rod kit into the wall vent opening. Gradually connect rod sections as you push the brush deeper into the ductwork, rotating it to dislodge lint. Work slowly and methodically. As you pull the brush back, use your shop vacuum to immediately suck up the loosened lint. Continue this process until the brush travels the entire length of the duct to the exterior and no more lint is extracted.
- If your home's vent run is exceptionally long or has multiple tight bends, consider hiring a professional. They have more powerful equipment.
-
Clean the Exterior Vent Hood — Go outside and locate the dryer vent hood on the exterior wall. Use a screwdriver to remove any screws holding the cover in place, then open or remove the cover. Manually remove any large clumps of lint obstructing the flap or screen. Use your brush and vacuum to clean the inside of the hood and the last few feet of the duct from the outside in. Ensure the flap opens and closes freely.
- Never install a screen over the exterior vent opening, as this will quickly trap lint and create a blockage. The flap alone is sufficient to keep pests out.
-
Reassemble and Test — Once all sections are clean, reattach the flexible vent hose to the wall duct and then to the dryer's exhaust port, securing both connections tightly with clamps. Push the dryer back into place, ensuring the vent hose isn't kinked or crushed. Plug the dryer back in or turn on the gas supply. Run your dryer on an air-only (no heat) cycle for about 10–15 minutes. Go outside and verify that strong airflow is coming out of the exterior vent hood. Your clothes should also dry faster now.
Common Causes
- Infrequent Cleaning: The primary cause of lint buildup is simply not cleaning the vent often enough. Manufacturers typically recommend annual cleaning, but homes with heavy dryer use or pets may need it more frequently.
- Improper Vent Material: Flexible foil or plastic accordion-style vents are prone to kinks, crushes, and have corrugated surfaces that easily trap lint. Rigid or semi-rigid metal ducts provide a smoother path for airflow.
- Excessive Vent Length or Bends: Long vent runs (over 25 feet) or those with numerous 90-degree bends significantly reduce airflow, making it easier for lint to accumulate. Each 90-degree bend is equivalent to several feet of straight duct in terms of airflow restriction.
- Damaged or Loose Connections: Gaps or tears in the vent hose or loose clamps can allow lint to escape into wall cavities or create turbulence that aids in lint buildup.
- Missing or Damaged Lint Trap: A compromised lint trap allows significantly more lint to bypass the filter and enter the exhaust system.
Common Mistakes
- Ignoring the Back of the Dryer: Many homeowners only clean the lint trap, failing to realize that significant lint builds up in the exhaust port directly behind the dryer drum.
- Using the Wrong Vent Material: Opting for cheap, flexible plastic or thin foil vents instead of rigid or semi-rigid metal ducts that are more resistant to crushing and lint buildup.
- Forgetting the Exterior Vent Hood: Neglecting to clean the exterior opening of the vent allows lint to accumulate there, creating a blockage right at the exit point.
- Using a Screen on the Exterior Vent: Installing a screen to keep out pests seems logical but will inevitably trap lint, causing a severe blockage that's difficult to clear and dramatically increases fire risk.
- Not Disconnecting Power/Gas: Skipping this crucial safety step before working on the dryer or vent, which can lead to electrical shock or gas leaks.
- Kinking the Vent Hose During Reinstallation: Pushing the dryer back against the wall without ensuring the flexible hose has a smooth, uncrushed path. Kinks drastically restrict airflow.
Cost & Time Breakdown
| Task | DIY Cost | Pro Cost | Time |
|---|---|---|---|
| Basic Tools (Brush, Vacuum) | $0-$40 | N/A | N/A |
| Flexible Vent Hose (Replacement) | $15-$30 | $40-$70 | 10 min |
| Cleaning (DIY) | $0 | N/A | 30-60 min |
| Professional Vent Cleaning | N/A | $100-$200 | 1-2 hours |
| Upgrade to Rigid Ducting (Parts) | $30-$60 | $80-$150 | N/A |
Tips & Prevention
- Clean the Lint Trap After Every Load: This is the easiest and most effective daily prevention measure. A full lint trap restricts airflow immediately.
- Vacuum Behind the Dryer Annually: Even if you don't do a full vent cleaning, vacuuming the floor and wall area behind the dryer helps prevent dust and lint from being sucked into the system.
- Inspect Vent Hose Regularly: Periodically pull your dryer out and visually check the flexible vent hose for kinks, crushes, and secure connections. Address any issues promptly.
- Consider Shorter, Straighter Vent Runs: If possible during home renovations or appliance replacement, aim for the shortest, straightest vent path possible with minimal bends (ideally no more than two 90-degree bends).
- Upgrade to Rigid Metal Venting: If you currently have flexible foil or plastic ducting, upgrading to smooth-wall rigid or semi-rigid aluminum ducting will significantly reduce lint accumulation and improve airflow.
- Beware of Burning Smells or Longer Drying Times: These are telltale signs of a clogged vent. Don't ignore them – they indicate your dryer is overheating or struggling.
When to Call a Professional
While cleaning your dryer vent is a manageable DIY task for most homeowners, certain situations warrant calling a licensed professional. If your dryer vent run is extremely long (over 35 feet from the dryer to the exterior), has multiple tight turns, or if you can't easily access the entire length of the ductwork, a professional has specialized equipment like powerful vacuums and longer, more robust rotary brushes that can effectively clean these challenging vents. Additionally, if your dryer is gas-powered and you are uncomfortable disconnecting or reconnecting the gas line, or if you suspect a gas leak (e.g., you smell gas), immediately shut off the gas supply and call a licensed HVAC technician or plumber. Professionals can also inspect the entire system for potential code violations, damage, or areas prone to recurrent clogs, offering solutions for long-term safety and efficiency.
Related Articles
Keep troubleshooting with these hand-picked guides from FixlyGuide:
- The #1 Dryer Fire Culprit Hiding in Your Laundry Room (And How to Evict It) — Regular dryer vent cleaning is crucial to prevent lint buildup, improve efficiency, and most importantly, safeguard your home from potentia…
- The Dryer Vent Fire Trap: 3 Hidden Signs Your Home Is at Risk — Learn the critical signs your dryer vent is clogged and how to safely clean it to prevent a dangerous house fire.
- The $5 Part That Stops Your Dryer From Heating (And How to Replace It in 30 Minutes) — A dryer that tumbles but doesn't heat often points to a blown thermal fuse, a simple and inexpensive fix most homeowners can do themselves.
- The $5 Part That Stops Your Dryer From Heating (And How to Replace It in 30 Min) — Discover the most common, inexpensive culprit behind a dryer not heating up and learn how to quickly diagnose and replace it yourself.
- The #1 Gutter Mistake That Leads to $10,000 Roof Damage — Learn the most common gutter-cleaning mistake homeowners make and how to properly maintain your gutters to prevent expensive roof damage.
- The Silent Fire Hazard Lurking In Your Laundry Room — Don't let a clogged dryer vent become a silent fire starter. Learn why this common oversight is so dangerous, the clear warning signs to lo…
Get the print-ready PDF of this guide
A clean, ad-free, printable version you can keep on your phone or pin to the workshop wall. Free with a FixlyGuide account.
- Print-optimized layout
- Tools, materials & every step included
- Saved to your account
Frequently asked questions
How often should I clean my dryer vent?+
Most experts recommend cleaning your dryer vent at least once a year. However, if you use your dryer frequently, have pets that shed a lot, or notice your clothes taking longer to dry, you may need to clean it every 6 months or more often.
What are the signs of a clogged dryer vent?+
Key signs include clothes taking much longer to dry than usual, clothes feeling unusually hot after a cycle, a burning smell coming from the dryer, excessive lint accumulation around the dryer, or the exterior vent hood flap not opening fully when the dryer is running.
Can I clean my dryer vent myself?+
Yes, cleaning your dryer vent is a common DIY task that most homeowners can handle with basic tools like a vacuum cleaner and a specialized dryer vent brush kit. However, for very long or complex vent runs, or if you have a gas dryer and are uncomfortable with connections, it's best to call a professional.
What's the best type of dryer vent material?+
Rigid metal (galvanized steel or aluminum) or semi-rigid aluminum ducting is superior to flexible foil or plastic accordion-style vents. Rigid ducts offer a smoother interior surface that reduces lint buildup and are less prone to crushing or kinking, ensuring better airflow and safety.
Why shouldn't I put a screen on my outside dryer vent?+
While it might seem logical to prevent pests, a screen on the exterior dryer vent will inevitably trap lint, leading to a quick and severe blockage. This blockage significantly increases fire risk and reduces dryer efficiency. The standard vent hood with a freely operating flap is designed to keep pests out without impeding airflow.


Discussion
Loading comments…