
Tools & materials you'll need
Affiliate linksAs an Amazon Associate FixlyGuide earns from qualifying purchases — at no extra cost to you. Prices and availability are accurate as of publication and subject to change.
Quick Answer
Uneven watering in a drip irrigation system often stems from a combination of inconsistent water pressure and clogged emitters. The fix involves systematically checking your system's pressure, cleaning or replacing clogged emitters, ensuring your system's flow rate matches your water supply, and verifying that the correct emitter types are distributing water appropriately to each plant.
The Problem
You've installed a drip irrigation system with the best intentions: saving water, delivering precise moisture to your plants, and reducing weeds. Yet, you're noticing some plants thriving while others wilt, or perhaps water seems to gush from one emitter while another barely trickles. This frustrating inconsistency, known as uneven watering, defeats the purpose of your efficient system. It can lead to overwatering in some areas, promoting root rot and fungal diseases, and underwatering in others, causing stress, stunted growth, and even plant death. The root causes aren't always obvious, ranging from simple clogs to incorrect design or pressure issues, making accurate diagnosis key to restoring your system's efficiency and your garden's health.
How It Works
Drip irrigation systems work by delivering water directly to the plant's root zone, drop by drop, through a network of tubing, emitters, and connectors. Water enters the system from your main water supply, typically passing through a filter to remove sediment and a pressure regulator to maintain a consistent operating pressure (usually 15-30 PSI). This regulated water then travels through thicker mainlines, branching into smaller diameter drip tubing or emitter lines, which are fitted with individual emitters. These emitters are designed with tiny, tortuous paths or diaphragms that create resistance, converting the water's pressure into a slow, controlled drip. Different emitters have different flow rates, measured in gallons per hour (GPH), allowing you to customize water delivery based on plant type and soil conditions. Pressure compensating (PC) emitters are particularly clever; they contain a flexible diaphragm that adjusts to varying inlet pressures, maintaining a consistent flow rate over broad pressure fluctuations and along long runs of tubing. This compensates for elevation changes and friction loss, ensuring that the first emitter in a line delivers the same amount of water as the last. Non-pressure compensating emitters, on the other hand, are simpler and cheaper but their flow rate is directly dependent on the water pressure at their specific location, making them more susceptible to uneven watering on sloped terrain or longer runs.
Step-by-Step Fix
1. Inspect the Main Components — Start at the source and work your way out.
- Check the main water supply: Ensure the faucet or valve supplying your drip system is fully open. A partially closed valve can significantly reduce overall system pressure.
- Examine the filter: Turn off the water, remove the filter housing, and clean the screen or cartridge. Sediment, algae, or mineral deposits can drastically restrict water flow and pressure. Rinse thoroughly under a strong stream of water.
- Verify the pressure regulator: The pressure regulator is crucial for consistent output. If your system has a gauge, check the reading. Most drip systems operate optimally between 15-30 PSI. If the pressure is too high or too low, the regulator might be faulty and need replacement. You can test a regulator by temporarily attaching a pressure gauge to an open port or emitter line.
2. Flush the System Laterals — Clear out accumulated debris that can block emitters.
- Open end caps: Locate the end caps on all your main drip lines and lateral tubing. Carefully remove them. Be prepared for a rush of water.
- Flush thoroughly: Turn on the water supply and let the water run for several minutes from each open end. This strong flow will push out any sediment, dirt, or debris that has settled in the lines. Observe the water for clarity.
- Reattach end caps: Once the water runs clear, turn off the water supply and securely reattach all end caps.
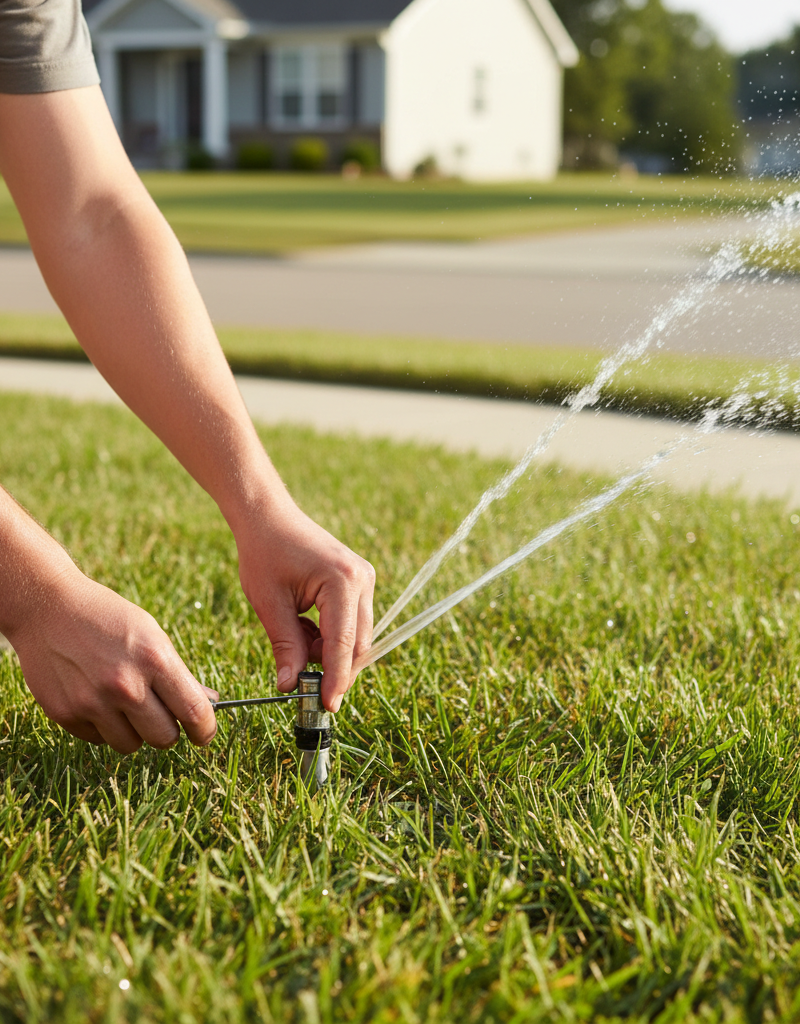
3. Inspect and Clean Emitters — The most common culprits for uneven watering.
- Visual check: Observe which emitters are dripping slowly, not at all, or gushing. Look for visible debris, mineral buildup (white, crusty deposits), or damaged components.
- Remove and clean: For clogged emitters, carefully twist or pull them out of the tubing. Disassemble if possible and rinse thoroughly under running water. A small, soft brush or a straightened paper clip can help dislodge stubborn debris. For mineral buildup, soak emitters in a solution of equal parts white vinegar and water for 30 minutes to an hour.
- Replace problematic emitters: If an emitter is damaged, cracked, or simply won't clean effectively, it's best to replace it with a new one of the same flow rate. Keep a small supply of common emitters on hand.
4. Address Pressure Differential Issues — Especially critical for long runs or sloped yards.
- Confirm pressure-compensating (PC) emitters: If you have long runs of tubing or significant elevation changes, ensure you are using PC emitters. Non-PC emitters will deliver vastly different flow rates under varying pressures along a line.
- Install additional pressure regulators: For very large systems or zones with significant elevation drops, installing a second pressure regulator at the beginning of a specific zone or uphill section can help equalize pressure further downstream.
- Shorten long lines or create new zones: If a specific line is excessively long (check manufacturer recommendations, often 200-300 feet for 1/2-inch tubing), the friction loss can become too great. Consider splitting it into two shorter zones, each with its own supply. If a line is too long, the water pressure will decrease significantly at the end, leading to insufficient flow.
5. Even Out Emitter Flow Rates — Match water delivery to plant needs.
- Check GPH (Gallons Per Hour): Review the GPH rating of your emitters. You might have inadvertently used different rated emitters on plants that have similar water requirements, or misused high-flow emitters in areas needing less water.
- Adjust emitter spacing and quantity: For dense planting areas, you may need more emitters or emitters with a higher GPH. For individual plants, ensure 1-2 emitters are strategically placed within the root zone. You can add or subtract emitters as needed.
- Consider adjustable emitters: For areas with diverse plant needs or new plantings, adjustable flow emitters allow you to manually fine-tune the water output for each plant.
6. Check for Leaks and Kinks — Hidden efficiency killers.
- Walk the lines: Turn on the system and carefully walk the entire length of your drip lines. Look for obvious leaks, punctures, or loose connections. Pinhole leaks can significantly reduce pressure downstream.
- Repair leaks: Use appropriate repair couplings or drip plugs to fix any leaks. For larger punctures, cut out the damaged section and insert a new piece of tubing with two barbed couplings.
- Straighten kinks: Tubing can get kinked during installation or if heavy objects are placed on it, restricting water flow. Carefully unkink any pinched areas. If a kink is severe and has weakened the tubing, it might be best to cut out the section and splice in a new piece.
7. Examine Backflow Preventer (if applicable) — Can impact overall pressure.
- Inspect and test: If your system includes a backflow preventer, especially certain types like pressure vacuum breakers or reduced pressure zone devices, ensure it's functioning correctly. These devices have internal components that can fail or become partially clogged, reducing system pressure. If you suspect a backflow preventer issue and are unsure how to inspect or test it, consult a licensed plumber or irrigation specialist, as these are critical for protecting your home's water supply.
Common Causes
- Clogged Emitters: The most frequent offender. Sediment, mineral deposits (calcium, magnesium), algae, or even tiny insect larvae can block the emitter's narrow passageways, restricting or stopping water flow. This is especially true for non-pressure compensating emitters.
- Inconsistent Water Pressure:
- Lack of a Pressure Regulator: Without a regulator, your drip system will operate at fluctuating household water pressure, which is often too high (50-80 PSI) for drip components, causing some emitters to gush and others to struggle, or even blowing emitters off the tubing.
- Faulty Pressure Regulator: A regulator can fail over time, either allowing too much pressure or too little, or providing an inconsistent output.
- Friction Loss: In long runs of tubing, especially with smaller diameter lines, water loses pressure due to friction against the pipe walls. This means emitters at the end of the line receive less water than those at the beginning.
- Elevation Changes: On sloped landscapes, gravity significantly impacts water pressure. Emitters at lower elevations will experience higher pressure and thus higher flow, while those uphill will have lower pressure and reduced flow.
- Dirty Filter: A clogged main filter or even smaller in-line filters directly upstream of emitters can significantly reduce the overall water volume and pressure reaching the system.
- Leaks or Punctures: Even small leaks in the mainline or lateral tubing can cause substantial pressure drops downstream, leading to uneven watering.
- Incorrect Emitter Selection: Using non-pressure compensating emitters on sloped terrain or very long runs where PC emitters are required will inevitably lead to uneven water distribution. Also, selecting emitters with flow rates unsuitable for the plant's water needs (e.g., too high GPH for a drought-tolerant plant next to a water-loving one with a low GPH emitter).
- Kinks in Tubing: Pinched or kinked drip tubing restricts water flow, much like a partially closed valve, reducing pressure and flow to downstream emitters.
- Inadequate Water Supply: If your overall water supply (well pump capacity, municipal water pressure and volume) can't keep up with the total GPH demand of your drip system, the entire system will suffer from low pressure and uneven output.
Common Mistakes
- Skipping the Pressure Regulator: Many DIYers overlook this critical component, leading to busted emitters, connection failures, and highly inconsistent watering due to excessive and fluctuating main line pressure. Always install a quality pressure regulator at the system's head.
- Not Flushing Lines Regularly: Allowing sediment and debris to accumulate in the drip lines almost guarantees clogged emitters. Make flushing a routine part of your system maintenance, especially after initial installation or repairs.
- Ignoring the Filter: A dirty filter chokes your system. Neglecting regular filter cleaning means smaller debris will eventually bypass or overwhelm the filter, leading directly to emitter clogs. Check and clean your filter monthly during irrigation season.
- Using Non-PC Emitters on Slopes/Long Runs: This is a common design flaw. Non-pressure compensating emitters are fine for short, flat runs, but for any significant length or elevation change, invest in pressure-compensating (PC) emitters to ensure uniform water delivery.
- Overlooking System Design for Plant Needs: Putting high-flow emitters on succulents next to low-flow emitters on ferns will cause problems. Group plants with similar water needs together and select appropriate emitter GPH for each plant's zone.
- Ignoring Leaks and Pinched Lines: Even small, seemingly minor leaks or kinks can significantly impact system pressure and water distribution to downstream emitters. Address these promptly to maintain system efficiency.
Cost & Time Breakdown
| Task | DIY cost | Pro cost | Time |
|---|---|---|---|
| Filter cleaning | $0 | $50–$100 | 10–15 mins |
| Emitter cleaning/replacement | $5–$20 | $75–$150 | 30–60 mins |
| Pressure regulator replacement | $20–$50 | $150–$250 | 15–30 mins |
| Fixing leaks/kinks | $5–$30 | $75–$150 | 15–45 mins |
| System flush | $0 | $50–$100 | 10–20 mins |
Tips & Prevention
- Regular Filter Checks: Inspect and clean your drip system filter monthly, or more frequently if your water source is prone to sediment (e.g., well water). A clean filter is your first line of defense against clogs.
- Routine System Flushes: At least twice a year (beginning and end of irrigation season), open the end caps of your drip lines and flush them thoroughly to remove accumulated sediment and debris. This prevents most emitter clogs.
- Annual System Audit: Before turning on your system for the spring, walk through your entire garden with the system running. Check all emitters for proper flow, look for leaks, and note any areas of uneven watering.
- Consider a Fertilizer Injector: If you use liquid fertilizers, a fertilizer injector can introduce them directly into the drip system. This ensures even nutrient distribution but requires careful backflow prevention and regular flushing to prevent clogs from fertilizer residue.
- Install Air Vents/Vacuum Breakers: For systems with significant elevation changes, installing air vents at high points and vacuum breakers at low points can prevent siphoning and ensure smooth water flow, reducing pressure fluctuations.
- Winterization: In regions with freezing temperatures, properly winterize your drip system by draining all lines and removing vulnerable components (like backflow preventers and filters) to prevent freeze damage that can lead to leaks and malfunctions. This includes blowing out lines with an air compressor if necessary.
When to Call a Professional
While many drip irrigation issues are DIY-friendly, certain situations warrant calling a licensed irrigation specialist. If you've systematically worked through all the troubleshooting steps and still can't identify or resolve the problem, a professional can offer advanced diagnostic tools and expertise. Specifically, if you suspect a faulty mainline valve or a deeper issue within your home's main water supply impacting your irrigation, or if you encounter persistent low pressure despite all your efforts, a pro should be contacted. They can also help with complex system redesigns, large-scale leak detection using specialized equipment, or if you need to integrate new zones requiring complex hydraulic calculations. Do not attempt to repair or adjust backflow prevention devices if you are not certified; these protect your potable water supply and require professional handling.
Related Articles
Keep troubleshooting with these hand-picked guides from FixlyGuide:
- The 3 Hidden Reasons Your Sprinkler Head Won't Pop Up (And How to Fix Them) — Frustrated by a sprinkler head that won't rise? Discover the top three culprits behind this common irrigation issue and how to resolve them…
- The #1 Sprinkler Winterizing Mistake That Leads to $1,000s in Damage — Discover the crucial mistake homeowners make when winterizing sprinkler systems and how to avoid costly freeze damage with a simple, effect…
- The #1 Watering Mistake That Kills Lawns (And How to Fix Yours in 10 Minutes) — Discover the most common watering mistake homeowners make and how to adjust your watering routine for a healthier, more resilient lawn.
- The #1 Mistake Turning Your Healthy Lawn Brown After Watering — Discover the hidden culprit behind brown spots appearing in your lawn immediately after watering and learn how to correct this common mista…
- The 3 Hidden Reasons Your Tree Leaves Turn Brown (and the Easy Fixes) — Discover the often-overlooked environmental stressors and specific diseases that cause tree leaves to brown, and learn simple, actionable s…
- The Secret to Lush Raised Beds? It's Not Just About How You Water — Smart irrigation for raised garden beds isn't just about automation; it's about delivering the right amount of water precisely when your pl…
Frequently asked questions
Why is my drip irrigation system watering unevenly?+
Uneven watering is primarily caused by clogged emitters, inconsistent water pressure (due to a faulty regulator or friction loss), dirty filters, leaks, or using the wrong type of emitters for your system's design or terrain.
How do I fix low pressure in my drip irrigation system?+
To fix low pressure, first ensure your main water valve is fully open and the filter is clean. Then, check your pressure regulator for proper function (aim for 15-30 PSI) and inspect all lines and emitters for clogs or leaks. For long runs or slopes, ensure you're using pressure-compensating emitters.
How often should I clean my drip irrigation filter?+
You should check and clean your drip irrigation filter at least once a month during the irrigation season, or more frequently if you have well water or notice a lot of sediment in your supply. A dirty filter can significantly reduce water pressure and flow throughout the system.
Can I mix different types of emitters in my drip system?+
Yes, you can mix different types of emitters (e.g., 0.5 GPH for small plants, 2 GPH for larger shrubs) to customize water delivery to individual plants' needs. However, it's crucial to use pressure-compensating (PC) emitters on long runs or sloped terrain to ensure consistent flow rates across the system, regardless of the individual GPH rating.
What's the difference between pressure-compensating (PC) and non-pressure compensating emitters?+
Pressure-compensating (PC) emitters maintain a consistent flow rate regardless of fluctuations in water pressure (within a specified range). Non-pressure compensating emitters, however, have flow rates that directly vary with the water pressure at their location. PC emitters are ideal for slopes and long runs to ensure even watering, while non-PC emitters are better suited for flat, short runs.
What tools do I need to troubleshoot my drip irrigation?+
Basic tools include an adjustable wrench, flathead and Phillips screwdrivers, a small brush (like an old toothbrush), white vinegar for mineral deposits, replacement emitters and couplings, and potentially a pressure gauge for accurate pressure readings. Having a utility knife or tubing cutter can also be helpful for repairs.
How long do drip emitters last?+
Drip emitters typically last between 5-10 years, depending on the water quality, sun exposure, and material. High mineral content in water can accelerate clogging, while UV exposure can degrade plastic components. Regular cleaning and flushing can extend their lifespan.


Discussion
Loading comments…