Tools & materials you'll need
Affiliate links- AmazonAllen Key Set (Hex Keys)1 · Metric sizes are most common, especially 2.5mm and 3mm.
- AmazonSmall Flathead Screwdriver1 · For prying off the decorative cap.
- AmazonSoft Cloth or Rag1 · For protecting the finish and cleaning parts.
- AmazonSink Stopper or Plug1 · To prevent the set screw from falling down the drain.
- AmazonNon-Permanent (Blue) Threadlocker1 · Examples include Loctite 242 or 243. Do NOT use red.
As an Amazon Associate FixlyGuide earns from qualifying purchases — at no extra cost to you. Prices and availability are accurate as of publication and subject to change.
Quick Answer
To fix a wobbly faucet handle, you'll typically need to tighten a small component called a "set screw." This screw is often hidden under a decorative cap on the handle. Using the correct tool (usually a small Allen key or flathead screwdriver), you can tighten this screw to secure the handle to the faucet's valve stem. For a permanent fix that prevents future loosening from vibration and use, the trick is to apply a small drop of non-permanent (blue) threadlocker to the set screw's threads before tightening. This secures the screw without making it impossible to remove later.
The Problem
It starts subtly. A little bit of extra play in your bathroom faucet handle. A slight jiggle you can ignore. But soon, that minor wobble becomes a pronounced, clunky jostle every time you turn the water on or off. The handle feels cheap and unreliable. You might hear a metallic rattle as it shifts, or see the decorative base of the handle lift slightly off the faucet body.
This isn't just a cosmetic issue or a minor annoyance. A loose faucet handle is a mechanical problem that will invariably worsen. Continuous wobbling puts stress on the connection between the handle and the underlying valve stem (the part that actually controls the water). This can lead to several escalating issues:
- Stripped Components: The back-and-forth motion grinds down the metal or plastic splines inside the handle and on the valve stem. Once these are stripped, simply tightening the handle will no longer work. You'll be looking at replacing the handle or the entire faucet cartridge.
- Cartridge Damage: The jarring motion can transfer stress to the delicate ceramic or plastic cartridge inside the faucet, potentially leading to drips, leaks, or a complete failure of the valve mechanism.
- Loss of Control: In a worst-case scenario, the handle can become so loose that it spins freely without actually turning the valve, leaving you unable to control the water flow or temperature.
Ignoring a loose faucet handle is like ignoring a loose wheel on a car; the point of connection is critical, and its failure leads to bigger, more expensive problems down the line.
How It Works
To understand the fix, you need to understand the simple but effective engineering behind your faucet handle. It's not just a decorative lever; it's the interface between your hand and the complex valve system hidden within the faucet body.
At its core, a faucet handle assembly consists of four key parts:
- The Handle: The part you see and touch. It's usually made of metal with a decorative finish (chrome, brushed nickel, etc.). On its underside or back is a female-patterned socket, often with a series of teeth or splines.
- The Valve Stem: This is the top part of the faucet cartridge that protrudes from the faucet body. It has a corresponding male pattern of splines that are designed to mate perfectly with the socket inside the handle.
- The Set Screw: This is the linchpin of the whole operation. A set screw is a type of screw that is designed not to fasten two things together face-to-face, but to secure an object within another object by applying pressure. In this case, the set screw passes through a threaded hole in the side or back of the faucet handle and presses firmly against the side of the valve stem. This pressure locks the handle onto the stem, ensuring that when you turn the handle, the stem turns with it.
- The Decorative Cap (Optional): On most modern faucets, the access hole for the set screw is covered by a small plastic or metal cap to give the handle a clean, seamless look. This cap might have a red or blue ring or dot to indicate temperature.
The wobble begins when the set screw, for one reason or another, backs out by just a fraction of a turn. This releases the pressure holding the handle tight against the valve stem. Now, instead of being a single, solid unit, there's a tiny gap. That gap allows the handle to jiggle, and with every use, the rotational force causes the screw to loosen just a tiny bit more, amplifying the wobble until it becomes impossible to ignore.
Step-by-Step Fix
This is a classic DIY job that requires more patience than skill. Follow these steps carefully to create a rock-solid connection that will last for years.
SAFETY FIRST: While you aren't opening a water line for this repair, it's a good habit to shut off the water supply under the sink. Turn the oval-shaped knobs on the hot and cold water lines clockwise until they stop. This prevents any accidental bumps from turning the water on while the handle is removed. Also, and this is crucial, plug the sink drain. Set screws are tiny and have an almost supernatural ability to jump directly down the drain, turning a 15-minute job into a multi-hour plumbing project.
Step 1: Gather Your Tools & Materials You won't need much. Get an Allen key set (most faucet set screws are metric, with 2.5mm and 3mm being very common sizes), a small flathead screwdriver, a soft cloth or rag, and a small tube of non-permanent (blue) threadlocker, like Loctite 242 or 243.
Step 2: Identify the Set Screw Location Look closely at your faucet handle. The set screw is almost always hidden. It will be in one of three places:
- Under a decorative cap: Look for a small plastic cap on the main body of the handle. It may have a hot/cold icon.
- At the base of the handle: A small, exposed screw hole near where the handle meets the faucet body.
- On the underside/back of the handle: You may need to feel for a small hole.
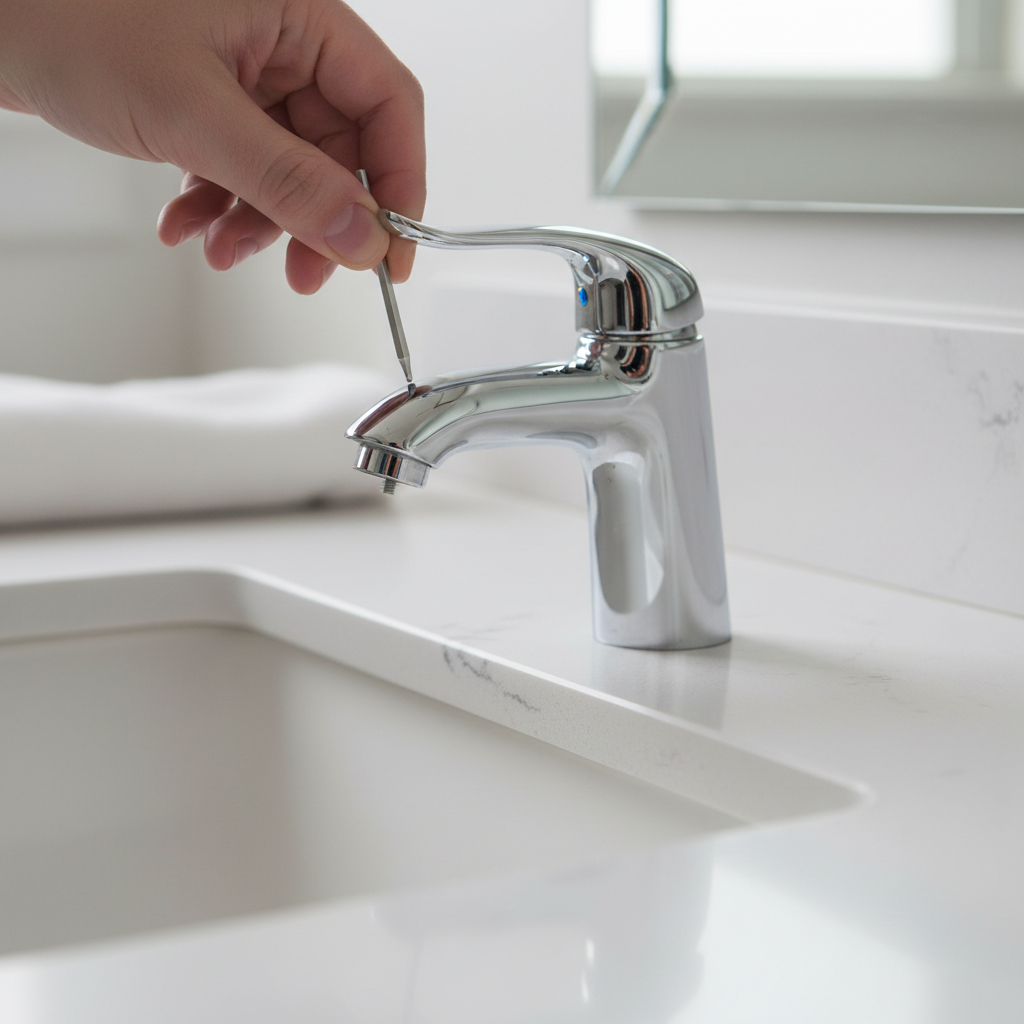
Step 3: Remove the Decorative Cap If your screw is hidden by a cap, you'll need to pry it off. Do not use a metal screwdriver directly. You will scratch the finish. Use a fingernail, a plastic pry tool, or a small flathead screwdriver with the tip wrapped in a single layer of your soft cloth. Gently insert the edge into the seam and pop the cap off. Set it aside somewhere safe.
Step 4: Access and Inspect the Set Screw With the cap removed, you'll see the head of the set screw. Note what type it is—most are Allen (hex) heads, but some older models might use a small Phillips or flathead. Confirm that your tool fits snugly. A loose-fitting Allen key is the number one cause of stripped set screws.
Step 5: Loosen and Remove the Screw Turn the set screw counter-clockwise. You may only need to loosen it a few turns to pull the handle off, but for our "forever fix," it's best to remove it completely. As you get to the last few threads, be careful not to drop it. Place it on your rag.
Step 6: Remove and Inspect the Handle With the set screw out, lift the handle straight up and off the valve stem. Now is the time for a quick diagnosis. Look at the splines on the valve stem and inside the handle socket. Are they clean and sharp, or are they worn down, flattened, or filled with gunk? If the splines are severely damaged or stripped, a new handle or cartridge is your only option.
Step 7: The "Set-Screw Trick" – Apply Threadlocker This is the secret to a permanent fix. Clean any oil or grime off the threads of your set screw with the rag. Now, apply a single, small drop of blue, non-permanent threadlocker to the threads of the set screw. Do not slather it on. A little goes a long way. The threadlocker is a liquid anaerobic compound that will cure in the absence of air (i.e., within the threads), creating a vibration-proof bond that still can be broken with hand tools if you need to make a repair later. Crucially, do not use red (permanent) threadlocker. Red is for industrial machinery and will require a blowtorch to remove.
Step 8: Reinstall the Handle and Screw Slide the handle back onto the valve stem, wiggling it slightly until you feel the splines fully engage. Insert the threadlocker-treated set screw into the hole and begin tightening it clockwise.
Step 9: Tighten Firmly, But Don't Overdo It As you tighten the set screw, you'll feel the handle pull snug against the stem. The goal is "snug plus a quarter turn." You want it tight enough to prevent any movement, but overtightening can strip the screw threads or even crack the handle. The blue threadlocker means you don't need brute force to keep it in place.
Step 10: Test and Reassemble Give the handle a good wiggle. It should feel completely solid, like it's part of the faucet body itself. If it's secure, snap the decorative cap back into place. Wipe away any excess threadlocker with your rag.
Step 11: Turn Water On and Final Test Unplug the drain. Go under the sink and turn the water supply valves back on (counter-clockwise). Operate the handle to make sure it functions correctly. The wobbly, unsatisfying clunk is gone, replaced by a smooth, solid action.
Common Causes
Why does this happen in the first place? It's rarely a single event, but a combination of factors over time.
- Micro-Vibrations: The simple act of turning the water on and off, especially with quarter-turn handles that stop abruptly, sends tiny vibrations through the assembly. Over thousands of cycles, these vibrations can cause a screw to slowly back out.
- Thermal Expansion and Contraction: The faucet body and handle heat up with hot water and cool down. These subtle changes in size cause the metal parts to expand and contract at different rates, which can work the set screw loose over time.
- Improper Initial Installation: Many faucets are installed with the set screws only finger-tight, or they are tightened without ensuring the handle is fully seated on the splines. This creates a small amount of initial play that quickly gets worse.
- Wear and Tear: On older faucets, the splines inside the handle can wear down. This creates more space for the handle to move, putting extra stress on the set screw and causing it to loosen faster.
- Corrosion: In humid bathroom environments, mineral deposits and corrosion can form on the valve stem and inside the handle, preventing a snug fit. This corrosion can also damage the set screw itself.
Common Mistakes to Avoid
- Using the Wrong Tool: Never try to force a Phillips head screwdriver into an Allen socket. You will strip the screw head, making a simple job incredibly difficult. If you don't have the right size Allen key, buy a set—it's one of the most useful tools a homeowner can own.
- Scratching the Finish: Be patient when prying off the decorative cap. A scratched chrome or brushed nickel finish is permanent. Always use a soft barrier like a cloth.
- Losing the Screw: Plug the drain. No exceptions. This is the single most common, and most infuriating, mistake.
- Using Permanent (Red) Threadlocker: This is a catastrophic error. You will not be able to remove the screw without extreme measures that will likely destroy the faucet. Only use blue, non-permanent, removable threadlocker.
- Overtightening: More is not better. A stripped screw or a cracked handle is a much bigger problem than a loose one. The goal is firm, not Herculean.
Cost & Time Breakdown
This repair is a perfect example of how a little DIY knowledge can save you significant money.
| Item | DIY Cost | Professional Cost | DIY Time | Professional Time |
|---|---|---|---|---|
| Repair | ||||
| Tighten Loose Faucet Handle | $0 - $15 | $150 - $300 | 15-20 Minutes | 10 Minutes (on site) |
| Breakdown | ||||
| Allen Key Set | $10 (if you don't own one) | Included in service | ||
| Blue Threadlocker | $7 | Included in service | ||
| Plumber Service Call Fee | N/A | $150 - $300+ |
The professional cost reflects a minimum charge for a licensed plumber to come to your home. While the job is quick for a pro, you are paying for their travel, expertise, insurance, and business overhead. For a non-emergency repair like this, the DIY savings are immense.
Tips & Prevention
- The Drain is Your Enemy: Have we mentioned plugging the sink drain? Plug the sink drain.
- Clean Before You Tighten: When the handle is off, use a small brush (an old toothbrush works great) to clean any gunk or mineral buildup off the valve stem and out of the handle socket. A cleaner connection is a better connection.
- Keep Spares: When you buy an Allen key set, keep it in a designated, easy-to-find spot. Many faucets even come with the correct-sized key in the box—tape it to the installation manual and file it away.
- Proactive Application: If you are installing a new faucet, apply a tiny drop of blue threadlocker to the set screws during the initial installation. You'll prevent this problem from ever happening in the first place.
When to Call a Professional
While this is a very manageable DIY task, there are a few scenarios where it’s smarter to put down the tools and call a plumber.
- The Set Screw is Stripped or Seized: If you or a previous owner has stripped the head of the set screw, you won't be able to tighten or remove it. A plumber has specialized screw extraction tools to handle this without damaging the faucet.
- The Handle is Tight, but the Faucet Leaks: If you've tightened the handle and it's solid, but you now see water dripping from the handle base or the spout, the problem isn't the handle—it's a failing internal cartridge. This is a more involved repair, and a pro can ensure it's done right.
- The Entire Faucet Body is Loose: If you grab the handle and the entire faucet base moves or lifts off the sink deck, the problem is with the mounting nuts under the sink. While also a DIY possibility, it can be a frustrating job in a tight space, and a plumber can knock it out quickly.
- The Handle Splines are Completely Stripped: If you take the handle off and the teeth inside are worn smooth, simply tightening it won't work for long. While you can try to find a replacement handle, it can be difficult to match. A pro can help you source the right parts or recommend a replacement faucet.
Frequently asked questions
Why does my faucet handle keep coming loose even after tightening it?+
This usually happens due to constant micro-vibrations from turning the water on and off. Over time, these vibrations cause the set screw to back out. This is why simply re-tightening it is often a temporary fix. Using a non-permanent (blue) threadlocker on the screw's threads is the best way to prevent it from vibrating loose again.
What do I do if the set screw is completely stripped or I can't get it out?+
If the hex head of the screw is rounded out, it's time to call a professional plumber. They have specialized screw extraction kits that can remove a stripped screw without damaging the faucet body. Trying to drill it out yourself is very risky and can easily ruin the entire fixture.
Can I just use Super Glue or another glue instead of threadlocker?+
No, this is a very bad idea. Super Glue (cyanoacrylate) and other adhesives are not designed for this application. They can become brittle, and more importantly, they are not designed to be removable. If you use Super Glue, you will likely never be able to remove that screw again without destroying the faucet handle, turning a simple repair into a forced replacement.
The handle is tight, but now it leaks from the base. What's wrong?+
If the handle itself is rock solid but water is seeping out from under it when you turn the water on, the problem is not the handle's connection but the faucet's internal cartridge. The cartridge is the valve that controls water flow, and its seals have likely failed. This requires replacing the cartridge, which is a more involved (but still DIY-friendly) repair.


Discussion
Loading comments…