
Tools & materials you'll need
Affiliate linksAs an Amazon Associate FixlyGuide earns from qualifying purchases — at no extra cost to you. Prices and availability are accurate as of publication and subject to change.
Quick Answer
A leaky single-handle faucet is most commonly caused by a worn-out o-ring, rubber washer, or a damaged cartridge. Repair involves shutting off the water, disassembling the faucet body, identifying the faulty part, and replacing it with a new, compatible component, then reassembling the faucet.
The Problem
That persistent drip-drip-drip from your single-handle faucet is more than just an annoyance. It’s a silent drain on your wallet, wasting dozens, even hundreds of gallons of water per year, and can lead to unsightly mineral stains on your sink or bathtub. While a faucet might seem like a simple device, a leak indicates a breakdown in its internal sealing mechanisms. Ignoring it won't make it go away; in fact, it can lead to further damage to the faucet body or, in rare cases, even cause water damage under the sink if the leak is at the base.
The most common leaks originate from the spout, but don't be fooled—sometimes the issue stems from deeper within the faucet's body or at its connection to the water supply lines. The good news is that for most single-handle faucets, the internal parts responsible for preventing leaks are replaceable, and the repair is a manageable DIY project for the average homeowner.
How It Works
Understanding how a single-handle faucet operates is key to diagnosing and fixing its leaks. Unlike older two-handle faucets, which have separate hot and cold valves, a single-handle faucet uses a sophisticated cartridge or ball assembly to control both water temperature and flow. When you lift the handle, you're adjusting a mechanism inside this cartridge or ball that dictates how much water from the hot and cold supply lines mixes and exits the spout.
Inside a typical single-handle faucet, you'll find a few key components: the handle itself, a decorative cap or screw cover, the main body of the faucet, and critically, either a ceramic disc cartridge or a ball valve assembly.
Ceramic Disc Cartridges: These are common in many newer faucets. They consist of two highly polished ceramic discs that slide against each other. Holes in the discs align to allow water flow for hot, cold, or mixed temperatures. When the handle moves, it rotates the upper disc. The precision of these discs creates a tight seal. Over time, sediment in the water, mineral buildup, or even microscopic scratches can compromise this seal, leading to leaks.
Ball Valve Assembly: Often found in older faucets, particularly those with a distinctive spherical shape under the handle, this system uses a rotating ball with spring-loaded rubber seats and O-rings. The ball has ports that align with corresponding ports in the faucet body to control water flow and temperature. The rubber seats and O-rings provide the crucial seal. Over years of use, these rubber components can harden, crack, or degrade, losing their elasticity and causing leaks.
O-Rings and Washers: Regardless of the cartridge type, various O-rings and rubber washers are strategically placed throughout the faucet to prevent water from escaping. These include O-rings around the spout base, inside the cartridge housing, or around the valve stems. These flexible seals are particularly vulnerable to wear and tear, especially in areas with hard water, which can cause them to become brittle or accumulate mineral deposits.
When any of these seals fail – whether it’s a compromised ceramic disc, a hardened rubber seat, or a degraded O-ring – water finds the path of least resistance and escapes, manifesting as a drip from the spout, a leak from the base of the handle, or even water pooling around the faucet base.
Step-by-Step Fix
Before you begin, always shut off the water supply to the faucet. Look under the sink for two shut-off valves (one for hot, one for cold) and turn them clockwise until tight. Open the faucet handle to drain any remaining water.
1. Identify Your Faucet Type and Leak Source
— Determine if you have a ceramic disc or ball-type faucet. This dictates the repair kit you'll need. Examine the base of the handle and spout for signs of where the water is emerging. A drip from the spout means internal components like the cartridge or O-rings are failing. A leak from the handle base might be the cartridge or packing nuts. * If your faucet is dripping from the spout: Start by checking the cartridge or ball valve components. * If water is leaking around the base of the handle: The cartridge or its retaining nuts are the likely culprits. * If water is pooling around the faucet body on the counter: The O-rings at the spout base might be failing, or the faucet itself is loose.
2. Disassemble the Faucet Handle
— Most single-handle faucets have a small screw hidden beneath a decorative cap on the handle, or sometimes on the side or front. Pop off the cap using a thin screwdriver or utility knife. Unscrew the handle screw and carefully lift the handle off. Set these parts aside in a safe place. * Tool Tip: A plastic pry tool can prevent scratches when removing decorative caps. * Safety Note: Wear safety glasses to protect your eyes from any unexpected debris or water.
3. Remove the Faucet Dome/Cap
— Once the handle is off, you'll see a decorative dome or a retaining nut. Use adjustable pliers or a basin wrench to unscrew this part counter-clockwise. Be gentle to avoid scratching the finish. Lift off any retaining rings or washers beneath it. * If it's stuck: Apply a penetrating lubricant and let it sit for 15-20 minutes before trying again.
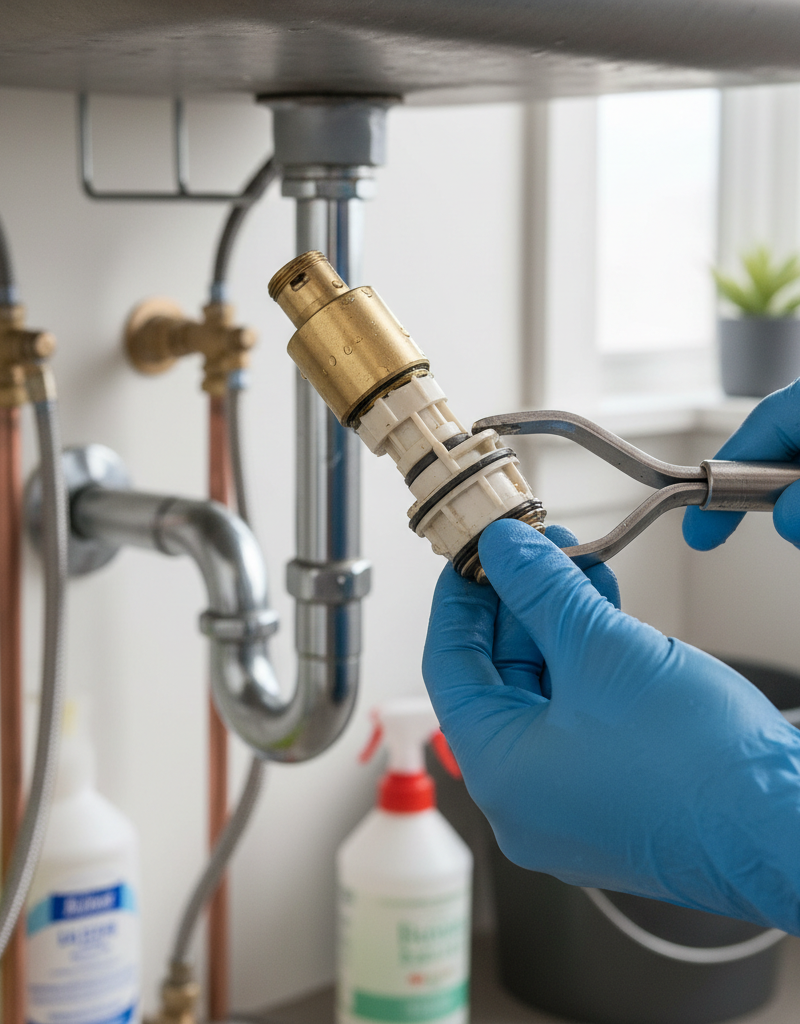
4. Extract the Cartridge or Ball Assembly
— This is the core of your faucet. For ceramic disc cartridges, there's usually a retaining clip or nut holding it in place. Remove the clip with needle-nose pliers or unscrew the nut. Carefully pull the cartridge straight up and out. For ball-type faucets, lift out the cam and packing. The plastic ball, springs, and rubber seats will then be accessible. * Pro Tip: Take a photo with your phone before removing parts to aid reassembly. * If the cartridge is stubborn: Use a cartridge puller tool specifically designed for your faucet brand, or gently rock it side-to-side with pliers while pulling.
5. Inspect and Replace Worn Components
— Carefully examine the removed cartridge or ball assembly, spring-loaded seats, and any O-rings. Look for cracks, wear, mineral buildup, or flattening on the rubber components. Pay close attention to the O-rings around the spout base if your leak was there. Replace any damaged parts. * Important: Take the old parts to a hardware store to ensure you buy the exact replacements. Faucet brands often have proprietary parts. * Lubrication: Apply a thin coat of plumber's silicone grease to new O-rings and any moving parts of the cartridge to ensure smooth operation and a better seal.
6. Reassemble the Faucet
— Work in reverse order. Carefully insert the new cartridge or ball assembly, ensuring it's oriented correctly (often there's a specific alignment tab or direction). Secure it with the retaining clip or nut. Replace any cam components, spring-loaded seats, or O-rings. Screw the dome/cap back on, hand-tightening first, then a quarter turn with pliers. * Check alignment: Ensure all parts fit snugly and are oriented correctly to prevent future leaks.
7. Reattach the Handle and Test
— Place the handle back on, align it, and screw it securely. Don't overtighten; you could strip the screw or crack the handle. Slowly turn the water supply back on under the sink. Turn the faucet on (both hot and cold) and check for leaks. Look carefully around the spout, handle base, and under the sink where the supply lines connect. * If it still leaks: Double-check that all components are seated correctly and that the retaining nut or clip is tight. Sometimes, a tiny misalignment can cause a drip. Ensure the shut-off valves are fully open. * Another common issue: If the leak persists, consider replacing the entire cartridge, even if you only replaced seals. Cartridges themselves can develop hairline cracks.
8. Address Spout O-Ring Leaks (If Applicable)
— If your leak was specifically from the base of the spout where it meets the faucet body, you'll need to remove the spout itself. This usually involves gently wiggling and pulling it upward or unscrewing a retaining nut underneath. Inspect and replace the O-rings at the base of the spout, lubricating them with plumber's grease before reassembly. * Be gentle: Older spouts can be brittle. Avoid excessive force when removing.
Common Causes
- Worn-out O-Rings: These small rubber rings provide seals throughout the faucet. Over time, they can dry out, crack, or lose their elasticity, especially with exposure to hard water and varying temperatures. They are the most frequent culprits for leaks around the spout or handle base.
- Damaged Cartridge: The ceramic disc or ball valve cartridge is the heart of a single-handle faucet. Internal wear, mineral deposits, or even manufacturing defects can compromise its ability to precisely control and seal water flow. This is a very common cause of persistent drips from the spout.
- Hard Water & Mineral Buildup: Calcium and magnesium in hard water can accumulate on internal components, creating abrasions on sealing surfaces or causing moving parts to stick, preventing a proper seal. This accelerates wear on O-rings and cartridges.
- Loose Packing Nuts: Some faucets have a packing nut that compresses a seal around the valve stem. If this nut loosens, or the packing material wears, water can seep out around the handle base. This is more common in older, rebuildable cartridges.
- Water Pressure Fluctuations: While less common, extreme or sudden changes in water pressure can put stress on faucet components, potentially dislodging seals or accelerating wear.
- Incorrect Installation: If the faucet was not installed correctly initially, with overtightened or undertightened connections, it can lead to premature leaks.
Common Mistakes
- Not Shutting Off Water Completely: Forgetting to turn off both hot and cold water supplies can lead to a messy surprise and potential water damage. Always double-check before disassembling.
- Using the Wrong Replacement Parts: Faucets often require specific cartridges, O-rings, or seals. Generic parts might fit but won't provide a lasting, leak-proof seal. Always bring the old part to the store or consult your faucet's manual.
- Overtightening Components: Screwing down nuts and screws with excessive force can strip threads, crack plastic parts, or deform rubber seals, causing more leaks or making future repairs difficult.
- Forgetting Plumber's Grease: Applying a thin layer of silicone plumber's grease to new O-rings and the cartridge body is crucial. It helps with a smoother installation, better seal, and prolongs the life of the rubber components.
- Not Cleaning Faucet Interior: Before installing new parts, take a moment to clean out any mineral buildup or debris inside the faucet body. This ensures new seals can seat properly. Use white vinegar and a small brush.
- Ignoring the Supply Lines: Sometimes, a perceived
Related Articles
Keep troubleshooting with these hand-picked guides from FixlyGuide:
- The $5 Secret to Silencing That Annoying Dripping Faucet (Single-Handle Fix) — Stop a dripping single-handle faucet with a simple and inexpensive DIY fix by replacing a worn-out o-ring or washer.
- The $5 Secret to Fixing Your Drip: Why Single-Handle Faucets Leak (and the O-Ring Trick) — A persistent drip from your single-handle faucet is often caused by worn-out O-rings or seals, a common issue with a simple, inexpensive DI…
- The 1 Common Reason Your Single-Handle Faucet Leaks (And How to Fix It in 30 Minutes) — A persistent drip from your single-handle faucet often points to a worn-out cartridge, a simple fix any homeowner can tackle.
- The 5-Minute Trick to Stop a Dripping Single-Handle Faucet (No Plumber Needed) — A persistent drip from your single-handle faucet is usually caused by a worn-out cartridge, a repair you can typically complete yourself in…
- The Secret Culprit Behind Your Leaky Chimney (It’s Not Always the Obvious Flashing) — Discover the often-overlooked causes of chimney leaks during rain and how to tackle them with effective DIY solutions and prevention tips.
- Is One Drip Emitter Starving? The Secret Culprit (It's Not Clogging) — A single drip emitter refusing to hydrate your plants can be frustrating, but the fix is often simpler than you think and rarely a clog.
Frequently asked questions
Why is my single-handle faucet leaking even after I replaced the O-rings?+
If your single-handle faucet still leaks after replacing the O-rings, the most likely culprit is a worn or damaged cartridge. The cartridge is the central component that controls water flow and temperature, and its internal seals or ceramic discs can fail over time, necessitating a full cartridge replacement.
How do I know if I have a ceramic disc or ball-type faucet?+
You can usually tell by the faucet's design and how the components look when you disassemble the handle. Ceramic disc faucets typically have a cylindrical cartridge with two visible ceramic discs inside, while ball-type faucets feature a plastic or metal ball with several ports, surrounded by spring-loaded rubber seats and O-rings.
Can I use any plumber's grease for my faucet repair?+
No, you should use only silicone-based plumber's grease. Petroleum-based greases can degrade rubber and plastic components found in faucets, leading to premature failure of seals and O-rings.
How long does a faucet cartridge typically last?+
The lifespan of a faucet cartridge varies greatly depending on water quality, usage frequency, and brand. Generally, a good quality cartridge can last anywhere from 5 to 20 years. Hard water areas might see shorter lifespans due to mineral buildup and wear.


Discussion
Loading comments…