
Tools & materials you'll need
Affiliate linksAs an Amazon Associate FixlyGuide earns from qualifying purchases — at no extra cost to you. Prices and availability are accurate as of publication and subject to change.
How it works
A single-handle faucet regulates water volume and temperature through a single, centralized valve mechanism. While designs vary between manufacturers, they typically fall into one of three categories: cartridge, ball, or ceramic disc. Understanding which type you have is the first step in diagnosing and fixing a leak.
Cartridge Faucets are the most common type in modern homes. They contain a self-contained plastic or brass cartridge with a series of precisely engineered holes and rubber seals. As you move the handle, the cartridge slides and rotates within the faucet body. This movement aligns internal channels with the hot and cold water inlets, controlling both the mix of water (temperature) and the amount of flow (volume). Leaks usually occur when the rubber O-rings or neoprene seals within the cartridge assembly degrade, crack, or become compromised by mineral buildup.
Ball Faucets, pioneered by Delta, use a slotted plastic or metal ball that sits atop spring-loaded rubber seats. Moving the handle rotates this ball, aligning its slots with the hot and cold water inlets. The springs press the rubber seats against the ball to create a seal. Leaks from the spout are typically caused by worn seats or springs, while leaks from the faucet base are often due to failing O-rings that seal the spout to the main body.
Ceramic Disc Faucets are a durable, high-end option. They operate using two interlocking ceramic discs, one stationary and one that rotates with the handle. These discs are polished to a near-perfect flatness, creating a watertight seal. As the top disc rotates, its openings align with the openings in the bottom disc to allow water to flow. These faucets are extremely reliable, but a leak can occur if the neoprene seals at the base of the cartridge fail or if hard water sediment manages to scratch a disc's surface.
Step-by-Step Fix
This guide focuses on replacing a faucet cartridge, the most common repair for a single-handle faucet. The principles are similar for ball-style faucets, with slight variations in the internal components.
-
Shut Off Water and Prepare Workspace — Locate the hot and cold water shut-off valves in the cabinet beneath the sink. Turn the handles clockwise until they are fully closed. Turn the faucet handle to the "on" position to drain any remaining water and confirm the supply is off. Finally, place a rag or drain stopper over the sink drain to prevent small screws or parts from being lost.
- Tools: Flashlight, rag.
- Safety: If no shut-off valves are present under the sink, you must turn off the main water supply to the entire house.
-
Remove the Decorative Cap — Most faucet handles have a small plastic cap that conceals a set screw. This cap may be on the front, side, or top of the handle's base. Use the tip of a utility knife or a small, flathead screwdriver to gently pry it off without scratching the faucet's finish.
-
Loosen the Set Screw and Remove Handle — Using the appropriate tool, typically a 1/8" or 3/32" Allen wrench (hex key) or a Phillips head screwdriver, turn the set screw counter-clockwise. You only need to loosen it a few turns; it does not need to be completely removed. Once loose, the handle should lift straight up and off the cartridge stem. If it is stuck, try wiggling it gently side-to-side while pulling upward.
-
Remove the Decorative Collar — With the handle removed, you will see a dome-shaped or cylindrical collar (escutcheon) covering the faucet's internal mechanism. This piece almost always unscrews by hand. Turn it counter-clockwise to remove it. If it’s stuck due to mineral deposits, wrap it with a soft cloth and use channel-lock pliers to gently break it loose, taking care not to mar the finish.
-
Identify and Remove the Retaining Mechanism — Below the collar, you will find the mechanism securing the cartridge. This is a critical point of variation between brands.
- Moen-style: A small, U-shaped brass or copper retaining clip holds the cartridge in place.
- Delta-style (and others): A large, threaded bonnet nut, often made of brass or plastic, screws down over the cartridge.
- Ball-style: A threaded cap, sometimes with a separate adjusting ring, holds the ball assembly in place.
-
Extract the Retaining Mechanism — For a retaining clip, use needle-nose pliers or a small screwdriver to pull it straight out of its slot. For a threaded bonnet nut, use channel-lock pliers or a basin wrench to grip and turn it counter-clockwise. If it's very tight, apply a small amount of penetrating oil and let it sit for 20-30 minutes before trying again.
-
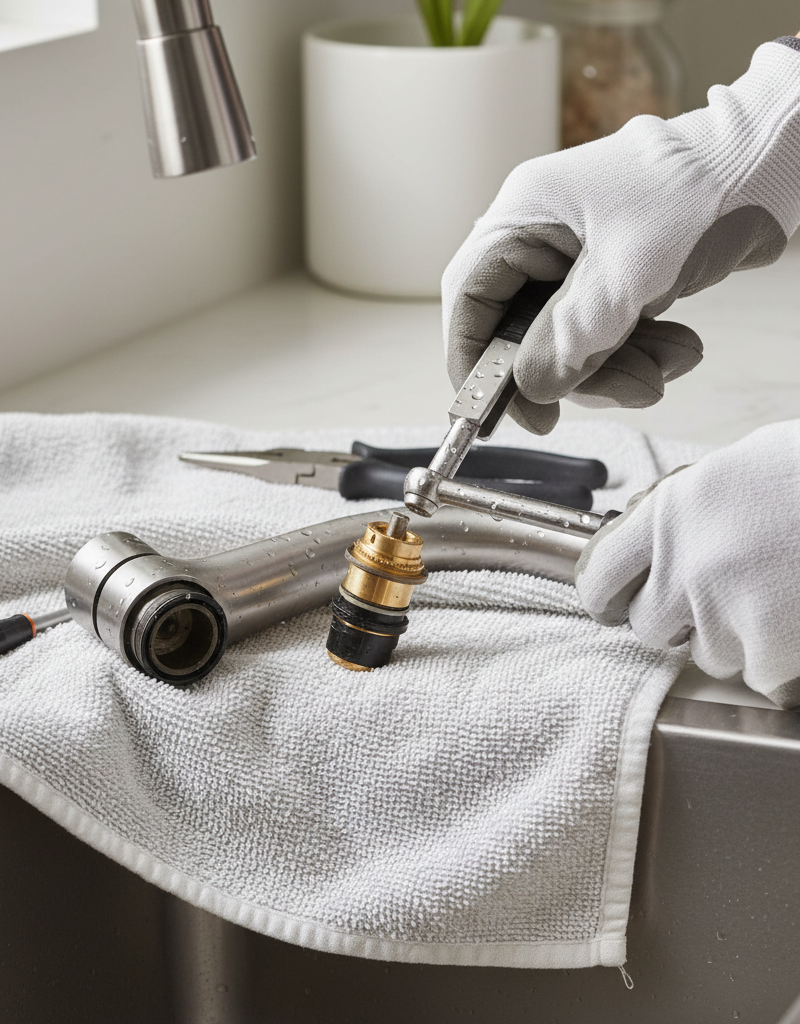
Remove the Old Cartridge — The cartridge should now be free. If you're lucky, you can pull it straight up by its stem. More often, it will be stuck by mineral deposits. Most replacement cartridges include a small plastic tool designed to fit over the stem; use this tool to rotate the cartridge back and forth to break the mineral seal, then pull it straight out. If no tool is provided, use pliers to grip the stem and pull upward with a steady, wiggling motion.
- Pro-Tip: Before removal, take a clear photo of the cartridge's orientation. Note the position of any tabs or notches, as the new one must be installed identically.
-
Clean the Faucet Body Interior — With the cartridge removed, thoroughly inspect and clean the inside of the faucet body. Use a soft nylon brush or an old toothbrush dipped in a 50/50 solution of white vinegar and water to scrub away any mineral scale, sediment, or bits of old rubber seals. Flush the cavity by briefly and gently cracking open one of the shut-off valves to wash away debris.
-
Replace Spout O-Rings (For Base Leaks) — If the original leak was from the base of the spout, now is the time to replace the O-rings. The spout assembly should lift straight off the faucet body. Use a small pick or screwdriver to carefully remove the old O-rings from the faucet body. Clean the grooves, then coat the new O-rings with a thin layer of silicone-based plumber's grease before seating them in the grooves. This lubricates them and ensures a perfect seal.
-
Install the New Cartridge — Take your old cartridge and photos to a hardware or plumbing supply store to find an exact match. Before installing, apply a light coat of plumber's grease to the rubber seals on the new cartridge. Align the tabs on the cartridge with the corresponding slots inside the faucet body and press it down firmly until it is fully and evenly seated.
-
Reassemble the Faucet — Re-install the components in the reverse order of removal. Re-insert the retaining clip or thread on the bonnet nut. Tighten the nut until it is snug, then give it an additional quarter-turn with pliers—do not overtighten, as this can crack the plastic cartridge. Screw the decorative collar back on by hand. Place the handle back on the stem, tighten the set screw, and snap the decorative cap back into place.
-
Restore Water and Test the Repair — Turn the shut-off valves back on slowly, opening them fully. Check for any leaks around the handle and spout base. Move the handle through its full range of motion, from off to full hot and full cold. Check that the temperature mixing is correct (hot on the left, cold on the right). If there are no drips from the spout when closed and no water seeping from the base, the repair is complete.
Common mistakes
- Buying the Wrong Replacement Part. Faucet cartridges are not universal. Even within the same brand, there are dozens of variations. The only way to guarantee a match is to identify the faucet's model number (often found on a tag on the supply line or etched on the back of the faucet base) or to bring the old cartridge with you to the hardware store for a side-by-side comparison.
- Using Excessive Force on Stuck Components. Faucet parts, especially the decorative finish and threaded plastic components like a bonnet nut, are easily damaged. If a part won't budge, do not apply more force. Instead, apply a penetrating oil, wait, and use the correct tool. A cloth-wrapped part and channel-lock pliers are a last resort; a dedicated basin or faucet wrench provides better leverage without damaging the finish.
- Forgetting to Clean the Faucet's Interior. Skipping the internal cleaning is a primary cause of failed repairs. Any mineral deposits, scale, or debris left inside the valve body can prevent the new cartridge's seals from seating properly, resulting in a persistent or new leak. This step is not optional.
- Overtightening connections. The credo for faucet repair is "snug, not stripped." Overtightening the bonnet nut can crack the cartridge housing. Overtightening the handle's set screw can strip the threads or damage the cartridge stem. Tighten until you feel firm resistance, then stop or give a final quarter-turn at most.
- Skipping the Plumber's Grease. Silicone-based plumber's grease is essential. It protects O-rings and seals from tearing during installation, helps them seat correctly, and extends their life by preventing them from drying out. Attempting to install new seals dry is a common mistake that can cause them to fail immediately.
Cost & time breakdown
| Task | DIY Cost | Pro Cost | Time |
|---|---|---|---|
| Spout O-Ring Replacement | $5 - $15 (O-ring kit, plumber's grease) | $150 - $250 | 30 - 60 minutes |
| Cartridge Replacement (Standard Plastic/Brass) | $20 - $50 (Cartridge, may include tool) | $175 - $300 | 45 - 75 minutes |
| Ball Valve Assembly Rebuild | $15 - $30 (Rebuild kit with ball, springs, seats) | $175 - $300 | 45 - 90 minutes |
| Ceramic Disc Cartridge Replacement | $40 - $80+ (Cartridge-specific) | $200 - $350 | 45 - 75 minutes |
| Full Faucet and Supply Line Replacement | $100 - $400+ (New faucet, lines, tools) | $350 - $600+ | 2 - 4 hours |
When to call a pro
While replacing a cartridge is a manageable DIY project, certain situations warrant calling a licensed plumber. If you encounter any of the following, it’s safer and more efficient to hire a professional:
- Frozen Shut-Off Valves: If the shut-off valves under the sink will not turn or they leak when you try to operate them, stop immediately. A plumber can replace these valves (a task that often requires shutting off water to the whole house) without flood risk.
- Extreme Corrosion: If the faucet base, retaining nut, or supply lines are heavily corroded, attempts to remove them can cause parts to snap off, potentially breaking a pipe inside the wall or cabinet. Plumbers have specialized tools like valve seat dressers and heavy-duty pullers to handle these situations.
- Persistent Leak After DIY Repair: If you have correctly installed a new, matching cartridge and cleaned the valve body, but the faucet still leaks, the problem may be a scratch or pit in the faucet's internal valve seat. This is not repairable with a simple parts swap and means the entire faucet assembly must be replaced.
- Leak from the Faucet Body: If you see water seeping from a hairline crack in the cast metal a of the faucet itself (not from a seam or connection point), the unit has failed and must be replaced.
- Uncertainty or Lack of Time: If you are not confident in your ability to perform the repair or cannot afford to have a primary kitchen or bathroom faucet out of commission for an extended period, a professional can complete the job quickly and correctly.
Prevention & maintenance
Proper care can significantly extend the life of your faucet's internal components and prevent premature leaks.
- Operate Gently: Avoid snapping the handle on and off. Smooth, deliberate movements put less stress on the cartridge and internal seals. Teach all household members to operate the faucet with care.
- Address Drips Immediately: The moment you notice a drip, schedule a time for repair. A constant drip forces water past a single point on a seal, causing it to wear out much faster and potentially damage the valve seat over time.
- Clean the Aerator: Every 3-6 months, unscrew the aerator from the tip of the faucet spout. Disassemble it and soak the parts in white vinegar to dissolve mineral buildup, then scrub with a brush and rinse. A clogged aerator creates back-pressure that can strain internal seals.
- Exercise Shut-Off Valves: Twice a year, turn the hot and cold shut-off valves under the sink all the way closed, then all the way open again. This simple action prevents mineral deposits from causing the valves to seize, ensuring they will work when you need them for a repair.
- Take Advantage of Warranties: Many major faucet manufacturers (including Moen, Delta, and Kohler) offer lifetime limited warranties that provide free replacement cartridges to the original owner. Check the manufacturer's website or call their support line; you may only need to pay for shipping.
- Consider a Water Softener: If you live in an area with hard water, a whole-house water softener is the most effective long-term solution. It removes the minerals that cause scale buildup, protecting not only your faucets but all of your home's plumbing fixtures and water-using appliances.
Related Articles
Keep troubleshooting with these hand-picked guides from FixlyGuide:
- The $5 Secret to Fixing Your Drip: Why Single-Handle Faucets Leak (and the O-Ring Trick) — A persistent drip from your single-handle faucet is often caused by worn-out O-rings or seals, a common issue with a simple, inexpensive DI…
- The 5-Minute Trick to Stop a Dripping Single-Handle Faucet (No Plumber Needed) — A persistent drip from your single-handle faucet is usually caused by a worn-out cartridge, a repair you can typically complete yourself in…
- The $5 Single-Handle Faucet Fix Plumbers Don't Want You to Know — Stop that annoying drip! Most single-handle faucet leaks are caused by worn-out O-rings or seals, a repair homeowners can easily tackle in…
- The Secret Culprit Behind Your Leaky Chimney (It’s Not Always the Obvious Fix) — A leaky chimney during rain can indicate several issues, from simple flashing problems to complex crown damage, requiring homeowners to dia…
- The $5 Secret to Fixing a Clogged AC Drain Line (and Avoiding a Costly Flood) — A clogged AC drain line can lead to water damage and mold, but a simple, inexpensive DIY fix can prevent costly repairs.
- Hail Damaged Siding: A Homeowner's DIY Repair Guide — Address hail-damaged siding promptly to prevent further issues like water intrusion and reduced curb appeal with this DIY repair guide.
Get the print-ready PDF of this guide
A clean, ad-free, printable version you can keep on your phone or pin to the workshop wall. Free with a FixlyGuide account.
- Print-optimized layout
- Tools, materials & every step included
- Saved to your account
Frequently asked questions
Why is my single-handle faucet leaking?+
Single-handle faucet leaks are usually caused by worn-out rubber O-rings or a faulty, degraded cartridge inside the faucet body. Mineral buildup from hard water can also contribute to component failure.
What tools do I need to fix a leaky single-handle faucet?+
You'll typically need a flathead screwdriver, Phillips head screwdriver, adjustable wrench or pliers, and potentially a utility knife. Make sure to have replacement O-rings or a new cartridge specific to your faucet model.
Can I replace just the O-rings or do I need a whole new cartridge?+
It depends on your faucet type and the source of the leak. Many ball-type faucets only require O-ring replacement, while cartridge faucets will need a new cartridge if that's the part that has failed. It's often best to replace wear parts as a kit.
How do I find the right replacement cartridge or O-rings?+
The best way is to shut off the water, disassemble your faucet, and remove the old cartridge or O-rings. Take the old part to a plumbing supply store or a well-stocked hardware store to ensure you purchase an exact match for your faucet's brand and model.


Discussion
Loading comments…