Tools & materials you'll need
Affiliate links- AmazonPlumber's grease (silicone-based)
- AmazonReplacement O-rings or faucet repair kitSpecific to your faucet brand and model
- AmazonReplacement faucet cartridgeSpecific to your faucet brand and model, if O-rings alone aren't enough
- AmazonSmall bucket or towelFor catching drips or protecting sink
- AmazonPenetrating oilOptional, for seized parts
As an Amazon Associate FixlyGuide earns from qualifying purchases — at no extra cost to you. Prices and availability are accurate as of publication and subject to change.
Quick Answer
Most single-handle faucet leaks stem from worn-out O-rings or a faulty cartridge. These components, critical for sealing and controlling water flow, are relatively inexpensive and can typically be replaced with basic tools in under an hour, restoring your faucet to like-new, drip-free operation.
The Problem
You hear that incessant drip, drip, drip. It's not just annoying; it's a silent drain on your wallet and a waste of precious water. A single-handle faucet, while convenient, relies on a precise internal mechanism to control both hot and cold water flow with a single lever. When this lever is in the "off" position, internal seals are supposed to create a watertight barrier. Over time, however, these seals – often rubber O-rings or gaskets – degrade, crack, or become encrusted with mineral deposits. The heart of many single-handle faucets, the cartridge, can also wear out, leading to leaks from the spout, around the base of the handle, or even from beneath the sink. Ignoring these leaks not only wastes water but can lead to unsightly mineral stains on your sink and countertops, and in severe cases, even water damage to your cabinets.
How It Works
Understanding how a single-handle faucet operates demystifies the repair process. Unlike older two-handle faucets with separate valves for hot and cold, a single-handle faucet employs a mixing valve design. The most common types are ball faucets, disc faucets, and cartridge faucets.
Ball Faucets: Identified by their spherical cap, these faucets use a rotating metal or plastic ball with slots and O-rings to control water flow. The ball rotates to align with hot and cold water inlets, mixing them to the desired temperature and flow rate. Leaks here are usually due to worn O-rings, inlet seals, or the ball itself.
Disc Faucets: These modern faucets use two ceramic discs working together. One disc rotates on top of the other. The bottom disc has inlet holes for hot and cold water, and an outlet for mixed water. The top disc has a chamber that, when the handle is moved, aligns with the bottom disc's holes, controlling the flow and mix. These are durable, but their seals can still fail.
Cartridge Faucets: Arguably the most common type, these faucets contain a cylindrical cartridge that houses the entire mixing mechanism. The cartridge itself has ports for hot and cold water, and an outlet for the mixed flow. Moving the handle rotates or slides internal components within the cartridge to meter the water. When a cartridge wears out, its internal seals or plastic parts fail, leading to drips or difficulty in controlling temperature/flow.
In all these designs, the core principle is containment and control. Water pressure from your supply lines pushes against internal seals. When these seals are intact, the water is held back. When they fail, even microscopically, water finds a path, resulting in a leak. Understanding which type of faucet you have will guide you in purchasing the correct replacement parts.
Step-by-Step Fix
Addressing a leaky single-handle faucet typically involves replacing worn O-rings or the entire cartridge. Here's how to do it.
1. Shut Off the Water Supply — Crucial first step for any plumbing repair.
- Look under the sink for the two shut-off valves (hot and cold) connected to your faucet. Turn them clockwise until they are completely closed. If you don't have individual shut-off valves, you'll need to turn off the main water supply to your house. Always test the faucet after shutting off the water to ensure no water comes out.
- Safety Note: Always ensure the water is completely off before disassembling any faucet components to prevent unexpected geysers and potential water damage.
2. Prepare Your Workspace — Gather tools and protect your area.
- Clear everything from under the sink and around the faucet. Place a towel or rags in the sink basin to protect it from dropped tools and to catch any residual water. Have a small container or cup handy to hold small parts as you remove them.
- Tools: Flathead screwdriver, Phillips head screwdriver, adjustable wrench, Allen wrench set (if needed), penetrating oil (optional).
3. Remove the Faucet Handle — Access the internal components.
- Most single-handle faucets have a decorative cap or a small screw hidden under the handle. Look for a small plastic button or a set screw (often Allen-head) on the side or back of the handle. Use a small flathead screwdriver or the appropriate Allen wrench to remove the cap or loosen the screw. Once loose, the handle should lift straight off.
- If stiff: If the handle is seized, apply a small amount of penetrating oil to the set screw and let it sit for a few minutes before trying again.
4. Disassemble the Faucet Body — Carefully expose the cartridge or ball valve.
- Beneath the handle, you'll likely see a dome-shaped cap or a retaining nut. For ball-type faucets, you'll see a cap with several screws; remove these. For cartridge faucets, there might be a retaining nut or clip. Use an adjustable wrench to carefully loosen and remove any nuts. If there's a retaining clip, use a flathead screwdriver to gently pry it out. Note the orientation of the clip for reinstallation.
- Identification: At this stage, you should be able to identify if your faucet uses a ball valve, a ceramic disc, or a cartridge. This is important for purchasing the correct replacement parts.
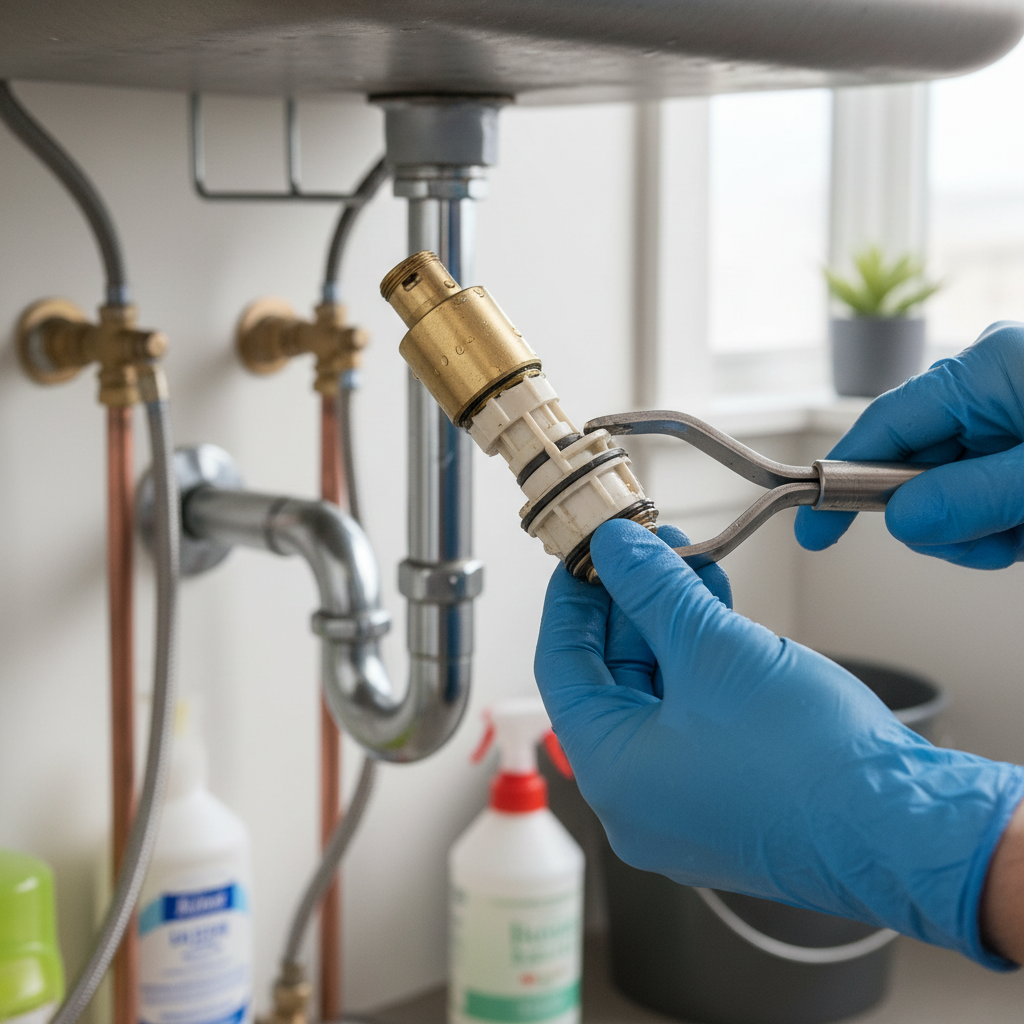
5. Remove and Inspect the Cartridge/Ball/Discs — Identify the source of the leak.
- Cartridge Faucets: Gently pull the cartridge straight up and out. You might need a pair of pliers to rock it slightly, but avoid twisting forcefully. Inspect the old cartridge for cracks, mineral buildup, or worn-out rubber seals. Often, the O-rings around the base of the cartridge are the culprits.
- Ball Faucets: Lift out the ball assembly, springs, and rubber seats. Inspect these components for wear, cracks, or hardened rubber. The springs should be firm, and the rubber seats pliable.
- Disc Faucets: The ceramic discs are usually held in a plastic housing that lifts out. Inspect the rubber seals beneath the discs and the discs themselves for chips or cracks. Significant damage to ceramic discs usually warrants a new faucet.
6. Replace Worn Parts — Install new seals or a new cartridge.
- O-Rings/Seals: If only the O-rings on a cartridge or the rubber seats/springs in a ball faucet are worn, you can purchase a repair kit specific to your faucet brand and model. Carefully remove the old O-rings with a small pick or screwdriver and roll on the new ones. Ensure they are seated correctly. Lubricate new O-rings with plumber's grease for easier installation and better sealing.
- Cartridge: If the cartridge itself is damaged or if a repair kit isn't available/effective, replace the entire cartridge. Ensure the new cartridge is the exact match for your faucet's brand and model. Orient it correctly, often with a 'hot' indicator (H) facing left, or aligning with a specific slot in the faucet body. Push it firmly into place.
- Helpful Tip: Take the old parts with you to the hardware store to ensure you get an exact match. Faucet parts are not universal.
7. Reassemble the Faucet — Work in reverse order.
- Carefully replace the retaining clip or tighten the retaining nut, but do not overtighten. Over-tightening can crack plastic components or compress seals too much. Reattach the decorative cap or screws. Slide the handle back onto its stem and secure it with the set screw or by replacing the cap.
8. Restore Water Supply and Test — Check for new leaks.
- Slowly turn the hot and cold water supply valves back on under the sink. Turn them counter-clockwise until fully open. Open the faucet handle to a mixed position and let water flow for a minute or two to flush any air from the lines. Close the handle and carefully inspect around the base of the faucet and under the sink for any new drips or leaks.
- If it still leaks: If the leak persists, you might have installed a part incorrectly, or there could be another worn component. Double-check all seals and connections. Sometimes, an older faucet may have multiple points of failure, making a full replacement a more cost-effective long-term solution.
Common Causes
- Worn O-rings and Seals: The most frequent culprit. Rubber and silicone seals harden, crack, or lose elasticity over time due to constant exposure to water, temperature changes, and mineral deposits.
- Mineral Buildup: Hard water leaves behind calcium and magnesium deposits that can abrade seals, clog cartridges, and prevent components from seating properly, leading to leaks.
- Damaged Cartridge: The internal mechanisms of a cartridge, including plastic components and seals, can wear out, crack, or become misaligned, causing drips.
- Loose Connections: Over time, nuts and screws holding parts together can loosen due to vibrations from water flow or regular use, creating tiny gaps for water to escape.
- Manufacturing Defects (Rare but possible): Occasionally, a brand-new faucet might have a faulty part or assembly error, leading to an early leak.
Common Mistakes
- Failing to Shut Off Water Completely: This is a messy and potentially damaging mistake. Always double-check that the water supply is off before starting work.
- Using the Wrong Replacement Parts: Faucet components are highly specific to brand and model. Guessing or buying generic parts will almost certainly lead to frustration and continued leaks. Always take the old part to the store or note the faucet's brand and model number.
- Overtightening Components: While it seems logical to tighten things securely to prevent leaks, overtightening plastic nuts or screws can crack the components and damage new seals, causing new leaks.
- Forgetting Plumber's Grease: Applying a thin layer of plumber's grease to new O-rings and seals reduces friction, makes installation easier, and helps create a better, longer-lasting seal.
- Ignoring Residual Leaks: If your faucet continues to drip after replacing the main suspected part, don't ignore it. A small drip can become a larger problem. It indicates another component needs attention or the replacement wasn't seated correctly.
- Trying to Force Parts: Never force a cartridge or any other component into place. If it doesn't fit easily, something is likely misaligned or you have the wrong part. Forcing it can cause damage to both the new part and the faucet body.
Cost & Time Breakdown
| Task | DIY Cost | Pro Cost | Time |
|---|---|---|---|
| O-ring/Seal Replacement | $5–$15 | $100–$200 (minimum) | 20–40 minutes |
| Cartridge Replacement | $20–$60 | $150–$250 | 30–60 minutes |
| Faucet Replacement (DIY) | $50–$300 (faucet) | N/A | 1–3 hours |
| Faucet Replacement (Pro) | $50–$300 (faucet) | $250–$500+ (labor) | 2–4 hours (incl. travel) |
| Tools (if not owned) | $20–$50 | N/A | N/A |
Tips & Prevention
- Know Your Faucet: Keep a record of your faucet's brand and model number (often found in the original manual or on the underside of the faucet body) for easier part identification in the future.
- Regular Cleaning: Periodically clean the aerator and around the handle base to remove mineral buildup, which can contribute to seal degradation.
- Use Water Filters: If you have exceptionally hard water, consider a whole-house water filter to reduce mineral content and prolong the life of all your plumbing fixtures.
- Gentle Operation: Avoid forcing the handle or turning it off with excessive force. Gentle operation prolongs the life of internal components.
- Annual Inspection: Every year, spend a few minutes inspecting your faucets for early signs of drips or stiffness in the handle. Addressing minor issues early can prevent larger leaks.
- Plumber's Grease: When performing any faucet maintenance, use plumber's silicone grease on rubber O-rings and seals to help them last longer and seal better.
When to Call a Professional
While most single-handle faucet leaks are DIY-friendly, there are times when calling a licensed plumber is the wisest choice. If you've replaced the cartridge and seals, and the leak persists, there might be a more complex underlying issue with the faucet body itself, or even your home's water pressure regulation. If you encounter significant corrosion, stripped screws that prevent disassembly, or if the leak appears to be coming from the water supply lines or connections within the wall, it's time to step back. Additionally, if dealing with plumbing makes you uncomfortable, or if you simply lack the time or proper tools, a professional can diagnose and fix the issue efficiently and correctly, often preventing more costly damage down the line. A professional can also advise on whether repair or full faucet replacement is more economical in the long run for older, less common models.
Related Articles
Keep troubleshooting with these hand-picked guides from FixlyGuide:
- The 30-Minute Trick to Stop Your Single-Handle Faucet Drip (And What Plumbers Charge if You Don't) — A persistent drip from a single-handle faucet often signals a worn-out cartridge, a common issue homeowners can fix with basic tools in und…
- The 1 Common Reason Your Single-Handle Faucet Leaks (And How to Fix It in 30 Minutes) — A persistent drip from your single-handle faucet often points to a worn-out cartridge, a simple fix any homeowner can tackle.
- The $5 Secret to Fixing Your Drip: Why Single-Handle Faucets Leak (and the O-Ring Trick) — A persistent drip from your single-handle faucet is often caused by worn-out O-rings or seals, a common issue with a simple, inexpensive DI…
- The $5 Single-Handle Faucet Fix Most Homeowners Ignore (And Pros Charge $200 For) — A single-handle leaky faucet can often be fixed with a simple, inexpensive DIY repair, saving you hundreds on a plumber.
- The $5 Single-Handle Faucet Fix Plumbers Don't Want You to Know — Stop that annoying drip! Most single-handle faucet leaks are caused by worn-out O-rings or seals, a repair homeowners can easily tackle in…
- The #1 Mistake Homeowners Make Adjusting Sprinklers (and How to Fix It) — Learn the simple, often overlooked technique for adjusting sprinkler spray patterns to ensure optimal lawn coverage and prevent water waste.
Frequently asked questions
How do I know if I need to replace the O-rings or the cartridge?+
If the leak is a constant drip from the spout or around the handle base, it's often an O-ring issue. If the leak is persistent, or if you also have trouble controlling temperature or water pressure, the cartridge is likely the culprit. Inspecting the disassembled faucet parts for visible wear will provide the clearest answer.
Are all single-handle faucet cartridges the same?+
No, cartridges are highly specific to the faucet brand and model. You *must* get an exact match. Take the old cartridge with you to the hardware store, or note down your faucet's brand and model number to ensure you purchase the correct replacement part.
What is plumber's grease and why should I use it?+
Plumber's grease is a silicone-based lubricant safe for rubber and plastic plumbing components. Applying it to new O-rings and seals helps them slide into place easily, creates a better seal, and extends their lifespan by preventing friction and premature wear.
My faucet is still leaking after replacing the cartridge. What's next?+
If the leak persists, re-check all connections for tightness (without overtightening). Ensure the cartridge is seated correctly and oriented properly. It's possible there's another worn seal you missed, or if the faucet is old, the housing itself might be corroded or damaged, warranting a professional assessment or full faucet replacement.
How can I prevent future faucet leaks?+
Regularly clean mineral deposits from the faucet aerator and around the handle. Avoid forcing the handle. Consider a whole-house water filter if you have hard water, and perform annual visual inspections for early signs of wear or drips to address them proactively.
When should I give up and call a plumber?+
If you've attempted the repair and the leak persists, or if you encounter stubborn corrosion, stripped screws, or feel uncomfortable with the process, it's best to call a licensed plumber. They can diagnose complex issues, perform the repair safely, and prevent further damage.
What's the difference between a cartridge and a ceramic disc faucet?+
A cartridge faucet uses a self-contained unit (the cartridge) to control water flow and temperature. A ceramic disc faucet uses two highly polished ceramic discs that slide against each other to achieve the same function. While both are common, their internal parts are distinctly different and not interchangeable.


Discussion
Loading comments…