
Tools & materials you'll need
Affiliate linksAs an Amazon Associate FixlyGuide earns from qualifying purchases — at no extra cost to you. Prices and availability are accurate as of publication and subject to change.
Quick Answer
Many homeowners overlook the critical role of proper window sealing, often making mistakes like using the wrong caulk, neglecting weatherstripping, or ignoring damaged glazing. Correcting these issues with appropriate materials and techniques can significantly reduce drafts, lower energy bills, and improve indoor comfort.
The Problem
Cold drafts creeping through your windows in winter and warm air seeping in during summer aren't just uncomfortable distractions; they're direct leaks in your home's energy efficiency. A significant portion of a home's heat loss can be attributed to poorly sealed windows, leading directly to inflated utility bills. Beyond the financial impact, persistent drafts can make rooms feel perpetually cold or hot, create condensation issues, and even allow pests and moisture to enter. The problem often isn't a faulty window frame itself, but rather a breakdown of the materials designed to create an airtight seal around and within the window assembly. These seals – caulk, weatherstripping, and glazing – degrade over time due to weather exposure, UV rays, and normal expansion and contraction of building materials. Identifying and correctly addressing these points of failure is crucial for maintaining a comfortable and energy-efficient home.
How It Works
Windows are complex assemblies designed to provide light and views while keeping the elements out. The primary barrier against air and moisture infiltration in a window system isn't just the glass, but a combination of components working in concert. Around the exterior perimeter of the window frame, where it meets the house siding or trim, caulk forms a flexible, waterproof, and airtight seal. This caulk is critical because it bridges the gap between two different materials that expand and contract at different rates. If this caulk cracks, shrinks, or pulls away, it creates an expressway for air and moisture.
Inside the window assembly, especially with double-hung or sliding windows, weatherstripping is essential. This could be foam, felt, rubber, or metal strips installed along the sashes and frame to seal gaps when the window is closed. When weatherstripping becomes brittle, compressed, or falls off, air can easily move through these moving parts. The glazing compound (or glazing putty) is another vital, often overlooked, sealant. It's the material that holds the glass panes within the window sash, traditionally found on older wood-sash windows. It hardens over time to form a rigid seal. If this putty cracks, crumbles, or lets go, not only will air pass through, but the glass itself can become loose, rattling in the wind and further compromising the seal.
Modern insulated glass units (IGUs) also rely on internal seals to maintain the inert gas (like argon or krypton) between panes. When these internal seals fail, moisture can enter between the panes, causing foggy windows – a sign that the thermal barrier is compromised. While repairing an IGU seal is a job for a professional, addressing exterior caulk, weatherstripping, and glazing putty is often well within a homeowner's DIY capabilities.
Step-by-Step Fix
1. Inspect and Diagnose — pinpoint the exact source of the draft.
Begin by thoroughly examining all your windows. On a windy day, hold a lit candle or an incense stick around the window frame, especially where the frame meets the wall, where sashes meet each other, and where the glass meets the sash. Any flickering or swirling smoke indicates an air leak. Pay close attention to deteriorated caulk, missing or compressed weatherstripping, and cracked glazing putty. Also, check for loose hardware or gaps where the window locks into place.
- Safety Note: Be careful with open flames, especially near curtains or other flammable materials. Have a fire extinguisher handy.
2. Prepare the Surface — ensure proper adhesion for new seals.
For any area requiring new caulk or glazing, the old, damaged material must be removed. Use a utility knife and a stiff putty knife to carefully scrape away old, brittle caulk. For glazing putty, a heat gun on a low setting can help soften it for easier removal, but be extremely cautious not to overheat or damage the glass or wood. Once removed, clean the surface thoroughly with a wire brush or abrasive pad, then wipe with a damp cloth to remove any dust or debris. Allow it to dry completely before proceeding. For weatherstripping, simply pull off the old, damaged material and clean the channel it was seated in.
- Tools: Utility knife, putty knife, wire brush, heat gun (optional).
- If this doesn't work: If the old caulk or glazing is particularly stubborn, specialized caulk removal tools or chemical caulk softeners are available but use with caution and follow product instructions.
3. Replace Weatherstripping — restore the seal between moving parts.
Measure the length and thickness of the existing weatherstripping you removed. Purchase new weatherstripping that closely matches the original type and dimensions (e.g., self-adhesive foam, rigid vinyl, or compression bulb). For adhesive types, ensure the surface is clean and dry, then press the new strip firmly into place, trimming to fit. For compression types, simply push them into the appropriate channels around the sashes or frame. Test the window operation after replacement to ensure it closes smoothly and creates a snug seal.
- Materials: Replacement weatherstripping (various types).
- Tip: Bring a small sample of your old weatherstripping to the hardware store to ensure you get the right replacement.
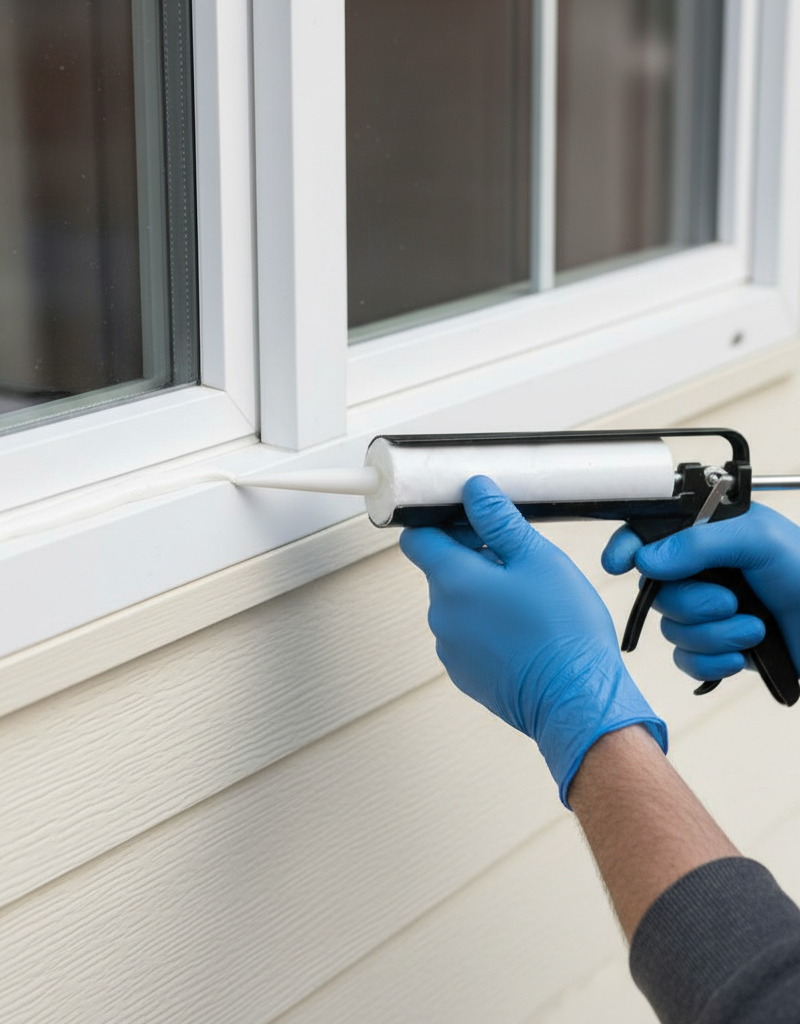
4. Apply New Caulk — seal exterior gaps around the window frame.
Choose a high-quality, exterior-grade, paintable caulk that is flexible and designed for windows and doors (siliconized acrylic latex is generally a good choice for most applications). Cut the tip of the caulk tube at a 45-degree angle, making an opening just wide enough to fill the gap. Apply a steady, even bead of caulk along the entire perimeter where the window frame meets the house, ensuring good contact with both surfaces. Smooth the caulk immediately with a wet finger, a caulk tool, or a damp sponge for a clean, professional finish. Allow the caulk to cure according to the manufacturer's instructions before painting, if desired.
- Materials: Exterior-grade caulk, painter's tape (optional).
- Mistake to Avoid: Applying too much caulk or not smoothing it adequately can lead to a messy, ineffective seal.
5. Repair or Replace Glazing Putty — secure loose glass panes.
For older windows with glazing putty, if it's cracked or missing, carefully remove all the old material as described in Step 2. Roll new glazing putty into narrow ropes and press it firmly into the rabbet (the groove) around the glass pane, ensuring it's flush with the glass and the sash. Use a putty knife at a 45-degree angle to create a clean, even bevel. Allow the putty to skin over for several days (or as per manufacturer instructions) before painting. Modern windows often use a flexible glazing bead or silicone, which may require different repair methods, potentially involving professional help if the seal is within an insulated glass unit.
- Materials: Glazing putty.
- Safety Note: Wear gloves when handling glazing putty as some formulations can be irritating. Be careful not to break the glass.
6. Address Loose Frame Components — tighten and secure.
Sometimes, drafts come from slight movements in the window frame or sash itself. Check all screws holding the window hardware, such as hinges, latches, and locks. Tighten any loose screws. If screws are stripped and no longer hold, you can use a larger screw, a wood dowel with wood glue, or fill the hole with wood filler before redrilling. Ensure the window locks engage snugly, as a tight lock often pulls the sash more firmly against the weatherstripping, improving the seal.
- Tools: Screwdriver set, drill, wood glue, wood dowels (optional).
7. Consider Interior Window Film (Temporary Fix) — for extreme cases.
If after addressing all the seals, you still feel a significant draft, or if your windows are very old and inefficient, clear plastic window film kits can provide an additional, temporary layer of insulation. These kits typically involve applying double-sided tape around the window frame, attaching a sheet of clear plastic, and then shrinking it taut with a hairdryer. While not a permanent solution, it can significantly reduce drafts and improve comfort during the coldest months.
- Materials: Window insulation kit.
8. Re-evaluate and Maintain — continuous monitoring for lasting results.
After completing the repairs, continue to monitor your windows for drafts, especially as seasons change. Make it a habit to inspect your window seals annually, ideally in the fall before cold weather sets in. Promptly address any new cracks in caulk or worn weatherstripping to prevent minor issues from becoming major energy leaks. Regular cleaning can also help you spot issues early and extends the life of your seals.
Common Causes
- UV Degradation: Sunlight's ultraviolet rays break down the polymers in caulk and weatherstripping over time, making them brittle and prone to cracking or crumbling.
- Temperature Cycles: Constant expansion and contraction of windows and house frames due to temperature fluctuations stress sealants, leading to fatigue and eventual failure.
- Poor Installation: Original installation mistakes, such as inadequate cleaning before sealing, using inappropriate caulk, or improperly installed weatherstripping, can lead to premature failure.
- House Settling: As a home settles over time, slight shifts can put stress on window frames and their seals, creating new gaps.
- Lack of Maintenance: Ignoring small cracks or worn weatherstripping allows minor issues to worsen, leading to larger drafts.
- Impact Damage: Hail, wind-blown debris, or even accidental impacts can damage glazing or frames, compromising the seal.
Common Mistakes
- Using Interior Caulk Outdoors: Applying interior-grade caulk to exterior window frames is a common error. Interior caulk isn't designed to withstand UV radiation, temperature extremes, or moisture and will fail quickly.
- Not Cleaning Surfaces: Failing to thoroughly clean and dry surfaces before applying new caulk or weatherstripping prevents proper adhesion, causing the new seal to fail prematurely.
- Ignoring the Glazing: Focusing only on the frame and weatherstripping while overlooking cracked or missing glazing putty around the glass panes leaves a significant entry point for drafts.
- Applying Caulk Over Old Caulk: Simply layering new caulk over old, failed caulk is ineffective. The old caulk will continue to deteriorate beneath, and the new layer won't adhere properly or create a lasting seal.
- Using the Wrong Weatherstripping Type: Not all weatherstripping is created equal. Using a generic foam strip where a compression bulb or fin seal is required won't provide an effective or long-lasting seal.
- Over-Tightening Screws: While tightening loose hardware is good, over-tightening can strip screw holes or warp tracks, making the problem worse or damaging the window.
Cost & Time Breakdown
| Task | DIY cost | Pro cost | Time |
|---|---|---|---|
| Inspect & Diagnose | $0 | $50–$150 | 15–30 min |
| Remove Old Caulk/Glazing | $5–$20 | $100–$300 | 30–60 min/win |
| Replace Weatherstripping | $10–$50/win | $150–$400/win | 15–30 min/win |
| Apply New Exterior Caulk | $5–$25/win | $100–$250/win | 20–40 min/win |
| Repair Glazing Putty | $10–$30/win | $150–$350/win | 30–60 min/win |
| Tighten Hardware/Minor Adjust | $0 | $50–$100 | 10–20 min/win |
Tips & Prevention
- Annual Inspection: Make it a habit to inspect all your window seals (caulk, weatherstripping, glazing) every fall before the heating season begins. Look for cracks, gaps, shrinking, or brittleness.
- Clean Regularly: Wipe down window frames and sashes during routine cleaning. This removes grime that can degrade sealants and helps you spot issues earlier.
- Use High-Quality Materials: When replacing caulk or weatherstripping, invest in products specifically designed for exterior window use with good flexibility and UV resistance. They last longer and perform better.
- Check Window Locks: Ensure all window locks fully engage. A properly locked window often pulls the sashes tighter together and against the weatherstripping, improving the overall seal.
- Proper Venting: In bathrooms and kitchens, use exhaust fans to reduce indoor humidity. Excessive moisture can lead to condensation, which over time can degrade window materials and seals.
- Consider Window Overhangs: If planning new construction or window replacement, consider architectural elements like eaves or overhangs that can shield windows from direct sun and heavy rain, extending the life of exterior seals.
When to Call a Professional
While many window sealing issues are DIY friendly, there are clear instances where calling a professional is the smarter, safer, and more effective choice. If you observe significant rot or deterioration of the wood window frame itself, beyond superficial damage, a professional contractor will need to assess if the window can be repaired or requires full replacement. Similarly, if your insulated glass units (double or triple-pane windows) appear foggy or have condensation trapped between the panes, the internal seal has failed. This cannot be DIY repaired and requires either professional glass replacement or full window replacement. For large, difficult-to-reach windows, or if you're uncomfortable working on ladders, a pro can safely complete exterior caulking. Finally, if you've diligently followed all DIY steps and still experience significant drafts, or suspect structural issues around the window opening, a home energy auditor or window specialist can provide a comprehensive diagnosis and lasting solutions that might be beyond the scope of a simple sealing fix. They can also advise on potential government rebates or energy efficiency grants for professional upgrades.
Related Articles
Keep troubleshooting with these hand-picked guides from FixlyGuide:
- The Secret to Lush Raised Beds? It's Not Just About How You Water — Smart irrigation for raised garden beds isn't just about automation; it's about delivering the right amount of water precisely when your pl…
- The 5-Minute Trick to Vacation-Proof Your Garden (Before You Leave Town) — Prevent your garden from wilting while you're away with simple, proactive steps that ensure lush growth and minimal fuss upon your return.
- The Hidden Reason Your GFCI Trips (It's Not Always a Faulty Outlet) — A continuously tripping GFCI outlet is a critical safety warning, often indicating moisture, a faulty appliance, or a wiring problem that r…
- The 3 Hidden Ways Your — Uncover the surprising habits and hidden household issues that are silently increasing your homeownership costs and learn how to fix them.
- Is That Sweet Car Smell a Secret Killer? (& 6 Other Odors to Watch For) — Unusual odors in your car aren't just unpleasant; they're often critical warnings of underlying mechanical issues that could compromise saf…
- The $7 Secret Why Your Windows Leak Air (And How to Seal Them in an Hour) — Discover the hidden culprits behind drafty windows and learn how to seal them effectively in about an hour with common, inexpensive materia…
This article was independently written by FixlyGuide based on the source topic.
Frequently asked questions
How do I know where a draft is coming from?+
To pinpoint drafts, use a lit candle or incense stick. On a windy day, slowly move it around the window frame, sashes, and where the glass meets the frame. Any flickering or swirling smoke will indicate an air leak.
What kind of caulk should I use for windows?+
For exterior window sealing, always use a high-quality, exterior-grade, flexible caulk. Siliconized acrylic latex caulk is a good all-around choice, as it's durable, paintable, and withstands outdoor conditions well.
Can I fix foggy windows myself?+
No, if your double or triple-pane windows are foggy *between* the panes, it means the internal seal of the insulated glass unit (IGU) has failed. This requires professional glass replacement or full window replacement, not a DIY fix.
How often should I check my window seals?+
You should inspect all your window seals – caulk, weatherstripping, and glazing – at least annually, ideally in the fall before cold weather sets in, to catch and address any deterioration early.


Discussion
Loading comments…