Tools & materials you'll need
Affiliate linksAs an Amazon Associate FixlyGuide earns from qualifying purchases — at no extra cost to you. Prices and availability are accurate as of publication and subject to change.
Quick Answer
Drafty windows are not just an annoyance; they're a significant source of heat loss in winter and heat gain in summer, leading to higher energy bills and reduced home comfort. The good news is that many common causes of drafts—like degraded caulk, worn weatherstripping, or loose sashes—are surprisingly easy and inexpensive to fix with basic DIY skills. By systematically identifying the source of the draft and applying the right sealant or adjustment, homeowners can drastically improve their window's performance and save money.
The Problem
That cold breeze you feel near your window isn't just a minor discomfort; it's a symptom of a larger energy efficiency problem. Drafty windows can account for up to 25% of a home's heat loss, according to the U.S. Department of Energy. This means your furnace or air conditioner is working harder than it needs to, driving up your utility bills. Beyond the financial impact, drafts create uncomfortable temperature fluctuations within your home, leading to cold spots and an overall less cozy living environment. Ignoring drafts won't make them go away; in fact, small gaps can worsen over time, allowing more air and even moisture to penetrate your home.
How It Works
To understand why a window becomes drafty, it helps to understand its components and how they're designed to keep air out. A typical double-hung or casement window relies on several layers of protection:
- The Frame and Sash: The fixed frame is built into your wall, and the movable sash (the part holding the glass) slides or pivots within it. Proper fit and alignment are crucial.
- Glazing: This refers to the sealed connection between the glass pane and the window sash. Older windows often use glazing putty, which can crack, shrink, or fall out over time. Newer windows use rubber gaskets or sealed units.
- Weatherstripping: These are flexible seals (made of foam, rubber, vinyl, or felt) installed along the edges where the sash meets the frame. Their purpose is to compress when the window is closed and locked, creating an airtight barrier against air and moisture infiltration. Over years of opening, closing, and exposure to the elements, weatherstripping can become brittle, compressed, torn, or fall off entirely.
- Caulking: This is a sealant applied around the exterior perimeter of the window frame, where it meets the house siding or trim. Its job is to seal this crucial seam against air and water intrusion. Sunlight, temperature changes, and house movement can cause caulk to dry out, crack, shrink, or detach from the surfaces it's meant to seal.
- Locks and Latches: These mechanisms pull the window sashes tightly together or against the frame. If they are loose, misaligned, or not engaged properly, they won't create the necessary compression, allowing drafts to slip through.
When any of these components fail – whether it's cracked caulk, degraded weatherstripping, failing glazing, or a loose lock – the integrity of the window's seal is compromised, allowing uncontrolled airflow in and out of your home. The stack effect (warm air rising and escaping through upper floors, pulling cold air in through lower areas) can exacerbate these drafts.
Step-by-Step Fix
Before you start, perform a quick diagnostic: on a breezy day, or with an exhaust fan running to create negative pressure, hold a lit incense stick or a damp hand around the entire perimeter of the closed window, including the sash seams and where the glass meets the frame. Watch for smoke deflection or feel for cold air. This will help pinpoint the exact source(s) of the draft.
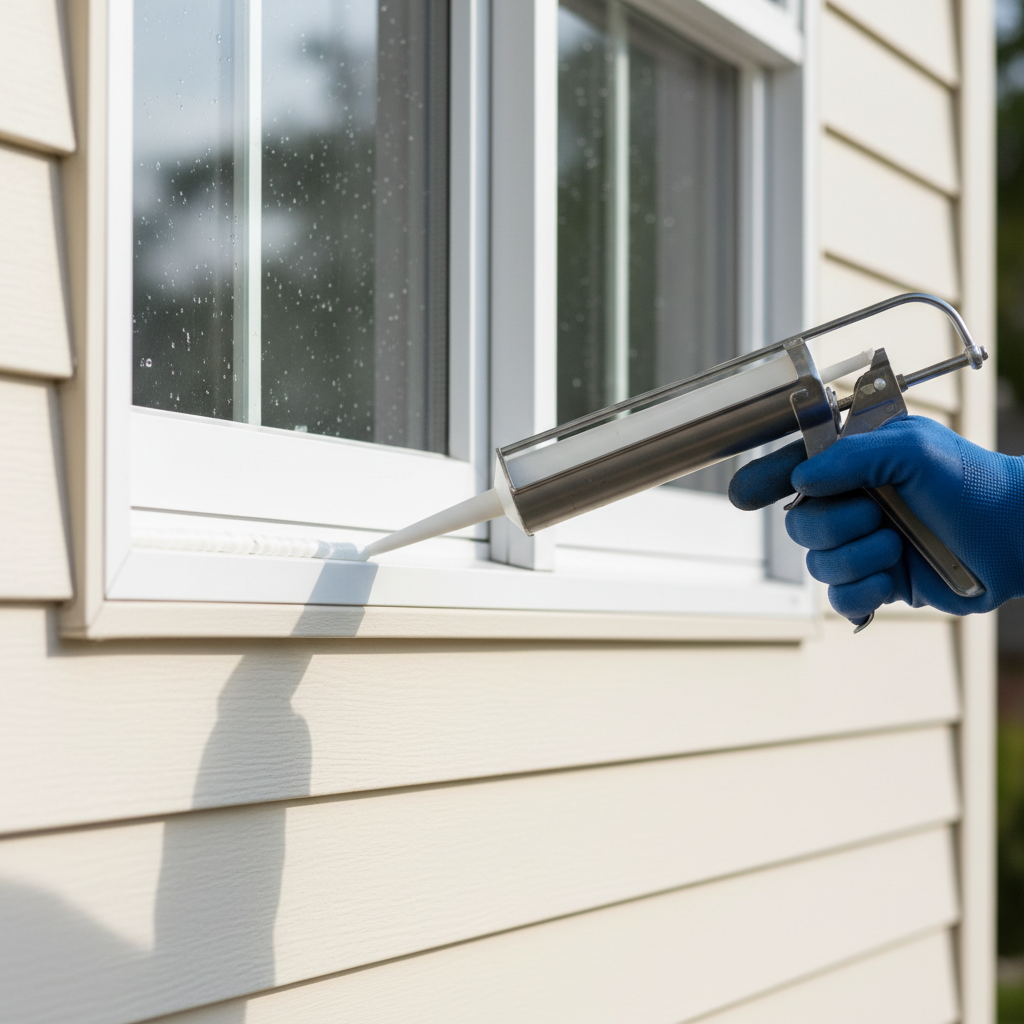
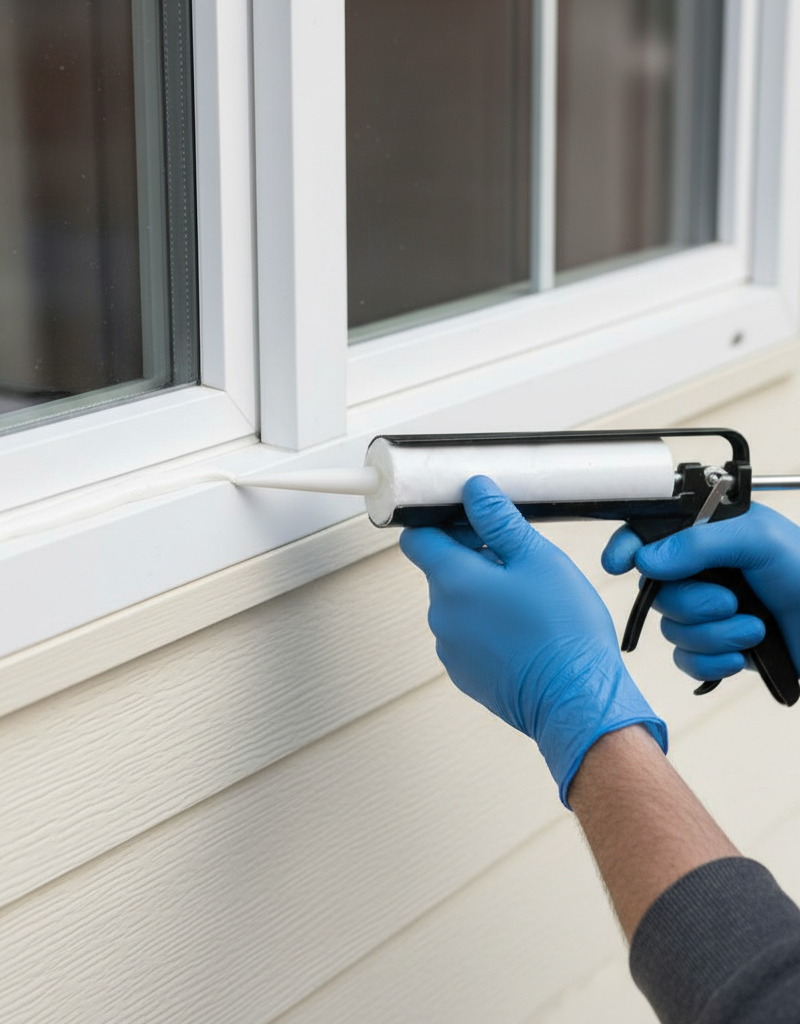
1. Re-Caulk the Exterior Window Frame — Seal the gap between the window and your house.
- Safety First: If working on upper stories, use a stable ladder and have a spotter. Do not overreach. Wear gloves and eye protection.
- Preparation: Use a utility knife and a stiff putty knife or 5-in-1 tool to scrape away all old, cracked, or loose caulk from the exterior joint between the window frame and the siding/trim. Clean the surface thoroughly with a wire brush and then wipe with a damp cloth to remove any dust or debris. Allow it to dry completely. A clean, dry surface is essential for good adhesion.
- Application: Load a tube of high-quality exterior-grade, paintable acrylic latex caulk with silicone into a caulk gun. Cut the nozzle at a 45-degree angle, making an opening just large enough for the gap you're filling (usually about 1/4 inch). Apply a smooth, continuous bead of caulk along the entire joint, maintaining even pressure on the trigger. Aim for one steady pass.
- Tooling: Immediately after applying, use a moistened caulk tool or your gloved finger to smooth the bead, forcing the caulk into the gap and creating a clean, professional finish. Wipe away any excess with a damp cloth. Allow the caulk to dry and cure according to manufacturer instructions before painting, if desired. This often takes 24-48 hours.
2. Replace Worn Weatherstripping — Restore the critical seal between movable window parts.
- Inspection: Open your window and carefully inspect the existing weatherstripping along the sashes and frame. Look for flattened, brittle, torn, missing, or excessively dirty sections. Note the type (foam, pile/brush, vinyl bulb, V-strip) and its placement.
- Removal: For most types, gently peel or pry away the old weatherstripping. For pile weatherstripping in a channel, you might need pliers to pull it out. Clean the channel or surface thoroughly with rubbing alcohol to remove adhesive residue and grime. Allow to dry.
- Selection & Installation: Purchase replacement weatherstripping that matches the original type and size as closely as possible. For adhesive-backed foam or V-strip, cut to size, peel the backing, and press firmly into place along the sash or frame. For pile or rigid vinyl bulb weatherstripping that slides into a channel, gently push it into the existing groove. Ensure it's snugly fitted and creates good compression when the window is closed and latched. Test the window's operation; it should close securely and feel slightly tighter.
3. Repair or Replace Glazing — Seal the glass to the sash.
- Safety Note: Wear thick gloves and eye protection when handling broken glass or old glazing. Use caution with sharp tools.
- Diagnosis: This applies primarily to older single-pane windows with putty glazing. Look for crumbling, missing, or severely cracked putty around the glass panes. If you have double-pane (insulated) glass units, a draft here usually means the seal between the panes has failed, causing condensation between the glass. This requires professional glass replacement and is not a DIY fix for drafts.
- Removal (for putty): Carefully chip away all old, loose, or cracked glazing putty using a putty knife or chisel. Work slowly to avoid damaging the glass or sash. Once the old putty is gone, clean the area thoroughly.
- Application (for putty): For traditional wood sashes, apply a thin bead of linseed oil to the wood to prevent it from absorbing moisture from the new putty. Roll glazing compound (available at hardware stores) into thin ropes and press it firmly into the rabbet (the channel where the glass sits) around the glass. Smooth it at a 45-degree angle using a putty knife, ensuring a tight seal against both the glass and the sash. Allow to cure as per product instructions, which can take several weeks, before painting.
4. Adjust or Tighten Window Locks and Latches — Ensure maximum sash compression.
- Inspection: Close and latch your windows. Do they feel loose? Can you slide a thin piece of paper between the sashes even when locked? Visually inspect the lock hardware. Are screws loose? Is the lock misaligned?
- Tightening Loose Hardware: Use the appropriate screwdriver (Phillips or flathead) to tighten any loose screws on the window locks or latches. Do not overtighten, as this can strip the screws or crack the frame.
- Adjusting Strike Plates: If the lock doesn't pull the sashes tightly together, the strike plate (the part on the opposite sash that the lock engages with) might be slightly misaligned. Loosen the screws holding the strike plate, tap it slightly in the direction that would create more compression when locked, and then retighten the screws. Test the lock – it should engage smoothly but pull the sashes together firmly. For casement or awning windows, ensure the crank mechanism pulls the sash fully into the frame and the locks engage properly.
Common Causes
- Degraded Exterior Caulk: Years of sun, rain, and temperature fluctuations cause the sealant around the window frame to dry out, crack, shrink, or pull away, creating gaps for air to enter.
- Worn-Out Weatherstripping: The flexible seals along the moving parts of the window (sashes) become flattened, brittle, or torn over time, losing their ability to create an airtight barrier when the window is closed.
- Cracked or Missing Glazing: On older windows, the putty or compound holding the glass in the sash can deteriorate, creating direct pathways for drafts.
- Loose or Misaligned Window Hardware: Locks, latches, and hinges (especially on casement or awning windows) can become loose or out of alignment, preventing the window sashes from sealing tightly against each frame.
- Shrinking Window Frames: Wood window frames can shrink and expand with humidity and temperature changes, sometimes creating small gaps, particularly in older or poorly maintained windows.
- Missing or Damaged Sash Guides: Some double-hung windows have side channels or guides that help the sash move smoothly and provide a partial seal. Damage here can contribute to drafts.
Common Mistakes
- Not Cleaning Surfaces Before Sealing: Applying caulk or adhesive weatherstripping to dusty, dirty, or greasy surfaces will result in poor adhesion and a short-lived fix. Always clean thoroughly.
- Using the Wrong Type of Caulk: Interior caulk on exterior surfaces will quickly fail. Use exterior-grade, paintable acrylic latex caulk with silicone for perimeter sealing. Use specialized sealants like butyl caulk for specific applications if recommended.
- **Ignoring the
Related Articles
Keep troubleshooting with these hand-picked guides from FixlyGuide:
- The 4 Hidden Causes of Drafty Windows (and How to Seal Them Tight) — Uncover the surprising reasons your windows are letting in cold air and learn practical, DIY solutions to seal them, saving energy and impr…
- The $7 Secret Why Your Windows Leak Air (And How to Seal Them in an Hour) — Discover the hidden culprits behind drafty windows and learn how to seal them effectively in about an hour with common, inexpensive materia…
- The 3 Hidden Reasons Your Window Won't Stay Up (And the Easy Fixes) — Before you call a repairman, learn the three most common reasons your double-hung window won't stay open and how to fix them yourself.
- The 3 Hidden Reasons Your Door Won't Latch (And the Easy DIY Fixes) — Frustrated by a door that refuses to latch? Discover the common culprits behind this annoying problem and learn simple, effective DIY fixes…
- The 5 Hidden Culprits Behind Your Drafty Windows (and the $15 Fix) — Don't let drafty windows steal your home's warmth and inflate your energy bills; learn how to diagnose and seal common air leaks yourself.
- The $5 Secret to Silencing That Annoying Dripping Faucet (Single-Handle Fix) — Stop a dripping single-handle faucet with a simple and inexpensive DIY fix by replacing a worn-out o-ring or washer.
Recommended for DIYers & woodworkers
Sponsored
The Top 20 Tools for Workshops of Any Budget
No stationary machines or power tools required — plus 3 fundamental tools that can't be bought at any price.
Get the free guide
Ted's Woodworking — The #1 Woodworking Resource
Detailed instructions, dimensioned drawings, materials & cutting lists, and 3D schematics for every skill level.
See the plansSponsored: links above are affiliate links. FixlyGuide may earn a commission on qualifying purchases — at no extra cost to you.
Frequently asked questions
Why are my windows drafty even when closed?+
Even when closed, drafts can occur due to degraded caulk around the exterior frame, worn-out weatherstripping between the window sashes and frame, cracked glazing putty around the glass, or loose/misaligned locks that prevent the sashes from compressing tightly against each other.
What is the cheapest way to seal drafty windows?+
The cheapest ways to seal drafty windows often involve using clear caulk or caulk strips for small gaps, or inexpensive adhesive-backed foam weatherstripping. Clear plastic window film kits applied to the interior can also be a very cost-effective temporary solution for an entire window.
How do I find where a draft is coming from?+
The easiest way to find a draft is to use an incense stick or a lit candle. On a breezy day, or with an exhaust fan creating negative pressure in your home, hold the smoke source around the entire perimeter of the closed window. Watch for the smoke to waver or be drawn into a specific area, indicating a draft.
Can I use tape to seal drafty windows?+
While temporary, utility tape or painter's tape can be used to seal minor drafts in a pinch, especially on seams. However, it's not a durable or aesthetically pleasing long-term solution. Specialized removable window insulating tapes are also available and are designed to be removed cleanly at the end of the season.


Discussion
Loading comments…