Tools & materials you'll need
Affiliate linksAs an Amazon Associate FixlyGuide earns from qualifying purchases — at no extra cost to you. Prices and availability are accurate as of publication and subject to change.
Quick Answer
Drafty windows are a common but often misunderstood problem, leading many homeowners to consider expensive replacements when a simple, affordable fix is all that's needed. The root cause is almost always a failure in the window's crucial air barriers: the caulk around the frame, the weatherstripping along the sashes, or the sealant within the glass unit itself. Addressing these weak points can dramatically improve your home's energy efficiency and comfort for as little as $15 and less than an hour of work.
The Problem
That cold chill you feel near your windows isn't just an annoyance; it's a sign of money leaking right out of your home. Drafty windows can account for 25% to 30% of residential heating and cooling energy use, according to the U.S. Department of Energy. Beyond the financial impact, drafts create uncomfortable hot and cold spots, forcing your HVAC system to work harder and reducing your overall indoor comfort. You might notice curtains moving on their own, or feel a distinct temperature difference when standing near a window on a cold day. While old, single-pane windows are notorious for drafts, even newer, energy-efficient windows can develop leaks over time due to normal wear and tear, house settling, or improper installation. Identifying the specific source of the draft is the first critical step to a successful and lasting repair.
How It Works
To understand how to seal a drafty window, it helps to know how a window is designed to prevent air infiltration in the first place. A modern window assembly has several layers of defense against air and moisture:
-
The Frame and Rough Opening: The window frame itself is installed into an opening in your wall (the rough opening). The critical air barrier here is the seal between the window frame and the house's exterior sheathing. This is typically achieved with flashing tapes and exterior-grade caulk, creating a continuous seal against the elements.
-
Exterior Sealant (Caulk): Once the window is installed, exterior caulk is applied around the perimeter where the window frame meets the exterior siding or trim. This acts as a primary weather seal, preventing rain, air, and insects from entering. Over time, UV exposure, temperature fluctuations, and house movement can cause this caulk to crack, shrink, or pull away, creating gaps.
-
Window Sashes and Glazing: The sashes are the movable parts of the window that hold the glass. Modern windows often use insulated glazing units (IGUs) – two or more panes of glass with a sealed air or gas-filled space between them. If this seal fails, moisture can enter the space between the panes, leading to fogging, but it doesn't typically cause a direct draft. However, drafts do occur when the sashes themselves don't seal tightly against the frame.
-
Weatherstripping: This is perhaps the most common culprit for drafts. Weatherstripping is a material (often foam, felt, vinyl, or rubber) installed along the edges of the sashes where they meet the stationary frame. Its purpose is to compress when the window is closed, creating a tight, resilient seal that blocks air movement. Over years of opening and closing, exposure to temperature extremes, and general wear, weatherstripping can become compressed, brittle, torn, or fall out of place, losing its ability to seal effectively.
-
Window Locks and Hardware: While not a direct air barrier, properly functioning locks pull the sashes tightly into the frame, compressing the weatherstripping. Loose or misaligned locks can prevent a full seal, leading to drafts.
When any of these layers of defense are compromised, air can bypass the intended barriers and create an uncomfortable draft. Understanding these components allows you to systematically diagnose and fix the specific cause of your draft.
Step-by-Step Fix
Always start by identifying the source of the draft. Light a stick of incense or a thin candle and slowly move it around the perimeter of the closed window, including the sash joints. Watch for flickering or smoke deflection to pinpoint the exact leak.
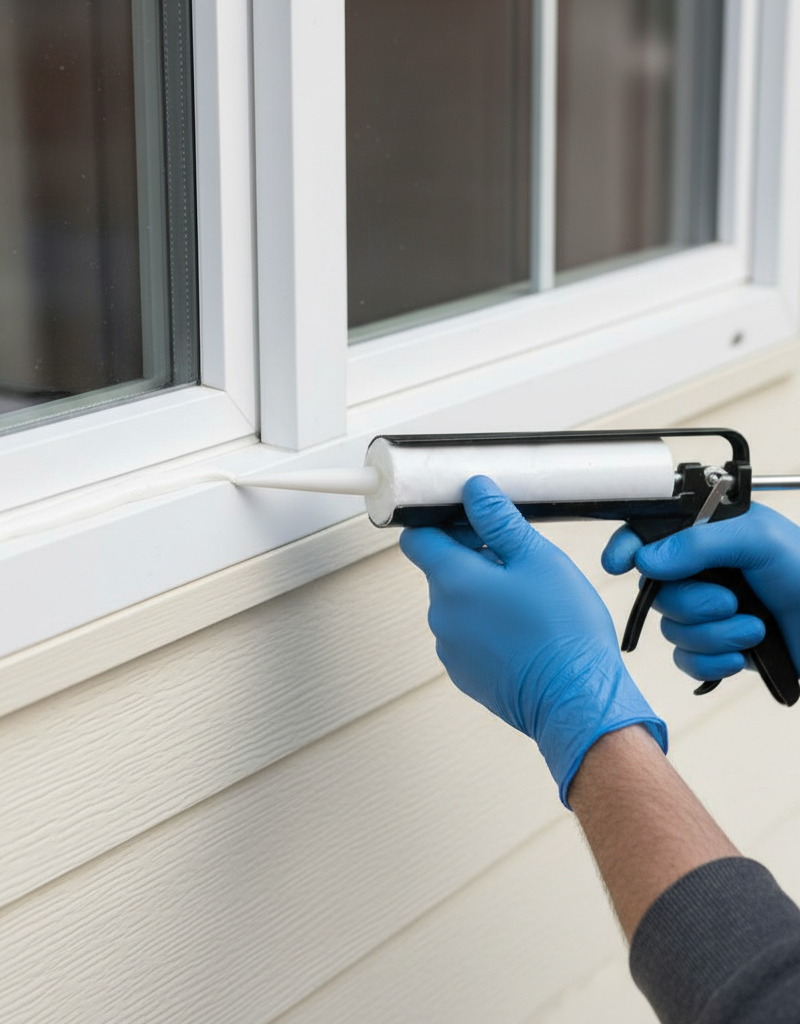
1. Inspect and Replace Exterior Caulk — Address gaps between the window frame and the house exterior.
- Safety First: When working on exterior caulk, especially on upper floors, use a stable ladder and have someone spot you. Wear gloves and eye protection.
- Examine the existing caulk around the outside of the window frame. Look for cracks, crumbling, or areas where the caulk has pulled away from either surface. These gaps are prime entry points for drafts.
- Remove Old Caulk: Use a utility knife and a stiff putty knife or a specialized caulk removal tool to scrape away all loose, cracking, or degraded caulk. A heat gun on a low setting can help soften old caulk, but be careful not to damage the window frame or siding. Clean the surface thoroughly with a wire brush and then wipe with denatured alcohol for good adhesion.
- Apply New Caulk: Choose a high-quality, exterior-grade, paintable acrylic latex caulk with silicone for flexibility and durability. Cut the tip of the caulk tube at a 45-degree angle, making a bead size appropriate for your gap. Apply a continuous, even bead along the joint, pushing the caulk into the gap. Smooth the bead immediately with a wet finger, a caulk tool, or a damp sponge for a professional finish. Allow to cure per manufacturer's instructions. If this doesn't fix the draft, move to interior seals.
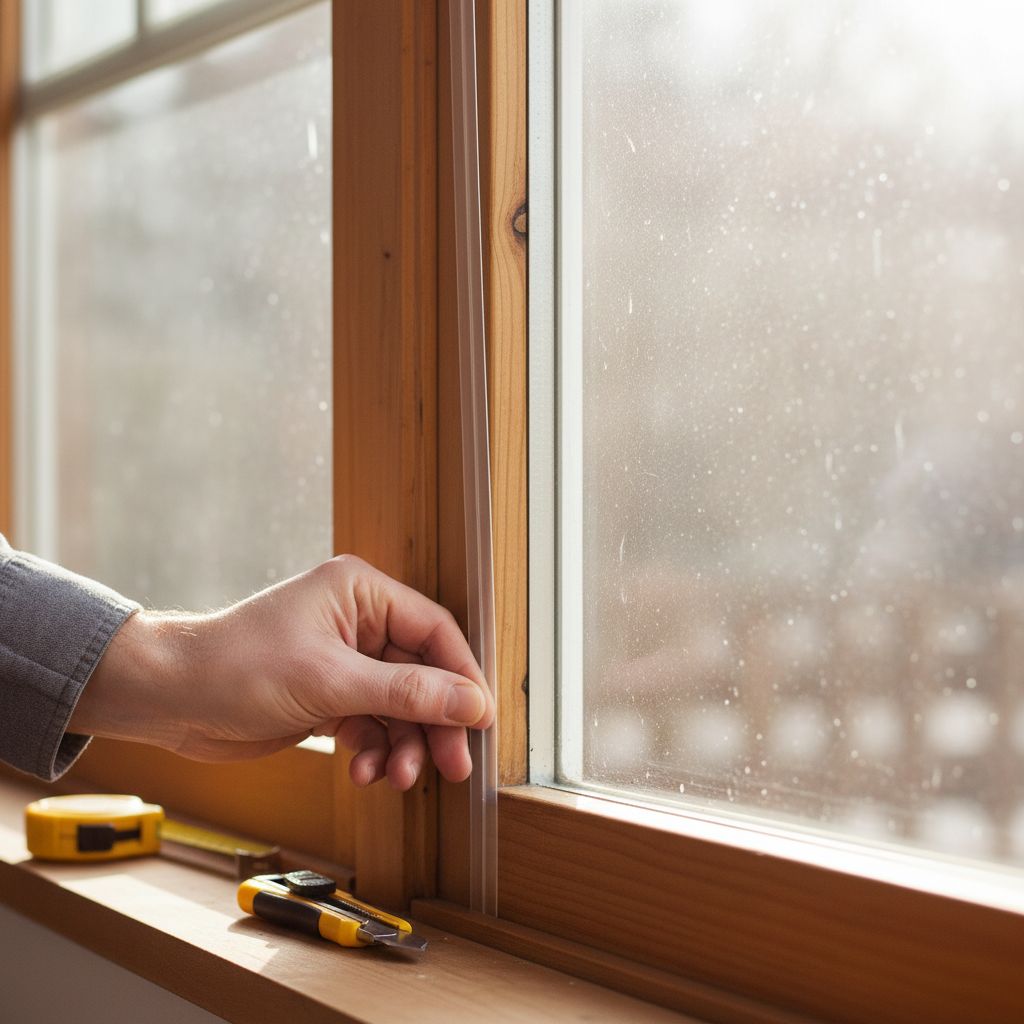
2. Replace Worn Weatherstripping — Renew the seal between movable sashes and the frame.
- Weatherstripping is often found along the top, bottom, and sides of movable sashes. Open the window and inspect the existing weatherstripping. Look for flattened, torn, brittle, or missing sections.
- Identify Type: There are many types: adhesive-backed foam, tension-seal strips (V-seal), tubular vinyl, or fin-pile (brush-like) strips. Take a small piece of the old weatherstripping to a hardware store to ensure you buy the correct replacement or an appropriate substitute.
- Remove Old Weatherstripping: For adhesive-backed types, simply peel them off. For tension-seal or tubular types, they often slide out of a channel. Clean the channel or surface thoroughly with rubbing alcohol.
- Install New Weatherstripping: Cut the new weatherstripping to the exact length. For adhesive types, peel the backing and press firmly into place. For channel-style weatherstripping, slide it into the groove. Ensure it's not bunched or twisted and allows the sash to close smoothly but snugly. Test the window operation and the seal with your incense stick.
3. Add Interior V-Seal Weatherstripping — A simple, effective, and often overlooked interior seal.
- Many older windows lack adequate interior weatherstripping. V-seal (or tension-seal) weatherstripping is an inexpensive, easy-to-install solution that creates a spring-like seal when the window is closed.
- Prepare Surface: Clean the inside frame where the sash meets it with rubbing alcohol. Measure the length of the top, bottom, and sides of the sashes where they meet the frame.
- Apply V-Seal: Cut the V-seal strips to length. Peel off the adhesive backing and press the V-shape firmly into the sash or frame, with the
Related Articles
Keep troubleshooting with these hand-picked guides from FixlyGuide:
- The 4 Hidden Causes of Drafty Windows (and How to Seal Them Tight) — Uncover the surprising reasons your windows are letting in cold air and learn practical, DIY solutions to seal them, saving energy and impr…
- The $7 Secret Why Your Windows Leak Air (And How to Seal Them in an Hour) — Discover the hidden culprits behind drafty windows and learn how to seal them effectively in about an hour with common, inexpensive materia…
- The 3 Hidden Reasons Your Door Won't Latch (And the Easy DIY Fixes) — Frustrated by a door that refuses to latch? Discover the common culprits behind this annoying problem and learn simple, effective DIY fixes…
- The 3 Hidden Reasons Your Door Won't Latch (And the Easy DIY Fixes) — Don't live with a door that refuses to latch; discover simple, DIY solutions for common door latch problems and restore security and privac…
- The 3 Hidden Reasons Your Door Won't Latch (And the 10-Minute Fix) — Discover the common culprits behind a door that won't latch properly and learn how to fix it in just 10 minutes, restoring security and pea…
- The $5 Secret to Silencing That Annoying Dripping Faucet (Single-Handle Fix) — Stop a dripping single-handle faucet with a simple and inexpensive DIY fix by replacing a worn-out o-ring or washer.
Recommended for DIYers & woodworkers
Sponsored
The Top 20 Tools for Workshops of Any Budget
No stationary machines or power tools required — plus 3 fundamental tools that can't be bought at any price.
Get the free guide
Ted's Woodworking — The #1 Woodworking Resource
Detailed instructions, dimensioned drawings, materials & cutting lists, and 3D schematics for every skill level.
See the plansSponsored: links above are affiliate links. FixlyGuide may earn a commission on qualifying purchases — at no extra cost to you.
Frequently asked questions
Why are my windows suddenly drafty?+
Windows can become drafty due to aged or cracked exterior caulk, worn-out weatherstripping around sashes, house settling that misaligns window components, or even a failed seal in a double-pane glass unit (though this typically results in fogging, not direct drafts). Normal wear and tear, and exposure to temperature changes, are common culprits.
Can I fix drafty windows myself?+
Yes, many common draft issues can be easily fixed by a homeowner. This includes replacing old caulk, installing new weatherstripping, using temporary window film kits, or adjusting window locks. These DIY remedies are often inexpensive and can significantly improve comfort and energy efficiency.
How much does it cost to seal a drafty window?+
The cost to seal a drafty window yourself can be as low as $15-$50 for materials like a tube of caulk, a roll of weatherstripping, or a window insulation kit. If the issue is more extensive, requiring specific replacement parts for your window model, the cost could be slightly higher but still far less than professional repair or window replacement.
When should I call a professional for drafty windows?+
You should call a professional if you suspect structural issues with the window frame, if the glass unit itself has failed (i.e., it's consistently foggy between panes), if adjusting components doesn't resolve the draft, or if you're uncomfortable working with ladders for exterior repairs. A professional can diagnose complex issues and recommend the most effective long-term solutions, including potential window replacement if necessary.
Do drafty windows increase energy bills?+
Absolutely. Drafty windows allow conditioned air (heated in winter, cooled in summer) to escape your home, while unconditioned outside air infiltrates. This forces your HVAC system to work harder and longer to maintain your desired indoor temperature, directly leading to higher energy consumption and increased utility bills.


Discussion
Loading comments…