
Tools & materials you'll need
Affiliate linksAs an Amazon Associate FixlyGuide earns from qualifying purchases — at no extra cost to you. Prices and availability are accurate as of publication and subject to change.
Quick Answer
When your gas stove burner refuses to light, the primary culprit is almost always an obstructed or fouled igniter, or clogged burner ports. These issues disrupt the delicate balance required for ignition: a consistent flow of gas, a clear spark, and proper air-gas mixture. A thorough cleaning of the burner cap, burner base, and particularly the spark igniter can often resolve the problem, restoring reliable ignition without the need for professional help.
The Problem
Ah, dinner plans foiled! You turn the knob on your gas stove, hear the hiss of gas, but instead of the satisfying click-click-click of the igniter and the pop of a flame, you get... nothing. Or perhaps you get a weak, erratic spark that just can't quite catch. This common household annoyance isn't just frustrating; it can sometimes make you wonder if your stove is broken or even dangerous. But before you panic or call a technician, understand that for many homeowners, a non-lighting gas burner is a simple maintenance issue, often caused by spills, crumbs, or moisture interfering with the ignition system. Addressing this problem promptly isn't just about cooking; it's about maintaining the efficiency and safety of your appliance.
How It Works
To understand why your gas burner isn't lighting, let's quickly review how it should work. When you turn a burner knob, two main things happen. First, the knob mechanism opens a valve, allowing natural gas or propane to flow from the gas line, through the burner orifice, and out into the burner head. Second, the same turning action triggers a small electrical switch that sends power to a spark igniter (a small ceramic rod with a metal tip, usually located near the burner). This igniter creates a rapid series of electrical sparks, similar to miniature lightning bolts. As the gas flows out of the burner ports, these sparks ignite the gas, creating a flame.
For successful ignition, several conditions must be met: there must be an adequate and continuous flow of gas, the igniter must produce a strong, consistent spark, and there must be proper airflow around the burner head to allow for the right gas-to-air mixture for combustion. If food debris, grease, excessive moisture, or even a misaligned burner cap obstructs any part of this process—especially the igniter tip or the burner ports—the gas won't ignite, leaving you with an unlit burner. The electronic ignition module, often located in the stove's control panel, manages the timing and intensity of these sparks. If it fails, all burners might cease to light, but if it's just one burner, the problem is almost always local to that specific burner assembly.
Step-by-Step Fix
Safety First! Before attempting any repairs, ensure your stove is completely cool to the touch. Unplug the stove from the electrical outlet, or if it's hardwired, turn off the corresponding circuit breaker in your home's electrical panel. This prevents accidental shocks or gas ignition during the cleaning process.
-
Remove Burner Components — Gently lift off the burner grates, followed by the burner caps (the flat, often black, circular discs). Then, remove the burner bases, which are typically made of aluminum and have the gas ports and igniter opening. Pay attention to how they fit together; some caps have specific orientations or a small notch that aligns with the igniter.
- If your burner caps are sticky or heavily soiled: You may need to soak them in warm, soapy water for 15-20 minutes before scrubbing. Ensure they are completely dry before reassembling.
-
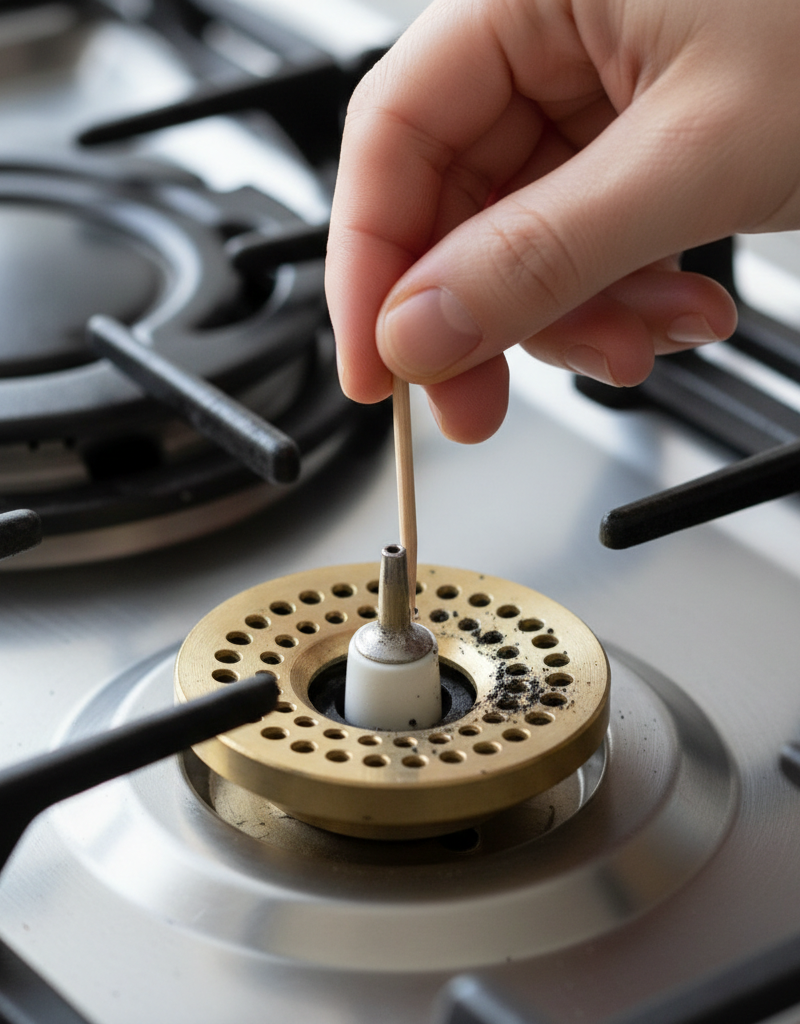
Locate the Igniter — Identify the small, cream-colored or off-white ceramic igniter stick protruding through the burner base. This is the component responsible for sparking. Inspect it for any visible food debris, grease, or corrosion.
-
Clean the Igniter — Using a dry toothbrush or a small, stiff-bristled non-metallic brush, gently scrub around the tip of the ceramic igniter. Be careful not to bend or damage it. For stubborn, caked-on residue, you can use a cotton swab lightly dampened with rubbing alcohol. Allow it to air dry completely for at least 5-10 minutes before proceeding.
- Avoid harsh chemicals: Never use abrasive cleaners, oven cleaner, or metal brushes on the igniter, as these can damage the ceramic or metal tip.
- If the igniter is cracked or broken: This indicates a deeper problem, and the igniter itself will likely need replacement. This is an advanced repair; consider calling a professional.
-
Inspect and Clean Burner Ports — Examine the small holes (ports) around the perimeter of the burner base. These are where the gas exits and mixes with air. Use a straightened paper clip, a needle, or a compressed air can to clear any clogs. Be gentle and avoid enlarging the holes. Also, check the central orifice (often a small brass fitting in the center of the burner base, where the gas comes out) for obstructions.
- For stubborn clogs in burner ports: A toothpick can be effective, but ensure no wood residue breaks off inside the port.
- If using compressed air: Hold the can upright and use short bursts to avoid moisture buildup.
-
Clean Burner Cap and Base — Thoroughly clean the underside of the burner cap and the top surface of the burner base. Any residue here can impede proper gas flow or spark distribution. A damp cloth with mild dish soap followed by a dry cloth works well. Ensure all components are bone dry before continuing.
-
Check for Moisture — Even a small amount of water or cleaning solution can prevent an igniter from sparking. If you recently cleaned your stovetop, ensure all parts and the area around the igniter are completely dry. You can use a soft cloth or let them air dry for an extended period.
-
Reassemble Burner Components — Carefully place the dry burner base back onto its position, ensuring it's flush and stable. Then, replace the burner cap, making sure it's seated correctly. Some caps have little nubs or a keyway that aligns them perfectly with the burner base or the igniter. Incorrect alignment is a common cause of non-lighting burners.
- Test for proper fit: Gently wiggle the burner cap. It should sit securely without significant wobble. If it feels loose, double-check its alignment.
-
Restore Power and Test — Plug the stove back in or turn the circuit breaker on. Turn on the problematic burner. Listen for the rapid clicking and observe if the gas ignites. If it still doesn't light, try a different burner that is working. If that burner ignites, it confirms the problem is still specific to the original burner.
- If the burner ignites but the flame is weak or uneven: The burner ports might still be partially clogged, or the burner cap could be misaligned. Repeat steps 4 and 7.
- If no spark at all after cleaning: The igniter might be faulty, or there could be a wiring issue, suggesting a more advanced repair or professional help.
Common Causes
- Food Debris and Grease: The most frequent culprit. Spills, crumbs, and grease can accumulate around the igniter tip or clog the small gas ports, blocking the spark or gas flow.
- Moisture: Water from cleaning or a recent spill, if not thoroughly dried, can short out the igniter, preventing it from sparking.
- Misaligned Burner Cap: If the burner cap is not seated correctly on the burner base, it can obstruct the gas flow or prevent the igniter spark from reaching the gas-air mixture.
- Clogged Burner Ports: The tiny holes where the gas exits can become blocked with boiled-over food or carbon buildup, preventing the gas from reaching the igniter for ignition.
- Faulty Igniter: Less common, but the ceramic igniter itself can crack, break, or wear out over time, preventing it from generating a spark. This often requires replacement.
- Loose or Damaged Wiring: Wires connecting the igniter to the stove's control module can become loose, corroded, or damaged, interrupting the electrical signal needed for sparking. (Pro-level fix)
Common Mistakes
- Using Abrasive Cleaners on Igniters: Harsh chemicals or scouring pads can damage the delicate ceramic and metal tip of the igniter, making it less likely to spark effectively or shortening its lifespan. Use only a dry brush or rubbing alcohol.
- Not Disconnecting Power: Forgetting to unplug the stove or shut off the breaker before cleaning. This poses a significant electrocution risk and the danger of accidental gas ignition.
- Failing to Dry Components Completely: Reassembling the burner while parts are still damp will almost guarantee the burner won't light, as moisture interferes with the electrical spark.
- Forcing Burner Caps: Trying to force a burner cap into place if it doesn't align naturally. This can damage the cap or the burner base, leading to improper gas flow or an uneven flame once ignited.
- Ignoring Other Clogged Ports: Focusing solely on the igniter and neglecting to clear the gas ports on the burner base. If gas can't flow out properly, the strongest spark won't help.
- Bending the Igniter Tip: Being too aggressive while cleaning can bend or break the fragile ceramic igniter rod. If bent too far from the burner, it won't be able to ignite the gas.
Cost & Time Breakdown
| Task | DIY Cost | Pro Cost | Time |
|---|---|---|---|
| Cleaning burner components | $0–$5 | $100–$200 | 20–40 min |
| Replacing a single igniter (parts) | $20–$50 | Not applicable | 10–20 min |
| Professional service call (diagnosis) | Not applicable | $150–$300 | 30–60 min |
| Replacing multiple igniters/module | Not applicable | $250–$600+ | 1–2 hours |
Tips & Prevention
- Clean Spills Immediately: The best way to prevent igniter and port clogs is to wipe up food spills as soon as the stove cools down. Don't let them dry and harden.
- Regular Deep Cleaning: Plan to remove and clean your burner caps and bases, including the igniters, every few months, or more frequently if you cook often and have messy meals.
- Use Proper Cookware: Ensure your pots and pans are sized appropriately for the burners to prevent excessive boil-overs and spills that can reach the igniters.
- Check for Alignment: Anytime you clean your stove, double-check that all burner caps and grates are seated correctly. A simple misalignment can cause ignition issues.
- Avoid Over-Boiling: Be mindful when boiling liquids to prevent them from overflowing and extinguishing flames or clogging burner components.
When to Call a Professional
While many igniter issues are DIY-friendly, certain situations warrant calling a licensed appliance repair technician. If, after thorough cleaning and ensuring all components are dry and correctly aligned, your burner still doesn't light, or if all your burners fail to spark, this could indicate a problem with the stove's ignition module, wiring, or gas supply. If you suspect a gas leak (you smell gas but don't see a flame, or hear a hissing sound), immediately turn off the gas supply to the stove, open windows, evacuate your home, and call your gas company or a licensed plumber/HVAC technician from a safe location. Never attempt to diagnose or repair gas supply issues yourself. Additionally, if the igniter itself is visibly cracked, broken, or if you see no spark whatsoever, even after cleaning, a professional can properly diagnose and replace the faulty component. Wiring issues require specialized tools and knowledge and are best left to experienced technicians to prevent electrical hazards and further damage to your appliance.
Related Articles
Keep troubleshooting with these hand-picked guides from FixlyGuide:
- The #1 Mistake Homeowners Make When a Gas Burner Won't Light (And the Easy Fix) — A gas stove burner that won't light is a common issue, often due to a clogged igniter or burner port, which homeowners frequently misdiagno…
- The #1 Mistake Homeowners Make When a Gas Burner Won't Light (And the Easy Fix) — Before you call a technician, discover the most common, overlooked reason your gas stove burner isn't lighting and how to fix it yourself i…
- The 3 Hidden Reasons Your Gas Burner Won't Light (Beyond a Clog) — Before you call a technician, discover the most common culprits behind a gas stove burner that refuses to ignite and learn how to fix them…
- The 3 Hidden Reasons Your Gas Burner Won't Light (Beyond a Clogged Pilot) — Before you call a technician, learn the common culprits behind a gas stove burner that refuses to light, from simple clogs to ignition comp…
- Why Does Only One Room Have Flickering Lights? The Real Culprit — Flickering lights in a single room often point to a localized electrical issue, frequently a loose connection in a light fixture or switch.
- The $5 Single-Handle Faucet Fix Most Homeowners Ignore (And Pros Charge $200 For) — A single-handle leaky faucet can often be fixed with a simple, inexpensive DIY repair, saving you hundreds on a plumber.
Get the print-ready PDF of this guide
A clean, ad-free, printable version you can keep on your phone or pin to the workshop wall. Free with a FixlyGuide account.
- Print-optimized layout
- Tools, materials & every step included
- Saved to your account
Frequently asked questions
Why is my gas burner clicking but not lighting?+
If your gas burner is clicking but not lighting, it almost always means the igniter is sparking correctly, but either the gas isn't flowing properly to mix with the spark, or the spark isn't reaching the gas effectively. This is typically due to clogged burner ports or a dirty igniter tip preventing proper contact with the gas.
Can water cause a gas burner not to light?+
Yes, absolutely. Even a small amount of water or moisture on or around the igniter can short out the electrical spark, preventing the burner from lighting. Ensure all burner components and the igniter are completely dry after cleaning or spills.
How do I clean a gas stove igniter?+
To clean a gas stove igniter, first ensure the stove is unplugged or the circuit breaker is off. Remove burner grates, caps, and bases. Gently scrub the ceramic igniter tip with a dry toothbrush or a cotton swab lightly dampened with rubbing alcohol. Allow it to air dry completely before reassembling.
When should I call a professional for a gas stove that won't light?+
You should call a professional if, after thorough cleaning and drying, the burner still doesn't light, if all burners fail to spark, if you suspect a gas leak (smell gas), or if the igniter itself is visibly broken or cracked. Gas appliance issues can be dangerous and should be handled by a licensed technician if beyond simple cleaning.


Discussion
Loading comments…