- Ensure Adequate Insulation: Check your attic's insulation levels. In many northern climates, this means R-value 49 to 60. Adding more insulation is a cost-effective way to keep heat in your living space and out of your attic.
- Maintain Proper Ventilation: Ensure your attic has a continuous path for air to flow from soffit vents to ridge vents (or other exhaust vents). Use baffles in the soffit areas to prevent insulation from blocking airflow.
- Gutter Maintenance: While not a direct cause of ice dams, clogged gutters can exacerbate drainage problems once meltwater starts flowing. Ensure gutters are clear of leaves and debris before winter sets in.
General remodeling · Renovation planning
| Project category | General remodeling |
|---|---|
| Problem type | Renovation planning |
| Trade required | General contracting |
| Urgency | Planned project |
| Safety risk | Low safety risk |
| DIY suitability | Pro recommended |
| Cost category | Major investment |
| Typical timeline | Design and permitting often 2–4 months before work starts |
| Contractor type | General contractor |
Repair option
Phase the work and fix the building envelope first.
Replacement option
Full renovation with permits, design, and a general contractor.
Common causes
- Space no longer fits how the household lives
- Resale preparation
- Deferred maintenance stacking up
Relevant tools:project cost estimatorcompare quoteshome improvement material prices
Published July 10, 2026Last updated August 17, 2026
Tools & materials you'll need
Affiliate links- AmazonExtension pole (optional)If you cannot safely reach the ice dam from a ladder
- AmazonRoof rake (optional)For safely removing snow from lower roof sections
- AmazonSturdy ladderIf needed for safe placement of the stocking. Ensure it is stable on solid ground.
- AmazonSafety glasses
- AmazonWork gloves
As an Amazon Associate FixlyGuide earns from qualifying purchases — at no extra cost to you. Prices and availability are accurate as of publication and subject to change.
Quick Answer
Ice dams are a common winter nuisance that can lead to significant roof and interior damage if not addressed promptly and correctly. The quickest and safest DIY method for removing existing ice dams involves creating channels for water to drain using a non-corrosive de-icer like calcium chloride. This technique melts the dam from the inside out, preventing further water intrusion without damaging your roofing materials or requiring dangerous ladder work with heavy tools.
The Problem
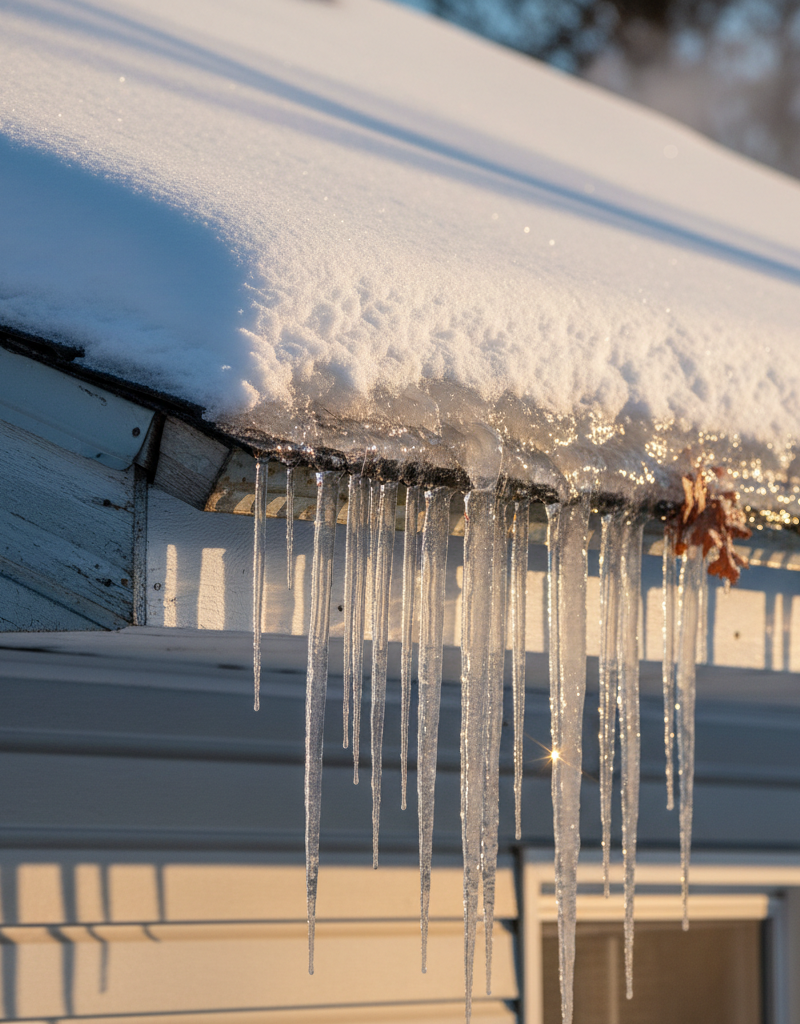
Imagine a wall of ice forming right along the edge of your roof. Above this wall, snowmelt from warmer sections of your roof pools up, with nowhere to go. This trapped water then backs up under your shingles, seeping into your attic, through your insulation, and eventually staining your ceilings and walls. This is the havoc wreaked by ice dams. They aren't just aesthetic issues; they are serious structural threats. The weight of a large ice dam can stress your gutters and fascia, leading to expensive repairs. Even more critically, the continuous moisture intrusion can lead to mold growth in your attic and walls, compromised insulation, and even structural wood rot, all of which are costly and unhealthy problems to resolve.
How It Works
Ice dams are fundamentally a problem of uneven roof temperatures. Here's the science: Heat from your living space rises and, due to insufficient insulation or air leaks, escapes into your attic. This warm air heats the roof deck from underneath, melting the layer of snow directly above it. As this meltwater flows down the roof, it reaches the colder eaves and soffits — areas that aren't warmed by escaping house heat. When this water hits the freezing temperatures at the roof's edge, it refreezes, forming a barrier of ice. More meltwater accumulates behind this barrier, refreezing and expanding the dam. The cycle continues, with the dam growing larger and larger, trapping more and more water behind it. This trapped water, unable to drain off the roof, then works its way under shingles through capillary action, eventually finding its way into your home. The key to prevention is a 'cold roof' – maintaining a consistent, cold temperature across the entire roof surface, from ridge to eave, primarily through proper attic insulation and ventilation.
Step-by-Step Fix
Safety First — Before attempting any work on your roof, always prioritize safety. Avoid working on icy roofs. If you must use a ladder, ensure it's securely placed on solid, non-slip ground and have a spotter. Consider wearing a safety harness if working at significant heights. Never use sharp tools like axes or chisels on your roof, as this can severely damage shingles.
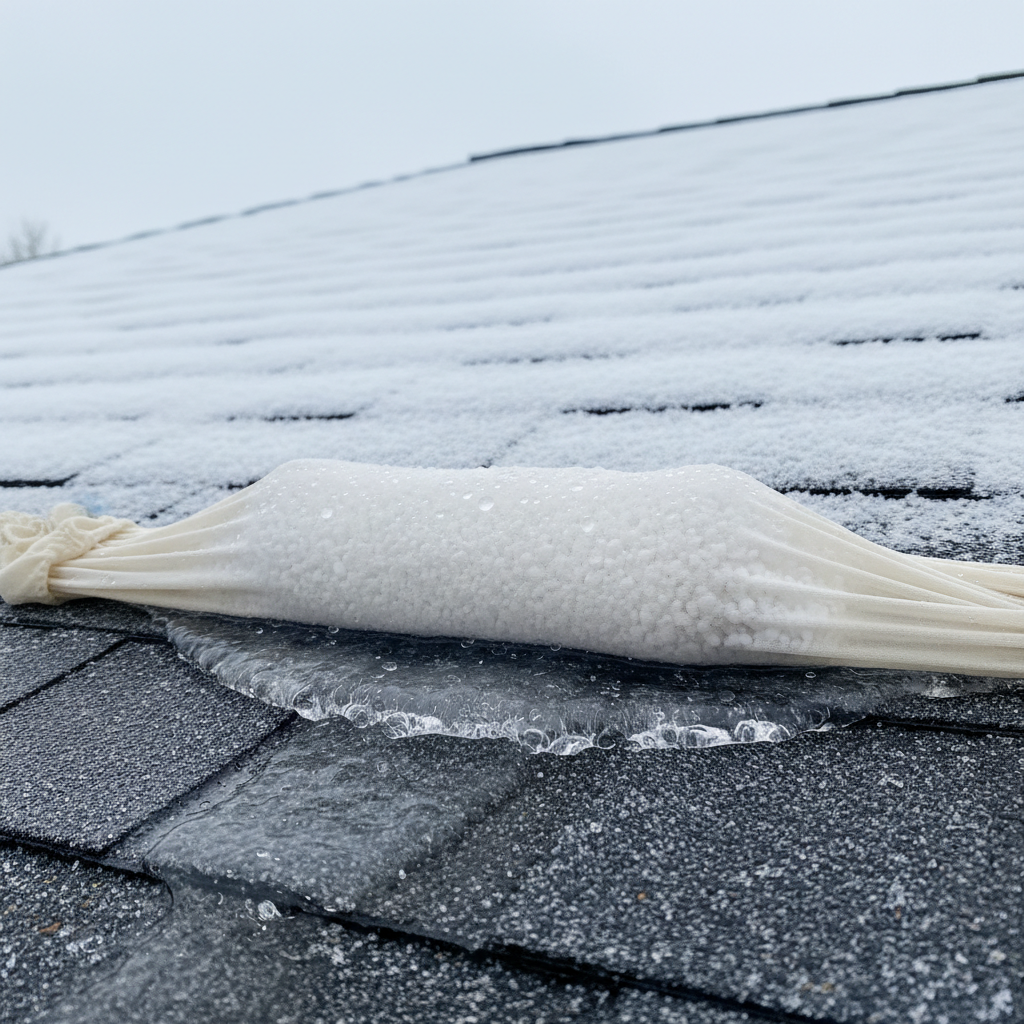
Prepare Your De-icer Sock — Fill an old nylon stocking (or pantyhose) with calcium chloride ice melt. Don't use rock salt (sodium chloride) directly, as it can be corrosive and harmful to landscaping. Tie off the end securely.
- Material: Calcium chloride ice melt (flakes or pellets)
- Tool: Old nylon stocking or pantyhose
Position the Sock — Carefully place the filled stocking across the ice dam, perpendicular to the roof edge, so it lies directly over the area where water is pooling. The goal is to melt a channel through the dam, not to remove the entire dam at once.
- Safety: Use an extension pole to reach if necessary, avoiding climbing onto a slippery roof.
Wait for it to Work — Allow the calcium chloride to slowly melt a channel through the ice dam. This process can take several hours, or even overnight, depending on the thickness of the dam and ambient temperatures. You'll see water begin to drain through the channel.
- Observation: Check periodically to ensure water is draining and the channel is forming effectively.
Repeat if Necessary — If the dam is very thick or extensive, you may need to reposition the sock or apply additional socks in other areas to create multiple drainage channels.
- Caution: Do not try to rush the process by pouring hot water, which can refreeze and create more ice, or damage shingles.
Clear Gutters (If Safe) — Once the ice dam has significantly reduced and water is flowing freely, it's a good idea to ensure your gutters are also clear of ice and debris, if it can be done safely from the ground. Use a specialized roof rake for this.
- Tool: Roof rake (never use standard garden rake on shingles)
- Safety: Absolutely do not attempt to clear icy gutters if there's any risk of falling or if conditions are too dangerous.
Address the Root Cause — Once the immediate danger is averted, focus on preventing future ice dams. This involves improving attic insulation, sealing air leaks from the living space into the attic, and ensuring adequate attic ventilation. These steps create a 'cold roof' that prevents snow from melting unevenly.
- Inspection: Check attic for insulation gaps, unsealed penetrations (pipes, wires, light fixtures).
- Ventilation: Ensure soffit and ridge vents are clear and unobstructed.
Common Causes
- Inadequate Attic Insulation: This is the most common culprit. If your attic lacks sufficient insulation, heat from your home readily rises into the attic, warming the roof deck and melting snow. The recommended R-value for attic insulation varies by region but is often between R-38 and R-60 (10 to 16 inches of fiberglass or cellulose). A simple check involves looking at your attic floor; if you can see the top of your ceiling joists, you likely need more insulation.
- Poor Attic Ventilation: Even with good insulation, a poorly ventilated attic can trap heat, leading to a warm roof deck. Attic ventilation, typically achieved with a combination of soffit (intake) and ridge (exhaust) vents, allows cool outside air to enter, circulate, and then expel warm air and moisture. The general rule is 1 square foot of net free vent area for every 300 square feet of attic floor space.
- Air Leaks into the Attic: Gaps around electrical fixtures, plumbing stacks, attic access hatches, exhaust fans, and even unsealed top plates of interior walls can allow significant amounts of warm, moist air to bypass insulation and enter the attic directly. These leaks create hot spots on the roof, accelerating snowmelt and the formation of ice dams.
- Snow Accumulation: While not a direct cause, heavy snow loads exacerbate the problem. The thicker the snow, the more effectively it insulates the roof, trapping any escaping heat and allowing for greater meltwater generation. This is why removing heavy snow from the lower parts of your roof can sometimes prevent dams from forming or limit their size.
- Heated Gutters/Heat Tape Malfunctions: While often installed to prevent ice dams, incorrectly installed, damaged, or malfunctioning heat tapes or heated gutters can sometimes create localized melting patterns that, paradoxically, contribute to ice dam formation rather than preventing it if they don't cover a wide enough area or fail to properly drain water away.
Common Mistakes
- Using a Pickaxe or Shovel to Chip Away Ice: This is incredibly risky and almost guaranteed to damage your shingles, flashing, or gutters. Shingles can crack, chip, or tear, leading to immediate leaks. The force can also loosen fasteners or damage the underlying roof deck. Always use gentler methods.
- Pouring Hot Water on the Ice Dam: While seemingly effective in the short term, hot water will quickly cool and refreeze, often adding to the ice dam's size and thickness, and potentially creating a slick, dangerous surface. The sudden thermal shock can also damage asphalt shingles.
- Using Rock Salt (Sodium Chloride) Directly on the Roof: Rock salt is corrosive and can damage roofing materials, gutters, downspouts, and even harm vegetation and landscaping below as it washes off. Calcium chloride is a safer alternative for de-icing on roofs.
- Ignoring the Root Cause: Simply removing ice dams without addressing the underlying issues (insulation, ventilation, air leaks) means they will almost certainly return with the next major snowfall. Focus on long-term prevention.
- Climbing on an Icy Roof: This is extremely dangerous. The risk of slipping and falling is very high, leading to severe injury or even death. Always work from a ladder securely placed on solid ground, or use an extension pole to apply de-icers.
- Damaging Electrical Wires or Cables: Be extremely careful when working near the roof edge, especially around outdoor lighting, festive decorations, or heat tape installations. Never use metal tools that could cut or short-circuit electrical components.
Cost & Time Breakdown
| Task | DIY cost | Pro cost | Time |
|---|---|---|---|
| Ice Dam Removal (DIY w/ socks) | $20–$50 | $300–$1,000+ | 1–4 hours |
| Attic Air Sealing (DIY) | $50–$200 | $500–$1,500 | 4–8 hours |
| Add Attic Insulation (DIY) | $300–$1,000 | $1,000–$3,000 | 8–16 hours |
| Attic Ventilation Upgrade (DIY) | $100–$500 | $500–$2,000 | 4–12 hours |
| Roof Rake Snow Removal (DIY) | $40–$80 | $150–$400 | 1–2 hours |
Note: Professional costs can vary significantly based on location, severity of the ice dam, and the size and pitch of the roof. Complex or very large ice dams can push pro costs much higher.
Tips & Prevention
- Regular Attic Checks: Routinely inspect your attic (annually, before winter) for signs of inadequate insulation, air leaks (look for dirt streaks on insulation, especially near penetrations), and proper ventilation. Make sure soffit vents aren't blocked by insulation.
- Install a Roof Rake: A roof rake allows you to safely remove snow from the lower 3-4 feet of your roof while standing on the ground. Removing this snow can significantly reduce the likelihood of ice dam formation, as it eliminates the raw material for the dam.
- Seal Attic Air Leaks: This is a crucial, often overlooked step. Use caulk and expanding foam to seal gaps around plumbing vents, electrical wires, light fixtures, and other penetrations into the attic from the conditioned space below. Don't forget the attic access hatch – weatherstrip and insulate it.
- Ensure Adequate Insulation: Check your attic's insulation levels. In many northern climates, this means R-value 49 to 60. Adding more insulation is a cost-effective way to keep heat in your living space and out of your attic.
- Maintain Proper Ventilation: Ensure your attic has a continuous path for air to flow from soffit vents to ridge vents (or other exhaust vents). Use baffles in the soffit areas to prevent insulation from blocking airflow.
- Monitor Snowfall: After heavy snowfalls, particularly followed by fluctuating temperatures, keep an eye on your roof edges for the earliest signs of ice dam formation. Early intervention, like targeted snow removal with a roof rake, can prevent major issues.
- Gutter Maintenance: While not a direct cause of ice dams, clogged gutters can exacerbate drainage problems once meltwater starts flowing. Ensure gutters are clear of leaves and debris before winter sets in.
When to Call a Professional
While DIY methods can address many ice dam issues, there are critical times to call a licensed professional. If you have significant ice dams extending several feet up your roof, or if you observe water actively leaking into your home, it's time to bring in help. Professionals have specialized equipment, such as steam removers, which can quickly and safely eliminate large ice dams without damaging the roof. They also have the experience and safety equipment to work on steep or extremely icy roofs, which are dangerous for homeowners. Furthermore, if you suspect the ice dam has already caused damage – such as stained ceilings, mold growth in the attic, or structural issues – a professional roofer or restoration specialist can properly assess and repair the damage. Never attempt to use high-pressure washers or torches on ice dams; these methods are incredibly dangerous and will cause severe damage to your roof and potentially your home. For any extensive, large, or particularly stubborn ice dams, or if you feel unsafe at any point, do not hesitate to contact a qualified roofing or ice dam removal specialist.
Related Articles
Keep troubleshooting with these hand-picked guides from FixlyGuide:
- The 3 Hidden Reasons Your Roof Gets Ice Dams (and the Only Safe Way to Remove Them) — Discover the real causes of ice dams and the safest, most effective methods for removal, preventing costly roof and water damage this winte…
- The $30 Trick to Melting Ice Dams (Before They Destroy Your Roof) — Discover how to safely remove ice dams from your roof instantly with common household items, preventing costly damage. Stay safe while tack…
- The $20 Trick That Melts Ice Dams (and Saves Your Roof) — Discover a surprisingly simple, budget-friendly method to safely remove ice dams and prevent costly roof damage to your home.
- The #1 Mistake Homeowners Make with Ice Dams (and How to Fix It SAFELY) — Most homeowners approach ice dam removal incorrectly, creating more damage or safety risks. Learn the right, safe methods to protect your r…
- The $30 Secret to Banishing Ice Dams Without Damaging Your Roof — Discover how a simple, inexpensive trick can safely eliminate dangerous ice dams from your roof and prevent costly damage to your home.
- The #1 Mistake Homeowners Make After Finding Missing Shingles (And How to Fix It Right) — Discover the crucial steps to take after a storm rips shingles from your roof, ensuring a proper, lasting repair and preventing costly futu…
What should this project cost?
Enter your project details for a realistic cost range before you call anyone.
Spot repairs commonly run $400–$1,800; full replacement typically $9,000–$18,000 for an average home.
- Regional adjustment
- National average
- Labor share (typical)
- ~$2,948
- Quotes to collect
- 3 written estimates
Educational estimate based on national averages — not a binding quote. Always confirm with written local estimates.
Fixly Project Decision Box
- DIY difficulty
- Professional Recommended
- Estimated time
- Inspection 1–2 hours · repairs 1–3 days
- Cost level
- High
Main tools / materials
- Binoculars for a ground-level look
- Flashlight for attic checks
- Moisture meter
- Roofing cement (temporary patch only)
When to stop and call a pro
- Active leak near lights, fans, or any wiring
- Sagging, bulging, or water-filled ceiling
- Steep, wet, or two-story roof — do not climb it
- Storm or hail damage you plan to claim on insurance
Need professional help?
Free roof assessment first — no phone calls until you ask for them.
Get Local Roofing HelpDecide what your roof needs
Two minutes of questions turns "something is wrong up there" into a clear next step.
- Repair or replace your roof?Answer 10 questions about age, leaks, and damage to get a clear next step.Open
- Compare contractor quotesScore up to four bids on price, warranty, licensing, and timeline.Open
- Get local estimatesSend one request and compare written estimates from vetted pros.Open
Free, no signup required. Estimates are educational guidance, not a quote or an inspection.
Recommended for DIYers & woodworkers
Sponsored
The Top 20 Tools for Workshops of Any Budget
No stationary machines or power tools required — plus 3 fundamental tools that can't be bought at any price.
Get the free guide
Ted's Woodworking — The #1 Woodworking Resource
Detailed instructions, dimensioned drawings, materials & cutting lists, and 3D schematics for every skill level.
See the plansSponsored: links above are affiliate links. FixlyGuide may earn a commission on qualifying purchases — at no extra cost to you.
Frequently asked questions
What causes ice dams to form on a roof?+
Ice dams form when heat from your home's interior escapes into the attic, warming the roof deck and melting snow. This meltwater then flows down the roof and refreezes at the colder eaves, forming a barrier that traps more water.
Is it safe to chip ice dams off my roof?+
No, chipping ice dams with tools like a pickaxe or shovel is extremely dangerous for both you and your roof. It can cause severe damage to shingles, flashing, and gutters, leading to costly leaks, and greatly increases your risk of falling.
What is the best way to remove an existing ice dam?+
The safest and most effective DIY method is to use a calcium chloride-filled stocking placed across the dam. This slowly melts channels through the ice, allowing trapped water to drain without damaging your roof. For large or stubborn dams, professional steam removal is best.
How can I prevent ice dams from forming in the first place?+
Prevention involves ensuring adequate attic insulation, sealing air leaks from your living space into the attic, and maintaining proper attic ventilation. These steps keep your roof deck cold, preventing uneven snowmelt.
Will hot water get rid of ice dams?+
Pouring hot water on ice dams is not recommended. It will quickly refreeze, potentially adding to the dam's size and thickness, and can create dangerous icy conditions or even damage your roofing materials due to thermal shock.
Discussion
Loading comments…