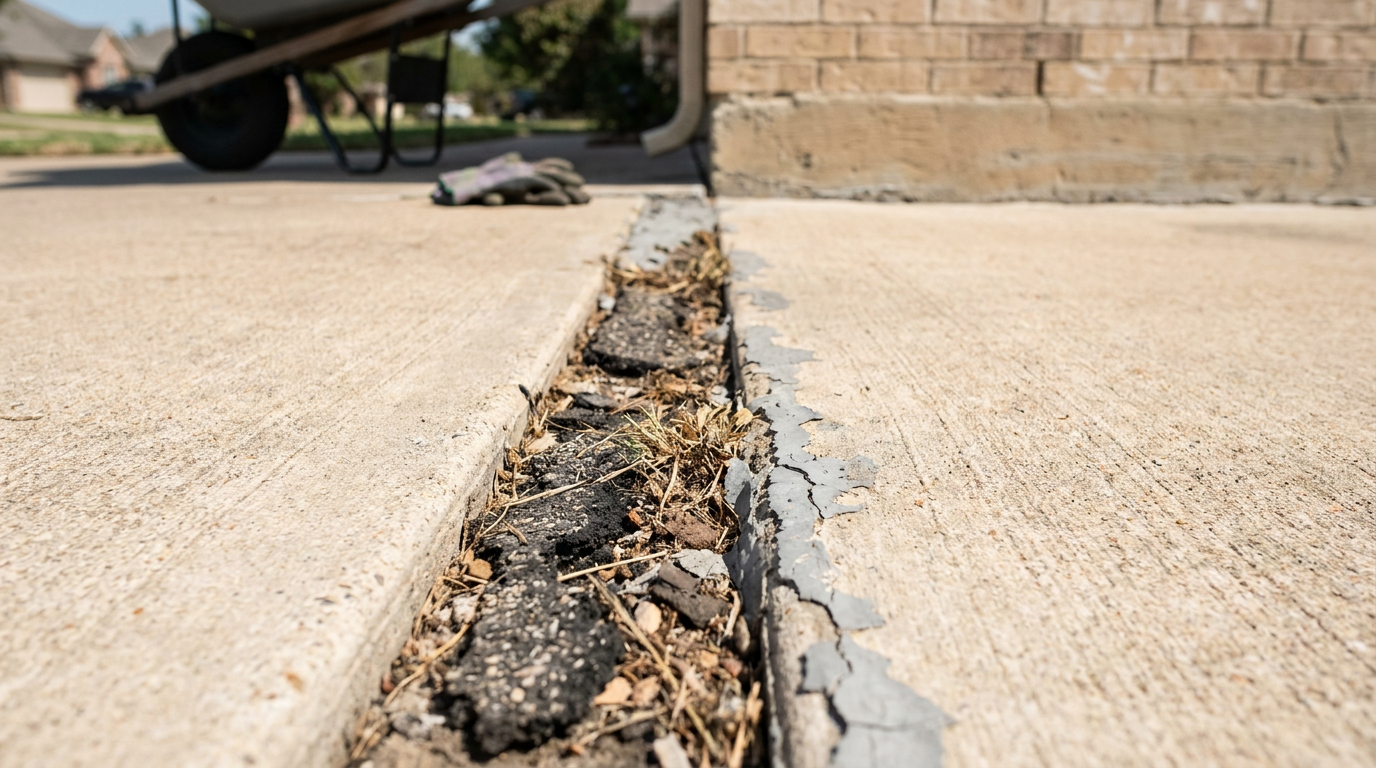
- Dig out the old, rotted material — Use a rigid utility knife, flathead screwdriver, or a purpose-made joint-clearing hook and rip out all the rotten fiberboard, weeds, and old caulk down to a depth of at least 1 to 1-1/2 inches.
- Tools required: Heavy-duty utility knife, 5-in-1 painter's tool, or rolling joint-clearing wheel.
- If stubborn: Break out an angle grinder with a diamond tuck-pointing blade and cut through hardened asphalt residue—wear full eye protection and an N95 respirator.
General remodeling · Renovation planning
| Project category | General remodeling |
|---|---|
| Problem type | Renovation planning |
| Trade required | General contracting |
| Urgency | Planned project |
| Safety risk | Low safety risk |
| DIY suitability | Pro recommended |
| Cost category | Major investment |
| Typical timeline | Design and permitting often 2–4 months before work starts |
| Contractor type | General contractor |
Repair option
Phase the work and fix the building envelope first.
Replacement option
Full renovation with permits, design, and a general contractor.
Common causes
- Space no longer fits how the household lives
- Resale preparation
- Deferred maintenance stacking up
Relevant tools:project cost estimatorcompare quoteshome improvement material prices
Published October 23, 2026Last updated October 23, 2026
Tools & materials you'll need
Affiliate links- AmazonHeavy-duty caulk gun1 · High-thrust 12:1 or 18:1 ratio for 29 oz tubes
- AmazonStiff wire wheel or hand wire brush1 · For scouring concrete joint sidewalls
- Amazon5-in-1 painter's tool or joint hook1 · For gouging out rotten fiberboard
- AmazonLeaf blower or wet/dry vacuum1 · To clear all dust and dry debris
- AmazonSelf-leveling polyurethane concrete sealant3-4 tubes · 29 oz commercial tubes
- AmazonClosed-cell foam backer rod50 ft · 1/8 inch wider than joint width
- AmazonExterior masking tape or duct tape1 roll · To protect slab faces from overflow
- AmazonDry silica play sand1 bag · Optional, to pack deep voids or texturize surface
As an Amazon Associate FixlyGuide earns from qualifying purchases — at no extra cost to you. Prices and availability are accurate as of publication and subject to change.
Quick Answer
To fix a cracking or pulling concrete expansion joint, scrape out all the busted sealant and rotten fiberboard to a depth of at least 1 inch. Pack the void with closed-cell foam backer rod so it sits exactly 1/4 to 3/8 inch below the concrete surface, then fill the gap with a self-leveling polyurethane or hybrid polymer sealant. Don’t reach for standard acrylic latex or rigid mortar—they won’t stretch, and the first time that slab moves, they’ll shear apart.
The Problem
Take a walk down your driveway after a good rain and really look at the joints between the concrete slabs. You’ll usually spot weeds pushing through, crumbling gray filler, or dark gaps where water just disappears.
That missing or shredded seal isn’t just ugly. It’s a live problem for your foundation and flatwork.
Concrete slabs don’t sit still. In hot stretches and winter freezes—think North Texas and those nasty expansive clay soils—driveways keep expanding, contracting, and heaving. Once an expansion joint fails, runoff heads straight under the slab. Then the water starts washing out the sand base or turning the subsoil into mush. Come winter, that trapped water freezes, expands by 9%, and starts snapping concrete edges like peanut brittle. Leave it open long enough and a $15 tube of sealant turns into an $8,000 mudjacking job or a full slab replacement. No joke.
How It Works
Concrete expansion joints (isolation joints) do exactly what the name says: they give big slabs room to move. When summer heat pushes slab surface temperatures past 130°F, concrete expands. Without a planned gap, neighboring slabs crash into each other and the edges start to spall, break, or heave into ugly trip hazards.
Back in the day, builders slipped treated asphalt fiberboard between driveway slabs, patio sections, and garage aprons. That fiberboard rots out after 5 to 10 years and leaves you with an open trench.
Modern flatwork needs an elastomeric joint system if you want it to last. That means two parts working together: a foam backer rod and an elastomeric sealant—usually polyurethane or a polyether-based product.
The trick to a 15-year seal is avoiding three-point adhesion. If the sealant sticks to the left slab, the right slab, and the bottom of the trench, it tears right down the middle the first cold snap. The foam backer rod breaks that bottom bond and gives the sealant the right “hourglass” shape. When the joint opens up in winter, the sealant stretches side to side like a thick rubber band instead of snapping.
I pulled a water heater in Frisco last month and saw a driveway joint that had failed exactly this way—clean crack, standing water, and a base that was already washing out underneath. Same story, different job.
Step-by-Step Fix
Follow these steps on a dry weekend when outdoor temperatures will stay between 50°F and 85°F for at least 48 hours.
-
Dig out the old, rotted material — Use a rigid utility knife, flathead screwdriver, or a purpose-made joint-clearing hook and rip out all the rotten fiberboard, weeds, and old caulk down to a depth of at least 1 to 1-1/2 inches.
- Tools required: Heavy-duty utility knife, 5-in-1 painter's tool, or rolling joint-clearing wheel.
- If stubborn: Break out an angle grinder with a diamond tuck-pointing blade and cut through hardened asphalt residue—wear full eye protection and an N95 respirator.
-
Scour the concrete sidewalls — Sealant won’t bond to dusty, algae-slick, or crumbling concrete. Scrub both vertical concrete faces inside the joint with a stiff-bristle wire brush until you’ve got clean, bare aggregate showing.
- Tip: Don’t skip this step; loose dust works like flour on a baking board, and your new sealant will peel loose within twelve months.
-
Blast the joint clean and bone-dry — Blow all the loosened debris, dirt, and stone chips out of the trench with a leaf blower or shop vacuum set to exhaust.
- Moisture warning: The joint has to be bone-dry. Polyurethane reacts badly with standing water, making tiny carbon dioxide bubbles that turn a clean joint into a spongy, porous mess.
-
Establish your base layer if the trench is deep — If you had to dig out rotted board and the gap is deeper than 1-1/2 inches, fill the lower void with clean, dry masonry sand or medium leveling sand up to about 3/4 inch from the surface.
- Crucial detail: Pack the sand down firmly with a scrap of wood so the backer rod won’t settle later.
-
Install closed-cell backer rod — Measure the joint's width and buy a closed-cell backer rod that is 1/8 to 1/4 inch wider than the gap (for example, use 5/8-inch rod for a 1/2-inch joint). Press it into the gap with a blunt roller, paint stick, or your fingers.
- Target depth: Set the top crown of the backer rod exactly 1/4 inch below the slab surface for joints under 1/2-inch wide, and 3/8 inch below for joints up to 1-inch wide.
- Caution: Don’t puncture the foam rod during installation; punctured closed-cell rod "outgasses" into wet sealant and leaves you with ugly blisters.
-
Mask both concrete edges with tape — Stick heavy-duty exterior painter's tape or duct tape flat along both slab edges, leaving exactly 1/16 inch of concrete edge exposed.
- Why this matters: Self-leveling sealant acts like warm honey. If your driveway has even a little slope, it’ll run, and getting polyurethane off decorative or brushed concrete without staining is almost impossible.
-
Cut and puncture the sealant cartridge — Slice the plastic nozzle of your 29-oz self-leveling polyurethane tube straight across at a 90-degree angle to create an opening roughly 1/4 inch wide. Puncture the inner foil seal thoroughly with the caulk gun's plunge rod or a long nail.
- Tool setup: Load the cartridge into a high-thrust (minimum 12:1 or 18:1 ratio) caulk gun; these heavy commercial tubes will chew up your forearms in a cheap stamped-steel gun.
-
Fill the joint smoothly — Hold the nozzle tip down inside the joint just above the backer rod and squeeze the trigger steadily, letting the sealant pool and flow ahead of the tip.
- Depth control: Fill the joint until the liquid settles roughly 1/8 inch below the top concrete edge. Don’t fill it flush! If you do, vehicles will track it down the street, and summer expansion will squeeze the sealant up into a tire-grabbing ridge.
-
Address slope runoff if working on an incline — If your driveway slopes toward the street, self-leveling caulk will chase its own level and run downhill like lava.
- Branching fix: If your slab grade exceeds 3%, switch immediately to a gun-grade (non-sag) polyurethane sealant. Tool non-sag sealant with a curved margin trowel dipped in mineral spirits instead of letting it self-level.
-
Pull the tape before it skins — Peel your masking tape up right after finishing a run, pulling it back at a sharp 45-degree angle.
- Timing check: Polyurethane starts skinning over within 30 to 45 minutes on warm days. If you wait until it cures, you’ll tear the fresh rubber right out of the joint when you pull the tape.
-
Barricade the repair area — Set up traffic cones, sawbucks, or trash cans to keep cars, pets, and delivery couriers off the wet bead.
- Cure timeline: Self-leveling polyurethane stays tacky for 24 hours and takes 3 to 5 full days to reach a complete, durable cure under vehicle tires.
Common Causes
- Rotten organic fiberboard: Original expansion strips made of wood pulp or asphalt-impregnated fiber break down after repeated water saturation and leave empty trenches that just collect dirt.
- Three-point adhesion tears: A past repair put caulk right over flat concrete or dirt without a backer rod. When the slabs pulled apart, the bead tore open in the middle because the caulk was glued to the bottom.
- Wrong caulk chemistry: Cheap outdoor acrylic, window silicone, or rigid sand-mix mortar. Slabs move up to 1/4 inch seasonally, and rigid or light-duty sealants shear apart during the first winter freeze.
- Hydrostatic moisture pressure: Trapped underground water pushed up through unsealed bottom joints and blew standard caulks off the concrete sidewalls.
- Deep root invasion: Tree roots from nearby live oaks or sweetgums lifted one slab, twisted the joint, and sheared the elastic bond along the concrete edge.
Common Mistakes
- Filling the joint flush with the surface. Slabs squeeze together in July heat. If your caulk sits level with the driveway surface, expansion turns that rubber bead into a raised hump that gets chewed up by snowplows, lawnmowers, and car tires. Keep the bead recessed 1/8 inch.
- Pouring self-leveling caulk down a steep grade. Self-leveling sealant acts like pancake batter. Put it on an 8% driveway slope and it’ll run straight out the bottom onto the city sidewalk. Use non-sag polyurethane for sloped driveways and steps.
- Skipping the backer rod. Dumping three tubes of caulk into a 2-inch-deep canyon wastes money and all but guarantees failure. Deep plugs of caulk lose their elasticity, skin over on top, and stay gooey underneath for months.
- Applying over damp concrete. Trapped moisture turns curing polyurethane into Swiss cheese. Wait for at least two clear, sunny days after rain before applying sealant.
- Using silicone caulk. Pure 100% silicone doesn’t have the abrasion resistance needed for foot and vehicle traffic. It tears easily under tires and grabs road grime that turns it black within weeks.
Cost & Time Breakdown
| Task | DIY Cost | Pro Cost | Time |
|---|---|---|---|
| Clear and clean 50 ft of joints | $0–$15 (wire brush, scraper) | $150–$250 | 1.5–2 hours |
| Install backer rod (50 ft) | $10–$15 | $75–$125 | 30 minutes |
| Apply self-leveling polyurethane (50 ft) | $45–$65 (3–4 large tubes) | $200–$350 | 45 minutes |
| Non-sag tooling on steep driveways (50 ft) | $50–$70 | $250–$400 | 1.5 hours |
| Total Driveway Joint Overhaul | $55–$95 | $425–$725 | 2.5–3.5 hours |
Tips & Prevention
- Inspect your perimeter joints every fall. Walk your driveway, patio, and pool deck every October before freezing temperatures show up. Sealing a hairline pull-away now keeps frost heave from lifting your slabs over the winter.
- Never blast joints with a high-pressure washer tip. A 3,000 PSI pressure washer nozzle held close will blast out fresh or aging polyurethane and drive gallons of water straight beneath your slab.
- Dust fresh caulk with masonry sand for a textured match. If you hate the smooth, shiny look of fresh polyurethane against rough brushed concrete, wait 10 minutes after application and lightly cast clean, dry silica play sand over the wet surface. It cuts the shine and blends in with aged concrete.
- Keep string trimmers out of the seams. Whacking weeds near your expansion joints with a weed eater will shred elastomeric caulk. Pull the weeds by hand or spot-treat them before you recaulking.
When to Call a Professional
If your concrete slabs are still level with each other and have simply pulled apart, resealing is well within your DIY wheelhouse.
But step back and look across the joint line. If one slab has dropped more than 1/2 inch below the adjacent section, caulking won’t fix the real issue. That height difference is a serious trip hazard and usually means the base has washed out. Sealing a dropped slab just traps water on the sunken side.
Call a commercial concrete leveling contractor for mudjacking or polyurethane foam injection ("poly-jacking") to bring the sunken slab back to grade first.
Same goes for badly fractured concrete with spiderweb cracks branching away from the joint. At that point, the sub-base has likely collapsed or tree roots have wrecked the structural integrity of the flatwork. That’s not a caulk job—you’re looking at saw-cutting and pouring new concrete sections.
Frequently Asked Questions
Can I just fill my concrete expansion joints with mortar or sand mix?
No, don’t use mortar, concrete patch, or rigid sand mix inside an expansion joint. Concrete slabs naturally expand and contract with seasonal temperature swings, and rigid materials can’t compress or flex. The second the slabs shift, the mortar will crack, shatter, and pop out of the gap, usually taking the fragile driveway edges with it.
What is the difference between self-leveling and non-sag polyurethane caulk?
Self-leveling caulk has a low viscosity, so it flows smoothly like thick syrup and fills horizontal, flat seams without much tooling. Non-sag caulk is thicker and pastier, built to hold its shape without slumping. Use self-leveling sealant on flat driveways, garage aprons, and patios; save non-sag for sloped grades greater than 3%, vertical walls, and steps.
Why do I need a foam backer rod instead of just filling the whole gap with caulk?
A backer rod does two important jobs: it controls sealant depth and keeps you out of three-point adhesion trouble. Sealant should only stick to the two opposing slab faces so it can stretch like a rubber band. If it bonds to the dirt base too, that three-way pull tears the sealant down the middle as soon as the concrete moves.
Can I apply new polyurethane sealant directly over the old caulk?
No, new polyurethane won’t make a dependable bond over old, weather-beaten, or dirty sealant. Any loose or crumbly leftover material will pull away from the concrete and take your brand-new caulk with it. You’ve got to strip the joint down to clean, bare concrete sidewalls with a utility knife, scraper, or wire wheel before you lay in new material.
How long does concrete driveway caulk take to dry before I can drive on it?
Self-leveling polyurethane usually skins over within 2 to 4 hours and handles foot traffic and light rain after 24 hours. That said, it takes a full 3 to 7 days to hit maximum cure and hardness. Don’t park vehicles or roll heavy machinery over newly sealed joints for at least 72 hours, especially in cooler or dry weather where polyurethane cures slower.
What size backer rod should I purchase for my driveway joints?
Always buy a backer rod with a diameter that’s roughly 1/8 to 1/4 inch larger than the widest point of your joint. Backer rod depends on friction and compression to stay put. If you match the rod diameter exactly to the gap width, it’ll slip down into the sub-base as soon as you inject the heavy sealant over it.
Can I caulk my driveway joints if it rained yesterday?
No, you should wait at least 24 to 48 hours of dry, sunny weather after heavy rain before applying polyurethane sealant. Moisture trapped in the porous concrete sidewalls will react with moisture-cure polyurethanes, creating carbon dioxide bubbles that weaken the bond and leave ugly surface blisters.
What happens if I fill the expansion joint completely flush with the top of the concrete?
Filling the joint flush is a recipe for early failure. In the summer heat, your concrete slabs expand, narrow the joint, and squeeze the elastomeric caulk upward. If it starts flush, it makes a raised rubber ridge that gets sheared off by snowplows, car tires, and dragged trash cans. Always leave the finished sealant recessed 1/8 inch below the slab edge.
Related Articles
Keep troubleshooting with these hand-picked guides from FixlyGuide:
- The Tiny Gap Behind Your Baseboards That Costs You $100s in Drafts — Discover why your baseboards are pulling away from the wall and the simple, inexpensive fixes that can seal drafts and improve your home's…
- The 7 Mistakes First-Time DIYers Make When Installing a Kitchen Backsplash — Learn the common pitfalls and smart solutions for installing a kitchen backsplash, transforming your space with confidence and avoiding cos…
- The Tiny Gap That Wastes Energy: Why Your Baseboards Pull Away (And the Simple, Permanent Fix) — Baseboards separating from walls are a common issue, often indicating underlying problems with moisture or house settling, but are typicall…
- The $30 Trick to Melting Ice Dams (Before They Destroy Your Roof) — Discover how to safely remove ice dams from your roof instantly with common household items, preventing costly damage. Stay safe while tack…
- The $20 Trick That Melts Ice Dams (and Saves Your Roof) — Discover a surprisingly simple, budget-friendly method to safely remove ice dams and prevent costly roof damage to your home.
- The #1 Caulk Mistake That Leads to Mold Around Your Bathroom Sink — Discover the crucial caulking mistake most homeowners make that allows mold and water damage around their bathroom sink, and how to fix it…
What should this project cost?
Enter your project details for a realistic cost range before you call anyone.
Driveways and patios commonly run $8–$18 per square foot poured.
- Regional adjustment
- National average
- Labor share (typical)
- ~$2,003
- Quotes to collect
- 3 written estimates
Educational estimate based on national averages — not a binding quote. Always confirm with written local estimates.
Fixly Project Decision Box
- DIY difficulty
- Professional Recommended
- Estimated time
- Monitoring over 60–90 days · engineer visit 1–2 hours
- Cost level
- Major Project
Main tools / materials
- Crack monitor or pencil marks with dates
- Tape measure
- Marble or level for floor slope
When to stop and call a pro
- A crack wider than 1/4 inch or growing month over month
- Doors and windows that suddenly stick or will not latch
- Stair-step cracks in brick or block
- Separation between walls and ceilings or floors
Need professional help?
Get a Foundation EvaluationGet the print-ready PDF of this guide
A clean, ad-free, printable version you can keep on your phone or pin to the workshop wall. Free with a FixlyGuide account.
- Print-optimized layout
- Tools, materials & every step included
- Saved to your account
Recommended for DIYers & woodworkers
Sponsored
The Top 20 Tools for Workshops of Any Budget
No stationary machines or power tools required — plus 3 fundamental tools that can't be bought at any price.
Get the free guide
Ted's Woodworking — The #1 Woodworking Resource
Detailed instructions, dimensioned drawings, materials & cutting lists, and 3D schematics for every skill level.
See the plansSponsored: links above are affiliate links. FixlyGuide may earn a commission on qualifying purchases — at no extra cost to you.
Frequently asked questions
Can I just fill my concrete expansion joints with mortar or sand mix?+
No, never use mortar, concrete patch, or rigid sand mix inside an expansion joint. Concrete slabs naturally expand and contract with seasonal temperature swings; rigid materials cannot compress or flex. The moment the slabs shift, the mortar will crack, shatter, and pop out of the gap, frequently spalling the fragile edges of your driveway along with it.
What is the difference between self-leveling and non-sag polyurethane caulk?+
Self-leveling caulk has a low viscosity, flowing smoothly like thick syrup to fill horizontal, flat seams without requiring tooling with a spatula. Non-sag caulk is thick and pasty, designed to hold its shape without slumping. Use self-leveling sealant on flat driveways, garage aprons, and patios; reserve non-sag for sloped grades greater than 3%, vertical walls, and steps.
Why do I need a foam backer rod instead of just filling the whole gap with caulk?+
A backer rod serves two critical engineering functions: it controls the depth of the sealant and prevents three-point adhesion. Sealant must only adhere to the two opposing slab faces so it can stretch like a rubber band. If it sticks to the dirt base as well, the three-way pull tears the sealant down the middle as soon as the concrete moves.
Can I apply new polyurethane sealant directly over the old caulk?+
No, new polyurethane will not form a dependable bond over old, weather-beaten, or dirty sealant. Any remaining loose, crumbly material will pull away from the concrete, taking your brand-new caulk with it. You must strip the joint down to clean, bare concrete sidewalls using a utility knife, scraper, or wire wheel before laying down new material.
How long does concrete driveway caulk take to dry before I can drive on it?+
Self-leveling polyurethane typically skins over within 2 to 4 hours and resists foot traffic and light rain after 24 hours. However, it takes a full 3 to 7 days to reach maximum cure and hardness. Do not park vehicles or roll heavy machinery over newly sealed joints for at least 72 hours, especially in cooler or dry weather where polyurethane cures slower.
What size backer rod should I purchase for my driveway joints?+
Always buy a backer rod with a diameter that is roughly 1/8 to 1/4 inch larger than the widest point of your joint. Backer rod relies on friction and compression to stay in place. If you match the rod diameter exactly to the gap width, it will slip down into the sub-base as soon as you inject the heavy sealant over it.
Can I caulk my driveway joints if it rained yesterday?+
No, you should wait at least 24 to 48 hours of dry, sunny weather after heavy rain before applying polyurethane sealant. Moisture trapped within the porous concrete sidewalls will react with the moisture-cure polyurethanes, creating carbon dioxide bubbles that weaken the bond and cause unsightly surface blisters.
What happens if I fill the expansion joint completely flush with the top of the concrete?+
Filling the joint flush is a recipe for premature failure. In the summer heat, your concrete slabs expand, narrowing the joint and squeezing the elastomeric caulk upward. If it starts flush, it creates a raised rubber ridge that gets sheared off by snowplows, car tires, and dragged trash cans. Always leave the finished sealant recessed 1/8 inch below the slab edge.
Discussion
Loading comments…