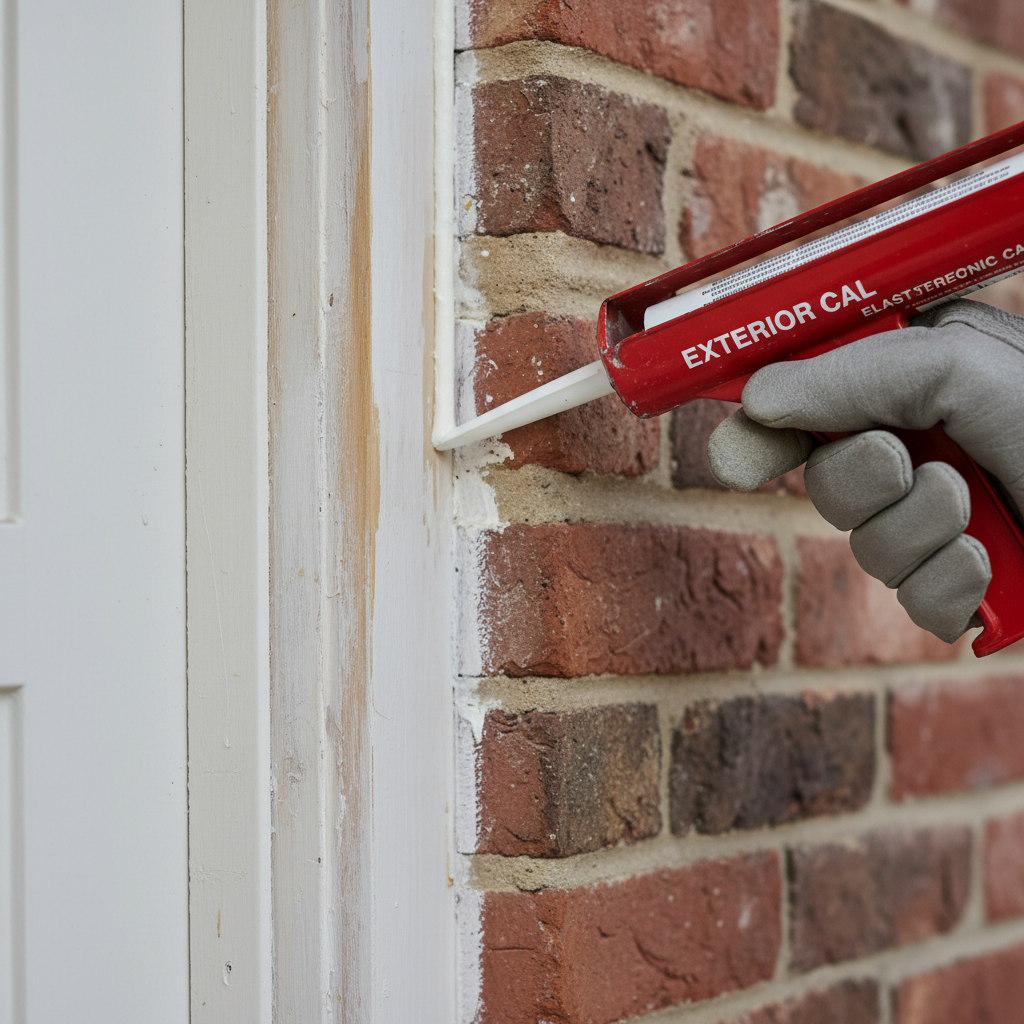
- Improper Surface Prep: If you don’t clean out the old caulk, dirt, and debris, the new caulk’s got nothing solid to grab. It’s like sticking tape to a muddy board—it just won’t hold.
- Wrong Caulk Type: Cheap acrylic latex belongs inside, not on an exterior door frame. It doesn’t flex enough and breaks down fast under UV and temperature swings.
- Three-Sided Adhesion: This happens when caulk sticks to both sides of the joint and the back. Then it can’t stretch like it should, so it tears or pulls loose. That’s why backer rod matters so much in deeper gaps.
- Poor Application Technique: If you rush it, lay down too thin a bead, or skip tooling, you end up with voids, air bubbles, and weak adhesion. Looks fine for a day. Fails later.
- Building Movement & Age: Even the best caulk won’t last forever. Your house moves, the sun beats on it, and weather cycles wear it down. A proper job buys you a good run, but nothing stays perfect forever.
Plumbing · Leak
| Project category | Plumbing |
|---|---|
| Problem type | Leak |
| Trade required | Plumbing |
| Urgency | Emergency — act now |
| Safety risk | High safety risk |
| DIY suitability | DIY for experienced homeowners |
| Cost category | Low cost |
| Typical timeline | Shut water off now; repair usually same or next day |
| Contractor type | Licensed plumber |
Repair option
Isolate at the shutoff, replace the failed component, and dry the cavity fully.
Replacement option
Repipe the run or the branch when corrosion is widespread.
Common causes
- Failed supply line or shutoff valve
- Worn washers, cartridges, or P-trap connections
- Pinhole corrosion in older copper
Relevant tools:emergency checklistdiy or hire a pro
Published September 15, 2026Last updated September 15, 2026
Tools & materials you'll need
Affiliate linksAs an Amazon Associate FixlyGuide earns from qualifying purchases — at no extra cost to you. Prices and availability are accurate as of publication and subject to change.
Quick Answer
Think your exterior door frame’s sealed up tight, but you’re still spotting water stains, soft wood, or a damp patch on the floor after a storm? The problem isn’t always obvious. Most of the time, it’s a sneaky caulk failure—not a total lack of caulk, just a hairline crack, a tiny gap, or sealant that’s gone stiff and lost its stretch. Water’s got a funny way of finding the easiest route, and it’ll wick behind trim or creep through microscopic openings long before you see a big ol’ leak.
The Problem
I’ve seen this play out a hundred times. A homeowner calls me out, dead sure they’ve got a roof leak or a foundation issue, and it turns out to be the door frame. They’ll point at what looks like perfectly good caulk around the exterior door and scratch their head. “It’s sealed, I swear,” they’ll say. But here’s the rub: “looks sealed” and “is sealed” are two different animals. Exterior caulk isn’t just there to look neat; it’s your first defense against water sneaking in around a door frame. When that caulk gives up—even just a little—you’re inviting rot, mold, and structural damage. That stuff gets expensive fast if you let it ride. You might notice peeling paint, soft trim, or a mystery damp spot on the subfloor near the threshold. That’s your house waving a red flag.
How It Works
An exterior door frame isn’t just a chunk of wood stuck in a hole. It’s a system. You’ve got the jambs, the head jamb, the sill or threshold, and usually some trim on the outside, like brickmold or casing, wrapping the rough opening. All those pieces meet at seams, and those seams are prime real estate for water if they’re not sealed right.
And your house moves. It does. Wind, heat, cold, humidity—they all make building materials expand and contract. That movement beats up caulk joints over time. Add UV from the sun and everyday weather, and the caulk dries out, hardens, and starts pulling away from one side or cracking right down the middle. Even a gap as tiny as 1/64th of an inch can act like an open invitation for water. Gravity pulls rain down the wall, and capillary action can even draw it up into those little openings, wicking it behind the trim and into the framing. Once water gets back there, it sits. Then the rot starts. Mold follows. Before long, it’s making its way inside. Slow, ugly damage. The worst kind, because you don’t always catch it right away.
Step-by-Step Fix
Alright, let’s do it right. Don’t race through this; good prep is 90% of the job.
-
Clear the Area & Inspect for Damage — Assess the Battleground
First thing, get everything out of the way. Move pots, pull back landscaping, sweep away debris. Then really look at the old caulk. Press on the wood trim around the door. Is it soft? Punky? Discolored? Check for hairline cracks in the old caulk, or spots where it’s pulled away from the trim or siding. This tells you what’s going on and whether there’s damage hiding underneath. If you find serious rot, you may need to replace trim before you even think about caulking. -
Remove Old Caulk Completely — Strip Away the Weakness
This is where a lot of DIY work goes sideways. You can’t just smear new caulk over failed caulk. No dice. You’ve got to remove the whole mess. Use a utility knife, a 5-in-1 tool, or a proper caulk removal tool. Work slow and careful so you don’t gouge the wood or siding. For stubborn bits, a heat gun on low can soften it, but don’t get careless—scorched wood and melted vinyl siding are a bad day. Clean the joint until you’re down to bare, clean substrate. It takes time, sure, but it’s worth it.- Tool Tip: A stiff wire brush or a painter’s multi-tool helps get the leftovers out of corners.
- Safety First: Wear gloves and eye protection. Knives slip, and caulk removers can be nasty on skin.
-
Clean the Joint Thoroughly — Prepare for Adhesion
Once the old caulk’s out, you need a clean surface for the new stuff to grab. Use a stiff brush or a vacuum to get rid of dust and debris. Then wipe the joint with denatured alcohol or mineral spirits on a clean rag. Let it dry all the way. You want clean, dry, dust-free surfaces. Any grease, oil, or old residue will mess with the bond. I had a callback in North Atlanta where the caulk failed early because the homeowner had wiped the frame with a silicone-based cleaner—rookie move. That thing was doomed from the start. -
Apply Backer Rod (If Necessary) — Build a Foundation
For wider gaps—generally anything over 1/4 inch deep or wide—backer rod is your best friend. It fills the void, helps the caulk form that proper hourglass shape, and stops three-sided adhesion, which is a common reason caulk fails. Pick a closed-cell backer rod that’s a little larger than the gap so it fits snug. Push it in with a blunt tool and leave it recessed enough to give you at least 1/4 inch of caulk thickness over it. -
Choose the Right Caulk — Sealant Selection is Key
This isn’t one-size-fits-all. For exterior door frames, you need a flexible, high-performance sealant. Forget cheap acrylic latex for this job; it won’t hold up. I usually go with 100% silicone or a good polyurethane sealant. They’ve got solid adhesion, flexibility, and UV resistance. Look for “exterior use” and “windows and doors” on the label. Polyurethane is paintable, while silicone usually isn’t, so keep that in mind if you’re painting. I’ve seen too many guys grab the cheapest tube on the shelf, then act surprised when they’re back redoing it in two years.Feature 100% Silicone Sealant Polyurethane Sealant Flexibility Excellent (up to 50% movement) Very Good (up to 25% movement) Adhesion Excellent to non-porous surfaces Excellent to many surfaces UV Resistance Excellent Good to Excellent Paintable No (generally) Yes Cure Time Skin in 30 min, full cure 24 hrs Skin in 30 min, full cure 3-7 days Cost (per tube) $8 - $15 $10 - $20 -
Cut the Nozzle Correctly — Control Your Bead
This matters more than folks think. Cut the nozzle at a 45-degree angle and make the opening just a hair smaller than the gap you’re filling. A common mistake is going too big. Start small; you can always trim more off. You want enough caulk in the joint without making a mess. For most door frame joints, a 1/4-inch opening is a solid starting point. -
Load the Caulk Gun & Puncture the Seal — Get Ready to Apply
Drop the tube into your gun. If it’s a new tube, puncture the inner seal. Most caulk guns have a long thin rod for that. Run it all the way in. If yours doesn’t, use a long nail or stiff wire. Back off the pressure after each pass so you don’t end up with drips where you don’t want them. -
Apply a Continuous, Even Bead — The Moment of Truth
Hold the gun at a steady 45-degree angle to the joint. Squeeze with even pressure and move smoothly along the seam. Push the caulk into the joint—don’t just lay it on top. You want one continuous, uniform bead. Work in sections: one side jamb, then the head jamb, then the other side. Don’t try to run a whole 8-foot side in one shot if you’re not comfortable yet. That’s how you get sloppy. -
Tool the Caulk Bead — The Pro Finish
Tool the bead right after you apply each section. That presses the caulk into the joint, helps it stick properly, and gives you a clean finish. You can use a wet finger—glove on—or a caulk tooling tool, even an old spoon if that’s what you’ve got handy. Wipe the excess off your finger or tool often with a damp rag. Don’t fuss with it too much; a couple passes is plenty. This is where the bead disappears into the joint instead of just sitting there looking like an afterthought. -
Clean Up & Cure — The Final Touches
Wipe excess caulk off the trim or siding with a damp cloth before it skins over. Mineral spirits can help with polyurethane, and soapy water works with some silicones. Follow the manufacturer’s cure time. Most silicones skin over in about 30 minutes but take 24 hours to fully cure. Polyurethanes can take several days. Don’t poke at it or let it get hammered by heavy rain until it’s cured. Patience pays off here. Rush it, and you’ll undo your own work.
Common Causes
- Improper Surface Prep: If you don’t clean out the old caulk, dirt, and debris, the new caulk’s got nothing solid to grab. It’s like sticking tape to a muddy board—it just won’t hold.
- Wrong Caulk Type: Cheap acrylic latex belongs inside, not on an exterior door frame. It doesn’t flex enough and breaks down fast under UV and temperature swings.
- Three-Sided Adhesion: This happens when caulk sticks to both sides of the joint and the back. Then it can’t stretch like it should, so it tears or pulls loose. That’s why backer rod matters so much in deeper gaps.
- Poor Application Technique: If you rush it, lay down too thin a bead, or skip tooling, you end up with voids, air bubbles, and weak adhesion. Looks fine for a day. Fails later.
- Building Movement & Age: Even the best caulk won’t last forever. Your house moves, the sun beats on it, and weather cycles wear it down. A proper job buys you a good run, but nothing stays perfect forever.
Common Mistakes
- Caulking Over Existing Failed Caulk: This is the big one. It doesn’t fix anything; it just hides the problem for a little while. Pull all the old stuff out.
- Not Cleaning the Joint Properly: Dust, dirt, and grease break the bond. Take the time to clean with alcohol or mineral spirits.
- Using Interior-Grade Caulk Outdoors: Interior caulk isn’t built for UV, wild temperature swings, or constant moisture. It’ll crack and quit in a season or two.
- Cutting the Caulk Nozzle Too Large: That gives you a sloppy, wasteful bead that’s hard to tool. Start small. You can always open it up more.
- Not Tooling the Caulk Bead: Skip this step and the caulk won’t get pressed into the joint right. Poor adhesion, rough look.
- Ignoring Backer Rod for Deep Gaps: Skip the backer rod and you get three-sided adhesion, which kills flexibility and shortens the life of the joint.
Cost & Time Breakdown
| Task | DIY Cost ($) | Pro Cost ($) | Time (minutes) |
|---|---|---|---|
| Gather Tools & Prep Area | 0 | N/A | 15-30 |
| Old Caulk Removal (per door) | 0 | 50-100 | 30-60 |
| Surface Cleaning & Prep | 0-5 | N/A | 15-30 |
| Backer Rod Insertion | 5-10 | N/A | 10-20 |
| Caulk Application (per door) | 10-20 | 100-200 | 30-60 |
| Tooling & Cleanup | 0 | N/A | 15-30 |
| Total (per door) | $15-$35 | $150-$300 | 105-230 |
Tips & Prevention
- Annual Inspection: Walk the house once a year—spring or fall works best—and look over every exterior caulk joint. Cracks, shrinkage, pulling away... catch it early and you’ll save yourself a pile of headaches.
- Proper Maintenance: Keep gutters clean and make sure downspouts send water away from the door frames. Standing water or constant dripping will wear caulk out faster than you’d think.
- Consider a Higher-Grade Caulk: Higher-end silicones or polyurethanes cost more up front, sure, but they last a lot longer, often 10-20 years instead of 2-5 years for the cheap stuff. That’s money well spent.
- Avoid Over-Caulking: More isn’t better. A properly sized, well-tooled bead beats a giant sloppy mess every time. Too much caulk can trap moisture and look terrible.
- Paint Before Caulking: If you’re painting trim, paint the raw wood first, then caulk, then do your final topcoat over paintable caulk. That way the caulk bonds to the substrate, not just to paint that might peel later.
- Sun Protection: If a door frame gets blasted with direct sun, think about an awning or overhang. UV rays are rough on exterior sealants and wear down their elasticity over time. It can add years to the life of the job.
When to Call a Professional
Look, I get it. DIY saves money. But there are times when you’ve gotta bring in a pro. If your door frame has major wood rot—more than a small soft spot—or if the frame is shifting or out of square, you’re probably past a simple recaulk. That usually points to deeper structural trouble or long-term water intrusion, and it may mean replacing part of the frame or even the whole door unit. Same goes for older homes where lead paint might be in the mix, or if you’re not comfortable with the prep work or handling certain chemicals. A pro can take care of it safely and without the guesswork. And if the leak keeps showing up after you’ve followed all these steps carefully, the water may be coming from above—roof, siding, flashing—and traveling down to the door. That’s a job for a general contractor or a leak detection specialist. Don’t let pride turn a small repair into a bigger mess.
Related Articles
Keep troubleshooting with these hand-picked guides from FixlyGuide:
- The Caulk Joint Mystery: Why Your Shower Base Keeps Leaking (Even After Recaulking) — Discover why your shower base might still be leaking after recaulking, focusing on common missed spots and structural issues that caulk alo…
- The #1 Mistake Homeowners Make When Diagnosing Low Water Pressure — Discover the most overlooked cause of frustrating low water pressure impacting your entire home and how to fix it yourself, saving hundreds…
- The #1 Mistake Homeowners Make with Ice Dams (and How to Fix It SAFELY) — Learn the safest and most effective ways to remove ice dams from your roof and prevent costly damage to your home, avoiding common DIY pitf…
- The #1 Mistake Homeowners Make When Spotting Soffit & Fascia Damage — Ignoring early signs of soffit and fascia damage can lead to costly structural issues. Learn to identify and fix common problems correctly.
- That Blinking Light on Your Opener? It's Trying to Tell You Something — When your garage door opener's light flashes, it's a diagnostic code pointing to problems like misaligned safety sensors, faulty wiring, or…
- The Annoying Drip: Why Your Refrigerator's Leaking Water (and the 10-Minute Fix) — Don't let a leaky refrigerator ruin your floor! Discover the common culprits behind water leaks and how you can fix most of them in just 10…
Should you do this yourself?
Answer five quick questions before you start. Safety outranks savings every time.
Your experience with work like this
How high do you have to work?
Does the job involve any of these?
Will it need a permit?
Specialty tools
Free and instant. Educational guidance only — not a quote, inspection, or professional diagnosis.
Questions to ask before you sign
Ask every contractor the same questions and the cheapest bid stops looking cheapest. Check them off as you go — your progress is saved on this device.
Free, no signup. Bring this to every walkthrough so you compare bids on the same terms.
What should this project cost?
Enter your project details for a realistic cost range before you call anyone.
Cost depends heavily on which system turns out to be the source.
- Regional adjustment
- National average
- Labor share (typical)
- ~$1,620
- Quotes to collect
- 3 written estimates
Educational estimate based on national averages — not a binding quote. Always confirm with written local estimates.
Handle this before it gets worse
First steps that limit damage, then a way to reach a qualified pro.
- Emergency repair checklistThe first steps that limit damage before a pro arrives.Open
- Get local estimatesSend one request and compare written estimates from vetted pros.Open
- Estimate this projectGet a cost range for your scope and ZIP before you call anyone.Open
Free, no signup required. Estimates are educational guidance, not a quote or an inspection.
Get the print-ready PDF of this guide
A clean, ad-free, printable version you can keep on your phone or pin to the workshop wall. Free with a FixlyGuide account.
- Print-optimized layout
- Tools, materials & every step included
- Saved to your account
Recommended for DIYers & woodworkers
Sponsored
The Top 20 Tools for Workshops of Any Budget
No stationary machines or power tools required — plus 3 fundamental tools that can't be bought at any price.
Get the free guide
Ted's Woodworking — The #1 Woodworking Resource
Detailed instructions, dimensioned drawings, materials & cutting lists, and 3D schematics for every skill level.
See the plansSponsored: links above are affiliate links. FixlyGuide may earn a commission on qualifying purchases — at no extra cost to you.
Frequently asked questions
How do I know if my door frame caulk is failing?+
Look for hairline cracks, areas where the caulk has pulled away from the trim or siding, or a chalky texture. Signs of water intrusion like peeling paint, soft wood, or water stains near the door are also major red flags.
What's the best type of caulk for exterior door frames?+
For maximum durability and flexibility, use 100% silicone or a high-quality polyurethane sealant. Avoid cheaper acrylic latex caulks, as they don't hold up well to exterior conditions and UV exposure.
Can I caulk over old caulk?+
Absolutely not. This is a common mistake that leads to premature failure. Always remove all traces of old, failed caulk to ensure proper adhesion for the new sealant.
Why is proper joint cleaning so important for caulking?+
Any dust, dirt, grease, or old caulk residue will prevent the new caulk from bonding properly to the surface. A clean, dry, and dust-free surface is essential for a long-lasting seal.
What is a backer rod and when should I use it?+
A backer rod is a foam material inserted into deeper joints (over 1/4 inch) before caulking. It helps the caulk form an hourglass shape, improving flexibility and preventing three-sided adhesion, which is crucial for durability.
How long does exterior door caulk typically last?+
The lifespan varies depending on the caulk type and application quality. High-quality silicone or polyurethane sealants, properly applied, can last 10-20 years, while cheaper caulks might only last 2-5 years.
What happens if I don't tool the caulk bead?+
Tooling forces the caulk into the joint, ensuring good adhesion and creating a smooth, professional finish. Skipping this step can lead to air pockets, poor bonding, and an unsightly, less durable seal.
My door frame is leaking, but the caulk looks fine. What could be the issue?+
Even if the caulk 'looks' fine, there might be microscopic cracks, or it could have lost its elasticity, allowing water to wick behind the trim. Water could also be entering from above (e.g., roof, siding) and traveling down to the door frame. A thorough inspection is key.

Discussion
Loading comments…