Tools & materials you'll need
Affiliate linksAs an Amazon Associate FixlyGuide earns from qualifying purchases — at no extra cost to you. Prices and availability are accurate as of publication and subject to change.
Quick Answer
Many homeowners attempt to recaulk their bathtub without fully removing the old caulk and meticulously cleaning the surface. This critical oversight prevents new caulk from adhering properly, leading to frustratingly quick failure, peeling, and the return of unsightly mold. The secret to a durable, professional-looking recaulk job lies in thorough preparation: stripping away every trace of existing caulk, deep cleaning with a mold killer, and ensuring the surface is bone-dry before applying a high-quality, 100% silicone sealant.
The Problem
That dingy, cracked, or moldy caulk line around your bathtub isn't just an eyesore; it's a critical breach in your bathroom's defense against water damage. Water seeping through failing caulk can lead to wood rot in subflooring, damaged drywall, and a thriving environment for black mold behind your tiles or tub surround. Many homeowners try to patch over old caulk or simply peel off the worst bits, only to find the new caulk quickly fails, peels, or gets re-infected with mold. The problem isn't usually the caulk itself, but the surface it's applied to – a surface still contaminated with old caulk residue, soap scum, grease, or mold spores. Without a truly clean, dry, and prepared substrate, even the best caulk won't form a lasting, watertight bond.
How It Works
Caulk, or sealant, functions by creating a flexible, watertight barrier between two different surfaces – in this case, your bathtub and the surrounding wall tiles or paneling. This barrier accommodates the slight movements and expansions/contractions that naturally occur due to temperature changes and structural shifts in your home.
Most modern bathtub caulks are silicone or acrylic latex with silicone additives. 100% silicone caulk offers superior elasticity, adhesion, and resistance to water and mold, making it the preferred choice for wet areas like bathtubs. Acrylic latex caulk is easier to work with and paintable but generally less durable and water-resistant for high-moisture environments. The caulk adheres to the microscopic pores and irregularities of the prepared surfaces, creating a strong mechanical bond. When applied correctly, a concave bead of caulk (concave because tooling pushes the caulk into the seam, maximizing contact with both surfaces) flexes with movement while preventing water ingress.
Failure to properly prepare the surface means the new caulk adheres to old caulk, soap scum, or mold instead of the clean, porous surfaces of the tub and tile. Old caulk, especially silicone, is difficult to bond to. Residues act as release agents, preventing proper adhesion. Furthermore, existing mold spores, if not eradicated, will simply grow through or under the new caulk, causing discoloration and failure in short order. A consistently strong, flexible, and mold-resistant seal relies entirely on the quality of its foundation: a perfectly clean, dry, and sound surface ready to receive the fresh sealant.
Step-by-Step Fix
1. Gear Up Safely — Protect yourself and your workspace before you begin.
- Safety First: Good ventilation is crucial when working with chemical removers and powerful cleaning agents. Open a window, turn on the bathroom fan, and consider wearing a respirator mask, especially if you're sensitive to strong fumes. Always wear chemical-resistant gloves and safety glasses to protect your skin and eyes from caulk removers and bleach. Lay down a drop cloth or old towels to protect your bathroom floor from debris and spills.
2. Slice and Dice Old Caulk — Physically remove the bulk of the existing caulk bead.
- Carefully use a utility knife or a specialized caulk removal tool to cut along both edges of the existing caulk bead. Hold the knife at a shallow angle, just enough to break the seal between the caulk and the tub/tile. Avoid scratching the tub or tiles. For stubborn areas, a stiff plastic putty knife can help lift sections without damaging surfaces. Work slowly and methodically, pulling up strips of caulk as you go. Focus on separating the caulk from the surfaces, not just scraping the surface.
- Pro Tip: If your caulk is very old and hard, try warming it slightly with a hairdryer on a low setting. This can soften it just enough to make removal easier.
3. Chemical Attack on Residue — Dissolve remaining caulk stubbornly clinging to the surface.
- After removing the bulk, you'll inevitably have invisible film or small bits of caulk remaining. Apply a quality caulk remover (e.g., silicone remover for silicone caulk) following the manufacturer's instructions, paying close attention to recommended dwell times. These products chemically soften residual caulk, making it easier to scrape away. Let it sit for the recommended time, typically 15-30 minutes, keeping the area well-ventilated.
- If this doesn't work: For very stubborn silicone residue, mineral spirits or denatured alcohol can sometimes help dissolve the final thin film, but test in an inconspicuous area first to ensure it doesn't damage your tub or tile finish.
4. Scrape, Scrub, and Repeat — Leave no trace of old caulk, cleaner, or film.
- With a plastic scraper or a dedicated caulk removal tool, meticulously scrape away the softened residue. Use a stiff nylon brush or even an old toothbrush to get into corners and grout lines. Wipe the area thoroughly with clean rags or paper towels, frequently changing them to avoid spreading residue. It might take several passes of applying remover, scraping, and wiping to achieve a truly clean surface. The goal is to see the bare tub and tile surfaces, free of any shiny or sticky substances.
5. Sanitize and Degrease — Eliminate mold spores, soap scum, and grease for perfect adhesion.
- Mix a solution of 1 part bleach to 10 parts water, or use a commercial mold and mildew killer. Apply it generously to the entire seam where the caulk will go, scrubbing with a stiff brush to penetrate any existing mold or mildew. Allow it to sit for 10-15 minutes to kill spores, then rinse thoroughly with clean water. Next, clean the surface with a degreasing agent like rubbing alcohol or white vinegar to remove any lingering soap scum, body oils, or cleaning product residues. Wipe completely dry with clean, lint-free cloths until the surface squeaks. Do not skip this step – any residual grease or moisture will compromise adhesion.
6. Bone Dry is Key — Ensure absolutely no moisture remains.
- This is one of the most critical steps. Even a tiny amount of moisture can prevent caulk from bonding properly. Air dry the area for at least 2-4 hours, or ideally, overnight. Use a fan or a hairdryer on a cool setting to speed up the process. Before applying caulk, wipe the area with a dry cloth – if you see any moisture, keep drying. Some pros even recommend stuffing a few paper towels into the space and leaving them for an hour or two to wick out any hidden moisture from grout or porous tile edges.
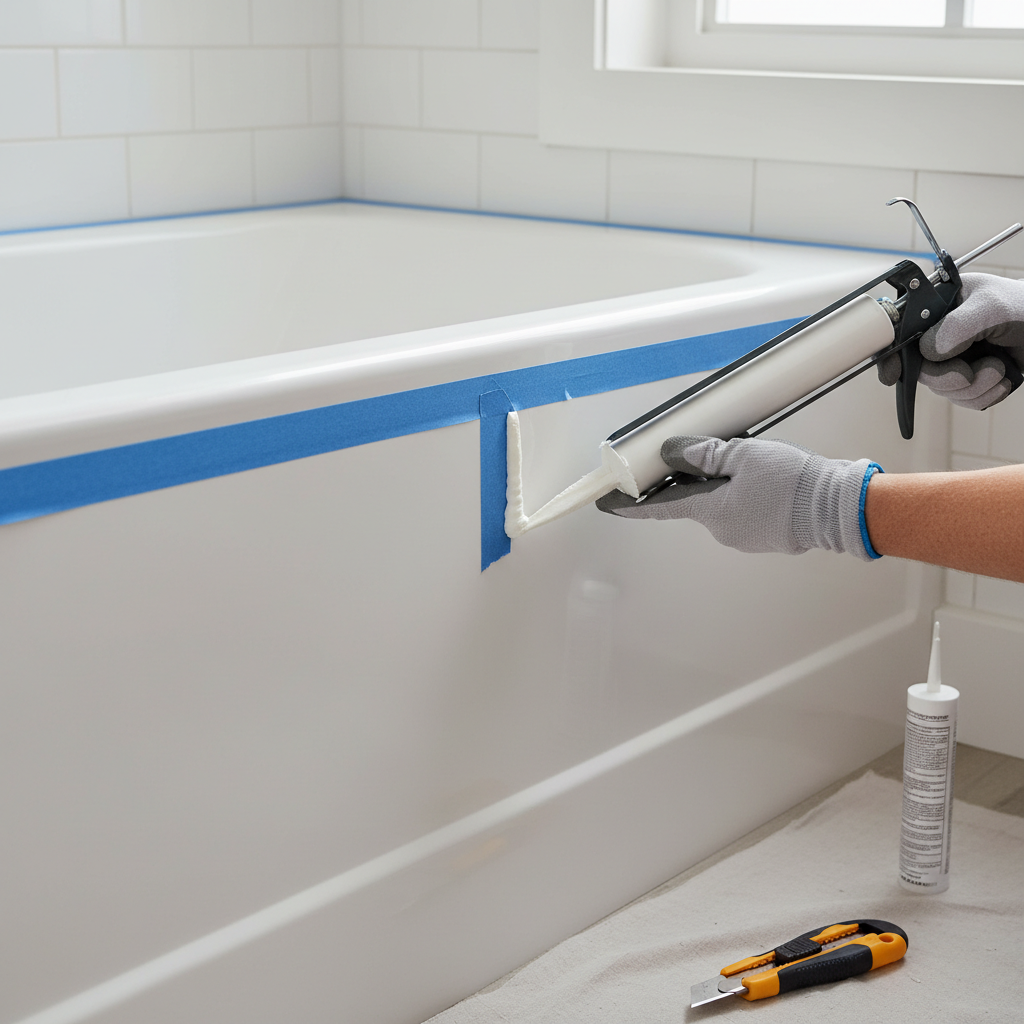
7. Tape for a Pro Finish — Create perfectly straight edges with painter's tape.
- Apply painter's tape (preferably a low-adhesion, blue painter's tape) to both the tub and the tile, creating parallel lines that define the width of your desired caulk bead. Leave a consistent gap, typically 1/4 to 3/8 inch wide, centered over the seam. Press the edges of the tape down firmly to create a crisp line. This tape creates a guide for applying the caulk and makes cleanup much easier, ensuring a perfectly straight, professional-looking bead.
8. Load and Cut Smart — Prepare your caulk gun and tube for optimal flow.
- Cut the tip of your caulk tube at a 45-degree angle, making an opening slightly smaller than the bead you intend to apply (around 1/4 to 3/8 inch). A smaller opening allows for more control. Puncture the inner seal with the long needle on your caulk gun. Load the tube into the caulk gun and push the plunger forward until caulk just begins to emerge. Practice on a piece of cardboard or scrap material to get a feel for the pressure needed for a steady, consistent flow.
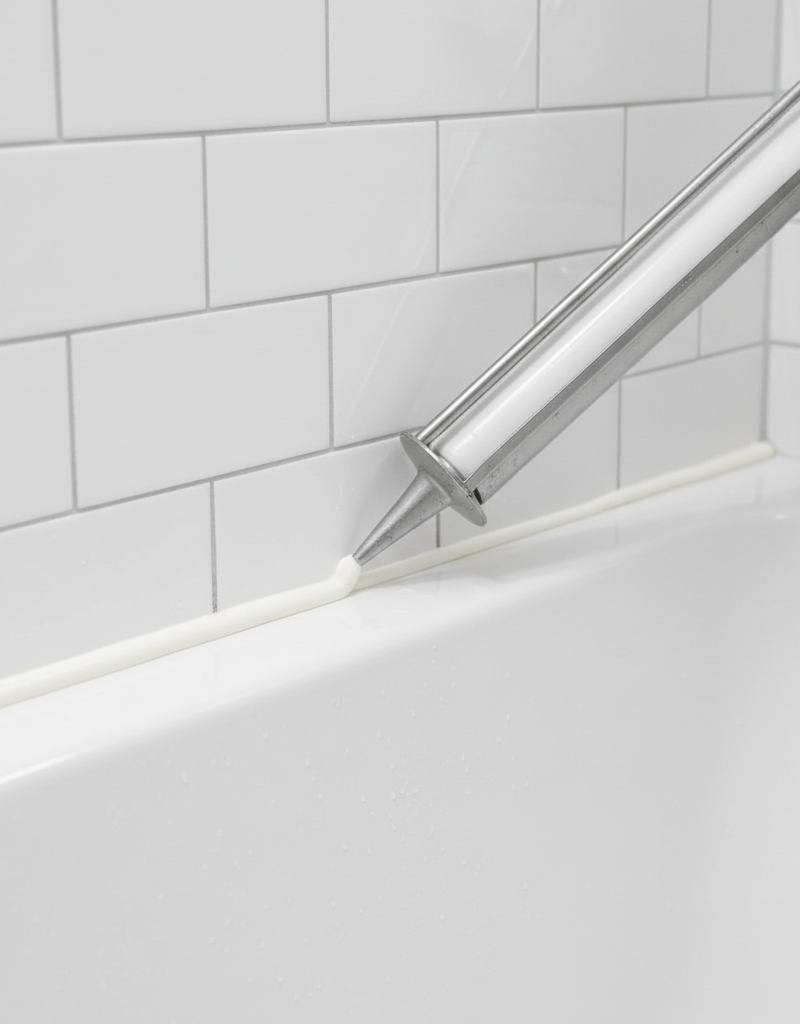
9. Lay the Perfect Bead — Apply caulk in a single, continuous, even motion.
- Starting in a corner, apply a continuous, even bead of caulk into the taped gap. Maintain steady pressure on the caulk gun trigger and move at a consistent speed. Aim for a full, slightly proud bead that fills the gap completely. Try to complete each side of the tub in one pass if possible. Consistency is key here; avoid stopping and starting excessively, which can lead to bumps and unevenness.
10. Tool for Smooth Perfection — Shape and smooth the caulk for a watertight seal.
- Immediately after applying the bead (before it skins over, usually within 5-10 minutes), wet your finger or a caulk tooling tool (a specialized plastic tool designed for shaping caulk) with water. Gently drag it along the caulk bead, applying light but consistent pressure. This action pushes the caulk into the seam, creates a smooth, concave finish, and forces out air bubbles. Wipe excess caulk from your finger/tool frequently with a damp cloth. Work quickly.
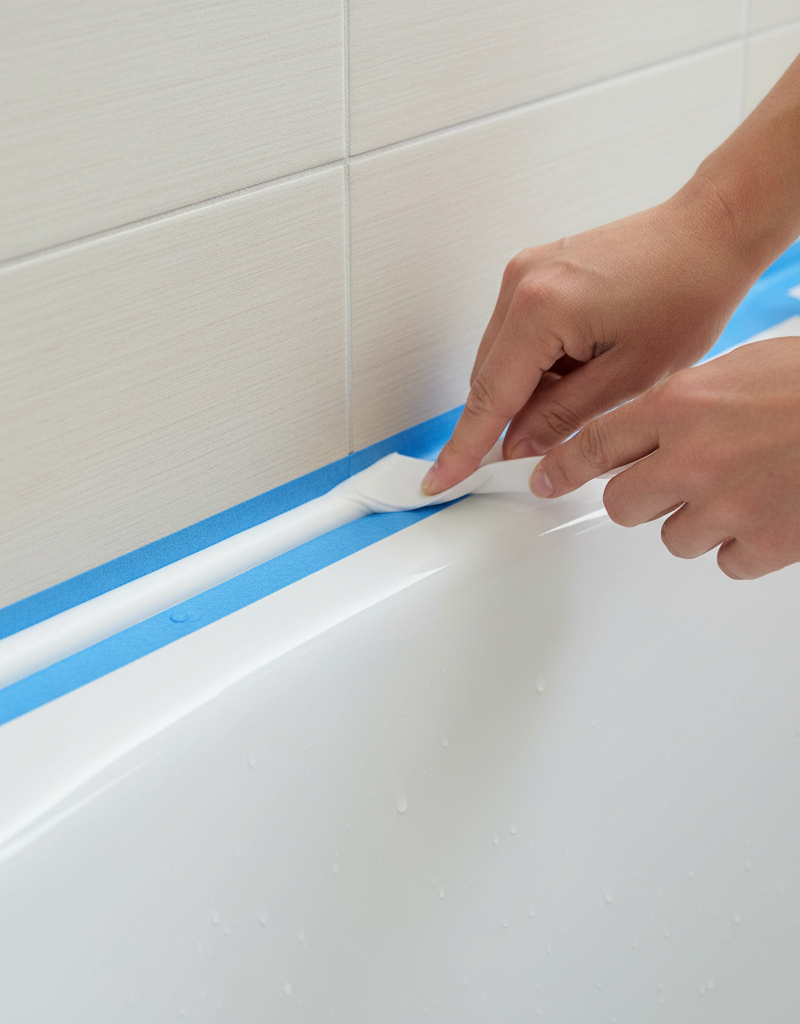
11. Peel and Cure — Remove tape and allow caulk to fully harden.
- As soon as you finish tooling the caulk, and before it starts to skin over, carefully and slowly pull up the painter's tape. Pull it away at a 45-degree angle. This will leave a perfectly crisp caulk line. If you wait too long, the caulk will start to cure to the tape, and you risk pulling up the fresh caulk. Allow the caulk to cure fully according to the manufacturer's instructions – typically 24-72 hours – before exposing it to water. This is non-negotiable for a long-lasting seal.
Common Causes
- Incomplete Old Caulk Removal: The number one reason new caulk fails. Any residual old caulk, especially silicone, prevents new caulk from adhering properly to the tub and tile.
- Wet Surface: Applying caulk to a damp or wet surface inhibits adhesion and can trap moisture, leading to mold growth and poor bonding.
- Dirty/Greasy Surface: Soap scum, body oils, cleaning product residues, or mold spores act as barriers, preventing the caulk from bonding directly to the tub and tile.
- Using the Wrong Caulk: Acrylic latex caulk, while easy to work with, is not as durable or water-resistant as 100% silicone for wet bathroom environments, leading to faster failure.
- Improper Application/Tooling: Applying too thin a bead, too thick a bead, or not properly tooling it to create a concave surface can result in a weaker seal prone to cracking.
- Movement/Flex: Excessive movement between the tub and wall (e.g., a poorly supported tub) can stress and crack even well-applied caulk over time.
Common Mistakes
-
Mistake #1: Skipping the Chemical Caulk Remover. Many homeowners try to remove old caulk with just a knife. While this gets the bulk, it leaves microscopic residue that actively prevents new caulk from bonding. Instead: Always follow physical removal with a chemical caulk remover designed for the type of caulk you're tackling (silicone remover for silicone, generally). This dissolves the stubborn film for a truly clean slate.
-
Mistake #2: Not Letting the Area Dry Thoroughly. Caulk needs a bone-dry surface. Even an hour or two isn't enough for porous grout or tile edges. Instead: After cleaning, allow the area to air dry for at least 4 hours, and ideally, overnight. Use a fan or hairdryer to ensure every spec of moisture is gone.
-
Mistake #3: Applying New Caulk Over Moldy Spots. Covering mold doesn't kill it; it just gives it a new surface to grow through. Instead: After removing old caulk, scrub the seam with a bleach solution (1:10 bleach to water) or a commercial mold killer. Let it sit for 10-15 minutes, then rinse thoroughly and dry completely. Eliminate the mold before sealing it in.
-
Mistake #4: Using a General-Purpose Caulk (e.g., Paintable Latex). While cheaper, these caulks often lack the flexibility and mold resistance needed for a high-moisture, high-movement area like a bathtub. Instead: Invest in a high-quality, 100% silicone caulk explicitly labeled
Related Articles
Keep troubleshooting with these hand-picked guides from FixlyGuide:
- The #1 Caulk Mistake That Leads to Mold (And How to Fix It Right) — Discover the most common caulk mistake that causes frustrating mold growth around your bathtub and learn the simple, effective way to recau…
- The Tiny Gap That Destroys Your Bathtub's Structure (and How to Seal It) — Recaulking your bathtub correctly is crucial to prevent water damage, mold growth, and structural issues in your bathroom.
- The #1 Mistake When Fixing Baseboards That Pull Away From Walls — Discover the crucial mistake homeowners make when reattaching baseboards and how to properly secure them for a lasting fix.
- The #1 Mistake First-Timers Make Installing a Backsplash (and How to Fix It) — Avoid the most common first-timer backsplash mistake: uneven tiles. Learn precise techniques for a professional-looking finish.
- The $30 Trick to Melting Ice Dams (Before They Destroy Your Roof) — Discover how to safely remove ice dams from your roof instantly with common household items, preventing costly damage. Stay safe while tack…
- The #1 Mistake Homeowners Make When Sealing a Deck (and How to Fix It) — Prevent costly damage and extend your deck's life by avoiding common sealing errors and following a simple, effective resealing process.
Recommended for DIYers & woodworkers
Sponsored
The Top 20 Tools for Workshops of Any Budget
No stationary machines or power tools required — plus 3 fundamental tools that can't be bought at any price.
Get the free guide
Ted's Woodworking — The #1 Woodworking Resource
Detailed instructions, dimensioned drawings, materials & cutting lists, and 3D schematics for every skill level.
See the plansSponsored: links above are affiliate links. FixlyGuide may earn a commission on qualifying purchases — at no extra cost to you.
Frequently asked questions
How often should you recaulk a tub?+
The lifespan of bathtub caulk varies widely depending on the type of caulk, application quality, and bathroom usage, but generally, it should be inspected annually and replaced every 3-5 years, or sooner if you notice cracking, peeling, or mold growth.
What's the best caulk for a bathtub?+
For bathtubs and high-moisture areas, 100% silicone caulk is highly recommended. It offers superior adhesion, flexibility, and mold resistance compared to acrylic latex or other types. Look for products specifically labeled for bathrooms and kitchens, often containing mildewcide.
Can I caulk over old caulk?+
No, you should never caulk over old caulk. This is the surest way to guarantee premature failure. New caulk will not properly adhere to old caulk, leading to peeling, cracking, and trapped moisture or mold. Always remove all existing caulk before applying a new bead.
How long does caulk need to dry before taking a shower?+
Most 100% silicone caulks require at least 24 hours to cure enough for water exposure, and often up to 72 hours for full strength. Always check the manufacturer's specific instructions on the tube, as premature exposure to water will significantly weaken the caulk's bond and durability.

Discussion
Loading comments…