
Tools & materials you'll need
Affiliate linksAs an Amazon Associate FixlyGuide earns from qualifying purchases — at no extra cost to you. Prices and availability are accurate as of publication and subject to change.
Quick Answer
Removing and replacing old bathtub caulk is a skill any homeowner can master, but it requires patience and proper technique. The most common pitfall is insufficient preparation – leaving behind old caulk, soap scum, or moisture. This compromises the new caulk's adhesion, leading to premature failure, mold growth, and leaks. Always prioritize a perfectly clean, dry surface before you even open the new caulk tube.
The Problem
That unsightly black mold creeping along your bathtub caulk isn't just a cosmetic issue; it's a symptom of a failing seal. Old, cracked, or mildewed caulk around your bathtub allows water to penetrate behind tiles, into walls, and beneath the tub itself. This can lead to serious hidden damage like wood rot, crumbling drywall, and persistent mold growth, not to mention a perpetually damp, musty bathroom. Many homeowners attempt a quick fix by simply applying a new bead of caulk over the old, or fail to adequately clean the surface, setting themselves up for a repeat performance of the same problem within months.
How It Works
Caulk serves as a flexible, watertight joint filler, accommodating the minor expansions and contractions that naturally occur within a home. Bathtub caulk, specifically, creates a hygienic seal between the non-moving tub and the surrounding wall or tile. Modern silicone caulks achieve this by forming a strong adhesive bond to both surfaces. When water impacts the sealed area, the caulk's hydrophobic (water-repelling) properties and its elastic nature prevent moisture from seeping into the vulnerable gaps behind the tub enclosure.
Over time, several factors degrade this seal. Continuous exposure to water, soap, and cleaning products slowly erodes the caulk's surface. The natural flexing of the house, coupled with temperature fluctuations, causes the caulk to stretch and compress, eventually leading to cracks and tears. Mildew spores, omnipresent in humid bathroom environments, find purchase in microscopic imperfections and begin to proliferate, leaving those characteristic black streaks. Once the seal is broken, water infiltrates, encouraging more mold and further weakening the caulk's adhesion, creating a vicious cycle. The goal of recaulking isn't just to make it look nice; it's to re-establish a robust, waterproof barrier that protects your home's structure and your family's health.
Step-by-Step Fix
Safety First! Always wear gloves and eye protection when working with caulk removers and cleaning solutions. Ensure good ventilation in your bathroom by opening windows and running the exhaust fan.
-
Clear the Area — Remove all items from around the tub – toiletries, shower caddies, bath mats. This ensures you have ample workspace.
-
Scrape Away Old Caulk — Using a caulk removal tool or a utility knife, carefully cut and scrape away all traces of the old caulk bead. Aim to get down to the bare surface of the tub and tile/wall. For stubborn areas, a thin-bladed putty knife or even a flat-head screwdriver can help pry up tough sections. Work slowly to avoid scratching the tub or tile.
- If your caulk is very old or hard, apply a specialized caulk softener/remover according to product directions. Allow it to sit for the recommended time (often 15-30 minutes) before scraping.
-
Clean Residue Thoroughly — This is the most critical step often overlooked. After scraping, wipe down the entire area with a stiff brush or abrasive pad to remove any remaining caulk fragments, soap scum, and mildew. Then, spray with a bathroom cleaner containing bleach or a dedicated mold and mildew remover. Let it sit for 5-10 minutes, then scrub thoroughly. Rinse the area completely with water.
-
Degrease and Prep — Even after cleaning, invisible residues can hinder adhesion. Apply rubbing alcohol (isopropyl alcohol) or mineral spirits to a clean rag and wipe down all surfaces that will be caulked. This removes any oily films or cleaner residues, ensuring a pristine surface for the new caulk to bond to. Repeat until your rag comes away clean.
-
Achieve Bone-Dry Surfaces — Any moisture trapped beneath new caulk will lead to mold and poor adhesion. Use a hairdryer on a low-heat setting to completely dry the joint. Aim warm air into the gap for 5-10 minutes, and then allow the area to air dry for at least 4-6 hours, or ideally overnight. Ventilation is key here; a fan can speed up the process.
-
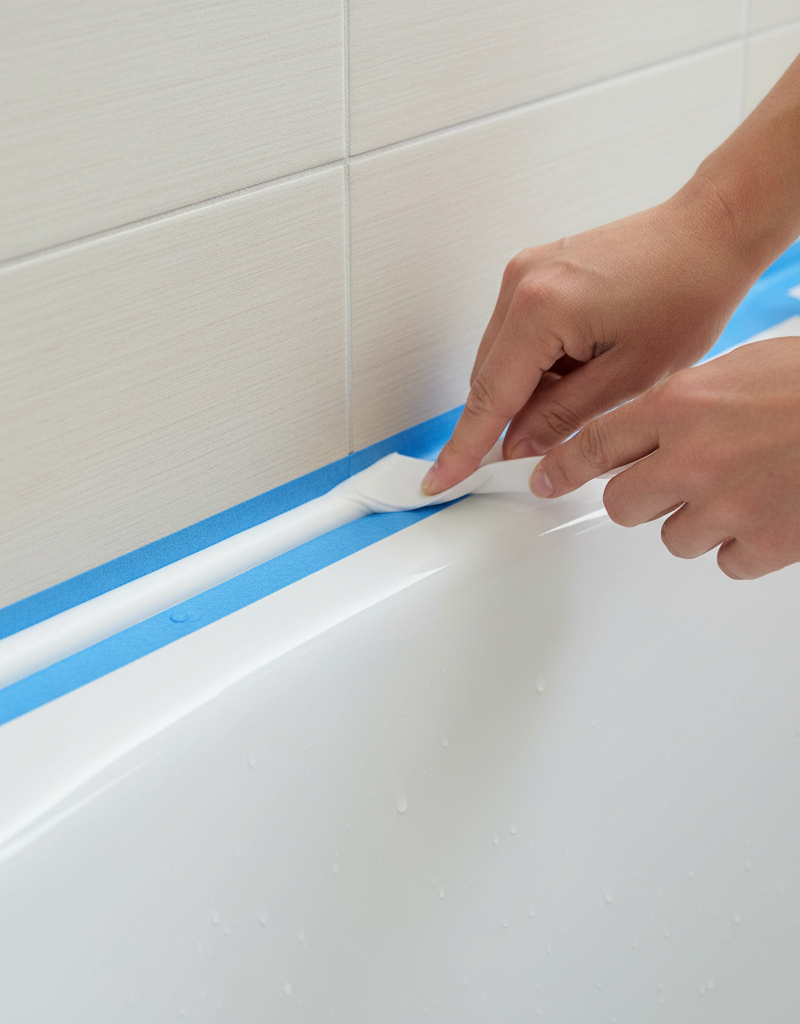
Apply Painter's Tape (Optional, but Recommended) — For a razor-sharp caulk line, apply painter's tape along both sides of the joint, leaving a consistent gap the width of your desired caulk bead (typically 1/8 to 1/4 inch). Press the tape down firmly to prevent caulk from bleeding underneath.
-
Prepare the Caulk Gun and Tube — Cut the tip of your silicone caulk tube at a 45-degree angle, just wide enough to create a bead that fills the joint. Puncture the inner seal with a long nail or the wire attached to your caulk gun. Load the tube into the caulk gun.
-
Apply a Smooth Bead — Hold the caulk gun at a consistent 45-degree angle to the joint. Apply steady, even pressure to the trigger while moving the gun smoothly along the gap. Aim for a continuous bead, avoiding stopping and starting if possible. Practice on a piece of scrap cardboard if you're new to using a caulk gun.
-
Tool the Caulk — Immediately after applying the caulk, use a caulk tooling tool, a gloved finger, or an old spoon to smooth the bead. This presses the caulk into the joint for maximum adhesion and creates a professional finish. Remove any excess caulk as you go. Work quickly, as silicone caulk begins to skin over within minutes.
-
Remove Painter's Tape — If you used painter's tape, gently peel it away immediately after tooling the caulk, before the caulk begins to set. Pull the tape away slowly and at a slight angle to avoid disturbing the smoothed bead.
-
Allow for Cure Time — This is crucial. Most silicone caulks require 12-24 hours before exposure to water, and a full 48-72 hours to completely cure. Check your specific caulk tube for exact cure times. Avoid using the shower or tub during this period.
Common Causes
- Poor Initial Preparation: The absolute leading cause of caulk failure. If the surface isn't meticulously clean and dry before initial application, the caulk won't adhere properly, leading to early peeling, cracking, and mold growth.
- Incorrect Caulk Type: Using acrylic latex caulk (which is paintable) in wet areas like a tub surround is a common error. Acrylic caulk isn't designed for constant moisture exposure and often breaks down and mildews much faster than silicone.
- Insufficient Cure Time: Not allowing the caulk to fully cure before exposing it to water significantly weakens its bond and longevity.
- Joint Movement: Homes settle and materials expand/contract with temperature changes. If the underlying structure is unstable or if there's excessive movement between the tub and wall, the caulk bead can stress and crack.
- Improper Application: Applying too thin or too thick a bead, or an uneven application, can compromise the seal. A good bead fills the joint adequately without being overly bulky.
- Aggressive Cleaning: Using harsh abrasive cleaners or brushes on caulk can degrade its surface over time, leading to premature breakdown and mold.
- Ventilation Issues: A consistently humid bathroom without proper ventilation (exhaust fan, open window) creates an ideal breeding ground for mildew to attack even well-applied caulk.
Common Mistakes
- Applying New Caulk Over Old: This is the cardinal sin of recaulking. The new caulk won't adhere to the old, creating air pockets and channels for water and mold. Always remove every last bit of old caulk.
- Not Cleaning or Drying Properly: Residual soap scum, mildew, or moisture beneath new caulk guarantees failure. The surface must be surgically clean and bone dry for optimal adhesion.
- Using the Wrong Caulk: Opting for cheap acrylic caulk instead of 100% silicone in a high-moisture area dramatically reduces lifespan and mold resistance. Check the label for
Related Articles
Keep troubleshooting with these hand-picked guides from FixlyGuide:
- The #1 Bathtub Recaulking Mistake (And How to Flawlessly Seal Yours) — Discover the biggest mistake homeowners make when recaulking bathtubs and learn the proper steps to achieve a long-lasting, watertight seal.
- The #1 Mistake Homeowners Make Recaulking a Tub (And How to Fix It for Good) — Discover the most common recaulking error and a step-by-step guide to resealing your bathtub like a pro, ensuring a watertight, mold-free f…
- The #1 Caulk Mistake That Leads to Mold (And How to Fix It Right) — Discover the most common caulk mistake that causes frustrating mold growth around your bathtub and learn the simple, effective way to recau…
- The #1 Mistake Homeowners Make When Spotting Soffit Damage — Ignoring early signs of soffit and fascia damage can lead to costly structural issues. Learn to identify and fix common problems the right…
- The 7 Critical Home Inspection Mistakes Most Homeowners Make (and How to Spot Them) — Discover the crucial home inspection mistakes homeowners commonly overlook and learn how to identify potential problems before they become…
- The #1 Mistake Homeowners Make Installing Floating Shelves (and How to Fix It) — Discover the crucial error most homeowners make when mounting floating shelves into drywall, leading to sagging or collapse, and learn the…
Get the print-ready PDF of this guide
A clean, ad-free, printable version you can keep on your phone or pin to the workshop wall. Free with a FixlyGuide account.
- Print-optimized layout
- Tools, materials & every step included
- Saved to your account
Recommended for DIYers & woodworkers
Sponsored
The Top 20 Tools for Workshops of Any Budget
No stationary machines or power tools required — plus 3 fundamental tools that can't be bought at any price.
Get the free guide
Ted's Woodworking — The #1 Woodworking Resource
Detailed instructions, dimensioned drawings, materials & cutting lists, and 3D schematics for every skill level.
See the plansSponsored: links above are affiliate links. FixlyGuide may earn a commission on qualifying purchases — at no extra cost to you.
Frequently asked questions
How long does bathtub caulk last?+
High-quality 100% silicone caulk, properly applied, can last 5-10 years or even longer. Acrylic latex caulk typically lasts 1-3 years in wet environments before needing replacement.
What's the best caulk to use for a bathtub?+
For bathtubs and showers, 100% silicone caulk is highly recommended. It offers superior water resistance, adhesion, and flexibility compared to acrylic latex caulks, and is more resistant to mold and mildew.
Can I caulk over existing caulk?+
No, this is a common mistake and will lead to almost immediate failure. New caulk will not properly adhere to old caulk, creating air pockets and pathways for water and mold. Always remove all old caulk before applying new.


Discussion
Loading comments…