- Loose Closet Bolts: This is the big one. Over time, the nuts can back off and let the toilet rock a bit. That small movement eventually breaks the wax seal.
- Improper Installation: If the toilet didn’t get pressed down evenly during the original install, the wax ring may never have sealed right in the first place.
- Damaged or Low Flange: A cracked flange can’t hold the closet bolts like it should. If the flange sits too far below floor level—real common after tiling—a standard wax ring can’t bridge that gap.
- Major Drain Clog: A bad clog farther down the line can make water back up when you flush. Then it’ll take the easiest path out, and that might be right past the wax seal.
Plumbing · Leak
| Project category | Plumbing |
|---|---|
| Problem type | Leak |
| Trade required | Plumbing |
| Urgency | Emergency — act now |
| Safety risk | High safety risk |
| DIY suitability | DIY for experienced homeowners |
| Cost category | Low cost |
| Typical timeline | Shut water off now; repair usually same or next day |
| Contractor type | Licensed plumber |
Repair option
Isolate at the shutoff, replace the failed component, and dry the cavity fully.
Replacement option
Repipe the run or the branch when corrosion is widespread.
Common causes
- Failed supply line or shutoff valve
- Worn washers, cartridges, or P-trap connections
- Pinhole corrosion in older copper
Relevant tools:emergency checklistdiy or hire a pro
Published October 7, 2026Last updated October 7, 2026
Tools & materials you'll need
Affiliate linksAs an Amazon Associate FixlyGuide earns from qualifying purchases — at no extra cost to you. Prices and availability are accurate as of publication and subject to change.
The Problem
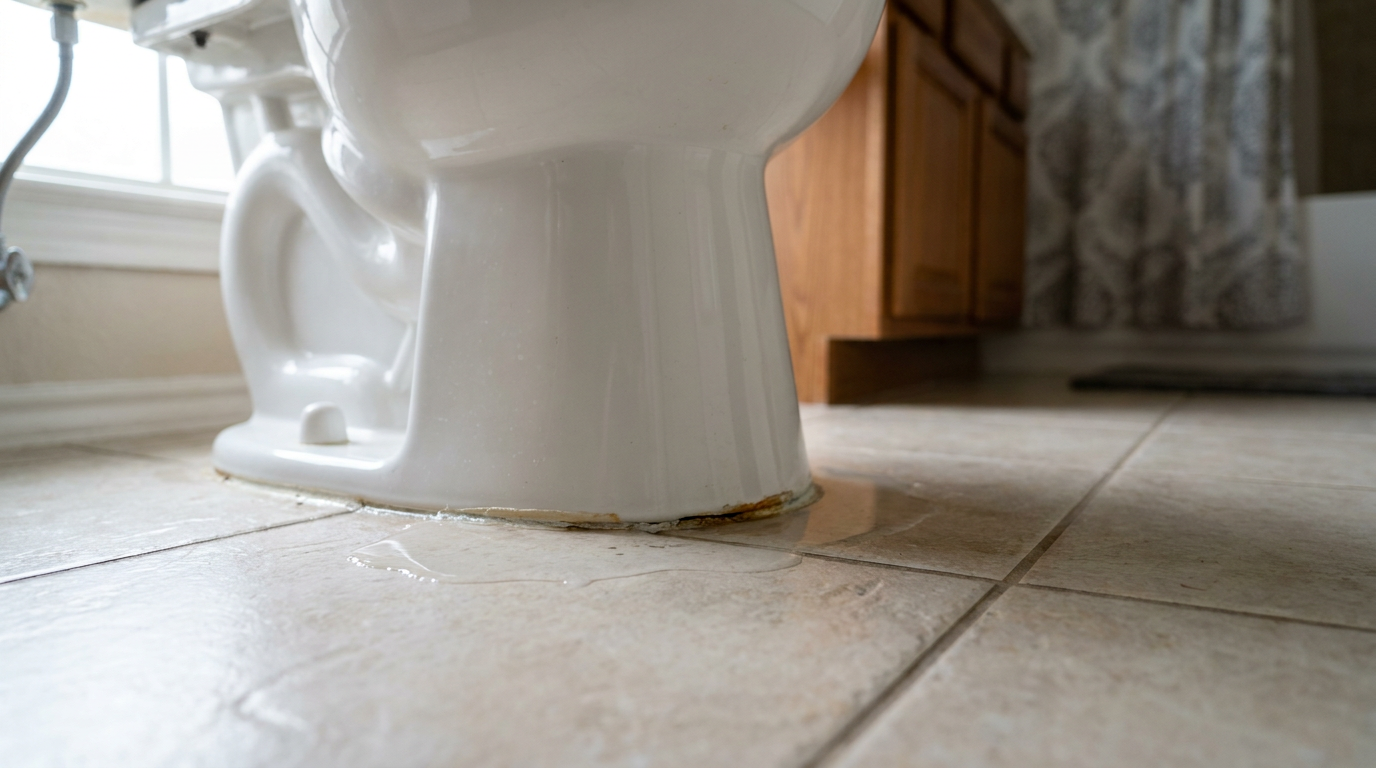
You spot a puddle around the bottom of your toilet. Could be a little puddle. Could be half a lake. Sometimes the water looks clean, other times... not so clean. Either way, that’s not something you just wipe up and forget. That water can work its way into the subfloor, and once that starts, you’re looking at rot, mold, and some ugly repair bills. Ignore it? No dice.
The good news is it’s probably not a cracked toilet bowl, even though that’s the scary thought everybody jumps to. More often than not, it’s a cheap part that’s given up the ghost: the wax ring that seals the toilet to the drainpipe in the floor. Swapping that ring is one of those classic DIY fixes that can save you a couple hundred bucks in plumber fees.
How It Works
A toilet looks simple enough, but the connection to the floor is doing all the real work. It sits on a part called a toilet flange (or closet flange), which is a round pipe fitting bolted to the subfloor. Your home’s main drainpipe comes up through the middle of that flange.
To make a watertight and airtight seal between the bottom of the toilet and the flange, you use a soft, sticky ring made of petroleum wax. That’s the wax ring. When you set the toilet down, its weight compresses the wax and forces it into every gap, making a custom seal. Two long closet bolts stick up from the flange, pass through the base of the toilet, and get tightened with nuts so the whole thing stays put.
Simple system. Works great. Until it doesn’t. If the closet bolts loosen up, the toilet can rock. And yeah, even a tiny bit of movement—less than 1/8 of an inch—can break that wax seal. Once that happens, water from each flush can leak out under the base. Same story if the flange is cracked or sitting too low below the finished floor. Then the wax ring won’t compress the way it should, and you’re headed for a leak sooner or later.
Step-by-Step Fix
This isn’t rocket science, but it does involve some lifting and getting real friendly with your toilet. Give yourself a solid 2-3 hours and lay down a couple old towels you don’t mind trashing.
1. Confirm the Source — First thing, make sure the leak’s actually coming from the base. Dry the whole toilet—tank, bowl, supply line, shutoff valve—with paper towels. Flush it and watch close. Check for drips at the tank bolts (those two bolts holding the tank to the bowl) and the water supply line connection. If the only water you see shows up at the base after a flush, the wax ring’s your likely culprit.
2. Shut Off the Water and Drain — Turn the oval handle on the water supply valve behind the toilet clockwise until it stops. Then flush the toilet and hold the handle down to get as much water out of the tank and bowl as you can. Use a sponge or a wet-dry vac to pull out the last bit. It doesn’t have to be bone dry, but less water means less mess. Simple math.
3. Disconnect the Supply Line — Put a small bucket or towel under the connection. Unscrew the water supply line coupling nut from the bottom of the toilet tank. A little water’ll spill out. That’s normal.
4. Remove the Closet Bolt Nuts — Pop the plastic caps off the bolts at the base of the toilet. If they’re stuck, a small flathead screwdriver usually does the trick. Use an adjustable wrench to loosen and remove the nuts from the closet bolts. If the bolts are old, rusty, and just spin, grab the top of the bolt with locking pliers while you turn the nut. Happens all the time.
5. Lift the Toilet — This is the part where you earn your money. Get a solid grip on the sides of the bowl. Bend at the knees, brace yourself, and lift straight up. A toilet usually weighs between 60 and 100 pounds. As soon as you lift, the old wax seal lets go. Set the toilet down on its side on the towels or cardboard you’ve already staged nearby. Don’t lay it flat on its back or front—that can mess up the internal parts. I pulled a water heater in Frisco last month that had the same “almost dry, still a mess” situation, and the cleanup took longer than the actual repair. Same kind of job-site headache.
6. Scrape the Old Wax — You’ll find the old squished wax ring on the flange or stuck to the bottom of the toilet. Use a plastic putty knife and scrape all of it off. Get it clean. Scrape the wax off the bottom of the toilet, too. Wear disposable gloves because this part gets nasty fast.
7. Inspect the Flange — With the wax gone, take a hard look at the toilet flange. Is it cracked? Rusted through? Sitting level with the finished floor? If it’s old cast iron and cracked, stop right there and call a plumber. A broken flange is a bigger animal. If it’s PVC and just has a small crack, you may be able to use a flange repair kit, which is a metal plate that slips over the old flange to reinforce it.
Pro Tip: If the top of the flange sits more than 1/4-inch below your finished floor (like after a new tile installation), a standard wax ring might not be thick enough. Use an extra-thick wax ring or a wax-free toilet seal to ensure a good connection.
8. Place the New Wax Ring — You’ve got two ways to do this: set the new wax ring directly onto the flange, centered over the drain hole, or press it onto the bottom of the toilet outlet. Most pros like putting it on the flange. A standard wax ring costs about $3 and does the job fine on a level flange. A wax-free seal costs $10-$15 and gives you a little more forgiveness if the height’s off or the toilet moves some.
9. Reset the Toilet — Carefully lift the toilet and line it up over the flange, making sure the holes in the base match the closet bolts. Lower it straight down. Once it hits the wax, press down firmly with your body weight to compress the new ring. Sit on the toilet backwards, facing the tank, and rock it gently side to side so it seats all the way. Do not twist or slide the toilet once it’s on the wax.
10. Tighten and Reconnect — Put the washers and nuts back on the closet bolts. Tighten them a little at a time, side to side. You want snug and stable, not gorilla-tight. If you crank it down too hard, you will crack the porcelain. Once the toilet base doesn’t rock at all, stop. Reconnect the water supply line, hand-tighten the coupling, then give it a final quarter-turn with a wrench.
11. Test for Leaks — Slowly turn the water back on and let the tank fill. Check the supply line connection for drips. Once the tank’s full, flush a few times and watch the base like a hawk. If it stays dry, you’re good. Caulk around the base if you want, but leave a 1-inch gap at the back so you can spot a future leak, and call it a day.
Common Causes
Why did the wax ring fail in the first place? Usually, it’s one of these troublemakers.
- Loose Closet Bolts: This is the big one. Over time, the nuts can back off and let the toilet rock a bit. That small movement eventually breaks the wax seal.
- Improper Installation: If the toilet didn’t get pressed down evenly during the original install, the wax ring may never have sealed right in the first place.
- Damaged or Low Flange: A cracked flange can’t hold the closet bolts like it should. If the flange sits too far below floor level—real common after tiling—a standard wax ring can’t bridge that gap.
- Major Drain Clog: A bad clog farther down the line can make water back up when you flush. Then it’ll take the easiest path out, and that might be right past the wax seal.
Common Mistakes
I’ve seen plenty of DIY toilet installs go sideways. Don’t make these mistakes.
- Overtightening the Closet Bolts. This one does the most damage. You hear a little ping and suddenly you’ve got a hairline crack in the toilet base. Tighten only until the toilet is stable and doesn’t wobble, then stop.
- Forgetting to Scrape the Old Wax. You can’t stack a new seal on top of an old one and expect it to work. The flange and the toilet horn both need to be clean so the new wax can seal right.
- Moving the Toilet After Setting It. Once that toilet touches the new wax ring, that’s it. If you try to slide or twist it into place, you’ll smear the wax and ruin the seal. Lift it back up and try again if your aim’s off.
- Ignoring a Damaged Flange. A new wax ring won’t fix a broken flange. If the flange is cracked or rusted out, it can’t anchor the toilet the way it should, and the new seal’ll fail pretty quick. This is where you’ve gotta be honest about whether the job’s bigger than a seal swap.
- Caulking the Entire Base Shut. Don’t caulk all the way around the toilet base. That just traps water if there’s a leak and hides the problem while it chews up your subfloor. Leave a small gap at the back so you can catch a leak right away.
Cost & Time Breakdown
Replacing a wax ring is one of the cheapest DIY plumbing repairs out there. The parts don’t cost much; you’re mostly paying a pro for their time and know-how.
| Task | DIY Cost | Pro Cost | Time |
|---|---|---|---|
| Confirming the leak | $0 | $75–$150 (service call) | 10 minutes |
| Buying parts (wax ring, bolts) | $5–$20 | Included in total | 20 minutes |
| Removing & Resetting the Toilet | $0 | $150–$300 (labor) | 1–2 hours |
| Replacing a Broken Flange (if needed) | $20–$50 (parts only) | $300–$500+ | 3–5 hours |
Tips & Prevention
- Check for Wobble: Every few months, give the toilet a gentle rock. If you feel any movement at all, pop the caps and snug up the closet bolt nuts before the seal gives out.
- Don't Use Harsh Chemicals: Heavy-duty drain cleaners can be rough on old wax seals and the pipes themselves. Use a toilet auger (plunger) for clogs instead.
- Be Careful with Flooring Changes: If you’re putting in thicker flooring like tile or luxury vinyl plank, the flange may end up too low. Plan ahead and use flange extenders or a taller seal.
- Look for Condensation: Sometimes the water on the floor isn’t a leak at all. It’s condensation dripping from the tank and bowl during hot, humid North Texas summers. An insulated tank or a "tempering valve" on the supply line can help with this.
When to Call a Professional
A wax ring swap is a pretty manageable DIY project, but there are times you need to put the wrench down and call a licensed plumber. If you pull the toilet and find the flange is cracked, broken, or severely rusted, that’s a pro job. Replacing a flange means cutting into the drainpipe and getting a perfect seal, and if you miss, you can end up with a much bigger leak inside the floor structure. Same goes if the subfloor around the flange feels spongy, soft, or looks rotten. That’s water damage, and it needs to be fixed before a new toilet goes back in. Don’t just cover up a structural problem and call it good.
Related Articles
Keep troubleshooting with these hand-picked guides from FixlyGuide:
- The Sagging Gutter Secret: Why Your Rain Runs Wild (And How to Seal It Right) — Sagging gutters often point to failing sealant in the joints, leading to leaks and water damage. This guide shows you how to effectively cl…
- The Caulk Mystery: Why Your Door Frame Is Leaking (Even When It Looks Sealed) — Think your door frame is sealed tight but still getting leaks? You're probably looking at a common caulk failure point that lets water snea…
- The Caulk Joint Mystery: Why Your Shower Base Keeps Leaking (Even After Recaulking) — Discover why your shower base might still be leaking after recaulking, focusing on common missed spots and structural issues that caulk alo…
- The Grimy Secret: Why Your Toilet Bowl Stains Keep Coming Back — Fed up with scrubbing stubborn toilet bowl stains only for them to reappear days later? The real culprit is likely hiding in your tank, not…
- The Weird Reason Your Drain's Gurgling (and It's Not a Clog) — That unsettling gurgling sound from your drain isn't always a full-blown clog; it's often a sign of negative air pressure building in your…
- The Mystery of the Raised Floorboards: It's Not Always Water Damage — Don't panic if your hardwood floorboards are lifting and uneven. It's often a solvable humidity problem, not major water damage. Learn how…
Should you do this yourself?
Answer five quick questions before you start. Safety outranks savings every time.
Your experience with work like this
How high do you have to work?
Does the job involve any of these?
Will it need a permit?
Specialty tools
Free and instant. Educational guidance only — not a quote, inspection, or professional diagnosis.
Questions to ask before you sign
Ask every contractor the same questions and the cheapest bid stops looking cheapest. Check them off as you go — your progress is saved on this device.
Free, no signup. Bring this to every walkthrough so you compare bids on the same terms.
What should this project cost?
Enter your project details for a realistic cost range before you call anyone.
Common repairs run $150–$650; repipes and water-heater replacements reach $1,500–$4,500.
- Regional adjustment
- National average
- Labor share (typical)
- ~$754
- Quotes to collect
- 3 written estimates
Educational estimate based on national averages — not a binding quote. Always confirm with written local estimates.
Fixly Project Decision Box
- DIY difficulty
- Moderate
- Estimated time
- 30 minutes – half a day
- Cost level
- Moderate
Main tools / materials
- Adjustable wrench
- Plunger or drain auger
- Bucket and towels
- Thread tape
When to stop and call a pro
- Water you cannot shut off at the fixture or main
- Sewage backing up into more than one fixture
- Water near electrical panels or outlets
- Gas water heater work beyond relighting a pilot
Need professional help?
Get a Licensed PlumberHandle this before it gets worse
First steps that limit damage, then a way to reach a qualified pro.
- Emergency repair checklistThe first steps that limit damage before a pro arrives.Open
- Get local estimatesSend one request and compare written estimates from vetted pros.Open
- Estimate this projectGet a cost range for your scope and ZIP before you call anyone.Open
Free, no signup required. Estimates are educational guidance, not a quote or an inspection.
Recommended for DIYers & woodworkers
Sponsored
The Top 20 Tools for Workshops of Any Budget
No stationary machines or power tools required — plus 3 fundamental tools that can't be bought at any price.
Get the free guide
Ted's Woodworking — The #1 Woodworking Resource
Detailed instructions, dimensioned drawings, materials & cutting lists, and 3D schematics for every skill level.
See the plansSponsored: links above are affiliate links. FixlyGuide may earn a commission on qualifying purchases — at no extra cost to you.
Frequently asked questions
How do I know if my toilet wax ring is bad?+
The most obvious sign is water pooling around the base of the toilet after flushing. You might also notice a sewer gas smell, or the toilet may feel wobbly or loose when you sit on it.
Can a clogged toilet cause a leak at the base?+
Yes, a severe clog downstream can cause water to back up and force its way out through the weakest point, which is often the wax seal. If the leaking stops after you clear the clog, you may have gotten lucky, but the seal might still be compromised.
Is it okay to double up wax rings?+
It's generally not recommended. Stacking two wax rings can create a seal that's more likely to fail over time. If your flange is too low, it's better to use a single extra-thick wax ring or a flange extender kit.
What is a wax-free toilet seal?+
A wax-free seal is a modern alternative to the traditional wax ring. It's a rubber gasket that creates a seal using pressure and is often easier and cleaner to install. They are reusable and more tolerant of slight movement or imperfect flange heights.
How long does a toilet wax ring last?+
A properly installed wax ring can last the life of the toilet, easily 20 to 30 years. They don't degrade on their own, but they will fail if the toilet becomes loose or is removed for any reason.
Should I caulk around the base of my toilet?+
This is a topic of debate, but most plumbers recommend it to keep mop water and dirt from getting under the toilet. However, you must leave a 1-inch gap at the back. This allows you to see if the wax seal ever fails and water is leaking out.
How tight should toilet closet bolts be?+
Just tight enough to stop any wobbling. Hand-tighten the nuts, then use a wrench for alternating, partial turns until the base is firm on the floor. Overtightening will crack the porcelain, so err on the side of caution.
What if the closet bolts are rusted and just spin?+
If the nut is rusted solid to the bolt, you can try using a penetrating oil like WD-40. If the bolt itself is spinning in the flange, you may need to use a mini-hacksaw or an oscillating tool with a metal-cutting blade to carefully cut the bolt off.

Discussion
Loading comments…