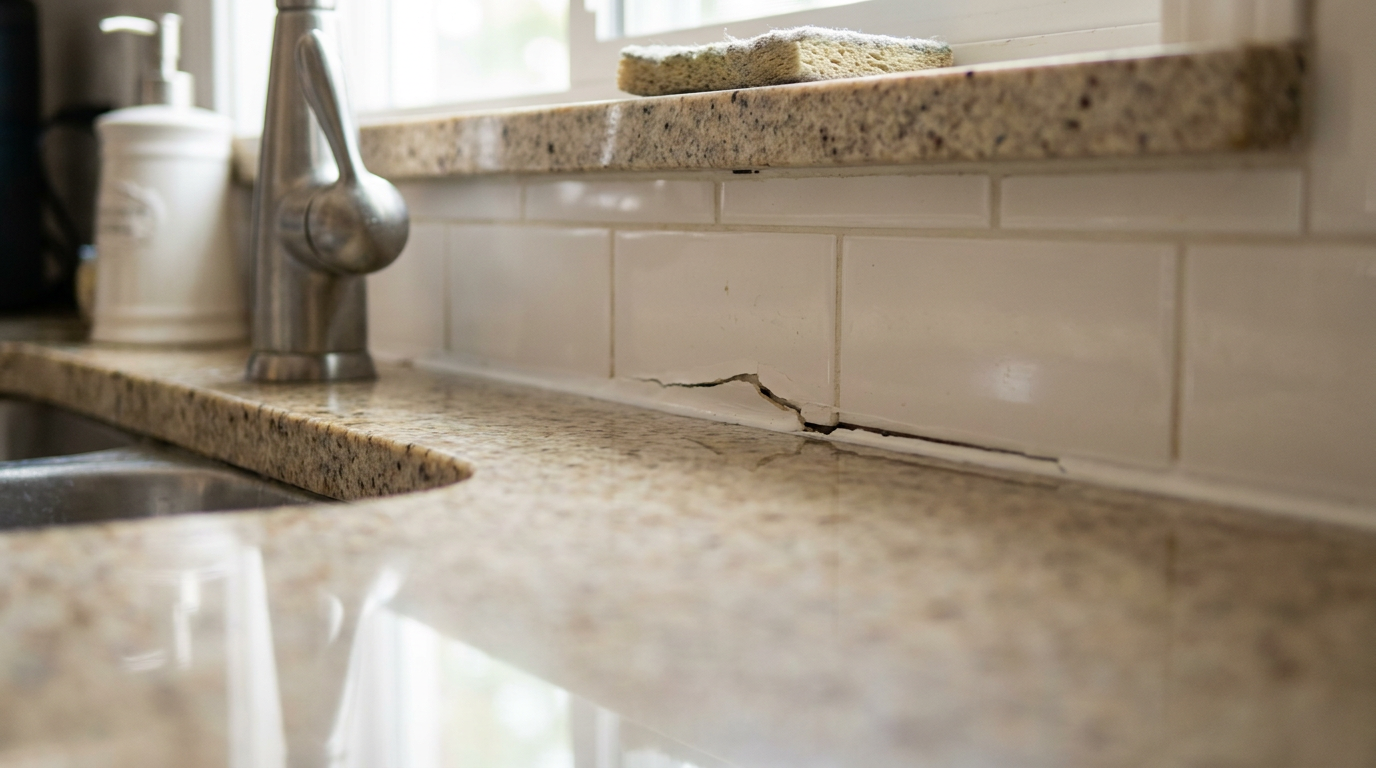
- Rigid tile grout in a moving joint: Tile installers like to run grout straight down to the slab because it’s fast and looks uniform. Grout can’t stretch; the second the counter settles under the weight of stone or cooking gear, it cracks.
- Thermal and moisture expansion of wall framing: Kitchen walls hold plumbing lines and sometimes face exterior temps. Winter heat and summer cooling make wood studs expand and contract at different rates than composite stone.
- Using acrylic latex painter's caulk instead of silicone: Standard acrylic caulk contains 30% to 50% water. As it cures, that water evaporates, the bead shrinks, and it pulls away from the slick stone face.
- Contaminated surfaces during installation: Caulking over grease, leftover dish detergent, dust, or old silicone residue is asking for bond failure in a few months. Silicone needs an ultra-clean, dry surface to cross-link properly.
General remodeling · Renovation planning
| Project category | General remodeling |
|---|---|
| Problem type | Renovation planning |
| Trade required | General contracting |
| Urgency | Planned project |
| Safety risk | Low safety risk |
| DIY suitability | Pro recommended |
| Cost category | Major investment |
| Typical timeline | Design and permitting often 2–4 months before work starts |
| Contractor type | General contractor |
Repair option
Phase the work and fix the building envelope first.
Replacement option
Full renovation with permits, design, and a general contractor.
Common causes
- Space no longer fits how the household lives
- Resale preparation
- Deferred maintenance stacking up
Relevant tools:project cost estimatorcompare quoteshome improvement material prices
Published November 2, 2026Last updated November 2, 2026
Tools & materials you'll need
Affiliate links- Amazon100% kitchen and bath silicone or hybrid polymer sealant1 tube
- Amazon91% or 99% isopropyl alcohol1 bottle
- AmazonLow-tack painter's masking tape (1.5-inch)1 roll
- AmazonClosed-cell foam backer rod (3/8-inch)1 pack · for gaps over 1/4 inch deep or wide
- AmazonMicrofiber rags and paper towels1 pack
As an Amazon Associate FixlyGuide earns from qualifying purchases — at no extra cost to you. Prices and availability are accurate as of publication and subject to change.
Quick Answer
Kitchen backsplash caulk cracks, pulls away, or turns yellow because folks use standard latex caulk or stiff grout in a joint that’s meant to move. Countertop slabs shift under load, cabinets settle, and moisture behind the sink chews up the wrong sealant. Scrape out every trace of old material, clean the seam with 91% isopropyl alcohol, stuff foam backer rod into gaps wider than 1/8 inch, and tool in a fresh bead of 100% silicone or advanced polymer sealant. That’s the fix. Clean prep, flexible bead, done right.
The Problem
You look behind the kitchen faucet and there it is: a jagged, hairline crack running along the seam between your quartz, granite, or laminate countertop and the tile backsplash. Or the seal’s gone completely, and now you’ve got an open little channel where dirty dishwater, coffee drips, and rinse water disappear every day.
Water doesn’t sit there politely. It sneaks down behind your base cabinets, soaks raw drywall, swells particleboard cabinet backs, and feeds hidden colonies of black mold. No dice.
A lot of builders and remodelers make the same mistake. They pack hard tile grout into that joint. Others slap in a quick bead of cheap painter’s acrylic latex caulk just to make it look finished for closing day. Then 6 to 18 months later, the movement wins. That kitchen counter takes a beating: heavy cast-iron pans getting dropped, people leaning on the island, seasonal humidity swings working the framing studs. Rigid stuff cracks. Cheap acrylic dries out, shrinks, and peels like sunburned skin.
I pulled a water heater in Frisco last month where the same bad joint had let water crawl straight into the cabinet box behind the sink. Looked like a small caulk problem. Turned into a messy little repair.
How It Works
To fix this for good, you’ve got to understand what an expansion joint is doing.
Where a horizontal plane (your countertop) meets a vertical plane (your wall or backsplash), builders call that a change of plane. Those two surfaces move on their own schedules. In North Texas and other places with expansive clay soils, foundations shift between wet spring months and baking summer heat. Your floor joists flex under cabinet loads, and wall studs expand and contract with indoor humidity swings from 30% to 65%.
   [ Backsplash Tile ]
           |
           |  <- Vertical Plane (Wall Movement)
           |
         +---+
         | * | <- Silicone Bead (Flexible Bridge)
         +---+
    ======================
      [ Countertop Slab ] <- Horizontal Plane (Cabinet Settling)
Grout’s got excellent compressive strength, but zero tensile strength or elasticity. So when the countertop settles just 1/32 of an inch, rigid grout pops and splits.
Flexible sealants—specifically 100% silicone or modified silane polymers (hybrid sealants)—act like little rubber shock absorbers. They’ve got high elongation properties and can stretch over 200% to 400% of their original bead width without tearing.
For caulk to work, it has to stick to only two surfaces: the top face of the counter and the bottom edge of the tile backsplash. That’s called two-point adhesion. If it bonds to three surfaces (counter, tile, and the drywall substrate hiding in the crevice), you get three-point adhesion. Then the planes move and the bead tears right down the middle like a cheap shirt seam.
Step-by-Step Fix
Follow these steps and you’ll strip out the failed material, prep the joint the right way, and put in a watertight seal that’ll handle years of kitchen abuse.
-
Clear and protect the work zone — Move every appliance, dish rack, soap dispenser, and bottle off the counters so you’ve got room to work. Lay clean drop cloths or thick painter's masking paper over the countertop right below the backsplash seam to protect granite or polished quartz from scratches, chemical spills, and falling junk.
- Tools: Heavy kraft paper, 1.5-inch blue painter's tape.
- Safety: Crack a window or run the range hood so you’ve got decent ventilation.
-
Rake out existing grout or slice out failed caulk — If the builder grouted the joint, use a manual carbide-grit grout saw held parallel to the counter and grind it out to a depth of at least 1/4 inch. For old silicone or latex caulk, slice along the countertop plane with a fresh utility blade, then cut vertically along the tile bottom edge to free the bead.
- Tools: Carbide grout rake, retractable utility knife with heavy-duty blades.
- Caution: Don’t use steel blades at a wild angle on polished stone or quartz—you can gouge the surface resin before you know it.
-
Scrape away stubborn micro-residue — Silicone leaves behind a slick, invisible film that acts like paraffin and keeps new silicone from bonding. Use a stiff plastic scraper or a dedicated brass-wire brush along the crevice to lift the leftover junk without scratching glazed tile.
- Alternative: If the residue’s really stubborn, dab a little mineral spirits or commercial silicone digester on the strip and let it sit for 15 minutes to soften the rubber before you scrape.
-
Vacuum the crevice down to bare substrate — Run a high-suction shop vacuum with a narrow crevice attachment right against the cleared joint to pull out grout dust, drywall crumbs, and dried caulk shavings.
- Tip: Tap the nearby tiles gently with the rubber heel of your hand to knock loose any dust hiding behind the bottom row, then vacuum it again.
-
Degrease and sanitize with 91% isopropyl alcohol — Soak a clean microfiber rag with 91% isopropyl alcohol (don’t use rubbing alcohol with moisturizers or scents) and scrub the tile bottom and countertop edge hard.
- Safety: Wear nitrile gloves. Skip household cleaners like vinegar, dish soap, or bleach here—they leave surfactant films that mess up silicone adhesion.
-
Inspect the joint depth and install backer rod — Measure the gap width between the counter and backsplash with a small ruler. If the gap is deeper or wider than 1/4 inch, press a continuous length of 3/8-inch closed-cell polyethylene foam backer rod into the crevice with a blunt putty knife or the wheel of a screen spline tool.
- Why this matters: The backer rod fills extra void space, cuts down on sealant waste, and acts as a bond breaker to kill destructive three-point adhesion.
-
Tape crisp border lines — Put low-tack painter's tape along the bottom edge of the backsplash tile (leaving roughly 1/16 inch of tile edge exposed) and along the countertop surface (1/16 inch forward from the wall).
- Pro tip: Tape gives you straight lines and keeps silicone off porous stone, but you’ve got to pull it while the bead is still wet.
-
Cut the tube nozzle at an exact 45-degree angle — Uncap your tube of 100% kitchen and bath silicone (or color-matched hybrid polymer). Cut the plastic nozzle tip at a 45-degree angle with your utility knife to make an opening roughly 1/8 to 3/16 inch wide, matching the width of the seam.
- Technique: Puncture the inner foil seal inside the nozzle using the fold-out wire puncturing rod on your caulk gun.
-
Apply a smooth, continuous bead — Hold the caulk gun at a 45-degree angle to the joint. Pull the trigger steadily while pushing the gun forward along the seam instead of dragging it backward behind you; pushing packs the sealant into the corners instead of letting it sit lazy on top.
- Control: Move at a steady pace of about 1 foot every 3 to 5 seconds so you don’t end up with fat humps or skimpy gaps.
-
Tool the joint cleanly — Within 3 to 5 minutes of laying the bead, smooth the joint so the sealant presses firmly against both surfaces and forms a concave, water-shedding profile.
- Method: Lightly mist the bead with a 50/50 mix of water and dish soap (or denatured alcohol for pure silicone), then pull a silicone profiling tool or a gloved finger firmly down the joint in one smooth pass. Wipe excess caulk onto a damp paper towel right away.
-
Peel the tape before the skin forms — Pull the painter's tape off immediately after tooling, while the silicone is still completely wet (within 5 to 7 minutes max of application).
- Technique: Yank the tape backward at a sharp 45-degree angle toward you. If you wait until the caulk starts skimming over, the tape will tear the edge of the rubber bead and leave it flapping loose.
-
Respect the cure window — Leave the joint alone. Silicone might feel dry to the touch in 30 to 60 minutes, but it needs a full 24 hours at room temperature (around 70°F) to finish curing and reach maximum tensile strength.
- Caution: Don’t wash dishes, splash water, or shove heavy appliances back against the wall until the 24-hour mark passes.
Common Causes
Why’d the seam fail in the first place? Usually it comes down to one of these five culprits:
- Rigid tile grout in a moving joint: Tile installers like to run grout straight down to the slab because it’s fast and looks uniform. Grout can’t stretch; the second the counter settles under the weight of stone or cooking gear, it cracks.
- Cabinet settlement and subfloor deflection: Kitchen base cabinets carry a pile of weight—granite counters weigh 15 to 20 lbs per square foot, plus cast-iron cookware, sinks full of water, and garbage disposals. As subfloors settle or joists flex, the counter drops a hair and opens a gap at the wall.
- Thermal and moisture expansion of wall framing: Kitchen walls hold plumbing lines and sometimes face exterior temps. Winter heat and summer cooling make wood studs expand and contract at different rates than composite stone.
- Using acrylic latex painter's caulk instead of silicone: Standard acrylic caulk contains 30% to 50% water. As it cures, that water evaporates, the bead shrinks, and it pulls away from the slick stone face.
- Contaminated surfaces during installation: Caulking over grease, leftover dish detergent, dust, or old silicone residue is asking for bond failure in a few months. Silicone needs an ultra-clean, dry surface to cross-link properly.
Common Mistakes
- Caulking over old, dried caulk: New caulk won’t stick to old caulk. Slapping a fresh bead over a cracked, degraded line is just a band-aid that traps moisture and peels away in weeks. Always cut out 100% of the old material first.
- Licking your bare finger to tool the bead: Saliva brings bacteria and enzymes into the wet caulk, and that can speed up mold growth and black spotting inside the rubber, even if the tube says "10-year mold protection." Use a silicone profiling tool or a nitrile-gloved finger wet with denatured alcohol or soapy water.
- Leaving tape on until the caulk cures: If you wait 20 minutes to pull painter's tape, the silicone skins over the tape edge. Rip it off then, and you’ll tear jagged edges into the fresh bead and wreck your watertight seal. Pull the tape right after smoothing.
- Using the wrong cleaner before caulking: Rubbing alcohol from the medicine cabinet often contains 30% water and cosmetic oils, while dish soap leaves behind a slick surfactant layer. Stick with 91% or 99% isopropyl alcohol, or acetone (only on solvent-safe surfaces like unsealed granite or glazed ceramic).
- Skipping the backer rod on oversized gaps: Filling a 3/8-inch deep void with a whole tube of silicone causes deep-core curing failures, surface sinking, and three-point adhesion tearing. Always pack foam backer rod into deep cavities first.
Cost & Time Breakdown
| Task | DIY Cost | Pro Cost | Time |
|---|---|---|---|
| Grout/Caulk Removal & Scraping | $10–$18 (saw & razor blades) | $120–$180 (handyman minimum) | 45–90 mins |
| Joint Cleaning & Prep (Solvent/Tape) | $8–$12 (alcohol & tape) | $30–$50 (labor included above) | 15–20 mins |
| Backer Rod Installation (if needed) | $4–$6 (foam rod pack) | $15–$25 | 10 mins |
| Applying & Tooling 100% Silicone | $9–$15 (commercial silicone tube) | $60–$100 | 20–30 mins |
| Total Project | $31–$51 | $225–$355 | 1.5–2.5 hours active |
Tips & Prevention
- Check the sink-rear seam monthly: Run your finger along the caulk line right behind your main sink basin every month. That spot gets splashed constantly, so early lifting shows up there first before it starts hurting the back wall.
- Keep countertops cleared during cure: Leave an empty 6-inch buffer along the wall for a full 24 hours after installation. Bumping appliances or setting cutting boards against the wet bead ruins the joint profile.
- Choose color-matched silicone over paintable caulks: If white or clear silicone doesn’t match your stone, don’t fall back to cheap paintable caulk. Go to a tile supply warehouse and buy 100% silicone color-matched to your grout line brand, like sanded-texture silicone.
- Dry the seam after heavy prep sessions: If dishwater or cleaning spray pools along the back edge of the counter during daily cooking, wipe it dry with a microfiber cloth instead of letting it sit. Even mold-resistant silicone eventually gives up if it’s sitting under greasy water all the time.
- Recaulk on a 5-year cycle: Even the best silicone sealants wear out over time from UV exposure through kitchen windows and aggressive chemical degreasers. Plan to scrape and refresh the joint every 5 to 7 years before water gets behind the cabinets.
When to Call a Professional
Most homeowners can handle a standard backsplash seam on a Saturday morning. Still, you should step back and call a licensed countertop fabricator, plumber, or general contractor under certain warning signs:
If the gap between your countertop and the tile exceeds 3/8 of an inch, your base cabinets may be pulling loose from the wall framing or the subfloor might be showing serious structural deflection. Pumping caulk into a 1/2-inch drop is just hiding a bigger problem.
Second, if you shine a flashlight down behind the counter and see black mold spreading across the back drywall or smell persistent damp rot inside the lower sink cabinet, water’s probably already made it into the subfloor or wall cavity. That means water mitigation, drywall replacement, and mold remediation before any fresh caulk goes in.
Finally, if you’ve got exotic, unsealed natural marble or quartzite, call a stone restoration pro—bad solvents or acidic sealants can permanently etch, stain, or leach oils into expensive stone slabs.
Frequently Asked Questions
Should I use grout or caulk between the backsplash and the countertop?
Always use caulk. Any transition where two different building planes meet, like the horizontal countertop meeting the vertical wall, moves. Rigid grout will crack and crumble in months under normal settlement and weight shifts, while flexible caulk stretches and keeps an airtight, waterproof seal.
Can I just caulk over the cracked grout to save time?
No. Caulking over cracked, crumbly grout gives you a weak surface bond that peels away in weeks. And yes, water trapped beneath the new caulk layer can rot your cabinet backing or grow hidden mold. You’ve got to scrape out the cracked grout to a depth of at least 1/8 to 1/4 inch before you apply new sealant.
What is the best type of caulk for a kitchen backsplash?
The gold standard is 100% kitchen and bath silicone, or a premium modified polymer (hybrid) sealant. Look for products with mold-resistant additives. Avoid standard acrylic latex painter's caulk, since it doesn’t have the stretch, water resistance, or longevity needed for kitchen splash zones.
How do I get a perfectly straight caulk line behind my counter?
Apply low-tack painter's tape along both sides of the seam before you put down the sealant. Leave roughly 1/16 inch of space between the tape and the corner on both the tile and the counter. Smooth the caulk bead with a tooling tool or gloved finger, then peel the tape off right away while the caulk’s still wet.
Why is my new caulk pulling away from the granite countertop?
This almost always comes from poor surface prep. Silicone can’t bond to grease, dish soap residue, moisture, or the paraffin film left behind by old silicone. Clean the seam thoroughly with 91% isopropyl alcohol and let it dry completely before recaulking so you get a solid chemical bond.
How long do I have to wait to use the kitchen sink after recaulking?
Wait a full 24 hours before running water near the seam or splashing around the sink. Silicone may form a dry skin in 30 to 60 minutes, but it takes roughly 24 hours to cure through the core and lock in full water resistance and elasticity.
How do I match the color of my grout with flexible caulk?
Major grout manufacturers make color-matched 100% silicone sealants to pair with their grout palettes. You’ll find them at local tile supply stores or flooring distributors, in both smooth and sanded textures, so they blend with the existing backsplash lines.
What should I do if the gap between the counter and backsplash is larger than 1/4 inch?
Don’t try to fill a big gap with caulk alone. Press a closed-cell foam backer rod into the seam first, setting it about 1/8 to 1/4 inch below the counter surface. The backer rod fills the space, gives the caulk something to work against, and keeps three-point adhesion from tearing the bead.
Can mineral spirits damage my quartz or granite countertops during cleanup?
Yes, some solvents can hurt engineered stone or stone sealers. Mineral spirits can soften old silicone on glazed ceramic tile, but they can dull the resin binders in quartz or strip the protective seal coat off granite if they sit there pooling. Use 91% isopropyl alcohol instead, which cuts grease and sanitizes stone safely without leaving residue.
Related Articles
Keep troubleshooting with these hand-picked guides from FixlyGuide:
- The Tiny Gap That Wastes Energy: Why Your Baseboards Pull Away (And the Simple, Permanent Fix) — Baseboards separating from walls are a common issue, often indicating underlying problems with moisture or house settling, but are typicall…
- Driveway Expansion Joint Cracking? 11 Steps to Reseal It for Good — Stop weeds, water erosion, and winter frost heave by replacing failed concrete expansion joints with commercial-grade polyurethane and clos…
- The Tiny Gap Behind Your Baseboards That Costs You $100s in Drafts — Discover why your baseboards are pulling away from the wall and the simple, inexpensive fixes that can seal drafts and improve your home's…
- The 3 Hidden Reasons Your Baseboards Are Pulling Away (And How to Fix It Right) — Don’t just nail it back! Discover the real reasons your baseboards are separating from the wall and how to achieve a lasting repair.
- The Caulk Mystery: Why Your Seams Shrink & Crack (And How to Fix It) — Discover the hidden reasons your caulk shrinks and cracks, leaving unsightly gaps and compromising your home’s protection, and learn the pr…
- The #1 Caulk Mistake That Leads to Mold Around Your Bathroom Sink — Discover the crucial caulking mistake most homeowners make that allows mold and water damage around their bathroom sink, and how to fix it…
Should you do this yourself?
Answer five quick questions before you start. Safety outranks savings every time.
Your experience with work like this
How high do you have to work?
Does the job involve any of these?
Will it need a permit?
Specialty tools
Free and instant. Educational guidance only — not a quote, inspection, or professional diagnosis.
What should this project cost?
Enter your project details for a realistic cost range before you call anyone.
Cosmetic refreshes start near $5,000; full remodels commonly $25,000–$45,000.
- Regional adjustment
- National average
- Labor share (typical)
- ~$8,550
- Quotes to collect
- 3 written estimates
Educational estimate based on national averages — not a binding quote. Always confirm with written local estimates.
Fixly Project Decision Box
- DIY difficulty
- Professional Recommended
- Estimated time
- Monitoring over 60–90 days · engineer visit 1–2 hours
- Cost level
- Major Project
Main tools / materials
- Crack monitor or pencil marks with dates
- Tape measure
- Marble or level for floor slope
When to stop and call a pro
- A crack wider than 1/4 inch or growing month over month
- Doors and windows that suddenly stick or will not latch
- Stair-step cracks in brick or block
- Separation between walls and ceilings or floors
Need professional help?
Get a Foundation EvaluationGet the print-ready PDF of this guide
A clean, ad-free, printable version you can keep on your phone or pin to the workshop wall. Free with a FixlyGuide account.
- Print-optimized layout
- Tools, materials & every step included
- Saved to your account
Recommended for DIYers & woodworkers
Sponsored
The Top 20 Tools for Workshops of Any Budget
No stationary machines or power tools required — plus 3 fundamental tools that can't be bought at any price.
Get the free guide
Ted's Woodworking — The #1 Woodworking Resource
Detailed instructions, dimensioned drawings, materials & cutting lists, and 3D schematics for every skill level.
See the plansSponsored: links above are affiliate links. FixlyGuide may earn a commission on qualifying purchases — at no extra cost to you.
Frequently asked questions
Should I use grout or caulk between the backsplash and the countertop?+
Always use caulk. Any transition where two different building planes meet (such as the horizontal countertop meeting the vertical wall) experiences movement. Rigid grout will crack and crumble within months under routine house settlement and weight shifts, whereas flexible caulk stretches and retains an airtight, waterproof seal.
Can I just caulk over the cracked grout to save time?+
No. Caulking over cracked, crumbly grout creates a weak surface bond that peels away within weeks. Furthermore, water trapped beneath the new caulk layer can rot your cabinet backing or breed hidden mold. You must scrape out the cracked grout to a depth of at least 1/8 to 1/4 inch before applying new sealant.
What is the best type of caulk for a kitchen backsplash?+
The gold standard is 100% kitchen and bath silicone, or a premium modified polymer (hybrid) sealant. Look for products containing mold-resistant additives. Avoid standard acrylic latex painter's caulk, as it lacks the elasticity, water resistance, and longevity needed for kitchen splash zones.
How do I get a perfectly straight caulk line behind my counter?+
Apply low-tack painter's tape along both sides of the seam before applying the sealant. Leave roughly 1/16 inch of space between the tape and the corner on both the tile and the counter. Smooth the caulk bead with a tooling tool or gloved finger, and immediately peel the tape off while the caulk is still wet.
Why is my new caulk pulling away from the granite countertop?+
This almost always stems from poor surface preparation. Silicone cannot bond to grease, dish soap residue, moisture, or the paraffin film left behind by old silicone. Clean the seam thoroughly with 91% isopropyl alcohol and let it dry completely before recaulking to ensure a durable chemical bond.
How long do I have to wait to use the kitchen sink after recaulking?+
Wait a full 24 hours before running water near the seam or splashing around the sink. Although silicone may develop a dry surface skin within 30 to 60 minutes, it takes roughly 24 hours to cure through the core and establish complete water resistance and elasticity.
How do I match the color of my grout with flexible caulk?+
Major grout manufacturers produce color-matched 100% silicone sealants designed to pair with their grout palettes. These can be found at local tile supply stores or flooring distributors, available in both smooth and sanded textures to blend in with your existing backsplash lines.
What should I do if the gap between the counter and backsplash is larger than 1/4 inch?+
Do not try to fill a massive gap entirely with caulk. Press a closed-cell foam backer rod into the seam first, setting it roughly 1/8 to 1/4 inch below the counter surface. The backer rod fills the gap, provides a firm backing, and prevents three-point adhesion, ensuring the caulk flexes properly without tearing.
Can mineral spirits damage my quartz or granite countertops during cleanup?+
Yes, certain solvents can harm engineered stone or stone sealers. While mineral spirits soften old silicone on glazed ceramic tile, they can dull the resin binders in quartz or strip the protective seal coat off granite if left pooling. Use 91% isopropyl alcohol instead, which cuts grease and sanitizes stone safely without leaving residue.
Discussion
Loading comments…