Tools & materials you'll need
Affiliate linksAs an Amazon Associate FixlyGuide earns from qualifying purchases — at no extra cost to you. Prices and availability are accurate as of publication and subject to change.
Quick Answer
The most common mistake when caulking a bathroom sink is failing to completely remove the old, compromised caulk and properly clean the surface before applying a new bead. This leads to a weak, porous seal that traps moisture, encourages mold and mildew growth, and ultimately allows water to seep behind your sink and countertop. The correct and lasting solution involves meticulously stripping away all existing caulk, cleaning the area with a specialized caulk remover and denatured alcohol, allowing it to dry fully, and then applying a continuous, smooth, silicone caulk bead designed for bathrooms.
The Problem
Few things detract from a bathroom's appearance and hygiene quite like discolored, peeling, or moldy caulk around the sink. Beyond aesthetics, compromised caulk is a serious problem; it's an open invitation for water to penetrate the vulnerable seams between your sink and countertop, or between the countertop and the wall. This insidious water intrusion can lead to a cascade of costly issues:
- Mold and Mildew Growth: The warm, humid environment of a bathroom, coupled with trapped moisture behind failing caulk, creates the perfect breeding ground for mold and mildew. This often manifests as black, green, or pink discoloration, which can be difficult to remove and poses potential health risks.
- Water Damage: Water seeping past the caulk can silently damage the underlying cabinet, subfloor, or wall materials. This can lead to swelling, warping, rot, and structural compromise over time, often going unnoticed until significant damage has occurred.
- Pest Infestation: Gaps and cracks created by deteriorating caulk can become entry points or nesting sites for small insects, compounding hygiene issues.
- Unsanitary Conditions: Cracked or porous caulk traps dirt, soap scum, and bacteria, making the area difficult to clean and maintain a truly hygienic bathroom environment.
Most homeowners attempt to fix this by simply applying new caulk over the old. While this might look better for a week or two, it’s a temporary facade that only exacerbates the underlying problem by trapping existing moisture and giving new caulk nothing proper to adhere to. The real fix demands a thorough, step-by-step approach that addresses both the visible symptoms and the hidden causes.
How It Works
Caulk, or sealant, acts as a flexible, waterproof barrier that bridges the small gaps between different surfaces around your bathroom sink. These surfaces – typically the ceramic or porcelain of the sink, the laminate, stone, or tile of the countertop, and sometimes the painted drywall or tile backsplash – expand and contract at different rates due to changes in temperature and humidity. Without a flexible sealant, these tiny movements would quickly create cracks, allowing water to penetrate.
Modern bathroom caulk is typically made from silicone, acrylic latex with silicone additives, or polyurethane. Silicone caulk is generally considered superior for bathrooms due to its excellent flexibility, superior water resistance, and natural resistance to mold and mildew. It adheres well to non-porous surfaces like glazed ceramics, glass, and many plastics. Acrylic latex caulk is easier to work with and clean up (water-soluble) but is less durable and waterproof long-term compared to silicone, and more prone to cracking and mold unless heavily modified.
When caulk is applied correctly, it forms a strong, continuous bond to both surfaces, creating an impenetrable seal. This bond relies heavily on a clean, dry, and structurally sound substrate. Old caulk, especially if it's cracked, moldy, or lifting, compromises this substrate. It acts as a weak, non-adhesive layer between the new caulk and the actual surface, preventing a proper bond. Furthermore, applying new caulk over old can trap existing moisture and mold spores, leading to rapid regrowth of mold under the fresh layer. The key to a long-lasting, mold-free seal is creating a perfectly clean, dry canvas for the new caulk to adhere to directly and thoroughly.
Step-by-Step Fix
Safety Note: Always wear appropriate personal protective equipment (PPE) such as gloves and eye protection when working with caulk removers, solvents, and cleaning agents. Ensure the bathroom is well-ventilated during the entire process.
1. Clear the Area — Empty the sink and remove any items from around the immediate work area.
- This provides unobstructed access and prevents accidental damage or contamination.
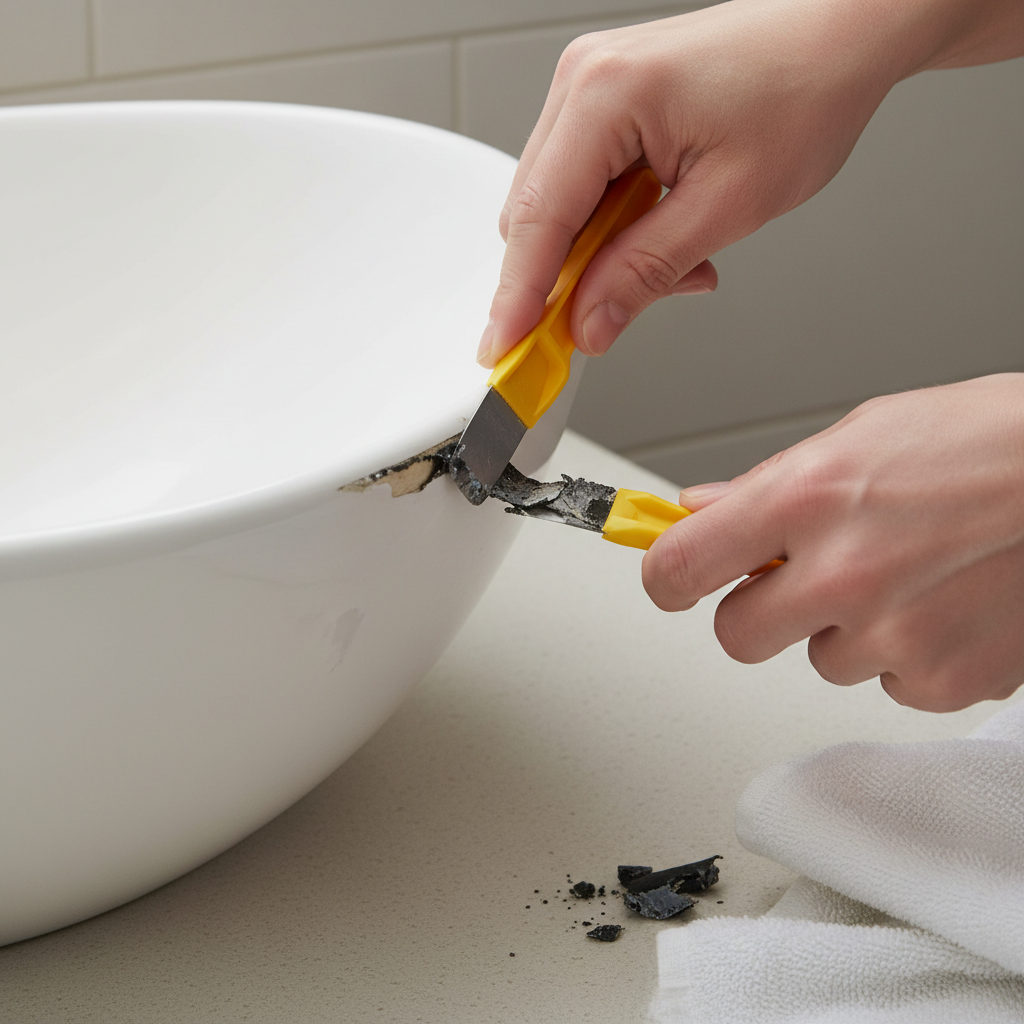
2. Score the Old Caulk — Use a utility knife or caulk removal tool to score along both edges of the old caulk bead.
- Tool Tip: A dedicated caulk removal tool often has a triangular blade for scraping and a pointed end for digging into corners.
- Technique: Angle the knife slightly into the joint to cut the caulk's bond with the sink and countertop surfaces. Be careful not to scratch the sink or countertop.
3. Remove Bulk Caulk — Peel away as much of the old caulk as possible using the caulk removal tool, putty knife, or even needle-nose pliers for stubborn pieces.
- Persistence: This step requires patience. Work slowly and methodically.
- If this doesn't work: For very hard, brittle caulk, gently warmed caulk (with a hairdryer on a low setting) can sometimes make it more pliable, but be cautious not to overheat surfaces.
4. Apply Caulk Remover — For any remaining caulk residue, apply a specialized caulk remover product following the manufacturer's instructions.
- Product Choice: Ensure the remover is safe for your sink and countertop material (e.g., stone-safe if you have granite or marble). Read labels carefully.
- Dwell Time: Allow the remover to sit for the recommended time, typically 15-30 minutes, to soften the residue.
5. Scrape and Clean Residue — Use a plastic scraper, old credit card, or sponge to gently remove the softened caulk residue. Wipe down with a clean rag.
- Avoid Abrasives: Do not use abrasive pads or harsh wire brushes that could scratch your fixtures.
- Repeat if necessary: For heavy residue, you may need to reapply remover and scrape again.
6. Clean with Denatured Alcohol — Saturate a clean rag with denatured alcohol and thoroughly wipe down the entire joint area.
- Why Alcohol? Denatured alcohol is excellent for removing any lingering soap scum, grease, and caulk residue, leaving a pristine surface for new caulk adhesion. Isopropyl alcohol (rubbing alcohol) can also be used but may not be as effective for heavy residue.
- Ventilation: Ensure good ventilation when using alcohol.
7. Allow to Dry Completely — This is a critical step. The joint must be bone dry before applying new caulk.
- Time Estimate: Allow at least 2-4 hours, or ideally overnight, for the area to dry, especially in humid environments. A hairdryer on a cool setting can speed up the process slightly.
- Check: Run your finger along the joint; it should feel perfectly dry and clean.
8. Prepare the Caulk Tube — Cut the tip of the caulk tube at a 45-degree angle, making an opening just slightly smaller than the gap you need to fill.
- Size Matters: A smaller opening gives you more control and helps prevent applying too much caulk. You can always cut more off if needed.
- Puncture Seal: Use a long nail or the built-in puncture tool on your caulk gun to break the inner seal of the tube.
9. Load the Caulk Gun — Insert the caulk tube into the caulk gun. Push the plunger rod firmly against the back of the tube.
- Release Pressure: After each bead, press the thumb release lever on the caulk gun to stop caulk flow and prevent drips.
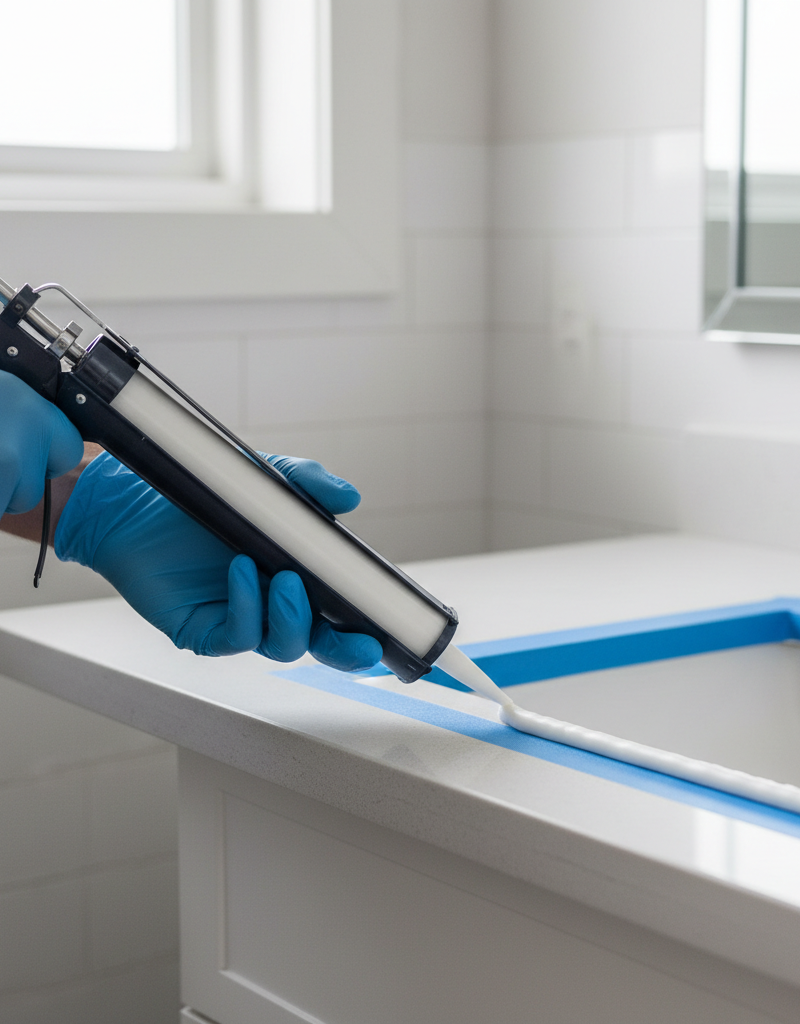
10. Apply the Caulk Bead — Apply a continuous, even bead of caulk along the joint, maintaining consistent pressure and speed.
- Technique: Start in a less visible area if you're a beginner. Pull the gun steadily towards you, or push it away, keeping the nozzle angled at 45 degrees. Aim for a single, unbroken line.
11. Tool the Caulk (Smooth) — Immediately after applying the caulk, tool the bead to create a smooth, concave finish.
- Tools: Use a specialized caulk tooling tool, a wetted finger, an ice cube, or a plastic spoon.
- Technique: Lightly drag the tool or finger along the fresh caulk, removing excess and creating a professional-looking seal. Wipe excess caulk from your tool or finger onto a paper towel frequently.
12. Clean Up and Cure — Wipe away any excess caulk immediately with a damp paper towel. Allow the caulk to cure fully.
- Curing Time: Check the caulk tube for specific curing times. Most silicone caulks require 24-48 hours before exposure to water.
- Avoid Water: Do not use the sink or expose the caulk to moisture until the recommended curing time has passed.
Common Causes
Several factors contribute to caulk failure around a bathroom sink:
- Improper Surface Preparation: This is the leading cause. Applying new caulk over old, dirty, or wet surfaces prevents proper adhesion, leading to premature cracking and peeling.
- Using the Wrong Type of Caulk: General-purpose caulk or caulk not designed for high-moisture environments will quickly deteriorate and become susceptible to mold. Silicone or acrylic latex with silicone sealant is essential for bathrooms.
- Poor Application Technique: Too thin a bead won't seal effectively; too thick a bead is prone to cracking and collects dirt. An inconsistent application also creates weak points.
- Lack of Ventilation: High humidity in bathrooms, especially without proper ventilation, provides a constant source of moisture that can penetrate and degrade caulk over time, fostering mold growth.
- Age and Wear: Even properly applied caulk has a lifespan (typically 5-10 years for good quality silicone). Constant exposure to water, cleaning chemicals, and temperature fluctuations will eventually break down its integrity.
- Settling and Movement: Minor structural shifts in the house or expansion/contraction of materials can stress the caulk joint, causing it to crack.
Common Mistakes
- Not Removing All Old Caulk: This is the cardinal sin of re-caulking. New caulk won't adhere properly to old caulk, leading to quick failure and trapped mold. Always remove every last bit.
- Caulking a Wet Surface: Moisture prevents caulk from bonding. The surface must be completely dry for a strong, lasting seal. Even slight dampness can compromise adhesion.
- Using Too Much Caulk: While it might seem like more is better, excessive caulk makes it harder to tool smoothly, creates unsightly blobs, and can still lead to weaker adhesion at the edges.
- Not Tooling the Caulk: Skipping the tooling step results in a messy, uneven, and porous seal that's harder to clean and more prone to trapping moisture and dirt.
- Using Non-Mildew Resistant Caulk: In a bathroom, this is a recipe for rapid mold growth. Always choose a silicone or acrylic latex caulk specifically formulated with mildewcides for kitchen and bath use.
- Ignoring Cure Times: Using the sink or exposing the freshly applied caulk to water before it has fully cured will wash away the seal or significantly weaken its bond, leading to premature failure.
Cost & Time Breakdown
| Task | DIY Cost | Pro Cost | Time |
|---|---|---|---|
| Caulk removal and cleaning | $10–$25 | Included in job | 30–60 minutes |
| Materials (caulk, tools) | $15–$40 | Included in job | N/A |
| Caulk application | $0 | Included in job | 15–30 minutes |
| Total (DIY) | $25–$65 | $75–$200+ | 1–2 hours hands-on |
| Curing (idle time) | N/A | N/A | 24–48 hours |
Note: Professional costs can vary significantly based on location and the extent of existing damage that needs repair.
Tips & Prevention
- Annual Inspection: Make it a habit to visually inspect your caulk joints every year. Look for discoloration, cracks, lifting, or softness. Address minor issues promptly.
- Maintain Ventilation: Always use your bathroom exhaust fan during and after showers/baths for at least 15-20 minutes to reduce humidity levels, which helps prevent mold and extends caulk life.
- Clean Regularly but Gently: Clean caulk with mild, non-abrasive bathroom cleaners. Avoid harsh chemicals or abrasive brushes that can degrade the caulk surface. For light mildew, a diluted bleach solution (1 part bleach to 10 parts water) can be used sparingly.
- Choose High-Quality Silicone: Invest in 100% silicone caulk specifically labeled for kitchen and bath use, with mildewcide additives. It costs a bit more but lasts significantly longer.
- Proper Storage: Store opened caulk tubes with a nail or screw in the tip, or with a dedicated cap, to prevent premature drying and hardening.
- Re-caulk on Schedule: Even if it looks okay, consider re-caulking every 5-10 years as a preventative measure to ensure continued water resistance.
When to Call a Professional
While re-caulking is a very DIY-friendly task, there are specific situations where a professional plumber or handyman should be called. If you notice signs of extensive water damage such as swollen or discolored cabinet bases, soft or spongy flooring around the sink, or persistent leaks in the plumbing connections underneath, these indicate that water has likely penetrated beyond the caulk and caused damage requiring professional assessment and repair. Additionally, if you are dealing with very old, stubborn caulk that you cannot remove effectively, or if you have high-end or unusual countertop materials (like antique marble or custom-fabricated surfaces) where you worry about scratching or damaging them during the removal process, a professional can ensure the job is done without risk to delicate finishes.
Related Articles
Keep troubleshooting with these hand-picked guides from FixlyGuide:
- The #1 Mistake Homeowners Make When Caulking a Bathroom Sink (And How to Fix It) — Discover the most common caulk mistake homeowners make around bathroom sinks and follow simple steps to achieve a lasting, watertight seal.
- The 5-Minute Trick to Restore Your Kitchen Sink Sprayer's Lost Pressure — Restore your kitchen sink sprayer's low pressure with a quick, simple trick that often takes less than five minutes and requires no special…
- The #1 Mistake Homeowners Make with a Slow Kitchen Drain (and the Real Fix) — Before you reach for harsh chemicals, learn the right way to fix a slow kitchen sink drain and prevent future clogs.
- The 5-Minute Trick to Stop a Dripping Single-Handle Faucet (No Plumber Needed) — A persistent drip from your single-handle faucet is usually caused by a worn-out cartridge, a repair you can typically complete yourself in…
- The $5 Secret to Silencing That Annoying Dripping Faucet (Single-Handle Fix) — Stop a dripping single-handle faucet with a simple and inexpensive DIY fix by replacing a worn-out o-ring or washer.
- The Tiny Gap That Destroys Your Bathtub's Structure (and How to Seal It) — Recaulking your bathtub correctly is crucial to prevent water damage, mold growth, and structural issues in your bathroom.
Frequently asked questions
How often should I re-caulk my bathroom sink?+
Ideally, inspect your caulk annually and plan to re-caulk your bathroom sink every 5 to 10 years, even if it looks okay. High-quality silicone caulk lasts longer, but constant exposure to moisture and cleaning products will eventually degrade its seal.
What's the best type of caulk for a bathroom sink?+
100% silicone caulk is generally considered the best for bathroom sinks due to its superior water resistance, flexibility, and natural resistance to mold and mildew. Look for products specifically labeled for 'kitchen and bath' use with mildewcide additives.
Can I caulk over old caulk?+
No, you should never caulk over old caulk. This is the most common mistake. New caulk won't adhere properly to old caulk, trapping moisture and encouraging mold growth, ultimately leading to a failed, unsanitary seal. Always remove all old caulk first.
How long does new caulk need to dry before using the sink?+
Most silicone caulks require 24 to 48 hours to fully cure before being exposed to water. Always check the specific manufacturer's instructions on your caulk tube for precise cure times. Avoid using the sink or getting the caulk wet during this period.
Why does my caulk keep getting moldy?+
Caulk often gets moldy due to improper surface preparation (old caulk or moisture trapped underneath), using non-mildew resistant caulk, high humidity in the bathroom (lack of ventilation), or simply old, degraded caulk that has lost its protective properties.

Discussion
Loading comments…