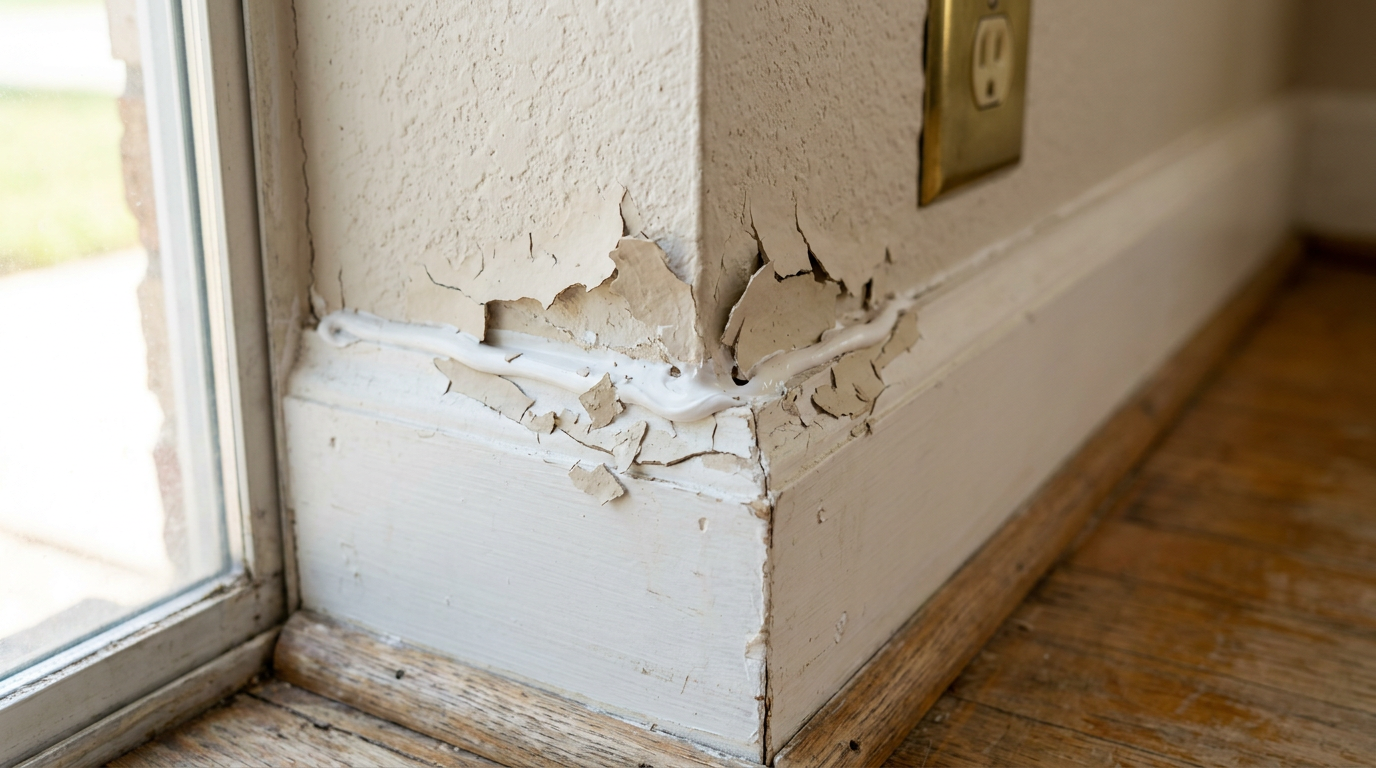
- Tools: Retractable utility knife, sharp snap-off blades.
- Safety: Wear cut-resistant work gloves; cured rubbery caulk loves to make blades skate.
- If this doesn't work: If the caulk is hard and brittle, warm it with a hair dryer on medium heat for 30 seconds before you scrape.
General remodeling · Renovation planning
| Project category | General remodeling |
|---|---|
| Problem type | Renovation planning |
| Trade required | General contracting |
| Urgency | Planned project |
| Safety risk | Low safety risk |
| DIY suitability | Pro recommended |
| Cost category | Major investment |
| Typical timeline | Design and permitting often 2–4 months before work starts |
| Contractor type | General contractor |
Repair option
Phase the work and fix the building envelope first.
Replacement option
Full renovation with permits, design, and a general contractor.
Common causes
- Space no longer fits how the household lives
- Resale preparation
- Deferred maintenance stacking up
Relevant tools:project cost estimatorcompare quoteshome improvement material prices
Published November 11, 2026Last updated November 11, 2026
Tools & materials you'll need
Affiliate links- AmazonDripless caulk gun1 · smooth pressure rod, 12:1 thrust ratio
- AmazonUtility knife with fresh blades1 · for slicing out old sealant
- Amazon5-in-1 painter's tool1 · for scraping corner joints
- Amazon120-grit sanding sponge1 · for feathering paint edges
- Amazon2-inch angled trim paintbrush1 · nylon-polyester blend
As an Amazon Associate FixlyGuide earns from qualifying purchases — at no extra cost to you. Prices and availability are accurate as of publication and subject to change.
Quick Answer
To fix paint peeling, bubbling, or cracking off freshly caulked trim, you’ve got to strip out the bad bead, clean off any oily junk with isopropyl alcohol, and come back with an elastomeric or premium acrylic latex caulk that’s actually labeled paintable. Standard silicone never takes paint, and cheap painters caulk shrinks and skins over too slowly, which can snap brittle latex paint films as it dries. Give the new sealant a real cure window — at least 2 to 4 hours — before you hit it with high-quality acrylic interior trim paint.
The Problem
You spend a whole weekend caulking every baseboard, door casing, and crown moulding seam in the living room. Looks clean. Looks tight. Then you roll or brush on your finish paint, wait for it to dry, and it pulls away from the caulk line like water off a waxed hood. Or worse — two days later, the paint film splits into little spiderwebs (alligatoring), cracks right down the middle, or peels off in long, rubbery strips. No fun.
This isn’t just a looks issue. A cracked or peeling paint seam leaves wood or MDF sitting out there exposed to humidity, and that’ll swell up and start opening joints before long. Once paint rejects caulk, a second coat won’t save it. The bond between the paint film and the sealant is already cooked, so every coat you lay over it is just more stuff waiting to flake off.
How It Works
If you want to know why paint fails over caulk, you need a quick read on surface tension and how these materials actually cure. Interior trim paints are water-based latex or acrylic emulsions. When wet paint hits a surface, it needs microscopic “tooth” and chemical compatibility so it can wet out and form one continuous film.
Sealants come in two main flavors: paintable water-based acrylics/hybrids and non-paintable 100% silicones. 100% silicone has crazy-low surface energy. Water-based paint just can’t wet it out; the paint beads up right away and leaves bare spots.
Even with paintable acrylic latex caulk, timing and movement matter. Caulk cures from the outside in as the water leaves, and it can shrink anywhere from 5% to 25% by volume depending on the solids content. Paint, on the other hand, dries into a rigid plastic skin as the binders cross-link. If you paint over caulk that’s only skinned over — even if the tube says "paintable in 30 minutes" — the wet core underneath keeps shrinking. As that core pulls inward, it stretches the paint film past its limit and rips it open. That’s your crazing or alligatoring right there.
| Caulk Chemistry | Surface Energy | Elastic Flexibility | Paintable? | Best Used For |
|---|---|---|---|---|
| 100% Silicone | Extremely low | 25% to 50% | No (Never) | Sinks, tubs, non-painted wet zones |
| Cheap Painter's Caulk | Moderate | 5% to 10% | Yes (with long dry times) | Budget drywall patch seams |
| Siliconized Acrylic | Moderate-High | 12.5% to 15% | Yes (after full skinning) | Interior doors, baseboards, trims |
| Urethane / Elastomeric Acrylic | High | 25% to 50% | Yes (superior bond) | High-movement trim, crown moulding |
| Modified Polymer (MS / Hybrid) | High | 25% to 35% | Yes (check specs) | Dissimilar materials, exterior casing |
Step-by-Step Fix
Follow this full reset to cut out the failed caulk, clean the joint right, and seal your trim with a paint-ready bead that’ll hold up.
-
Slice the Failed Bead Free — Grab a sharp utility knife with a fresh blade and score the seam where the caulk meets the wood trim and where it meets the drywall. Keep the blade shallow, about a 15-degree angle, so you’re slicing under the caulk instead of chewing up the trim face or tearing the drywall paper.
- Tools: Retractable utility knife, sharp snap-off blades.
- Safety: Wear cut-resistant work gloves; cured rubbery caulk loves to make blades skate.
- If this doesn't work: If the caulk is hard and brittle, warm it with a hair dryer on medium heat for 30 seconds before you scrape.
-
Scrape Out Old Sealant Residue — Pull the sliced strip out by hand, then use a stiff 5-in-1 painter's tool or a pull-type caulk scraper to dig out whatever’s left packed deep in the corner. Every last speck of old silicone or dried paint film has to come out down to bare substrate.
- Tools: 5-in-1 painter's tool, contour scraper.
- Pro Tip: Keep the tool flat so you don’t gouge soft pine or dent MDF trim.
-
Neutralize and Degrease the Joint — Soak a clean lint-free microfiber rag in 70% or 91% isopropyl alcohol and scrub the seam hard. If you think silicone was there before, follow up with mineral spirits and then an alcohol wipe-down to lift the invisible silicone oils that kill paint adhesion.
- Tools: Isopropyl alcohol, denatured alcohol, lint-free shop rags.
- Warning: Ventilate the room well; don’t use strong solvents near open pilots or baseboard heaters.
-
Sand the Joint Shoulders — Lightly rub the paint edges along the wall and trim with 120-grit sandpaper wrapped around a small foam sanding block. Feather out any ragged paint edges left by the blade so you don’t trap loose flakes under the new bead.
- Tools: 120-grit sanding block, shop vacuum.
- Check: Run your bare index finger down the trim edge; if you feel a hard ridge, keep feathering with 180-grit paper.
-
Vacuum Out Debris — Vacuum the whole joint length with a narrow crevice attachment and a fine-dust filter. Dust sitting in that recess will wreck caulk adhesion, and then the back of the bead lets go a few months later.
- Tools: Wet/dry shop vac with brush and crevice attachments.
-
Cut the Caulk Tube Tip at a Precise Angle — Cut the plastic nozzle on your premium elastomeric acrylic latex caulk at a clean 45-degree angle, opening it only enough to give you a 1/8-inch hole. Puncture the inner foil safety seal through the nozzle using the long puncture wire attached to your caulk gun.
- Tools: Heavy-duty utility knife, dripping-resistant smooth rod caulk gun (12:1 thrust ratio or higher).
- Common trap: Cut the nozzle too wide and you’ll dump out too much material, which turns into a smeary mess when you tool it.
-
Lay a Continuous, Uniform Bead — Hold the gun at a 45-degree angle to the seam, keeping the cut nozzle bevel parallel to the trim edge. Squeeze the trigger with steady pressure while you push or pull the gun smoothly along the corner, forcing caulk deep into the void instead of letting it sit loose on top.
- Target Bead Size: Keep the wet bead width between 1/8 inch and 3/16 inch across standard trim gaps.
- Technique: Keep your hand speed steady; let off the trigger before you lift the tip so you don’t leave dog-ear blobs.
-
Tool the Bead Smooth — Right away, smooth the bead with a damp lint-free foam sponge, a specialized silicone profiling tool, or a clean wet finger dipped in plain warm water. Press light, push the caulk against both surfaces, and shear off the excess from the outer edges.
- Tools: Damp rag or small bowl of clean tap water.
- Avoid: Don’t spray soapy water onto wet acrylic caulk — soap breaks surface tension and can mess with paint adhesion later.
-
Wipe Off the Feathers — Run a damp microfiber cloth parallel to the joint, staying 1/4 inch away from the bead itself, to pick up any paper-thin residue smeared onto the flat faces of the trim or drywall. Those tiny “flash” margins are notorious for cracking under paint.
- Critical detail: Check for thin translucent films; wipe them completely clear before they dry.
-
Respect the Real Cure Window — Ignore the marketing that says "paintable in 20 minutes" unless you’re using an oil-based primer. For interior latex paint, let the elastomeric caulk cure for a full 2 to 4 hours under normal conditions (70°F and 50% relative humidity); give it 8 to 12 hours in damp or cold rooms.
- Testing cure: Press your fingernail lightly into an inconspicuous corner; if the caulk feels soft and gummy like dough, it’s still giving off water — don’t paint it yet.
-
Prime the Transition (If Paint Crazing Persists) — If you’re using deep-base interior paints or high-gloss enamels that pull hard while drying, brush a thin coat of fast-drying shellac-based or acrylic bonding primer right over the cured caulk line. Let it dry for 45 minutes to seal the surface.
- Tools: 1.5-inch angled synthetic trim brush, bonding primer.
- Why this works: The primer gives you a tough, even barrier that keeps the finish paint from reacting to any leftover caulk plasticizers.
-
Apply Two Thin Finish Coats — Put on your finish trim paint with a high-density foam roller or a 2-inch synthetic sash brush, keeping the coats thin and even. Let the first coat dry to touch (roughly 2 hours) before the second one goes on, or you’ll drag the half-set film around.
- Tools: 2-inch angled nylon/polyester sash brush.
- Pro Tip: Don’t work the brush back and forth too much over the caulk line; lay it down and let it level out on its own.
Common Causes
- The Wrong Caulk Chemistry (Silicone Contamination): Folks grab 100% silicone thinking “more water protection is better.” No dice. Nothing sticks to silicone — not even high-end bonding paints. The paint beads up, pulls away, or falls off in sheets.
- Painting Before the Core Cures: Caulk gives off water as it cures, and that shrinkage matters. If you paint the second that outside skin forms, the shrinking core drags the fresh paint film inward and snaps it into thousands of tiny hairline cracks (crazing).
- Using Cheap "Painter's Caulk": Standard builder-grade $2 painter's caulk has a lot of water and very little solids. It shrinks a bunch — often more than 20% volume loss — and it doesn’t have much elasticity. As the house moves with the seasons, the caulk splits open and takes the paint with it.
- Excess Caulk Smearing (Flash Edges): When you smooth the bead, if you drag material too far across the drywall or trim, you leave an ultra-thin feather edge. That paper-thin film dries too fast, doesn’t have enough strength, and curls off the wall once paint hits it.
- Substrate Dust and Grime: Squeezing caulk right onto sanding dust, grease, or leftover drywall compound gives you a weak bond. The caulk lets go of the wall, and the paint follows right along.
Common Mistakes
- Trusting the "20-Minute Paintable" Label Blindly: Fast-dry claims assume perfect conditions (75°F, low humidity, dry wood). In a chilly house or a humid climate like a Dallas spring, 20 minutes leaves the core basically soupy; paint it that early and you’ll pay for it with cracks. Wait at least 2 to 3 hours.
- Smoothing with Soapy Water: Dish soap in the water leaves a slick detergent film on the caulk bead. Paint won’t stick to that. Always tool paintable acrylics with a finger dampened in plain clean water or a dry silicone tooling profile.
- Painting over Old, Cracked Caulk: Smearing new caulk over failed, cracked sealant never works. The old fracture still moves with temperature swings, and that stress goes straight through the fresh bead and snaps the new paint line within days. Strip it out completely.
- Cutting the Nozzle Tip Flat and Wide: Snipping the tip straight across at a 90-degree angle gives you a fat, uncontrolled stream that rolls over the trim edge. Cut the tip at an exact 45-degree angle with an opening no bigger than a pencil lead (1/8 inch) if you want control.
- Using Oil Paint Directly on Fresh Water-Based Caulk: Oil-based enamels dry by oxidation, not water evaporation. Trap wet moisture under an alkyd paint film and you stop the caulk from drying right. The result is sticky, uncured caulk that can ooze oil through the finish paint for weeks.
Cost & Time Breakdown
| Task | DIY Cost | Pro Cost | Time |
|---|---|---|---|
| Stripping Failed Caulk & Cleaning | $10–$25 (blade, alcohol, scrapers) | $150–$250 | 1–2 hours per room |
| Resealing with Elastomeric Caulk | $8–$15 per tube | $120–$200 | 45–60 minutes |
| Priming Stubborn Seams | $15–$25 (quart of primer + brush) | $75–$150 | 30 minutes |
| Final Finish Painting (2 Coats) | $20–$40 (paint on hand / supplies) | $200–$450 | 1.5–2.5 hours |
Tips & Prevention
- Upgrade to Class 25 or 35 Elastomeric Sealants: Skip ordinary painter's caulk and use elastomeric acrylic sealants (like Sashco Big Stretch or DAP Dynaflex 230). They handle joint movement up to 25% to 35% without pulling away from trim or snapping paint.
- Acclimate Wood and MDF Trim Before Sealing: Don’t caulk new trim the same day it shows up from an outdoor lumberyard. Let the wood adjust to indoor humidity for at least 72 hours, or moisture changes will open the joints and rip the paint seams apart.
- Keep Nozzle Openings Microscopic: A bead should tuck neatly into the inside corner of the trim. If your bead is wider than 3/16 inch on interior trim, you’re using too much material and setting yourself up for shrink-cracking under the paint film.
- Run the HVAC During Work: Don’t caulk and paint in dead, unconditioned air. Keep the AC or furnace running so the room stays around 40% to 55% humidity and the caulk cures evenly.
- Watch for Winter Seam Separation: During the winter heating season, homes dry out and framing lumber contracts, so tight summer caulk joints stretch. If paint lines crack every January, switch to an elastomeric caulk rated for extreme joint expansion.
When to Call a Professional
Most bad trim caulk can be beat with razor blades, elbow grease, and some patience. But if you find heavy black mold in the drywall paper behind the trim, that’s not a caulking problem — you’re likely looking at an active building envelope or plumbing leak, and that calls for a licensed remediation contractor. Same goes for door casings and crown moulding seams that keep snapping open even after you use elastomeric caulk; that usually means real foundation movement, undersized floor joists, or serious settling, and you’ll want a structural engineer to take a look before you repaint a thing. I pulled a water heater in Frisco last month that had exactly this kind of recurring trim failure nearby — turned out the leak had been softening the wall for ages.
Related Articles
Keep troubleshooting with these hand-picked guides from FixlyGuide:
- Dryer Smells Burnt? 5 Common Causes and the Step-by-Step Fix — Smelling burning from your dryer? Learn to identify rubber, electrical, and lint odors, clean blocked chutes, and replace worn drive belts…
- Kitchen Backsplash Caulk Cracking? 5 Causes and the 12-Step Fix — Kitchen backsplash caulk cracking or pulling away? Learn why rigid grout and cheap caulk fail, and follow these 12 pro steps to seal the co…
- Exterior Caulk Splitting Between Brick and Siding? 5 Causes and the 12-Step Fix — Fix split caulk joints where brick meets siding. Stop wind-driven rain leaks with this pro guide to joint prep, backer rods, and polyuretha…
- Shower Door Leaking at the Bottom? 6 Causes and How to Seal It Tight — Water pooling on your bathroom floor? A leaking shower door is the likely culprit. Here are the common failure points and how to fix them f…
- Glass Cooktop Burnt? 10 Steps to Remove Baked-On Rings Without Scratching — Struggling to clean burnt food rings off your glass cooktop? Learn the proper razor technique and soaking fix to restore your stove without…
- Why Is My New Paint Cracking? 9 Causes of 'Alligatoring' and How to Fix It — Seeing fine, alligator-skin cracks in your new paint? It's a common problem called 'alligatoring'—here are the nine most likely causes and…
Should you do this yourself?
Answer five quick questions before you start. Safety outranks savings every time.
Your experience with work like this
How high do you have to work?
Does the job involve any of these?
Will it need a permit?
Specialty tools
Free and instant. Educational guidance only — not a quote, inspection, or professional diagnosis.
Estimate your own project cost
National averages are a starting point. Enter your details for a range that fits your house.
Interior paint estimator
- Paint$96
- Supplies (tape, rollers, drop cloth)$35
- Estimated total (DIY)$131
Hiring a pro? Add roughly $1.50–$4.00/sq ft for labor depending on prep work and trim detail.
Educational estimate only — always confirm with written local bids.
What should this project cost?
Enter your project details for a realistic cost range before you call anyone.
Cost depends heavily on which system turns out to be the source.
- Regional adjustment
- National average
- Labor share (typical)
- ~$1,620
- Quotes to collect
- 3 written estimates
Educational estimate based on national averages — not a binding quote. Always confirm with written local estimates.
Fixly Project Decision Box
- DIY difficulty
- Professional Recommended
- Estimated time
- Monitoring over 60–90 days · engineer visit 1–2 hours
- Cost level
- Major Project
Main tools / materials
- Crack monitor or pencil marks with dates
- Tape measure
- Marble or level for floor slope
When to stop and call a pro
- A crack wider than 1/4 inch or growing month over month
- Doors and windows that suddenly stick or will not latch
- Stair-step cracks in brick or block
- Separation between walls and ceilings or floors
Need professional help?
Get a Foundation EvaluationGet the print-ready PDF of this guide
A clean, ad-free, printable version you can keep on your phone or pin to the workshop wall. Free with a FixlyGuide account.
- Print-optimized layout
- Tools, materials & every step included
- Saved to your account
Recommended for DIYers & woodworkers
Sponsored
The Top 20 Tools for Workshops of Any Budget
No stationary machines or power tools required — plus 3 fundamental tools that can't be bought at any price.
Get the free guide
Ted's Woodworking — The #1 Woodworking Resource
Detailed instructions, dimensioned drawings, materials & cutting lists, and 3D schematics for every skill level.
See the plansSponsored: links above are affiliate links. FixlyGuide may earn a commission on qualifying purchases — at no extra cost to you.
Frequently asked questions
Why is my paint beading up on caulk like water?},{answer:+
Because 100% silicone has an exceptionally low surface energy, which prevents water-based latex paint from spreading and wetting out. The liquid paint pulls back into droplets like water on a freshly waxed car hood. If you applied pure silicone, no paint will ever bond to it; you must cut it out completely or use an specialized oil-based transition primer.
Discussion
Loading comments…