- The 7 Critical Home Inspection Mistakes Most Homeowners Make (and How to Spot Them) — Discover the crucial home inspection mistakes homeowners commonly overlook and learn how to identify potential problems before they become…
- The 7 Critical Home Inspection Checks Most Homeowners Miss (And How to Spot Them) — Discover the crucial annual home inspection checks often overlooked by homeowners, and learn how to identify potential issues before they b…
- The 1 Mistake Homeowners Make with Ice Dams (and How to Fix It SAFELY) — Learn the safest and most effective ways to remove ice dams from your roof and prevent costly damage to your home, avoiding common DIY pitf…
- Glass Cooktop Burnt? 10 Steps to Remove Baked-On Rings Without Scratching — Struggling to clean burnt food rings off your glass cooktop? Learn the proper razor technique and soaking fix to restore your stove without…
- Why Does My LED Bulb Keep Burning Out? 6 Causes and How to Fix It — LED bulbs burning out prematurely? Learn how trapped heat, flattened socket tabs, incompatible dimmers, and voltage spikes kill LED drivers…
General remodeling · Renovation planning
| Project category | General remodeling |
|---|---|
| Problem type | Renovation planning |
| Trade required | General contracting |
| Urgency | Planned project |
| Safety risk | Low safety risk |
| DIY suitability | Pro recommended |
| Cost category | Major investment |
| Typical timeline | Design and permitting often 2–4 months before work starts |
| Contractor type | General contractor |
Repair option
Phase the work and fix the building envelope first.
Replacement option
Full renovation with permits, design, and a general contractor.
Common causes
- Space no longer fits how the household lives
- Resale preparation
- Deferred maintenance stacking up
Relevant tools:project cost estimatorcompare quoteshome improvement material prices
Published November 7, 2026Last updated November 7, 2026
Tools & materials you'll need
Affiliate links- Amazon1/4-inch and 5/16-inch nut drivers1 set · For cabinet sheet metal screws and duct clamps
- AmazonWet/dry shop vacuum1 · With narrow crevice tool attachment
- AmazonDryer vent cleaning brush kit1 kit · Flexible 10-to-20-foot drill-powered or hand rod
- AmazonLED work light or headlamp1 · For inspecting dark cabinet cavities
- AmazonReplacement drive belt1 · Must match your exact dryer model number
- AmazonReplacement idler pulley1 · Recommended when replacing a worn or seized belt
- AmazonSemi-rigid 4-inch aluminum transition duct6–8 ft · UL 2158A rated, replacing any plastic or thin foil duct
- Amazon4-inch worm-drive metal duct clamps2 · To securely clamp vent pipe without screws
As an Amazon Associate FixlyGuide earns from qualifying purchases — at no extra cost to you. Prices and availability are accurate as of publication and subject to change.
Quick Answer
A clothes dryer that smells burnt usually means one of three things: packed lint roasting against the heater element housing, a slipping rubber drive belt baking against a seized idler pulley, or a failing motor caked in fine debris. Unplug the unit right away, shut off the gas supply if you've got one, and don't run another cycle until you inspect the exhaust duct, clean behind the lint trap chute, and make sure the drum spins freely by hand.
The Problem
Few household smells hit the panic button faster than that acrid stink of something scorching inside the laundry room. One minute you're tossing in bath towels, and twenty minutes later the hallway smells like an electrical fire or toasted wool. No thanks.
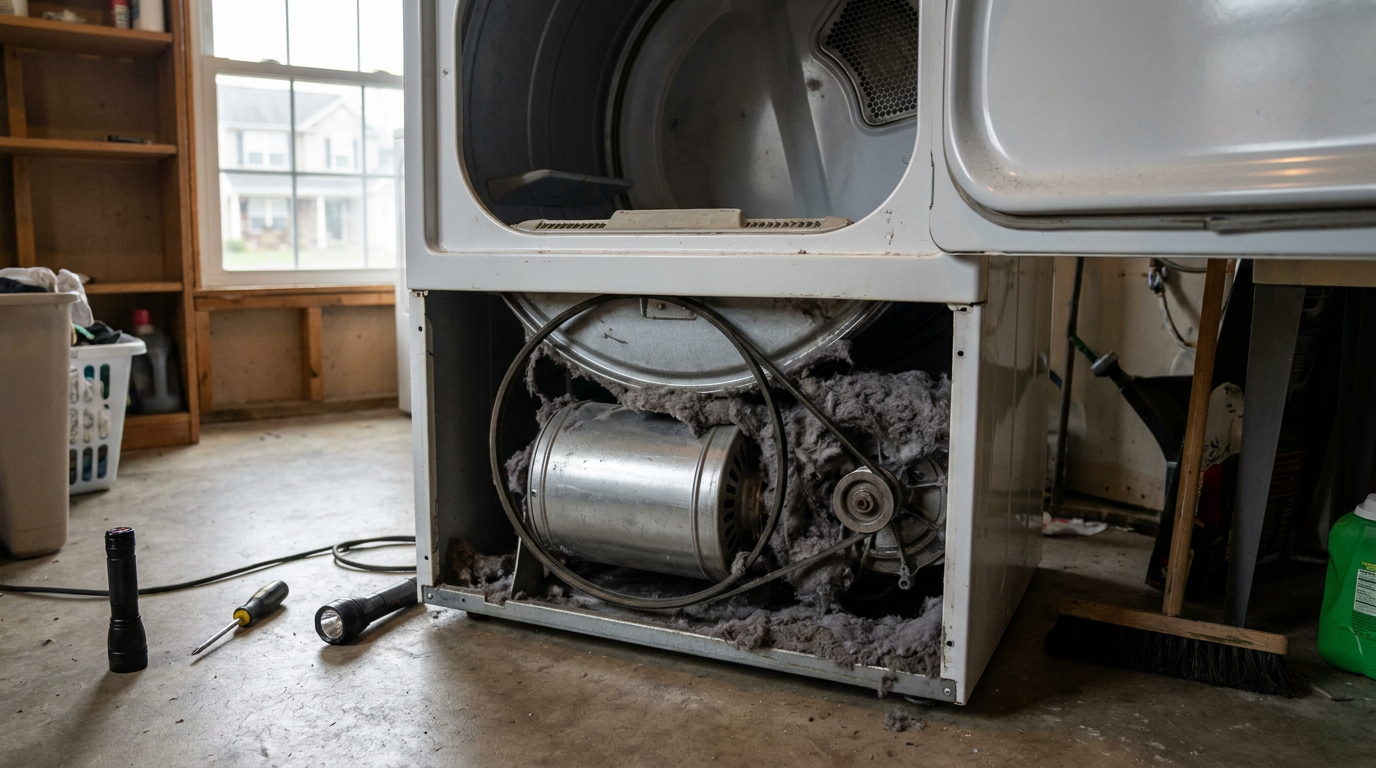
Most homeowners jump straight to worst-case thinking: either the thing's about to catch fire, or the control board fried itself. Sometimes, sure, it really is a fire hazard. Lint is basically flash paper; dried cotton fibers can ignite at just over 500°F. But plenty of times, the real problem is mechanical friction—a worn part screaming under load—or plain old user error, like drying a synthetic blanket on high heat or leaving an ink pen in a pocket. I've pulled a dryer in Frisco last month that had exactly this leak of hot, burnt smell, and it turned out to be a belt glazed to nothing and a lint pile behind the chute big enough to fill a coffee can.
You can't just shrug it off. That's a bad bet. A dryer fire isn't some abstract number on a chart. According to national fire incident data, dryers cause thousands of residential structure fires every year in the United States, with failure to clean lint accounting for roughly a third of them. And even if lint isn't burning, a friction-scorched rubber belt or a seized bearing can throw off enough heat to scorch clothes and cook internal wire harnesses. You need to pin down the exact smell, find the mechanical root, and fix it before you hit "Start" again.
How It Works
To chase down the smell, you've got to know how the dryer makes heat, moves air, and dumps that air outside. Room air gets pulled in through perforations in the rear or bottom cabinet. In an electric dryer, that air moves across exposed nichrome coil heating elements inside a metal duct. Those coils glow red-hot, running anywhere from 1,000°F to 1,200°F internally. In a gas dryer, an igniter lights a gas burner that feeds through a steel combustion tube.
[ Room Air Intake ]
        ↓
[ Heating Element / Gas Burner (1,000°F+ at heat source) ]
        ↓
[ Rotating Drum (120°F–160°F operating temp) ]
        ↓
[ Lint Screen Chute & Housing ]
        ↓
[ Blower Wheel (Driven by Motor Shaft) ]
        ↓
[ Exhaust Vent Duct & Outdoor Flapper ]
A heavy-duty electric motor spins the blower wheel to pull heated air through the tumbling drum, keeping normal internal drum temps between 120°F and 160°F. The drum itself rotates on a long rubber drive belt wrapped around the motor's drive pulley and tightened by an idler pulley assembly.
Air leaves the drum through the lint screen, drops down a plastic or stamped metal chute, passes through the blower wheel, and heads out the exhaust duct to the outside wall. If anything chokes that airflow—say, 40 feet of crushed flex ducting or three years of compacted dog hair—heat backs up fast. Operating thermostats and thermal cut-off fuses are supposed to kill power if internal air temps climb past 200°F to 260°F, but fine lint floating near the raw heating element will scorch long before a safety fuse trips. If the belt slips because the idler pulley bearing seizes, the motor shaft keeps spinning at 1,725 RPM and grinds right against the stationary rubber. That friction turns the belt into molten, smoking rubber in under three minutes. Ugly stuff.
Step-by-Step Fix
Before you drag the dryer away from the wall, shut it down. Let the machine cool completely for at least 30 to 45 minutes so you don't burn your hands on the drum or heater housing.
-
Cut All Power and Fuel Sources — Unplug the heavy-duty 240V three- or four-prong electrical plug from the wall receptacle (or flip the dedicated double-pole 30-amp circuit breaker at the main electrical panel). If you have a natural gas or propane dryer, find the shut-off valve on the rigid gas supply line behind the unit and turn the yellow or red handle a quarter-turn perpendicular to the pipe. Don't crack open a dryer cabinet while power is live; line voltage can kill.
- Safety: Check that the power is off by pressing the power/start button on the console before you take anything apart.
-
Categorize the Odor — Open the dryer door and smell inside the drum, then sniff around the back vent area and the bottom front panel. A sweet, organic, smoky smell points straight to scorched lint or cotton fabric. A sharp, stinging chemical smell that burns your nostrils usually means a melting rubber belt or plastic. An ozone, fishy, or soldering-iron smell points to an overheated electric motor, melted wiring terminal block, or scorched heating element insulator.
- If this doesn't work: If the smell is straight unburned gas—rotten eggs or sulfur—get out of the house and call the gas utility company from outside.
-
Check the Drum Free-Spin and Tension — Reach inside the drum with both hands and spin it counterclockwise, then clockwise. You should feel a little, steady resistance from the motor and belt, along with a quiet, smooth mechanical hum. If the drum spins totally free like a carnival wheel with zero drag, the drive belt snapped or slipped off the idler pulley. If the drum is locked solid, won't budge, or gives you a nasty metal-on-metal squeal, the idler pulley bearing, drum support rollers, or motor bearings have seized.
-
Pull the Unit and Disconnect the Exhaust Duct — Slide the dryer 2 to 3 feet out from the wall. Loosen the 4-inch worm-drive clamp holding the exhaust transition hose to the back exhaust port using a 5/16-inch nut driver or flathead screwdriver. Pull the duct free and look inside with a bright LED flashlight. If the interior is lined with a felt-like layer of lint thicker than 1/8 inch, or if the flexible pipe is crimped flat against the baseboard, your exhaust air has been backing up and cooking the internal cabinet.
- Material check: If you find white vinyl accordion ducting or thin foil foil-wrapped wire coils, cut them out and toss them immediately; they violate IRC building codes and are major fire hazards. Replace them with rigid or semi-rigid aluminum.
-
Deep-Clean the Lint Chute Housing — Pull the lint screen all the way out of its slot on top or inside the door rim. Take an 18-to-24-inch flexible dryer lint brush and feed it straight down through the lint screen slot into the lower blower chute. Twist the brush clockwise to grab impacted lint clumps, pull it out, wipe it clean, and repeat until it comes back clear. Hook an 18-inch flexible crevice adapter to your wet/dry vacuum and shove it down the chute to pull out the leftovers.
-
Inspect the Exterior Flapper and Wall Duct — Walk outside to where your exhaust duct exits through the exterior wall or roof. Check the louvers or damper hood. Turn the dryer's exterior flapper with your finger; it needs to swing freely without sticking. If bird netting, animal nesting material, or clumps of lint have glued the damper shut, clear it out completely. Run a rotating drill-powered dryer duct brush through the full length of the rigid wall pipe from outside to strip out internal blockages.
-
Remove the Access Panel to Inspect Components — Depending on your dryer brand (Whirlpool, GE, LG, or Samsung), remove either the lower front access panel or the entire rear galvanized metal panel. You'll need a 1/4-inch nut driver, a 5/16-inch nut driver, or a Phillips screwdriver. Keep track of the sheet metal screws—those little guys love to disappear. Once the panel is off, shine your light directly into the heater box and around the base of the drive motor.
- Visual check: Look for black rubber dust sprayed along the cabinet floor (a sign of a deteriorating belt) or charred, blackened lint around the heater box openings.
-
Inspect the Drive Belt and Idler Pulley Assembly — Find the idler pulley, which is the spring-loaded metal bracket holding a plastic or metal wheel that tensions the belt against the motor pulley. Wiggle the idler pulley wheel by hand; it should spin freely without wobbling, grinding, or seizing. Check the rubber belt for bald spots, longitudinal cracking, frayed edges, or melted rubber patches. If the belt is glazed smooth or brittle, slip the tension arm, unthread the old belt from around the drum, and install an OEM-grade replacement.
-
Examine the Heating Element and Terminals — On electric dryers, unscrew the cover to the heater tube. Inspect the coiled nichrome wire. The coils need to sit centered within the ceramic insulator mounts. If a coil has sagged, broken, or touched the metal casing wall, it creates a partial short circuit. That makes the element glow white-hot constantly no matter what the thermostat says, roasting nearby lint. Check the wire connections on the high-limit thermostat and thermal cut-off fuse for melted spade terminals or charred insulation sleeves.
-
Vacuum the Interior Base and Reassemble — Use your wet/dry vacuum with a plastic nozzle, never metal near electrical terminals, to vacuum every square inch of the lower cabinet base, the motor windings, the blower wheel blades, and the outside of the heater box. Wipe down any oily residue on metal brackets. Reinstall the access panels, driving the sheet metal screws snugly without stripping the thin metal holes. Reconnect the semi-rigid 4-inch exhaust vent, tighten the worm-drive clamp securely, restore power and gas, and run an empty 10-minute "Air Fluff" (no heat) test to make sure the drum spins quietly before you run a heated cycle.
Common Causes
Figuring out a burning dryer really comes down to finding which part drifted outside its operating range. These are the five usual suspects:
- Accumulated Lint in the Heater Casing — Even if you clean the lint screen before every cycle, roughly 10% to 15% of fine lint slips past the mesh edges. Over several years, that lint settles onto the floor of the dryer cabinet and gets pulled right into the heater element box. When the element hits 1,000°F, that lint smolders and chars, pushing a campfire-like odor into the drum and your house.
- Seized Idler Pulley or Drum Roller — The idler pulley keeps tension on the long drive belt. Over time, hair, synthetic threads, and dust wrap around the idler pulley shaft and bake into the sleeve bushing. When the bearing locks up, the pulley stops turning entirely. The motor shaft keeps spinning, dragging across the stationary rubber belt. That friction scorches the rubber compound in minutes and smells a lot like a burning car tire.
- Severely Blocked Exhaust Duct — If your vent run spans 25 feet with three 90-degree elbows, it creates backpressure. Lint falls out of the air stream and collects in the elbows. When exhaust air can't escape at its designed 150 to 200 cubic feet per minute (CFM), heat builds up inside the cabinet until the drum temperatures climb past safe margins, baking your clothes and heating the appliance cabinet to the touch.
- Burned Motor Windings or Dust Coating — The main motor is an open-frame design with exposed copper windings cooled by an internal fan. If the motor gets choked with dog hair and lint, it can't shed heat. The motor runs hotter than its rated temperature, slowly cooking the protective varnish on the copper wire windings and giving off an acrid, fishy, electrical odor.
- Melted Synthetics or Foreign Objects — Sometimes the machine is fine; the load's the problem. Running synthetic fabrics like nylon, spandex, or rubber-backed bathroom mats on high heat will melt the petroleum-based fibers directly against the drum holes. Same story with crayons, ink pens, or disposable lighters left in pockets—they'll melt against the drum surface and bake through multiple drying cycles.
Common Mistakes
Fix this the wrong way, and you'll be right back where you started—or worse, you'll create a real fire risk. Stay away from these common mistakes:
- Installing flexible foil or white plastic transition ducting. Thin corrugated foil and white vinyl accordion tubes sag, trap moisture, create huge airflow resistance, and crush flat behind the dryer. When hot lint catches fire, vinyl and foil burn right through and spread flames directly into the drywall. Use only rigid aluminum pipe or semi-rigid metal transition ducting UL-listed to 2158A.
- Resetting a tripped thermal fuse and ignoring the root cause. When a thermal fuse blows, it did its job by sacrificing itself to prevent a fire. Splicing the wires together to bypass the fuse, or just slapping a new $12 fuse in without clearing the blocked wall duct or fixing the seized blower, guarantees the new fuse will blow within three cycles—or your dryer will overheat unchecked.
- Spraying WD-40 or standard oil on squeaking drum rollers or pulleys. Liquid lubricants attract fine lint like crazy. Within two weeks, the lint mixes with the petroleum oil to make an abrasive, sticky sludge that permanently locks up the bearings. Use only high-temperature dry silicone, sewing machine mineral oil sparingly where specified, or just replace the worn sealed roller assembly outright.
- Ignoring a slow dry time before the smell starts. A dryer that suddenly takes two or three 60-minute cycles to dry a load of sheets isn't just getting old; its airflow is choking. Running a restricted dryer forces the heating element to cycle on and off constantly at extreme temperatures. The burning smell is usually the last warning before total component failure.
- Cleaning only the lint screen and forgetting the chute. Scraping the felt off the screen does not clear the 14-inch housing underneath it. Over a year of heavy laundry, that lower chute fills like a silo, directly feeding lint into the motor and blower wheel compartment.
Cost & Time Breakdown
| Task | DIY Cost | Pro Cost | Time |
|---|---|---|---|
| Lint Chute & Internal Cabinet Deep Vacuuming | $0–$15 (brush kit) | $120–$180 | 45–60 min |
| Complete Exhaust Vent Cleaning (Wall to Cap) | $20–$35 (drill brush) | $150–$250 | 1–2 hours |
| Drive Belt & Idler Pulley Replacement | $15–$35 (parts) | $175–$275 | 45–75 min |
| Heating Element & High-Limit Thermostat Kit | $25–$65 (parts) | $200–$350 | 60–90 min |
| Drive Motor Replacement | $90–$180 (motor) | $300–$450 | 1.5–2.5 hours |
Tips & Prevention
Keeping a dryer running clean and odor-free doesn't take all week; it just takes a few steady habits:
- Clean the screen after every single load. Don't let two loads stack up. A single load of new cotton flannel or bath towels can leave enough lint on the screen to cut airflow by up to 30% on the next cycle.
- Wash your lint screen with warm water and Dawn once every 3 months. Dryer sheets and liquid fabric softeners coat the fine mesh with an invisible waxy residue. Over time, that film seals the microscopic holes in the screen even when you don't see any lint. Scrub it gently with a soft toothbrush; if water pools on the mesh instead of running straight through, that waxy barrier is choking your machine.
- Perform a seasonal vent flapper check. Every spring and fall, walk outside while the dryer is running with heat. Feel the exhaust airflow coming out of the exterior hood. It should blow with the force of a strong hairdryer, and the exhaust air should feel warm, humid, and lively. If the breeze is weak or barely lifting the flap, your duct run's got a major lint obstruction.
- Replace corrugated flex duct with smooth, rigid metal pipe. Keep your total duct length under 35 feet (subtracting 5 feet for every 90-degree elbow and 2.5 feet for every 45-degree elbow). Smooth-walled rigid aluminum cuts friction loss way down and keeps lint from snagging on internal ridges.
- Never overload the drum beyond two-thirds capacity. Overstuffing forces damp, heavy clothes against the drum baffles, strains the motor shaft, stretches the rubber drive belt, and starves the blower wheel of proper cross-drum airflow.
When to Call a Professional
Most dryer burning odors come from simple lint clogs or worn mechanical parts that anybody with a screwdriver and a shop vacuum can handle. Still, you've got to know when to step back and call a certified appliance technician or a licensed HVAC/duct remediation specialist.
If you open the cabinet and find charred, melted wire insulation where the main 240-volt power cord connects to the machine's internal terminal block, don't try to patch it with electrical tape. That points to high-resistance electrical failure or a loose terminal lug that needs terminal block replacement and maybe wiring harness work.
Call a pro immediately if you smell unburned gas around a gas dryer, even when the appliance is completely turned off. Gas line joints and internal gas valve solenoid coils need specialized leak detectors and proper pipe dope rated for fuel lines. And if your dryer vents through a second-story roof penetration or requires crawling through a 30-foot concealed duct in finished ceiling joists, professional vent cleaners have the heavy-duty air-whips, containment hoods, and reverse-spinning nozzles to clear the line safely without tearing the duct loose inside your walls.
Related Articles
Keep troubleshooting with these hand-picked guides from FixlyGuide:
- The 7 Critical Home Inspection Mistakes Most Homeowners Make (and How to Spot Them) — Discover the crucial home inspection mistakes homeowners commonly overlook and learn how to identify potential problems before they become…
- The 7 Critical Home Inspection Checks Most Homeowners Miss (And How to Spot Them) — Discover the crucial annual home inspection checks often overlooked by homeowners, and learn how to identify potential issues before they b…
- The #1 Mistake Homeowners Make with Ice Dams (and How to Fix It SAFELY) — Learn the safest and most effective ways to remove ice dams from your roof and prevent costly damage to your home, avoiding common DIY pitf…
- Glass Cooktop Burnt? 10 Steps to Remove Baked-On Rings Without Scratching — Struggling to clean burnt food rings off your glass cooktop? Learn the proper razor technique and soaking fix to restore your stove without…
- Why Does My LED Bulb Keep Burning Out? 6 Causes and How to Fix It — LED bulbs burning out prematurely? Learn how trapped heat, flattened socket tabs, incompatible dimmers, and voltage spikes kill LED drivers…
- Baseboard Pulling Away from Wall? 5 Causes and the Step-by-Step Fix — Baseboards pulling away from the wall? Learn how to identify warped studs, re-nail into framing with the right fasteners, and seal gaps per…
Should you do this yourself?
Answer five quick questions before you start. Safety outranks savings every time.
Your experience with work like this
How high do you have to work?
Does the job involve any of these?
Will it need a permit?
Specialty tools
Free and instant. Educational guidance only — not a quote, inspection, or professional diagnosis.
What should this project cost?
Enter your project details for a realistic cost range before you call anyone.
Cost depends heavily on which system turns out to be the source.
- Regional adjustment
- National average
- Labor share (typical)
- ~$1,620
- Quotes to collect
- 3 written estimates
Educational estimate based on national averages — not a binding quote. Always confirm with written local estimates.
Fixly Project Decision Box
- DIY difficulty
- Advanced
- Estimated time
- Homeowner checks 20–30 minutes
- Cost level
- Moderate
Main tools / materials
- Clean air filter
- Garden hose for condenser coils
- Shop vac for the condensate line
When to stop and call a pro
- Burning smell, smoke, or a tripping breaker
- Refrigerant lines iced over or hissing
- Any work inside the sealed refrigerant circuit (EPA-licensed only)
- Gas smell near a furnace — leave and call the utility
Need professional help?
Find an HVAC Pro Near YouGet the print-ready PDF of this guide
A clean, ad-free, printable version you can keep on your phone or pin to the workshop wall. Free with a FixlyGuide account.
- Print-optimized layout
- Tools, materials & every step included
- Saved to your account
Recommended for DIYers & woodworkers
Sponsored
The Top 20 Tools for Workshops of Any Budget
No stationary machines or power tools required — plus 3 fundamental tools that can't be bought at any price.
Get the free guide
Ted's Woodworking — The #1 Woodworking Resource
Detailed instructions, dimensioned drawings, materials & cutting lists, and 3D schematics for every skill level.
See the plansSponsored: links above are affiliate links. FixlyGuide may earn a commission on qualifying purchases — at no extra cost to you.
Frequently asked questions
Why does my dryer smell like burning rubber?},{answer:+
A burning rubber odor almost always points to the drive belt slipping against a locked or sticking component. If the idler pulley bearing seizes, the drum support rollers lock up, or the drum is overloaded, the motor pulley keeps spinning at 1,725 RPM directly against the stalled rubber belt, cooking it within minutes.

Discussion
Loading comments…