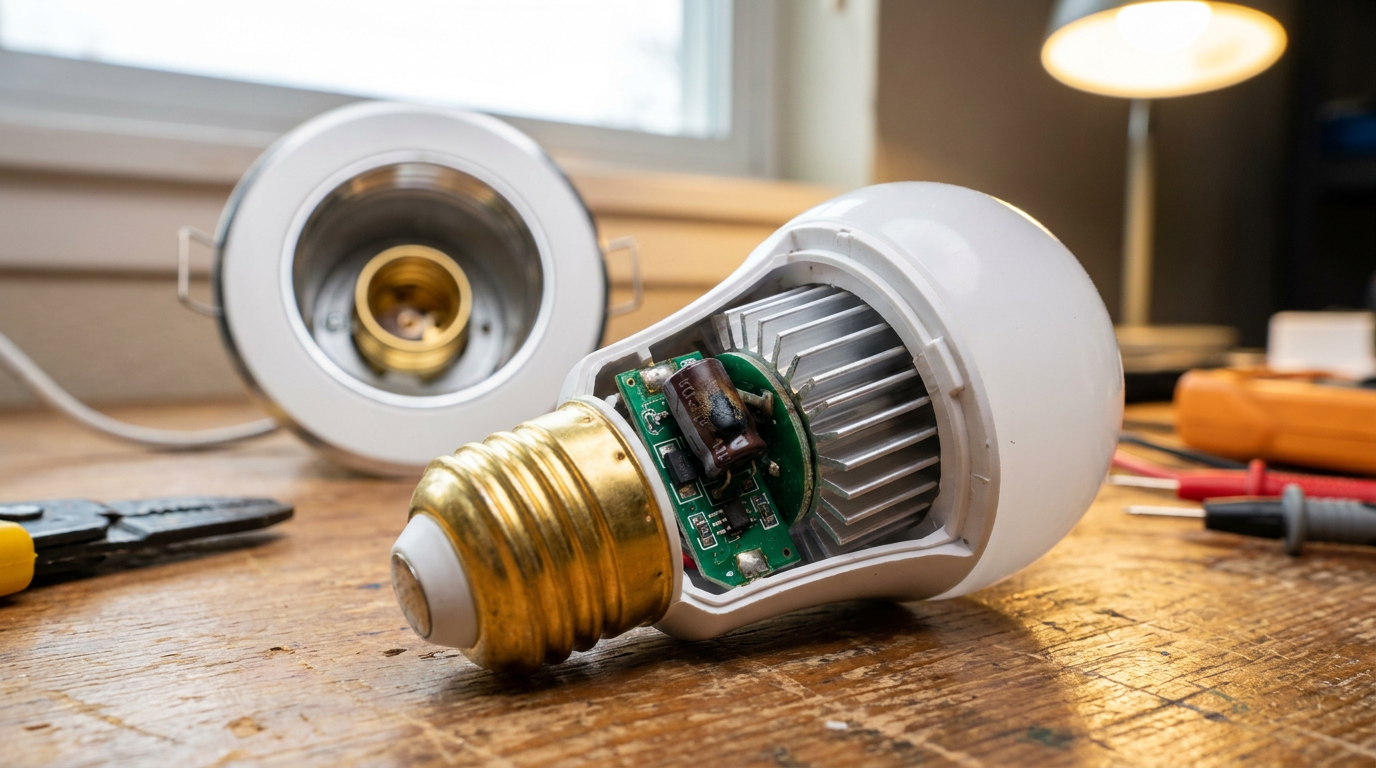
- Pry up the brass contact tab — Grab a clean, dry wooden toothpick or chopstick and slide it gently under the flat brass tab at the bottom of the socket. Pry it up roughly 1/8 to 3/16 of an inch (about 20 to 30 degrees).
- Tool choice: Skip the metal screwdriver, even if you swear the breaker’s off. Wood or non-conductive plastic keeps you out of trouble.
- Caution: Don’t get aggressive. Old porcelain sockets can get brittle, and if you snap that tab, the fixture’s toast.
General remodeling · Renovation planning
| Project category | General remodeling |
|---|---|
| Problem type | Renovation planning |
| Trade required | General contracting |
| Urgency | Planned project |
| Safety risk | Low safety risk |
| DIY suitability | Pro recommended |
| Cost category | Major investment |
| Typical timeline | Design and permitting often 2–4 months before work starts |
| Contractor type | General contractor |
Repair option
Phase the work and fix the building envelope first.
Replacement option
Full renovation with permits, design, and a general contractor.
Common causes
- Space no longer fits how the household lives
- Resale preparation
- Deferred maintenance stacking up
Relevant tools:project cost estimatorcompare quoteshome improvement material prices
Published November 3, 2026Last updated November 3, 2026
Tools & materials you'll need
Affiliate links- AmazonNon-contact voltage testerTo verify circuit is dead before touching socket
- AmazonDigital multimeterTo test line voltage at wall outlet
- AmazonWooden chopstick or toothpickNon-conductive tool to pry up brass contact tab
- AmazonNon-metallic abrasive pad (Scotch-Brite)To clean carbonized socket contacts
As an Amazon Associate FixlyGuide earns from qualifying purchases — at no extra cost to you. Prices and availability are accurate as of publication and subject to change.
Quick Answer
LED bulbs keep burning out for a few usual reasons: too much heat in an enclosed fixture, a weak connection at the socket’s center tab, or a dimmer that doesn’t play nice and feeds dirty current to the bulb’s little driver board. Sure, the box says 15,000 to 50,000 hours, but that sensitive electronics package will cook itself in months if it can’t dump heat or if your house voltage keeps pushing past 125 volts.
The Problem
You bought LED bulbs so you wouldn’t have to keep dragging out the ladder. The carton promised 15,000, 25,000, maybe even 50,000 hours. Sounds great, right? You figure that means ten years of not messing with that hallway ceiling can again.
Then six months later, it starts flickering like a bargain-bin horror prop. A week after that, it’s dead. You put in another ten-dollar bulb, and four months down the road—same story. No dice.
It’ll make you want to throw the thing across the yard.
LEDs don’t have those delicate tungsten filaments that snap just because somebody’s stomping around upstairs. When an LED “burns out,” the diodes themselves are usually fine. What actually died is the tiny, crowded circuit board hiding in the plastic base—the LED driver. That board’s doing the ugly job of turning 120-volt alternating current (AC) into low-voltage direct current (DC). It hates heat. It hates voltage spikes. It really hates a sloppy connection. If your LEDs keep dying in the same spot, something in that fixture is chewing through the driver.
I pulled a water heater in Frisco last month where the owner had gone through the same three bulbs in one mudroom can light. Same exact smell, same blackened base. The bulb wasn’t the real problem—the fixture was roasting them alive.
How It Works
To fix this, you’ve gotta know what’s going on inside one of these screw-in LEDs. There’s a little electronics lab stuffed in there, and it’s working hard every time you flip the switch.
An old incandescent bulb is basically a controlled fire in a glass bottle. Simple. An LED bulb is a solid-state electronic device. Your house power comes out of the wall as 120V AC at 60 Hz. Diodes can’t run on that. They need low-voltage direct current, usually 12V to 24V DC.
120V AC House Current
        │
        ▼
[ Brass Base Contact ]
        │
        ▼
[ Miniature Rectifier & Transformer ] (Inside plastic base)
        │
        ▼
[ Smoothing Capacitors ] ──► (Generates heat; fails above 185°F)
        │
        ▼
[ Aluminum Heat Sink ]
        │
        ▼
[ LED Diode Array ] ───────► (Produces visible light)
Inside that plastic or ceramic collar is the LED driver: little capacitors, resistors, and a bridge rectifier. AC comes in through the socket, the rectifier turns it into DC, and the capacitors smooth out the waveform.
It’s not a perfect setup. About 70% to 80% of the electrical energy an LED uses still becomes heat. The difference is, incandescents throw their heat forward as infrared light. LEDs push theirs backward into the driver board and the aluminum base.
And that’s where things go sideways. If that heat can’t escape, the electrolytic fluid inside those tiny capacitors boils off or dries out. Once one fails, the driver starts sending ugly, spiking voltage straight to the diodes. Then you get flicker, dimming, or a dead bulb that looks fine from the outside.
Step-by-Step Fix
Before you buy another pack of replacements, walk through these steps on the fixture that keeps eating bulbs.
-
Kill power at the service panel — Don’t just flip the wall switch; somebody can bump it while your hands are inside the socket. Go to the breaker panel, find the branch circuit for that room, and shut it off. Then verify the circuit is dead with a reliable non-contact voltage tester right inside the socket housing.
- Safety check: If your tester beeps or flashes red near the socket shell, your switch might be wired on the neutral leg instead of the hot leg—call an electrician immediately.
-
Inspect the bulb's neck and fixture enclosure — Look over the dead bulb for clues before you unscrew it all the way. Is the plastic collar yellowed, brown, or brittle? Is the bulb sitting in a sealed globe, a recessed can, or one of those tight glass jelly-jar fixtures?
- Rule of thumb: Bulbs marked "Not for use in totally enclosed fixtures" need airflow around the base; trapped air can push driver temperatures past 185°F in under an hour.
- If enclosed: You need bulbs specifically rated "Enclosed Fixture Rated" (look for UL 1598 compliance on the packaging).
-
Check the socket contact tab — Shine a bright flashlight straight down into the empty ceramic or plastic socket. Right in the middle of the threaded cylinder, there’s a small brass tab, the hot contact. After years of over-tightening old incandescent bulbs, that springy little tab gets flattened down against the bottom porcelain and loses its tension.
- The consequence: A flattened tab creates a tiny air gap or weak contact with the bulb base. That leads to micro-arcing—small sparks that make a lot of heat and scorch the bulb’s solder point.
-
Pry up the brass contact tab — Grab a clean, dry wooden toothpick or chopstick and slide it gently under the flat brass tab at the bottom of the socket. Pry it up roughly 1/8 to 3/16 of an inch (about 20 to 30 degrees).
- Tool choice: Skip the metal screwdriver, even if you swear the breaker’s off. Wood or non-conductive plastic keeps you out of trouble.
- Caution: Don’t get aggressive. Old porcelain sockets can get brittle, and if you snap that tab, the fixture’s toast.
-
Clean the socket threads and contacts — Use an old dry toothbrush or a small piece of fine Scotch-Brite pad wrapped around a wooden dowel. Gently scrub the threaded aluminum shell and the top of the brass center tab.
- Blow out loose debris, soot, or white oxidation dust with a quick burst of compressed air.
- Check for pitting or black carbon tracks; heavy carbonization means the socket’s been arcing for a while and should be replaced.
-
Verify dimmer switch compatibility — Walk over to the wall control. If the light is on a dimmer, pull the switch plate and look at the switch itself. If it’s got a round dial or an old slider installed before roughly 2012, it’s probably a traditional leading-edge TRIAC dimmer made for plain old incandescent loads.
- Why it matters: Older TRIAC dimmers chop up the AC sine wave in a way that messes with the switching power supplies inside modern LEDs, sending constant spikes that kill the driver.
- The fix: Swap the wall control for a modern digital trailing-edge or LED-rated universal dimmer (such as a Lutron Diva LED+ or Leviton Decora Smart switch).
-
Test for house-wide overvoltage — Grab a digital multimeter, set it to AC Volts (the ~V symbol), and plug the leads directly into a wall outlet on the same circuit branch. Read the display.
- Normal reading: 118V to 122V AC is ideal.
- Acceptable range: 114V to 125V AC.
- Danger zone: If your meter keeps reading 126V to 132V, your utility transformer down the street is tapped too high, or you’ve got a bad service neutral. High voltage makes LED drivers run hot all the time, and that shortens their life fast.
-
Check for mechanical vibration — Look at where the fixture sits. Is it right under a second-floor kids' playroom, hanging off a ceiling fan, or next to a door that slams all day?
- Solid-state diodes handle vibration better than old filaments, sure, but the through-hole solder joints tying the driver transformer to the circuit board can crack from repeated shock.
- Solution: If the bulb lives in a ceiling fan, use rough-service or appliance-rated LEDs with silicone potting compound to soak up the vibration.
-
Install a properly rated, high-spec bulb — Thread in a fresh, name-brand LED bulb (such as Philips, Cree, or TCP). Screw it in until it makes solid contact with the newly raised brass tab, then give it an extra 1/8 to 1/4 turn to seat the threads.
- Do not overtighten: Cranking it down until it squeaks will flatten that contact tab right back down and crack the bulb's ceramic potting base.
-
Restore power and monitor heat generation — Flip the breaker back on and run the light for 45 minutes. Carefully put your hand near the fixture housing, or lightly on it.
- Warm is normal (110°F to 130°F is standard for an LED heat sink).
- If the fixture body or glass shade is too hot to keep your hand on comfortably (over 150°F), ventilation’s lousy and that fixture will cook every LED you put in it.
Common Causes
- Trapped Ambient Heat (Enclosed Fixtures): Standard A19 LED bulbs count on natural convection to pull cooler air past the lower heat fins. In sealed glass flush-mounts ("boob lights") or recessed cans buried under thick attic insulation, heat climbs to over 190°F. The electrolytic capacitors dry out, and the circuit gives up within 300 to 1,000 hours.
- Flattened Socket Contact Tabs: After years of tightening, the center tab gets mashed flat against the socket floor. The bulb base barely touches the metal, so you get constant micro-arcing. That makes tiny spots hotter than 400°F right at the base pin, and the driver fries.
- Old Leading-Edge TRIAC Dimmers: Vintage dimmers chop the AC waveform hard at the front of each cycle. Incandescent filaments didn’t care, but LED drivers see it as repeated voltage punches 120 times every second.
- Utility Line Overvoltage: Utility companies sometimes feed neighborhoods at the top end of the grid limit (126V–130V). That may be within utility tolerances, but running an LED driver at 128V all the time drives internal heat way up.
- Cheap Unbranded Bulbs: Low-end bargain LEDs use cheap linear IC drivers instead of real switching step-down transformers. They usually don’t have thermal foldback protection—a circuit feature that dims the light automatically if parts get too hot.
- Loose Neutral Wiring in the Circuit: A loose or deteriorating neutral wire at the junction box or main service panel causes voltage swings. When big appliances, like an air conditioner or refrigerator compressor, kick on, the neutral shifts and sends sudden spikes up to 140V through 120V circuits.
Common Mistakes
- Buying non-enclosed bulbs for sealed fixtures. Folks grab whatever multi-pack’s on sale at the grocery store. Check the tiny print on the bulb or box. If it says "Not for use in totally enclosed luminaires," putting it in a sealed globe is a fast track to early failure. Buy wet-location or fully enclosed-rated bulbs.
- Cranking the bulb down with gorilla strength. People think tighter is better. It’s not. Over-torquing crushes the spring-brass contact tab, strips the socket threads, and snaps the internal solder joints inside the bulb neck. Tighten until snug, plus a quarter turn.
- Ignoring the minimum wattage load on older dimmers. Plenty of pre-2010 dimmers need at least 40 to 60 watts to work smoothly. If you swap four 60-watt incandescents (240W total) for four 9-watt LEDs (36W total), the load drops under the switch’s threshold. Then the dimmer chatters, pulses, and burns out the LED drivers.
- Confusing luminaire heat with diode heat. An incandescent gets hot on the glass; an LED gets hot at the base. Homeowners touch the glass, feel it’s cool, and figure heat isn’t the issue while the circuitry right above the socket is baking.
- Blaming the bulbs when a ceiling fan is the culprit. Ceiling fan light kits beat bulbs up with continuous low-frequency vibration. Standard household bulbs in there instead of fan-rated or vibration-resistant bulbs will snap the tiny internal inductors off the circuit board.
Cost & Time Breakdown
| Task | DIY Cost | Pro Cost | Time |
|---|---|---|---|
| Pry up socket tab & clean contacts | $0 | $100–$150 (Service call) | 10–15 mins |
| Replace standard wall dimmer with LED-rated dimmer | $20–$35 | $125–$225 | 20–30 mins |
| Upgrade to enclosed-fixture-rated LED bulbs (4-pack) | $12–$25 | N/A | 5 mins |
| Replace scorched light socket interior | $4–$9 | $100–$175 | 20–30 mins |
| Diagnose house-wide high line voltage (electrician) | $0 (multimeter check) | $150–$300 | 30–60 mins |
Tips & Prevention
- Match the rating to the room: Use damp-rated bulbs in bathrooms where steam can corrode boards, enclosed-rated bulbs in sealed hallway domes, and wet-rated bulbs in outdoor soffit cans.
- Check for the ENERGY STAR logo: Cheap no-name bulbs skip the basic testing. ENERGY STAR certified bulbs go through real stress tests, including thousands of hours at elevated temperatures in enclosed test jigs.
- Clean dust off recessed trim rings twice a year: In North Texas and other dry climates, attic insulation and static dust build up around the edge of recessed cans and block the little ventilation slits meant to vent driver heat into the ceiling joists.
- Watch for flickering when appliances turn on: If your LEDs pulse every time the HVAC compressor or microwave starts, you probably have loose connections at the panel or too much voltage drop—deal with that before you replace more bulbs.
- Label your bulb dates: Write the installation date on the plastic neck of new bulbs with a silver Sharpie. If one dies, you’ll know right away whether it lasted three years or three months, and you won’t be guessing about whether there’s an electrical problem.
When to Call a Professional
If you pull a dead bulb and smell acrid, burning fish or chemical plastic, stop right there. Scorched, blackened socket threads or charred wire insulation inside the fixture canopy point to serious arcing or thermal runaway, and that’s a house fire risk.
You should also pick up the phone if your digital multimeter reads above 125 volts at your wall outlets. That’s not a bulb issue—it’s an incoming utility problem or an open service neutral inside your main breaker panel. An open neutral can suddenly put 240 volts across your 120-volt home circuits and wipe out your refrigerator, television, and HVAC controls in an instant. If lights in different rooms flare up when a major appliance starts, cut the main breaker and get a licensed master electrician on-site immediately.
Related Articles
Keep troubleshooting with these hand-picked guides from FixlyGuide:
- Shower Door Leaking at the Bottom? 6 Causes and How to Seal It Tight — Water pooling on your bathroom floor? A leaking shower door is the likely culprit. Here are the common failure points and how to fix them f…
- Kitchen Backsplash Caulk Cracking? 5 Causes and the 12-Step Fix — Kitchen backsplash caulk cracking or pulling away? Learn why rigid grout and cheap caulk fail, and follow these 12 pro steps to seal the co…
- The #1 Mistake Homeowners Make with Ice Dams (and How to Fix It SAFELY) — Learn the safest and most effective ways to remove ice dams from your roof and prevent costly damage to your home, avoiding common DIY pitf…
- Glass Cooktop Burnt? 10 Steps to Remove Baked-On Rings Without Scratching — Struggling to clean burnt food rings off your glass cooktop? Learn the proper razor technique and soaking fix to restore your stove without…
- The 7 Critical Home Inspection Mistakes Most Homeowners Make (and How to Spot Them) — Discover the crucial home inspection mistakes homeowners commonly overlook and learn how to identify potential problems before they become…
- Yard Flooding After Heavy Rain? 9 Causes and How to Fix Your Drainage Fast — Tired of a swampy backyard every time it rains? Uncover the common causes of poor yard drainage, from compacted soil to clogged gutters, an…
Should you do this yourself?
Answer five quick questions before you start. Safety outranks savings every time.
Your experience with work like this
How high do you have to work?
Does the job involve any of these?
Will it need a permit?
Specialty tools
Free and instant. Educational guidance only — not a quote, inspection, or professional diagnosis.
What should this project cost?
Enter your project details for a realistic cost range before you call anyone.
Cost depends heavily on which system turns out to be the source.
- Regional adjustment
- National average
- Labor share (typical)
- ~$1,620
- Quotes to collect
- 3 written estimates
Educational estimate based on national averages — not a binding quote. Always confirm with written local estimates.
Before you start
Check the difficulty, permits, and safety risk — then decide whether to call a pro.
- Estimate this projectGet a cost range for your scope and ZIP before you call anyone.Open
- Get local estimatesSend one request and compare written estimates from vetted pros.Open
Free, no signup required. Estimates are educational guidance, not a quote or an inspection.
Get the print-ready PDF of this guide
A clean, ad-free, printable version you can keep on your phone or pin to the workshop wall. Free with a FixlyGuide account.
- Print-optimized layout
- Tools, materials & every step included
- Saved to your account
Recommended for DIYers & woodworkers
Sponsored
The Top 20 Tools for Workshops of Any Budget
No stationary machines or power tools required — plus 3 fundamental tools that can't be bought at any price.
Get the free guide
Ted's Woodworking — The #1 Woodworking Resource
Detailed instructions, dimensioned drawings, materials & cutting lists, and 3D schematics for every skill level.
See the plansSponsored: links above are affiliate links. FixlyGuide may earn a commission on qualifying purchases — at no extra cost to you.
Frequently asked questions
Why do my LED bulbs burn out if they're supposed to last 20 years?+
An LED light bulb uses a miniature solid-state driver packed with capacitors and rectifiers that transform high-voltage AC into low-voltage DC. While the light diodes themselves rarely fail, the internal driver circuit cooks quickly when exposed to trapped heat, high voltage, or electrical arcing.
Can an enclosed light fixture cause LED bulbs to burn out quickly?+
Yes, absolutely. Standard A19 LED bulbs require ambient airflow to shed heat from their internal heat sinks. Inside a sealed globe or flush-mount fixture, ambient air temperatures can exceed 185°F, rapidly degrading the driver's electrolytic capacitors and causing early failure. Always buy bulbs labeled 'Enclosed Fixture Rated' for sealed fixtures.
Why does my LED bulb keep dying on a dimmer switch?+
Older wall dimmers were designed for resistive incandescent loads with high minimum wattages (typically 40W to 100W). LEDs draw far less power, causing legacy leading-edge TRIAC dimmers to chop the electrical waveform irregularly. This sends repeated voltage spikes into the LED driver, burning it out within months.
What does a flattened socket contact tab do to an LED bulb?+
Over years of overtightening older bulbs, the brass tab at the bottom of the socket gets crushed flat against the porcelain base. When you screw in a new LED bulb, it barely makes contact, causing microscopic electrical arcing. This produces intense heat that melts the solder point and burns out the driver. Prying the tab up 1/8 inch restores solid spring contact.
Can high house voltage kill LED light bulbs?+
Normal household voltage in North America ranges between 114V and 125V AC. If your utility company supplies power consistently between 126V and 132V, or if you have a floating neutral wire, your LED drivers are forced to run at continuously elevated internal temperatures, drastically shortening their operating lifespan.
Do ceiling fan vibrations destroy LED bulbs?+
Yes. Ceiling fans produce continuous low-frequency vibrations that stress the through-hole solder connections holding the transformer and capacitors to the LED's circuit board. In ceiling fans, always use 'appliance-rated' or 'rough-service' LED bulbs designed with silicone potting material to absorb mechanical shock.
Does turning LED lights on and off frequently make them burn out faster?+
No. While frequent cycling was catastrophic for old fluorescent and CFL tubes due to electrode wear, modern LED chips are virtually unaffected by switching on and off. However, if a switch or socket is loose and sparks during the switching action, that momentary surge can damage cheap LED drivers.
Are cheap store-brand LED bulbs more likely to burn out early?+
Bargain-bin LED bulbs cut costs by using basic linear drivers that dump excess voltage directly as extra heat, rather than true switching drivers with protective transformers. They also use inferior capacitors rated for lower temperatures (often 85°C instead of 105°C) and lack thermal foldback circuits that dim the light to protect components during heat spikes.
Discussion
Loading comments…