- Pull the severed joint strip clear — Grab the cut strip with needle-nose locking pliers and pull it out at a 45-degree angle. A healthy failed bead should come out in long cords.
- If it breaks into little crumbly bits, use a 1/2-inch stiff gasket scraper or a painter’s 5-in-1 tool to dig out the stubborn leftovers.
- Check the cavity depth right away so you can tell whether the original installer skipped backer rod.
Plumbing · Leak
| Project category | Plumbing |
|---|---|
| Problem type | Leak |
| Trade required | Plumbing |
| Urgency | Emergency — act now |
| Safety risk | High safety risk |
| DIY suitability | DIY for experienced homeowners |
| Cost category | Low cost |
| Typical timeline | Shut water off now; repair usually same or next day |
| Contractor type | Licensed plumber |
Repair option
Isolate at the shutoff, replace the failed component, and dry the cavity fully.
Replacement option
Repipe the run or the branch when corrosion is widespread.
Common causes
- Failed supply line or shutoff valve
- Worn washers, cartridges, or P-trap connections
- Pinhole corrosion in older copper
Relevant tools:emergency checklistdiy or hire a pro
Published November 3, 2026Last updated November 3, 2026
Tools & materials you'll need
Affiliate links- AmazonHigh-thrust caulking gun1 · Minimum 18:1 thrust ratio for thick polyurethanes
- AmazonOscillating multi-tool or utility knife1 · With rigid non-serrated scraper blades
- AmazonStiff carbon steel wire brush1 · For scouring porous brick edges
- AmazonCurved caulk tooling spatula1 · Flexible stainless steel or plastic slick
- AmazonWet/dry shop vacuum1 · With crevice nozzle attachment
As an Amazon Associate FixlyGuide earns from qualifying purchases — at no extra cost to you. Prices and availability are accurate as of publication and subject to change.
Quick Answer
To fix exterior brick and siding caulk joints that split or pull away, I strip out every bit of hardened sealant with a multi-tool or utility knife, brush off the dust, pack closed-cell backer rod into any gaps deeper than 1/2 inch, and then lay in a commercial-grade polyurethane or hybrid polymer sealant. I smooth the bead with a dry tooling spatula within 15 minutes. Don’t grab standard painter's latex or pure acetoxy bathroom silicone. Neither one can keep up when two very different building materials start moving around in hot and cold weather.
The Problem
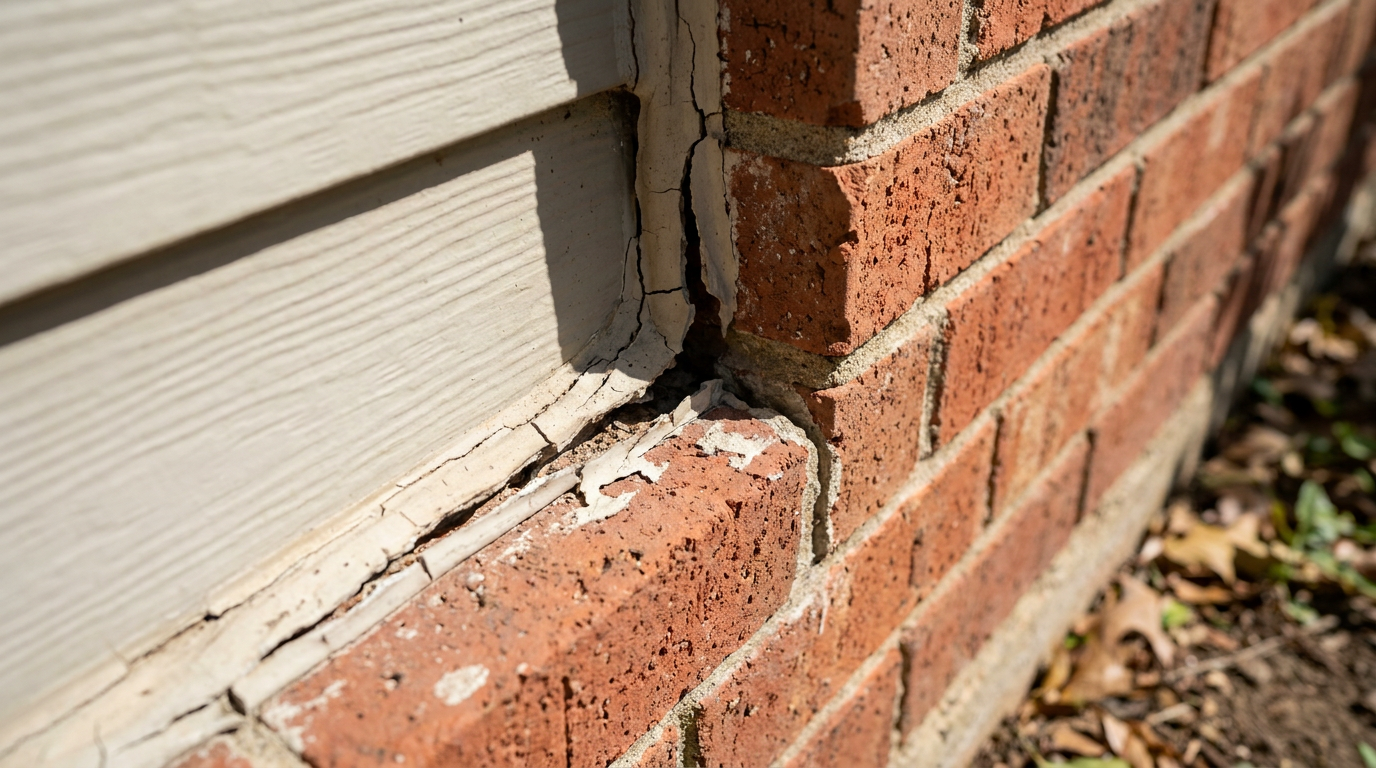
Walk around your house and check the spots where different exterior cladding systems meet. The ugly failures usually show up where masonry—brick, cast stone, or stucco—butts into wood trim, vinyl siding, fiber cement (HardiePlank), or an aluminum flashing apron.
Those transition seams take a beating. The caulk doesn’t just fade out there. It splits right down the middle (cohesive failure), or it lets go of the brick face completely (adhesive failure), and you end up with curled-up rubbery strips hanging there like old gasket material.
And no, this isn’t just a looks issue. Once that joint opens up, wind-driven rain smacks the brick veneer, sneaks around the edge, and heads straight into the wall cavity. Around North Texas and all across the American South, I’ve seen thunderstorms dump inches of rain in minutes against a wall that looked fine from the driveway. Once water gets past split perimeter caulk, it skips right past the exterior drainage plane, soaks the OSB sheathing, rots sill plates, and can grow black mold where you won’t see it until drywall starts staining. In freeze-thaw country, that trapped moisture freezes, expands by roughly 9%, and starts popping the brick edges apart. That thing’s toast if you leave it alone.
How It Works
Every house moves. Brick and siding just don’t move the same way, and that’s where the fight starts.
Brick is stable, sure, but it still absorbs moisture from the air and slowly changes over time while reacting a little to temperature swings. Wood framing and siding swell and shrink with seasonal moisture. Vinyl siding? That stuff moves a lot. It can expand and contract up to 1/2 inch over a 12-foot strip when you go from a 20°F winter morning to a 105°F summer afternoon. Fiber cement moves less than vinyl, but it still flexes way more than clay masonry.
       BRICK / STONE VENEER                  SIDING / TRIM BOARD
      +---------------------+               +---------------------+
      |                     |   JOINT GAP   |                     |
      |   Low expansion     |  (3/8" width) |  High expansion     |
      |   Rigid, porous     |<------------->|  Flexible, smooth   |
      |                     |               |                     |
      +---------------------+   |       |   +---------------------+
                                | CAULK |
                                | BEAD  |
                                +-------+
                                    |
                            [BACKER ROD BASE]
                      Prevents 3-point adhesion failure
When you run a bead across that joint, the sealant has to stretch and compress over and over without losing grip on either side. That’s called joint movement capability, and it’s rated as a percentage, like ±25% or ±50%.
For the joint to survive, the caulk needs two-point adhesion: it must stick to the brick on one side and the siding on the other, but it can’t stick to the back of the gap too. If it bonds to the rear substrate as well, now you’ve got three-point adhesion. Once the wall starts opening and closing with the weather, that middle section gets pinched and torn right down the centerline. No dice.
Standard acrylic latex caulk shrinks 25% to 40% as the water leaves it, and it dries into a brittle plastic skin that handles less than 7% total joint movement. High-grade polyurethanes and silyl-terminated polyethers (STPE/hybrid polymers) cure with atmospheric moisture without shrinking, and they stay flexible year after year through brutal temperature swings.
Step-by-Step Fix
Resealing exterior brick-to-siding seams takes proper prep and the right elastomeric sealant. Don’t do it in blazing mid-day sun or if rain’s coming within 12 hours.
-
Slice along both edges of the failed bead — Use a sharp, stiff utility knife or an oscillating multi-tool with a non-serrated scraper blade and cut along the line where the old sealant meets the brick. Keep the blade flat against the siding side so you don’t gouge wood, nick vinyl J-channels, or chip fiber cement.
- Safety: Wear cut-resistant work gloves (ANSI Level 3 minimum) and impact-rated eye protection; old exterior caulk can turn rock-hard and break loose fast.
- If the old caulk is petrified acrylic, an oscillating tool at medium speed helps break the bond without blowing out the brick face.
-
Pull the severed joint strip clear — Grab the cut strip with needle-nose locking pliers and pull it out at a 45-degree angle. A healthy failed bead should come out in long cords.
- If it breaks into little crumbly bits, use a 1/2-inch stiff gasket scraper or a painter’s 5-in-1 tool to dig out the stubborn leftovers.
- Check the cavity depth right away so you can tell whether the original installer skipped backer rod.
-
Scrape residual film off the siding profile — Take a pull-type shave hook or carbide scraper and lightly shave the siding side until you’re back to clean material. Fresh caulk won’t bond to old oxidized residue, mildew, or chalked paint.
- If you’re working on painted wood or fiber cement, don’t scrape down to bare substrate unless you have to; if you do expose bare cedar or raw fiber cement, spot-prime it with an exterior oil or acrylic primer and let it cure fully before caulking.
-
Wire-brush the masonry flank — Scrub the exposed brick edge hard with a stiff carbon-steel or stainless-steel wire brush. Brick is porous, and dust, loose mortar crumbs, efflorescence, and old grit hang up in those little crevices.
- If residue’s still stuck on, mount a small wire wheel on a cordless drill and run it along the brick edge at low RPMs (under 1,200 RPM) to clean the surface without chewing up the clay fire-skin.
- Don’t use chemical solvents or silicone removers on bare masonry; they leave an oily film that’ll ruin the adhesion for new polyurethane.
-
Vacuum and blow the seam clean — Use a crevice tool on a wet/dry shop vac and vacuum the whole open seam to clear out debris, bug nests, and crumbly mortar.
- Follow that with a quick burst from an oil-free leaf blower or canned compressed air to push out dust hiding deep in the pocket.
- If the gap is damp from morning dew or recent rain, stop right there. Wait at least 24 dry hours. Trapped moisture inside the seam will wreck polyurethane bonding.
-
Evaluate joint geometry and install closed-cell backer rod — Measure the width and depth of the gap in a few spots. If the gap exceeds 3/8-inch deep, you need foam backer rod. Pick closed-cell polyethylene backer rod that’s about 25% larger in diameter than the width of the gap (for a 1/2-inch gap, use 5/8-inch backer rod).
- Press the rod into the seam with a blunt, smooth tool like a roller wheel or a blunt wooden stick. Don’t use a screwdriver; puncturing closed-cell rod can let out gas and make ugly blisters in your fresh bead.
- Set the rod depth so the finished sealant depth equals half the joint width. For a 1/2-inch wide gap, recess the rod exactly 1/4 inch from the face. The absolute minimum caulk depth for exterior movement joints is 1/4 inch; the maximum depth is 1/2 inch regardless of width.
-
Apply painter's tape along both boundaries — Run high-tack exterior painter's tape along the brick edge and down the siding flank, leaving just the gap exposed.
- Polyurethane and elastomeric hybrids don’t wash off with water. They smear easy and leave a sticky haze on textured brick that’s a bear to remove once it gets on there. Tape gives you those sharp pro-grade lines.
- Press the tape down tight into the low spots of textured brick with a dry rag or stiff nylon brush so sealant won’t creep underneath.
-
Cut the sausage or cartridge nozzle to match joint width — Snip the plastic nozzle of your polyurethane or hybrid polymer cartridge at a 90-degree flat angle—not a sharp 45-degree angle—with utility shears.
- A flat-cut tip lets you push the nozzle deep into the pocket and fill it from the back to the front, which keeps air pockets from getting trapped.
- Punch through the inner foil seal inside the cartridge snout with the built-in puncture rod on your caulking gun, and work it a few times so the flow opens up clean.
-
Inject the sealant with consistent pressure — Load the tube into a high-thrust-ratio caulk gun (at least 18:1 or 26:1 ratio, since thick polyurethanes will jam a cheap 4:1 hardware store gun). Hold the gun at about an 80-degree angle to the surface and push the bead ahead of the nozzle tip.
- Keep steady trigger pressure so the sealant bulges against both sides of the joint and fully wraps the backer rod.
- Don’t drag the tip over empty space; you want enough pressure to force the sticky compound into the microscopic pores of the brick.
-
Tool the joint to an hourglass profile — Right after you lay down a 4-to-6-foot run of caulk, take a dry, curved stainless-steel or plastic tooling spatula and pull it across the bead in one firm, continuous stroke.
- Don’t use your bare finger, and don’t use spit or soapy water. Soapy water puts surfactants between the caulk and brick edge, and that can kill the bond fast.
- Tooling compresses the sealant against both surfaces and gives you a concave, hourglass cross-section. That thin middle section lets the joint flex without beating up the bonded edges.
-
Peel the tape before the skin forms — Pull the painter's tape off the wall right after tooling, while the sealant is still wet and workable (usually within 15 minutes of application).
- Pull the tape away from the bead at a flat 180-degree angle, folding it back on itself so the edge breaks cleanly.
- Wait too long and the sealant skins over, and you’ll drag strings of caulk all over the place, which ruins that clean line.
-
Protect the joint during full cure — Let the new sealant cure fully based on ambient humidity and temperature.
- Polyurethane and hybrid sealants skin over in 2 to 4 hours, become rain-ready in 8 to 24 hours, but need a full 7 to 14 days to hit maximum tensile strength and flexibility.
- Keep lawn sprinklers off and don’t pressure wash the siding for at least two weeks.
Common Causes
Exterior seams between brick and siding fail for pretty straightforward physical and weather-related reasons:
- Using Painter’s Acrylic Latex Outdoors: Cheap acrylic latex or "siliconized acrylic" caulk belongs on indoor baseboards, not exterior perimeter joints. Latex has water in it, and as it dries, it shrinks hard. When cold winter air pulls the siding inward, the brittle acrylic just tears apart down the middle.
- Skipping the Backer Rod (Three-Point Adhesion): If you shoot caulk into a deep seam with no backer rod, it bonds to the brick, the siding, and the back wall too—housewrap or wood framing. When the house expands, the center of the bead gets pinned against the back wall and can’t move. It splits right away.
- Thermal and Moisture Differential Movement: Siding—especially darker vinyl or composite board—expands a lot under direct sun, and it can heat up to 150°F on a hot afternoon. Masonry expands at a tiny fraction of that rate. That kind of shearing load will bust any sealant that doesn’t have at least a ±25% movement rating.
- Dust and Masonry Efflorescence: If you apply fresh caulk over dusty, weathered, or unbrushed brick, you’re only getting a fake bond. The sealant sticks to the top layer of microscopic masonry dust, not the solid brick underneath. Within a year, the caulk peels away cleanly and takes a strip of gritty brick dust with it.
- Trapped Moisture During Application: Sealing damp brick traps water in the masonry capillaries. Under summer sun, that water turns to vapor, builds pressure behind the caulk line, and blows the sealant off the wall.
Common Mistakes
- Smoothing the bead with soapy water: Wetting your finger in dish soap water is fine for kitchen sinks, but it’s trouble for exterior polyurethane. The soapy mix runs down the sides of the uncured caulk, breaks its grip on the brick face, and leaves loose, unbonded edges.
- Re-caulking over old, dried caulk: Putting a fresh bead over old, weathered caulk is a waste of time and money. The new bead can only cling to the failing layer underneath, and it’ll peel away in months. Every scrap of the old stuff has to come out down to the substrate.
- Using pure 100% silicone on masonry transitions: Pure acetoxy silicone cures fast, but it doesn’t bond well to porous, alkaline masonry like brick and mortar. Silicone can’t be painted, it grabs dirt like crazy, and it leaves a film that makes future repairs a nightmare to bond to.
- Puncturing backer rod during installation: Forcing backer rod into gaps with a flat-head screwdriver or putty knife cuts the outer skin of the closed-cell foam. The blowing agents trapped inside vent into the uncured sealant and create hundreds of bubbling gas pockets that ruin the seal.
- Tooling the caulk too thin: A joint that’s too thin (under 1/8 inch thick) doesn’t have enough mass to take movement and ends up tearing under normal thermal shifts. Caulk needs to be at least 1/4 inch deep at its thinnest midpoint to survive outside.
Cost & Time Breakdown
| Task | DIY Cost | Pro Cost | Time |
|---|---|---|---|
| Old Caulk Removal & Joint Prep (50 lin. ft.) | $15–$30 (blades, brushes) | $200–$350 | 2–3 hours |
| Backer Rod Installation (50 lin. ft.) | $8–$15 (foam rod) | $75–$125 | 30–45 mins |
| Masking & Tape Application | $10–$15 (exterior tape) | $50–$100 | 30–45 mins |
| Polyurethane/Hybrid Caulking & Tooling | $35–$65 (4–5 tubes sealant) | $250–$450 | 1.5–2 hours |
| Full Exterior House Perimeter Reseal (Entire home) | $120–$250 (tools & materials) | $1,200–$2,800 | 1–2 full weekends |
Tips & Prevention
- Perform a seasonal butter-knife check: Twice a year (spring and late autumn), walk the perimeter with a dull table knife. Lightly press the blade against the caulk line where brick meets siding. If the knife slips past the edge or the caulk feels like hard, petrified plastic, that section needs replacing before the next heavy rain.
- Stick with polyurethane or hybrid STPE sealants: Look for ASTM C920 compliance (Class 25, 35, or 50) on the tube label. Products like Loctite PL S10/S20, SikaFlex 1a, or DAP Platinum Patch Hybrid give you years of flexibility across dissimilar materials and stay paintable too.
- Never seal weep holes: While you’re sealing brick-to-siding transitions, check the bottom course of the brick veneer. If you see open vertical gaps between bricks (weep holes), leave them open. Those openings let moisture that condenses inside the wall cavity escape; sealing them traps water where it doesn’t belong.
- Paint over hybrid sealants for UV protection: High-performance polyurethane stands up to UV on its own, but a coat of quality exterior acrylic house paint gives the seam extra sun protection and can stretch its life. Wait 72 hours for the sealant to cure before you paint.
- Respect ambient installation temperatures: Only caulk when the temperature will stay between 40°F and 90°F for at least 24 hours. Cold weather makes polyurethane thick and stubborn, so it won’t wet out right, while extreme heat makes the bead sag and skin over before you can tool it flat.
When to Call a Professional
Most brick-to-siding caulk repairs on single-story walls are straightforward DIY work. But call a licensed general contractor or historic tuckpointing specialist if:
- The separation gap between the brick and the siding exceeds 3/4 inch wide, which can point to active foundation movement, framing settlement, or failing brick wall ties pulling the veneer away from the studs.
- You find a lot of black, soft, rotted sheathing or spongy sill framing behind the old caulk. That means cutting away siding, sistering wall studs, and replacing water-damaged structural parts.
- The failed joints are on a second or third story where ladders have to be set on uneven ground or near steep roofs. Wrestling with high-thrust caulk guns while you’re 25 feet up isn’t something to wing—this is scaffolding, pump jacks, and harness gear territory.
- Mortar joints along the brick interface are cracked in a stair-step pattern, which usually means foundation corners are shifting, not just normal seasonal movement.
Frequently Asked Questions
Can I just caulk over the old, cracked sealant if it is still stuck hard?
No. Don’t put fresh caulk over old sealant. The new bead can’t bond right to oxidized, dirty, or weathered surfaces, and stacking caulk on caulk makes the joint too thick, so it loses flex. The new bead will peel off in months. You’ve got to cut and scrape it down to clean, bare substrate.
What is the best caulk to use between brick and vinyl or wood siding?
The best choice is an ASTM C920-rated commercial polyurethane sealant or a silyl-terminated polyether (hybrid STPE) caulk. These products grab porous masonry without needing fancy primers, flex up to 50% of the joint width without tearing, and hold up to rough exterior weather without shrinking. Skip standard painter's latex and pure 100% silicone.
Why do I need foam backer rod for this repair?
Backer rod does two jobs: it controls the depth of the sealant bead so it doesn’t get too thick to flex, and it stops three-point adhesion. With the caulk sticking only to the brick and siding—and sliding freely against the backer rod—it behaves like an elastic rubber band. If it sticks to the framing behind it, it can’t stretch and it’ll rip apart.
Can I paint over the caulk once I finish?
Polyurethane and hybrid polymer sealants can be painted with high-grade exterior acrylic latex paint once fully cured (usually 24 to 72 hours). Painting the bead helps shield it from UV damage and stretches its lifespan. Pure 100% silicone caulk can never be painted; paint will bead up, crack, and peel right off.
How long does a properly installed brick-to-siding caulk joint last?
When the prep is done right—old material removed, dust brushed away, backer rod installed, and high-performance polyurethane applied—the joint should last 10 to 20 years. Cheap painter's latex caulk in the same exterior joint usually splits open within 12 to 18 months.
What should I do if the gap between my brick and siding is wider than 1/2 inch?
Gaps between 1/2 inch and 3/4 inch can still be sealed using a backer rod that is 1/8 to 1/4 inch larger than the gap, filled with an elastomeric hybrid sealant made for wide joints. For gaps larger than 3/4 inch, don’t count on caulk alone. Put in a custom-bent aluminum trim coil or PVC trim molding to bridge the gap before you caulk the remaining seams.
Why shouldn't I tool the caulk with my finger wet with soapy water?
Dipping your finger in soapy water leaves a thin film of surfactants on the joint edges where the caulk needs to bond. That soap film keeps the polyurethane from gripping the brick and siding, which leaves unbonded, leaky edges underneath. Use a dry, clean plastic or stainless-steel joint tooling spatula instead.
Can I caulk this exterior joint in the winter?
It’s best to wait until outdoor temperatures are consistently above 40°F (ideally 50°F to 80°F). Cold weather makes polyurethane thick and stiff, so it’s harder to dispense and doesn’t flow into the tiny pores of the brick the way it should. If you’ve got no choice and you need to seal during cold months, keep the tubes inside a warm room until the second you load them into the gun.
Related Articles
Keep troubleshooting with these hand-picked guides from FixlyGuide:
- Driveway Expansion Joint Cracking? 11 Steps to Reseal It for Good — Stop weeds, water erosion, and winter frost heave by replacing failed concrete expansion joints with commercial-grade polyurethane and clos…
- Kitchen Backsplash Caulk Cracking? 5 Causes and the 12-Step Fix — Kitchen backsplash caulk cracking or pulling away? Learn why rigid grout and cheap caulk fail, and follow these 12 pro steps to seal the co…
- The Tiny Gap Behind Your Baseboards That Costs You $100s in Drafts — Discover why your baseboards are pulling away from the wall and the simple, inexpensive fixes that can seal drafts and improve your home's…
- The 4 Hidden Signs Your Soffit & Fascia Are Failing (And What To Do) — Spotting early signs of soffit and fascia damage can prevent costly repairs and protect your home's structure from water and pest intrusion.
- The Tiny Gap That Wastes Energy: Why Your Baseboards Pull Away (And the Simple, Permanent Fix) — Baseboards separating from walls are a common issue, often indicating underlying problems with moisture or house settling, but are typicall…
- The #1 Caulk Mistake That Leads to Mold Around Your Bathroom Sink — Discover the crucial caulking mistake most homeowners make that allows mold and water damage around their bathroom sink, and how to fix it…
Should you do this yourself?
Answer five quick questions before you start. Safety outranks savings every time.
Your experience with work like this
How high do you have to work?
Does the job involve any of these?
Will it need a permit?
Specialty tools
Free and instant. Educational guidance only — not a quote, inspection, or professional diagnosis.
What should this project cost?
Enter your project details for a realistic cost range before you call anyone.
Panel repairs commonly $400–$1,500; whole-home siding replacement $10,000–$24,000.
- Regional adjustment
- National average
- Labor share (typical)
- ~$3,893
- Quotes to collect
- 3 written estimates
Educational estimate based on national averages — not a binding quote. Always confirm with written local estimates.
Get the print-ready PDF of this guide
A clean, ad-free, printable version you can keep on your phone or pin to the workshop wall. Free with a FixlyGuide account.
- Print-optimized layout
- Tools, materials & every step included
- Saved to your account
Recommended for DIYers & woodworkers
Sponsored
The Top 20 Tools for Workshops of Any Budget
No stationary machines or power tools required — plus 3 fundamental tools that can't be bought at any price.
Get the free guide
Ted's Woodworking — The #1 Woodworking Resource
Detailed instructions, dimensioned drawings, materials & cutting lists, and 3D schematics for every skill level.
See the plansSponsored: links above are affiliate links. FixlyGuide may earn a commission on qualifying purchases — at no extra cost to you.
Frequently asked questions
Can I just caulk over the old, cracked sealant if it is still stuck hard?+
No. Applying fresh caulk over an existing bead is a temporary patch that fails quickly. The new sealant cannot bond to oxidized, weathered, or dirty surfaces. Stacking beads also creates an overly thick joint that loses its elastic flexibility. Strip the old material completely down to sound substrate.
What is the best caulk to use between brick and vinyl or wood siding?+
Use an ASTM C920-rated commercial polyurethane or hybrid polymer (STPE) sealant. These materials stick aggressively to porous masonry and smooth siding, resist extreme weather without shrinking, and accommodate up to 50% joint movement. Standard painter's latex and pure silicone should not be used here.
Why do I need foam backer rod for this repair?+
Backer rod sets the proper joint depth and stops three-point adhesion. Sealant needs to bond only to the opposing sides (brick and siding) so it can stretch freely like a rubber band. If it adheres to the backing wall, movement forces rip the center of the bead open.
Can I paint over the caulk once I finish?+
Yes, as long as you use polyurethane or hybrid polymer sealants. Once fully cured (typically 24 to 72 hours), coat the bead with a quality exterior acrylic latex paint to add extra UV protection. Pure silicone, by contrast, can never be painted.
How long does a properly installed brick-to-siding caulk joint last?+
A commercial-grade polyurethane or hybrid sealant installed with proper surface prep and backer rod lasts 10 to 20 years. Cheap acrylic latex caulk in this exact location usually shrinks and splits within 12 to 18 months under seasonal thermal swings.
What should I do if the gap between my brick and siding is wider than 1/2 inch?+
Gaps up to 3/4 inch can be bridged using an appropriately sized backer rod and high-grade elastomeric sealant. For gaps wider than 3/4 inch, caulk alone is insufficient; you should install bent aluminum flashing or PVC transition molding, then seal the perimeter.
Why shouldn't I tool the caulk with my finger wet with soapy water?+
Soapy water introduces surfactants between the uncured sealant and the building materials, compromising your bond line. Polyurethane requires dry tooling or light solvent tooling (such as mineral spirits on the tool blade only) to seat properly against textured brick without lifting.
Can I caulk this exterior joint in the winter?+
It is best to apply caulk when temperatures remain between 40°F and 90°F. Cold weather makes polyurethane thick, stiff, and difficult to tool, while slowing the moisture-cure reaction. If emergency winter sealing is required, keep the tubes indoors at room temperature until the moment of application.
Discussion
Loading comments…