
Tools & materials you'll need
Affiliate linksAs an Amazon Associate FixlyGuide earns from qualifying purchases — at no extra cost to you. Prices and availability are accurate as of publication and subject to change.
Quick Answer
Most slow kitchen sink drains are caused by a buildup of grease, soap scum, and food particles, most often accumulating in the P-trap directly below the sink or slightly further down the main drain line. While often mistaken for a more severe plumbing issue, this common household problem can typically be resolved with basic tools and a bit of DIY effort, saving you the cost of a plumber. Avoid harsh chemical drain cleaners as they can damage pipes over time and often only provide a temporary fix due to not fully removing the clog.
The Problem
Your kitchen sink is draining at a snail's pace. You've tried running hot water, maybe even poured some baking soda and vinegar down, but the problem persists. Food particles, grease, and soap scum slowly accumulate inside your drainpipes over time. This narrows the opening of the pipe, restricting water flow and leading to that frustratingly slow drain. It feels like a minor inconvenience, but if left unaddressed, a slow drain can escalate into a complete blockage, or worse, pipe damage from the pressure buildup or corrosion from failed DIY attempts with caustic chemicals. The good news is that for most slow drains, the culprit is easily accessible and fixable.
How It Works
Understanding how your kitchen sink drain system functions is key to troubleshooting. Water from your sink basin flows down into the drain opening, then passes through a basket strainer that catches larger food particles. Below the strainer, it enters the tailpiece, typically a vertical pipe that leads into the P-trap. The P-trap is the U-shaped or J-shaped section of pipe directly under your sink. Its primary function is to hold a small amount of water, which creates a seal to prevent sewer gases from entering your home. This curved design, however, also makes it a prime location for debris to accumulate. Grease, cooled and solidified from dishwashing, readily adheres to the rough inner surfaces of the P-trap, trapping food scraps, coffee grounds, and soap scum. Over time, these layers thicken. From the P-trap, the water flows into the branch drain line, which connects to the main household drain stack. A vent pipe, usually extending through the roof, equalizes air pressure in the drain system, allowing water to flow smoothly. Without proper venting, you'd hear gurgling noises and experience even slower drainage due to airlocks. When a clog forms, it creates resistance, slowing the flow of water and sometimes causing gurgling or unpleasant odors as anaerobic bacteria break down the trapped organic matter.
Step-by-Step Fix
Here are the most effective DIY steps to get your kitchen sink draining freely again.
1. Clear the Basket Strainer — The first and easiest check
Remove any visible food particles, hair, or debris from the sink basket strainer. Use a paper towel to wipe it clean. Also, check the stopper mechanism if you have one. Often, accumulated gunk around the stopper can impede flow.
- Safety Note: Always wear gloves when handling drain debris.
2. Plunge the Drain — Your first line of attack for deeper clogs
Fill the sink with about 2-3 inches of hot water. Place a cup-style plunger over the drain opening, ensuring a tight seal. Plunge vigorously for 15-20 seconds, maintaining the seal. Break the seal quickly on the last plunge. Repeat this process 3-4 times. If you have a double sink, block the other drain opening tightly with a wet cloth or stopper to ensure maximum suction.
- If this doesn't work: The clog might be too dense or too far down for the plunger's force to reach.
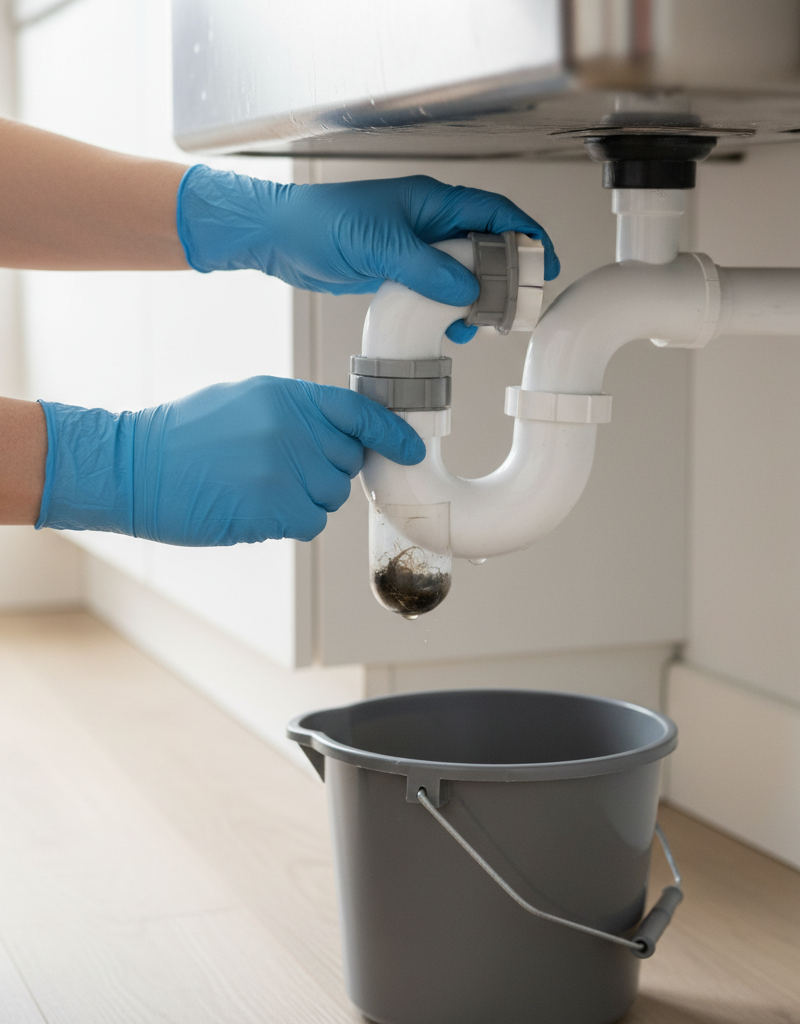
3. Clean the P-Trap — The most common culprit for slow kitchen drains
Place a bucket or old towel directly under the P-trap to catch any water and debris. Using a pair of adjustable pliers or a basin wrench, carefully loosen the slip nuts on both ends of the P-trap. If your pipes are older PVC, you might be able to unscrew them by hand. Once loose, gently remove the P-trap. Empty its contents into the bucket. Use a bottle brush or coat hanger to thoroughly clean the inside of the P-trap, removing all grease, food, and scum. Inspect the trap for any cracks or damage. Reattach the P-trap, hand-tightening the slip nuts, then give them a final quarter-turn with pliers. Turn on the water slowly to check for leaks.
- Tools: Bucket, adjustable pliers (or basin wrench), old toothbrush or bottle brush.
- Safety: Wear gloves and eye protection. Chemical residues may be present if you've recently used drain cleaners.
- If this doesn't work: The clog is likely further down the drain line.
4. Snake the Drain Line — For clogs beyond the P-trap
With the P-trap removed, you'll have direct access to the horizontal drainpipe leading into the wall. Insert a small hand-crank drain snake (auger) into the pipe. Push the snake slowly until you feel resistance. Crank the handle to feed the cable further into the pipe, breaking up or hooking the clog. Once you feel the clog is clear, or you've retrieved debris, pull the snake out slowly, wiping off any gunk with a rag. Repeat this process a few times until the drain feels clear. Reassemble the P-trap and run water to test.
- Tools: Hand-crank drain snake (25 ft recommended).
- Tip: Never force the snake. If it gets stuck, rotate it反向 to slightly retract and then push forward again.
- If this doesn't work: The clog might be deeper in the main drain line or require a more powerful auger.
5. Flush with Hot Water and Dish Soap — Post-fix maintenance
After clearing the clog, run very hot water down the drain for several minutes (5-10 minutes) to flush away any remaining debris. Periodically, pour a cup of liquid dish soap down the drain while the hot water is running. The soap helps to emulsify any residual grease and prevent future buildup.
Common Causes
- Grease Buildup: The primary culprit. Hot grease poured down the drain solidifies as it cools, coating the pipes and trapping other debris.
- Food Particles: Coffee grounds, rice, pasta, potato peels, fruit seeds, and fibrous vegetable scraps (like celery) can easily get caught in the grease-lined pipes.
- Soap Scum: While often associated with bathroom drains, soap scum from hand washing dishes contributes to clog formation, especially in conjunction with grease.
- Mineral Buildup: In hard water areas, minerals like calcium and magnesium can accumulate inside pipes, creating a rough surface for other debris to latch onto, though this is less common for kitchen sinks than food/grease.
- Improper Venting: Less common for a typical slow drain, but if your drain system isn't properly vented, air pressure differences can significantly slow drainage, often accompanied by gurgling sounds.
Common Mistakes
- Using Chemical Drain Cleaners Repeatedly: While they might offer a temporary fix, these caustic chemicals often don't fully remove the clog and can corrode pipes, especially older PVC or metal pipes, leading to leaks over time. They also pose significant safety risks if they splash back or mix with other chemicals.
- Ignoring a Slow Drain: Procrastination allows small clogs to grow into full blockages, making them much harder to clear without professional help.
- Over-Tightening P-Trap Nuts: When reassembling the P-trap, overtightening plastic slip nuts can strip the threads or crack the pipes, leading to leaks. Hand-tighten, then a quarter-turn with pliers is usually sufficient.
- Pouring Cooking Grease Down the Drain: This is the single biggest contributor to kitchen drain clogs. Always dispose of grease in a separate container once cooled.
- Flushing Food Scraps: Even small food particles should be scraped into the trash before rinsing plates. A garbage disposal helps, but it still doesn't eliminate all risks of clogging, especially with fibrous foods.
- Using the Wrong Plunger: A toilet plunger (bell-shaped) won't create a good seal on a flat sink drain. Use a cup-style plunger for sinks.
Cost & Time Breakdown
| Task | DIY Cost | Pro Cost | Time |
|---|---|---|---|
| Plunging the drain | $0 | N/A | 5-10 minutes |
| Cleaning the P-trap | $0–$15 | $100–$250 | 20–30 minutes |
| Snaking the drain line | $15–$50 | $150–$350 | 30–60 minutes |
| Recurring maintenance | $0–$10/year | N/A | 5-10 min/month |
Tips & Prevention
- Grease Disposal: Never pour cooking grease or oil down the drain. Let it cool and solidify, then scrape it into the trash.
- Food Scraps: Scrape all food scraps from plates into the trash bin before washing. Even with a garbage disposal, fibrous foods like celery, corn husks, and coffee grounds can contribute to clogs.
- Hot Water Flush: After washing dishes, run very hot water down the drain for 1-2 minutes. This helps to melt and flush away any residual grease before it can solidify and accumulate.
- Regular Cleaning: Once a month, pour a cup of vinegar followed by a cup of baking soda down the drain. Let it sit for 30 minutes, then flush with hot water. This creates a mild reaction that can help dislodge minor buildups.
- Drain Screens: Use a mesh drain screen to catch food particles before they enter your drain.
- Garbage Disposal Best Practices: If you have a disposal, run cold water while operating it and continue running water for 15-20 seconds after it sounds clear to ensure all ground-up food is flushed through.
When to Call a Professional
While most slow kitchen drains are resolvable with DIY methods, there are specific situations where calling a licensed plumber is the safest and most effective course of action. If you've attempted the steps above, including cleaning the P-trap and snaking the branch line, and the drain remains slow or completely blocked, the clog is likely deeper in your home's main drain line. These major clogs require specialized equipment like powerful augers or hydro-jetting to clear effectively and safely. Additionally, if you notice multiple drains in your home (e.g., bathroom sink, shower, main sewer) are draining slowly alongside your kitchen sink, this strongly indicates a main sewer line blockage, which is beyond DIY repair. Any signs of water backing up into other fixtures, foul sewage odors, or gurgling from toilets when the sink is draining also point to a main line issue. Attempting to clear these complex clogs yourself can result in pipe damage, leading to expensive repairs. A professional plumber has the tools and expertise to diagnose the exact location and nature of the clog and resolve it without damaging your home's plumbing system.
Related Articles
Keep troubleshooting with these hand-picked guides from FixlyGuide:
- The #1 Mistake Homeowners Make with a Slow Kitchen Drain (And the Simple Fix) — A slow kitchen sink drain is frustrating, but often an easy fix if you avoid common mistakes and know where to look first.
- The Nasty Truth: 3 Hidden Reasons Your Shower Drain Clogs (Beyond Just Hair) — Learn how to clear a stubborn shower drain clog efficiently and safely using common household tools, without harsh chemicals.
- The Secret Culprit Behind Your Slow Sink Drain (It's Not Always Hair) — Uncover the surprising reasons your kitchen sink drains slowly and learn straightforward fixes to restore flow without calling a plumber.
- The #1 Mistake Homeowners Make When Their Kitchen Sink Drains Slowly — A slow draining kitchen sink is a common problem, often caused by grease and food buildup, but many homeowners make a crucial mistake attem…
- The #1 Mistake Homeowners Make with a Slow Kitchen Drain (and the Real Fix) — Before you reach for harsh chemicals, learn the right way to fix a slow kitchen sink drain and prevent future clogs.
- The #1 Gutter Mistake Worsening Your Roof Damage (And The Easy Fix) — Overflowing gutters in heavy rain are typically caused by blockages, incorrectly sloped sections, or undersized gutters, leading to potenti…
Frequently asked questions
How do I know if my slow kitchen drain is serious?+
A slow drain is serious if multiple drains in your home are affected, if you hear gurgling from other fixtures like toilets when using the sink, or if water backs up in unexpected places. These indicate a main sewer line issue requiring professional help.
Can I use boiling water to clear a slow kitchen drain?+
Pouring boiling water down the drain can sometimes help melt grease, but it's not a permanent solution and can be risky. If you have PVC pipes and a significant grease buildup, very hot water can soften the plastic or cause joints to fail. It's better to use very hot tap water or follow the P-trap cleaning steps.
How often should I clean my P-trap?+
For preventative maintenance, cleaning your P-trap once every 1-2 years is a good practice, especially if you notice a slight decrease in drainage speed. If you frequently experience slow drains, you might need to clean it more often, perhaps every 6-12 months.
Is it safe to use a chemical drain cleaner?+
While readily available, chemical drain cleaners are generally not recommended. They often don't fully remove clogs, especially grease-based ones, and can damage pipes, particularly older PVC or metal. They also pose significant safety hazards to users and can complicate professional repair if a plumber needs to work on pipes containing caustic residues.
What items should NEVER go down a kitchen drain?+
Never pour cooking grease, oil, coffee grounds, eggshells, fibrous vegetables (like celery or potato peels), pasta, rice, or starchy foods down your kitchen drain. These items are the most common culprits for stubborn clogs.


Discussion
Loading comments…