
Tools & materials you'll need
Affiliate linksAs an Amazon Associate FixlyGuide earns from qualifying purchases — at no extra cost to you. Prices and availability are accurate as of publication and subject to change.
Quick Answer
A slow kitchen sink drain is typically the result of an accumulation of cooking grease, food scraps, and soap residue within the P-trap or the initial sections of the branch drain line. This gunk constricts the pipe's diameter, impeding water flow. The most effective DIY solution involves physically removing and cleaning the P-trap to clear the primary blockage, followed by a natural enzymatic or baking soda/vinegar treatment to break down any remaining film and prevent future buildup.
The Problem
You pour a glass of water down the kitchen sink, and it just… sits there. Or worse, it swirls sluggishly, taking several agonizing minutes to disappear. This isn't just an inconvenience; it's a sign that your kitchen drain is struggling. Over time, a combination of cooking oils, fats, grease (often collectively referred to as FOG), food particles flushed from plates, and even soap scum from dishwashing detergents gradually adheres to the interior walls of your drainpipes. This sticky, greasy film acts like a magnet, catching more debris and slowly reducing the effective diameter of the pipe. Eventually, the flow of water becomes significantly restricted, leading to that frustratingly slow drain. Ignoring it often leads to a complete clog, which is a much bigger headache to resolve.
How It Works
To understand a slow kitchen drain, it helps to know how your drain system functions. When water leaves your sink basin, it first enters the basket strainer (which ideally catches larger food particles) and then flows into the tailpiece. Immediately below the tailpiece is the P-trap. This U-shaped pipe is a critical component; it always holds a small amount of water, forming a seal that prevents noxious sewer gases from entering your home. From the P-trap, the water continues into the branch drain line, which typically runs horizontally (or with a slight downhill slope, usually 1/4 inch per foot) to connect to the main waste stack of your home.
The problem usually originates in the P-trap because its curve naturally slows water flow, allowing grease and debris more time to settle. This is its primary collection point. If the P-trap builds up, water struggles. If the P-trap is clear, but the drain is still slow, the blockage has moved further down into the initial section of the branch drain line. This horizontal section, with its gentle slope, also provides ample opportunity for FOG and food particles to cool, solidify, and cling to the pipe walls. The drain operates on gravity and atmospheric pressure; as water flows down, it displaces air. When the pipe is restricted, air can't move freely, creating a backpressure that further hinders drainage. Understanding this flow path helps you pinpoint where the congestion is most likely occurring, guiding your troubleshooting.
Step-by-Step Fix
Before you begin, gather your tools and materials. Always wear rubber gloves and have a bucket ready to catch wastewater.
-
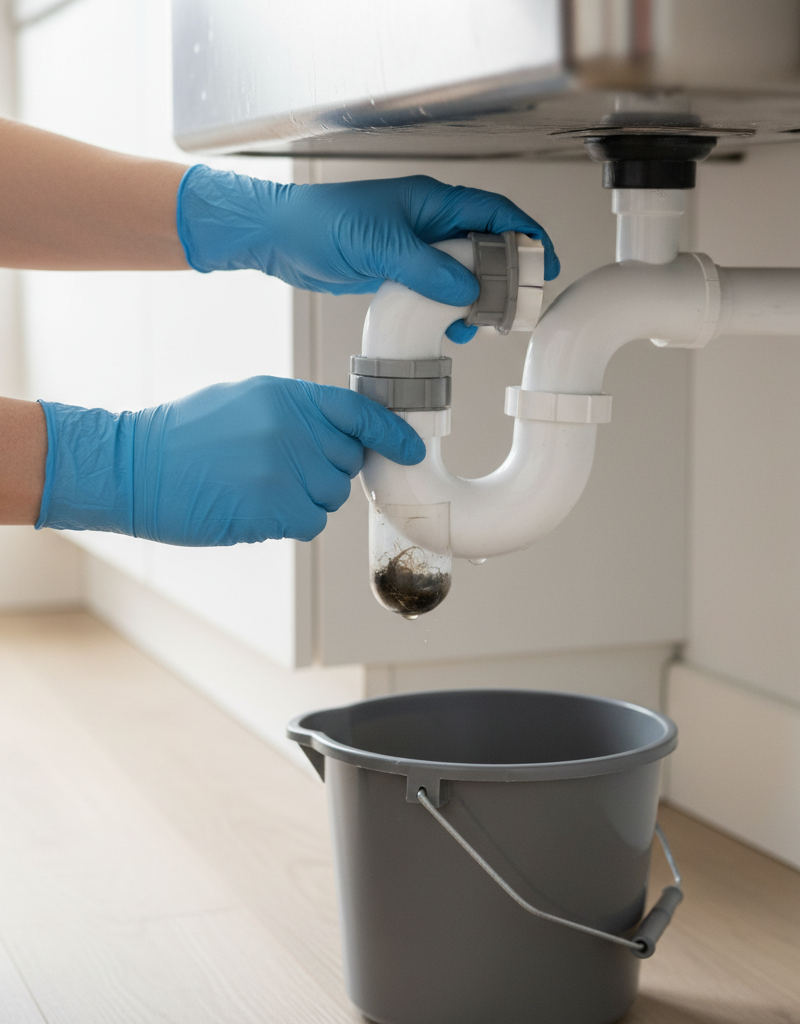
Clear the P-Trap — The most common culprit.
- Safety First: Place a bucket directly underneath the P-trap. Wear rubber gloves and eye protection.
- Preparation: Use an adjustable wrench to loosen the slip nuts on both ends of the P-trap. Older P-traps may have metal slip nuts; newer ones are plastic and can often be loosened by hand. Sometimes, a gentle twist will get them started.
- Removal & Cleaning: Carefully remove the P-trap. It will be full of old water and likely a slimy, greasy mess. Dump the contents into the bucket. Use a stiff wire brush (a bottle brush works well) or an old toothbrush to thoroughly scrub the inside of the P-trap, removing all grease, hair, and food debris. Inspect the tailpiece for any buildup as well.
- Reassembly: Reattach the P-trap, ensuring the slip nuts are hand-tightened first, then a quarter-turn more with the wrench. Do not overtighten, especially with plastic fittings, as this can crack them. Run hot water for a minute to check for leaks. If the drain is still slow, proceed to the next step.
-
Snake the Branch Drain Line — If the P-trap wasn't enough.
- Access: With the P-trap still removed, you have direct access to the horizontal branch drain line leading into the wall.
- Insertion: Carefully insert a small drain auger (often called a snake) into the exposed pipe. Push it gently but firmly until you feel resistance.
- Clearing: Once resistance is felt, crank the handle of the auger to extend the cable and break up the clog. Continue pushing and rotating the auger, retracting and reinserting it several times to clear the blockage. You might pull out clumps of hair, grease, or food. For a stubborn blockage, consider using a drilling-style motion when pushing forward.
- Flush: Once you've cleared what you can, reassemble the P-trap. Run hot water to flush the drain thoroughly. If the drain is still slow, the clog might be deeper or require a more aggressive approach.
-
Baking Soda & Vinegar Treatment — The natural degreaser.
- Preparation: Remove any standing water from the sink. Pour 1 cup of baking soda down the drain, followed by 1 cup of white vinegar. You'll hear a fizzing sound — this is the chemical reaction starting to break down the grease.
- Wait: Immediately cover the drain opening with a stopper or a rag to contain the reaction and force it downwards. Let it sit for 30 minutes to an hour, or even overnight for tough clogs.
- Flush: After the waiting period, flush the drain with a kettle-full of very hot (but not boiling, which can damage plastic pipes) water. If the drain is still slow, repeat the process or consider a different method.
-
Enzymatic Drain Cleaner — For long-term maintenance.
- Application: Follow the product instructions precisely. These cleaners use beneficial bacteria and enzymes to digest organic matter, like grease and food, without harsh chemicals. They work slowly but are excellent for maintenance and preventing future buildups.
- Timing: Apply before bed or when the sink won't be used for several hours to allow the enzymes to work without being flushed away.
- Safety: Always choose an enzymatic cleaner over harsh chemical drain openers. Chemical cleaners contain corrosive substances that can damage pipes (especially older ones), harm the environment, and pose a severe safety risk to you.
-
Clean the Basket Strainer — Often overlooked.
- Inspection: Lift out the basket strainer from your sink opening. Is there visible debris, hair, or food stuck to it?
- Thorough Clean: Use a stiff brush or old toothbrush to scrub away any trapped food particles, grease, or grime from the strainer and the opening itself. This ensures water has a clear path from the sink basin.
- Frequency: Make this a regular habit, perhaps once a week, to prevent debris from even entering the drain system.
Common Causes
- Grease, Fats, and Oils (FOG) Buildup: This is the undisputed champion of kitchen drain clogs. Pouring cooking grease down the drain, even if diluted with hot water, allows it to cool and solidify in the pipes, forming a sticky base for other debris.
- Food Particles: Small food scraps, coffee grounds, eggshells, and even starchy residues from pasta and rice can accumulate and combine with FOG to create stubborn blockages.
- Soap Scum: While often associated with bathroom drains, soap scum from dishwashing detergents can also contribute to the sticky film inside kitchen drainpipes, especially if you have hard water.
- Lack of Hot Water Flushes: Regular flushing with hot water (not scalding hot, but very warm) after disposing of greasy items can help keep FOG in a liquid state until it's past your immediate drain lines.
- Improper Venting: Less common for a slow drain, but a poorly vented drain can create air pressure issues that impede water flow. This is more often a constant slow drain rather than a gradual slowdown.
Common Mistakes
- Using Chemical Drain Cleaners: These harsh chemicals are highly corrosive, can damage PVC pipes, corrode older metal pipes, and pose significant health risks if they splash. They rarely fully clear a grease clog and can make the situation worse if a plumber later needs to open the line. Never use them.
- Pouring Boiling Water Down the Drain: While hot water is good, boiling water can soften and deform PVC pipes, potentially leading to leaks or structural failure. Use very hot tap water or water just off the boil, not actively boiling.
- Ignoring the Basket Strainer: Many homeowners let small food particles slip past, thinking the garbage disposal will handle it. Even with a disposal, the strainer is your first line of defense.
- Over-relying on Garbage Disposal: A disposal grinds food, it doesn't vaporize it. Starchy foods (pasta, rice), fibrous foods (celery, potato peels), and especially grease should always be kept out of the disposal and drain altogether, as they are prone to causing clogs downstream.
- Not Clearing the P-Trap First: Jumping straight to snaking or chemical treatments (which, again, don't use!) without checking the most common and easiest-to-access blockage point is a waste of time and effort.
- Overtightening P-Trap Nuts: Especially with plastic P-traps, overtightening the slip nuts can crack them, leading to leaks and the need for replacement.
Cost & Time Breakdown
| Task | DIY Cost | Pro Cost | Time |
|---|---|---|---|
| Clear P-Trap / Minor Clog | $0–$10 | $100–$250 | 15–30 mins |
| Basic Drain Snaking (DIY) | $20–$50 | $150–$350 | 30–60 mins |
| Baking Soda/Vinegar Treatment | $2–$5 | N/A | 1–4 hours |
| Enzymatic Cleaner Application | $15–$30 | N/A | Overnight |
| Professional Drain Cleaning | N/A | $200–$500+ | 1–3 hours |
Tips & Prevention
- Scrape Plates: Always scrape food scraps, especially grease, into the trash or compost before rinsing plates in the sink. Use paper towels to wipe greasy pans before washing.
- Use Strainers: Ensure your sink has a good basket strainer and use it diligently to catch all food particles before they enter the drain.
- Regular Hot Water Flushes: After washing dishes or pouring anything remotely greasy down the drain, run very hot tap water for 30-60 seconds to help flush grease through the pipes while it's still liquid.
- Monthly Baking Soda/Vinegar Flush: A proactive monthly treatment can help break down minor buildups before they become major clogs. Alternatively, use an enzymatic drain cleaner once a month for maintenance.
- Avoid Problematic Foods: Never put coffee grounds, eggshells, fibrous vegetables (celery, potato peels), or starchy foods (rice, pasta) down the garbage disposal or drain. These are notorious for creating clogs.
- Mind Your Detergents: While less common, some very inexpensive or low-quality dish soaps can contribute to more soap scrum buildup. Consider a quality, biodegradable detergent.
When to Call a Professional
While many slow kitchen drains can be tackled by a determined DIYer, there are clear indicators when it's time to call a licensed plumber. If you've diligently followed the steps above—cleared the P-trap, snaked the line repeatedly, and tried natural treatments—and the drain remains stubbornly slow or completely clogged, the issue is likely deeper in your home's plumbing system. This could involve a clog further down the branch line, a significant blockage in the main waste stack affecting multiple fixtures, or even an issue with your vent system. Furthermore, if you notice slow drains in other fixtures (like a bathroom sink or shower) concurrently with your kitchen sink, it's a strong sign of a main line blockage that requires professional diagnosis and advanced equipment like a heavy-duty auger or hydro-jetting. Any signs of water backing up into other sinks or tubs also points to a main line issue. A professional can quickly identify the exact location and nature of the clog and resolve it safely and effectively, preventing potential damage to your plumbing system.
Related Articles
Keep troubleshooting with these hand-picked guides from FixlyGuide:
- The #1 Mistake Homeowners Make with a Slow Kitchen Drain (And the Simple Fix) — A slow kitchen sink drain is frustrating, but often an easy fix if you avoid common mistakes and know where to look first.
- The #1 Mistake Homeowners Make When Their Kitchen Sink Drains Slowly — A slow draining kitchen sink is a common problem, often caused by grease and food buildup, but many homeowners make a crucial mistake attem…
- The 3 Hidden Reasons Your Bathroom Sink Stinks (And the 20-Minute Fix) — Uncover the surprising causes behind a foul-smelling bathroom sink drain and learn a simple, effective fix in just 20 minutes.
- Why Your Toilet Clogs Every Few Days (And the #1 Mistake Homeowners Make) — A toilet that clogs frequently is a frustrating problem, often caused by easily overlooked issues like trapway obstructions or ventilation…
- The 5-Minute Trick to Fix a Kitchen Sink Sprayer's Weak Stream — A weak kitchen sink sprayer can be frustrating, but often a simple cleaning or adjustment can restore full pressure in minutes.
- The #1 Mistake Homeowners Make When Their Dryer Stops Drying (And How to Fix It Free) — If your dryer is taking too long to dry clothes, the most common culprit is a clogged vent, which can be easily fixed with simple tools.
Get the print-ready PDF of this guide
A clean, ad-free, printable version you can keep on your phone or pin to the workshop wall. Free with a FixlyGuide account.
- Print-optimized layout
- Tools, materials & every step included
- Saved to your account
Frequently asked questions
Why is my kitchen sink draining slowly but not completely clogged?+
A slow drain, as opposed to a full clog, indicates a partial obstruction. This is typically a buildup of grease, soap scum, and food particles that has narrowed the pipe's diameter but hasn't fully blocked water flow yet. It's an early warning sign that a complete clog is on its way.
What should I *never* put down a kitchen drain?+
Avoid pouring cooking grease, fats, and oils (FOG) down the drain. Also, refrain from disposing of coffee grounds, eggshells, fibrous vegetables (like celery or potato peels), pasta, and rice, even with a garbage disposal. These items are the most common culprits for creating stubborn clogs.
Can regular hot water help prevent slow drains?+
Yes, regular flushing with very hot tap water (not boiling) for 30-60 seconds after using the sink, especially after washing greasy dishes, can help keep grease liquified and moved through your drainpipes, reducing the chances of buildup. This acts as a preventative measure, not a fix for an existing clog.
Are chemical drain cleaners safe for kitchen sinks?+
No, chemical drain cleaners are generally not recommended for kitchen sinks. They are corrosive and can damage PVC pipes, corrode metal pipes, and pose significant health risks. Enzymatic cleaners are a safer, more environmentally friendly alternative that gently breaks down organic matter over time, making them suitable for maintenance rather than quick fixes.
How often should I clean my P-trap to prevent clogs?+
For most households, inspecting and cleaning your P-trap every 6-12 months can help prevent slow drains, especially if you cook frequently with oils and fats. If you notice persistent slow draining, check it sooner. Regular strainers and mindful disposal practices can extend this interval.


Discussion
Loading comments…