Tools & materials you'll need
Affiliate linksAs an Amazon Associate FixlyGuide earns from qualifying purchases — at no extra cost to you. Prices and availability are accurate as of publication and subject to change.
Quick Answer
Low pressure in your kitchen sink sprayer often stems from easily fixable issues like mineral deposits, debris clogging the spray head, or a malfunctioning diverter valve. Most homeowners can diagnose and resolve these problems in under an hour with basic tools, restoring full spray power and avoiding the cost of a plumber.
The Problem
There's nothing more frustrating than reaching for your kitchen sink sprayer to rinse dishes or clean the sink, only to be met with a pathetic dribble instead of a powerful jet. This irritating lack of pressure can turn a simple task into a messy, time-consuming chore. While it might seem like a major plumbing issue, a weak kitchen sink sprayer is usually a symptom of a localized blockage or a minor component failure, not a problem with your home's main water supply pressure. Understanding the specific points where blockages occur is the first step to a quick and effective repair.
How It Works
To understand why your sprayer might lose pressure, it helps to know how a kitchen sink sprayer system operates. When you turn on your kitchen faucet, water flows to a diverter valve, typically located within the main faucet body or just below the faucet deck. This diverter is a clever little mechanism: when the sprayer is not in use, it directs the water flow primarily to the main faucet spout. However, when you depress the sprayer trigger, the diverter valve shifts, redirecting the water flow from the main spout through a separate hose directly to the spray head.
The pressure within this system is crucial. Water enters the diverter under your home's regular water pressure. For the sprayer to work effectively, this pressure needs to be maintained all the way to the nozzle. Any obstruction along this path – be it in the diverter, the hose, or the spray head itself – will reduce the internal diameter of the water pathway, causing a drop in pressure and a weaker spray. Mineral deposits (like calcium and lime, especially in hard water areas) are common culprits, gradually accumulating over time and narrowing the passages. Debris, such as sediment from your water heater or tiny particles dislodged from pipes, can also get trapped, particularly in the fine mesh screen often found inside the spray head or the diverter valve itself. The spray head itself is designed to create a focused stream; if its internal components are clogged, the water can't be properly directed, resulting in a weak, dispersed flow.
Step-by-Step Fix
1. Safety First – Always begin by shutting off the water supply to your sink. Look for the two shut-off valves (hot and cold) usually located under the sink cabinet. Turn both clockwise until they are completely closed. Also, open the faucet to drain any residual water from the lines to prevent leaks during the repair.
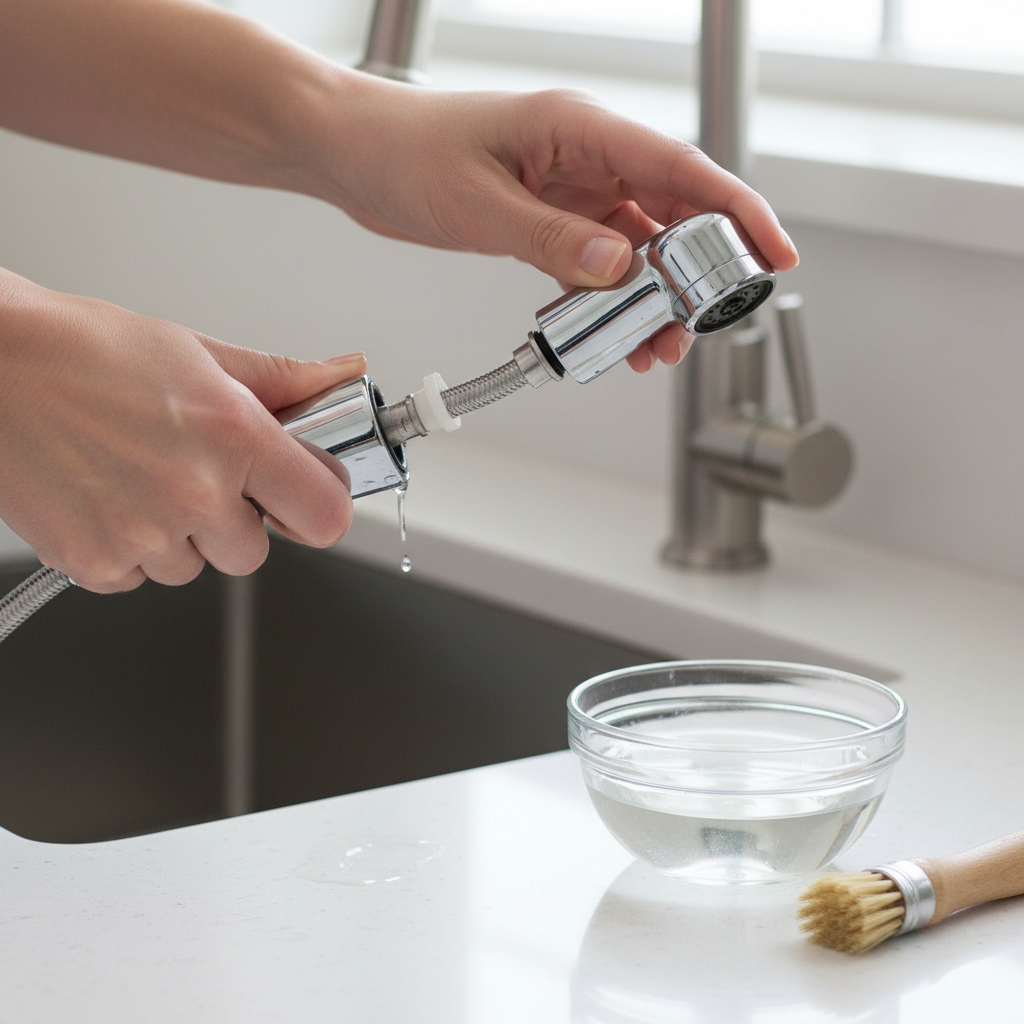
2. Remove the Spray Head – Carefully detach the sprayer head from the hose. Most spray heads simply unscrew counter-clockwise from the end of the hose. You might need a pair of pliers if it's tightened firmly, but be sure to wrap the connection with a cloth or electrical tape to prevent scratching the finish. Once removed, check the screen or aerator inside the spray head for visible debris or mineral buildup. Some sprayer heads have a removable insert or faceplate that can be pried off to reveal more internal components for cleaning.
3. Clean the Spray Head – Thoroughly clean all components of the spray head. Rinse the spray head under a strong stream of water from another faucet or a utility sink to dislodge loose debris. For stubborn mineral buildup, soak the spray head (and any removed internal screens or components) in a bowl of white vinegar for 30 minutes to a few hours, or even overnight for severe cases. Vinegar is a mild acid that effectively dissolves calcium and lime deposits. Use a small brush (like an old toothbrush) or a toothpick to scrub away any remaining gunk from the holes and screens. Ensure all tiny spray holes are clear.
4. Check the Sprayer Hose – Inspect the sprayer hose for kinks or damage. While the spray head is off, check the hose itself for any visible kinks or signs of wear, especially where it loops under the sink. Kinks can restrict water flow significantly. If there are no kinks, hold the end of the hose over a bucket and briefly turn on the hot and cold water supply valves under the sink to flush out any debris that might be trapped inside the hose. Then, turn the water supply off again.
5. Access the Diverter Valve – Locate and prepare to remove the diverter valve. The diverter valve is typically in the faucet body. You'll usually need to remove the main faucet handle and trim to access it. This might involve unscrewing a set screw (often hidden under a decorative cap) or unscrewing the entire handle assembly. Refer to your faucet's manual if you have it. Once the handle is off, you'll expose the cartridge or diverter. Some older faucets might have the diverter located where the sprayer hose connects to the main faucet body under the sink. You might see a small plastic or brass cylinder with a few ports.
6. Remove and Clean the Diverter – Carefully extract and clean the diverter valve. Use needle-nose pliers or a flathead screwdriver to gently pry or unscrew the diverter valve from its housing. It might look like a small cylindrical piece, sometimes with a spring and a rubber washer. Inspect it closely for mineral buildup, sediment, or a worn-out O-ring. Soak the diverter in white vinegar to dissolve mineral deposits, and use a small brush or toothpick to clean any screens or small passages. If the diverter looks significantly corroded or damaged, especially the rubber seals, it's best to replace it with an exact match from the faucet manufacturer or a well-stocked plumbing supply store. Worn seals can cause water to leak past the diverter, reducing pressure to the sprayer.
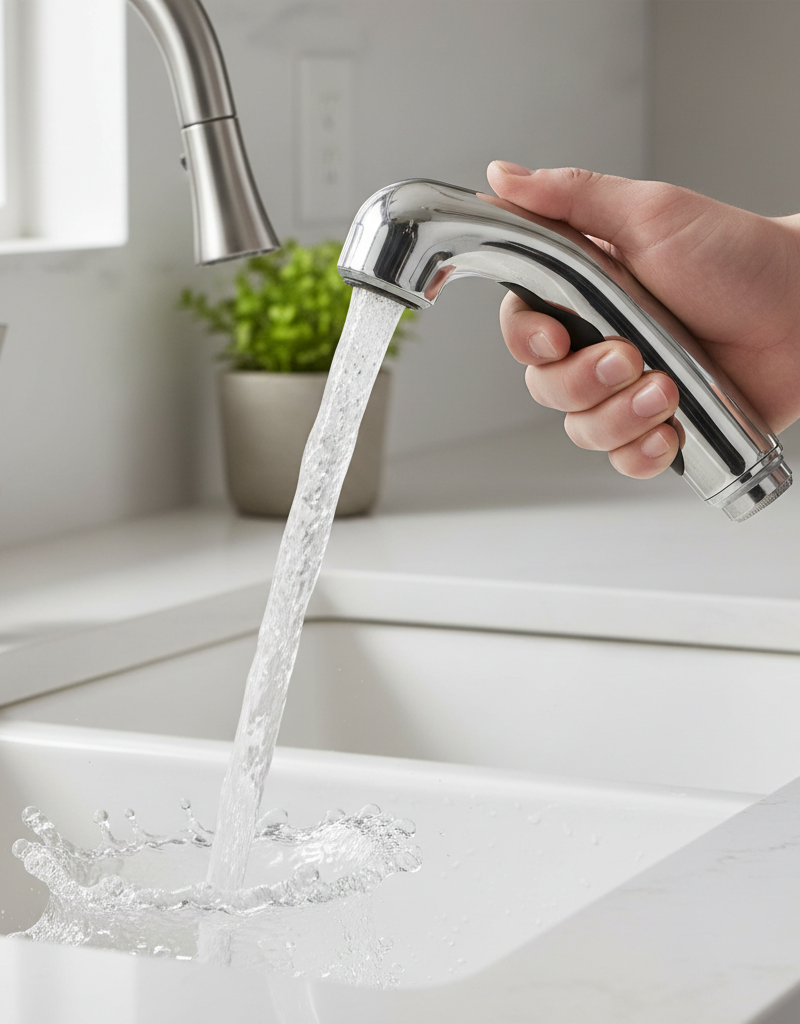
7. Reassemble and Test – Put everything back together and check your work. Reinsert the cleaned (or new) diverter valve, ensuring it's oriented correctly. Reattach the faucet handle and trim. Screw the cleaned spray head back onto the hose, hand-tightening it first, then using pliers for a final snug turn (again, protecting the finish). Slowly turn the hot and cold water supply valves back on. Check for any leaks around the connections. Then, test your sprayer. It should now have significantly improved pressure. If the pressure is still low, repeat the flushing steps for the hose, as there might be more stubborn debris.
Common Causes
- Mineral Buildup: Hard water contains minerals (calcium, magnesium) that precipitate out and accumulate inside the spray head, hose, and especially the diverter valve, restricting water flow over time. This is the single most common cause.
- Sediment and Debris: Small particles of rust, pipe scale, or sediment from your water heater can travel through your plumbing and get lodged in the sprayer's fine mesh screen or the narrow passages of the diverter valve.
- Kinked or Damaged Hose: The sprayer hose, especially if it's older or constantly pulled and retracted, can develop internal kinks or tears that restrict water flow. External damage might also be visible.
- Faulty Diverter Valve: The diverter valve, a mechanical part, can wear out. Its internal seals might degrade, or the mechanism itself might stick, preventing it from fully redirecting water to the sprayer.
- Low Household Water Pressure: While less common for a sprayer-specific issue, if all your fixtures have low pressure, your home's main water pressure might be too low. This usually points to a municipal issue or a problem with your pressure regulator if you have one.
Common Mistakes
- Ignoring the Water Shut-Off: Forgetting to turn off the water supply before starting work can lead to messy leaks and potential water damage. Always isolate the water supply first.
- Over-Tightening Connections: While you want connections to be snug, over-tightening with pliers can strip threads, crack plastic components, or damage the finish of your faucet, leading to leaks or a more expensive repair.
- Using Harsh Chemicals: While vinegar is safe, using strong chemical cleaners to clear clogs can damage plastic or rubber components within the sprayer or diverter, leading to premature failure.
- Not Checking the Diverter Valve: Many DIYers focus only on the spray head. If cleaning the spray head doesn't work, the diverter valve is often the next most likely culprit and should not be overlooked.
- Replacing the Entire Faucet Prematurely: Don't assume you need a new faucet just because the sprayer has low pressure. Most issues are minor and fixable with a simple cleaning or part replacement, saving you hundreds of dollars.
- Applying Force to Stuck Parts: If a component is stuck (e.g., the sprayer head or diverter), try soaking it with a penetrating oil designed for plumbing (like WD-40 Specialist Penetrant) or applying gentle heat with a hairdryer before forcing it, which can cause breakage.
Cost & Time Breakdown
| Task | DIY Cost | Pro Cost | Time |
|---|---|---|---|
| Clean Spray Head | $0–$5 | $75–$150 | 10–30 minutes |
| Clean/Replace Diverter | $5–$30 | $100–$250 | 30–60 minutes |
| Replace Sprayer Hose | $20–$60 | $120–$200 | 20–40 minutes |
| Diagnose All Components | $0 | $75–$150 (call-out) | 30–60 minutes |
| Full Faucet Replacement | $80–$400+ | $250–$600+ | 1–3 hours |
Tips & Prevention
- Regular Cleaning: If you have hard water, make it a habit to unscrew and soak your sprayer head in white vinegar every 3-6 months. This prevents major mineral buildup.
- Water Softening System: Consider installing a whole-house water softening system if you live in a hard water area. This not only protects your sprayer but all your plumbing fixtures and appliances from mineral damage.
- Flush the Lines Annually: Once a year, unscrew your sprayer head and temporarily turn the water on full blast for 30 seconds to flush out any loose sediment from the hose before it can clog the nozzle or diverter.
- Use a Sedimentary Filter: If you frequently experience sediment issues, a whole-house sediment filter can be installed at your main water line to trap particles before they reach your fixtures.
- Gentle Use: Avoid yanking or twisting the sprayer hose excessively, as this can lead to internal kinks or fatigue that cause it to fail prematurely.
When to Call a Professional
While most low-pressure sprayer issues are DIY-friendly, there are specific situations where calling a licensed plumber is the wisest course of action. If you've diligently followed all the steps—cleaning the spray head, flushing the hose, and inspecting or replacing the diverter valve—and the problem persists, it may indicate a deeper issue. This could involve a problem with the faucet's main cartridge, which can be more complex to replace and sometimes requires specialized tools. If you suspect an issue with your home's overall water pressure, or if you notice low pressure in other fixtures throughout your house, a plumber can accurately diagnose the root cause, which might be related to your main water supply line, pressure regulator, or even municipal supply. Furthermore, if you encounter any difficulty accessing faucet components, feel uncomfortable disassembling parts, or if a severe leak develops that you can't control, don't hesitate to contact a professional. Plumbers are equipped to handle intricate faucet repairs and assess broader plumbing system issues safely and efficiently, ensuring your kitchen returns to full functionality without further damage.
Related Articles
Keep troubleshooting with these hand-picked guides from FixlyGuide:
- The 5-Minute Fix for Your Kitchen Sink Sprayer's Weak Stream — Restore your kitchen sink sprayer's power with a simple, five-minute fix addressing common causes like mineral buildup and hose kinks.
- The 5-Minute Trick to Fix Your Kitchen Sprayer's Weak Stream — Restore your kitchen sink sprayer's full power with a simple, quick fix tackling common pressure culprits.
- The 5-Minute Trick to Fix a Kitchen Sink Sprayer's Weak Stream — A weak kitchen sink sprayer can be frustrating, but often a simple cleaning or adjustment can restore full pressure in minutes.
- The 5-Minute Fix for Your Kitchen Sprayer's Weak Stream — Restore your kitchen sink sprayer's strong stream with simple troubleshooting steps for common causes like clogs and diverter issues.
- The 5-Minute Fix for Your Kitchen Sink Sprayer (And Why It Lost Pressure) — Restore full pressure to your kitchen sink sprayer with a few simple steps, often caused by mineral buildup or a faulty diverter.
- The 5-Minute Trick to Fixing a Door That Won't Latch (No New Hardware Needed) — A door that won't latch properly is a common household nuisance, but often requires a simple, quick fix without replacing any hardware.
Frequently asked questions
Why is my kitchen sink sprayer suddenly weak?+
The most common reasons for a suddenly weak kitchen sink sprayer are mineral buildup or sediment clogging the spray head or the internal diverter valve within the faucet body. A kink in the sprayer hose can also cause a sudden drop in pressure.
Can I clean my kitchen sink sprayer head?+
Yes, most kitchen sink sprayer heads can be easily unscrewed and cleaned. Soaking the spray head in white vinegar for a few hours is highly effective at dissolving mineral deposits that cause clogs.
What is a diverter valve in a kitchen faucet?+
A diverter valve is a small component inside your kitchen faucet that directs water flow either to the main spout or to the spray hose when the sprayer is activated. If it's clogged or faulty, it can restrict water flow to the sprayer.
How often should I clean my sink sprayer if I have hard water?+
If you have hard water, it's recommended to unscrew and clean your kitchen sink sprayer head every 3 to 6 months to prevent significant mineral buildup and maintain optimal pressure.


Discussion
Loading comments…