Tools & materials you'll need
Affiliate linksAs an Amazon Associate FixlyGuide earns from qualifying purchases — at no extra cost to you. Prices and availability are accurate as of publication and subject to change.
Quick Answer
Ice dams form when heat escapes from your home's attic, melting snow on the roof. This meltwater then refreezes at the colder eaves, creating a barrier that traps more water. The safest and most effective DIY methods for removing ice dams involve using chemical ice melt products specifically designed for roofs or carefully applying steam or hot water to create drainage channels. Never use sharp tools like chisels or hammers, as they can severely damage shingles and gutters, leading to costly repairs.
The Problem
Many homeowners view ice dams as merely an aesthetic winter nuisance. However, these frozen formations are a serious threat to your home's integrity. An ice dam is essentially a wall of ice that builds up at the edge of your roof. As snow on the warmer parts of the roof melts, the water flows down until it hits the colder eave. Here, it refreezes, adding to the dam. This process can happen repeatedly, creating a significant barrier. The real problem occurs when subsequent melting snow or rainfall gets trapped behind this dam. This standing water can then seep under your shingles, through nail holes and seams, and into your attic, walls, and even ceilings. This leads to water stains, damaged insulation, rot, mold growth, and compromised structural components. In severe cases, the sheer weight of a large ice dam can pull gutters off or even stress the roof structure itself. Addressing ice dams promptly and correctly is crucial to preventing expensive and extensive damage.
How It Works
Understanding how ice dams form is key to preventing and safely removing them. It all starts with heat loss from your home. During winter, heat naturally rises and escapes through your ceiling into the attic. If your attic isn't properly insulated and ventilated, this heat warms the roof deck from underneath. This warmth causes the snow on the main part of your roof to melt. The melted water then flows down the roof slope. As it reaches the eaves – the parts of the roof that extend beyond the exterior walls – it encounters colder air because the eaves are not directly heated by the attic below. This temperature drop causes the flowing water to refreeze, forming an initial ridge of ice. As more snow melts and flows down, it backs up against this ice ridge, cools, and refreezes, gradually building up the ice dam. The cycle continues, with more and more water getting trapped behind the growing dam. This trapped water, instead of draining harmlessly off the roof, can then push its way under the shingles by a process called capillary action and hydrostatic pressure, which is what ultimately leads to interior water damage. The thickness of the snowpack, the outdoor temperature fluctuations, and the amount of heat escaping your attic all contribute to the size and severity of an ice dam. Effective solutions focus on either preventing this heat loss entirely or safely removing the ice without damaging the roof system.
Step-by-Step Fix
Always prioritize safety. Working on a ladder during winter conditions (ice, snow, cold temperatures) is inherently risky. Have a helper, use a stable ladder, wear appropriate footwear, and consider professional help for steep roofs or large ice dams.
-
Assess the Situation – Examine the ice dam's size and location. Before you start, carefully observe the ice dam. How large is it? How thick? Is it extending far up the roof? Are there visible signs of water intrusion inside your home (stains on ceilings or walls)? This assessment will help you choose the best removal method and determine if professional assistance is needed. Pay attention to electrical lines near the eaves.
-
Choose Your Method: Chemical Ice Melt – The safest DIY option for most homeowners. For smaller to medium-sized ice dams, a calcium chloride-based ice melt product is often the safest and most effective DIY choice. Avoid rock salt (sodium chloride), which can be corrosive to roofing materials and harmful to plants. Purchase granular calcium chloride specifically formulated for roofs.
- Tool: Roof rake or extension pole
- Material: Calcium chloride ice melt (roof-safe formulation)
- Safety: Always wear gloves and eye protection when handling chemicals.
-
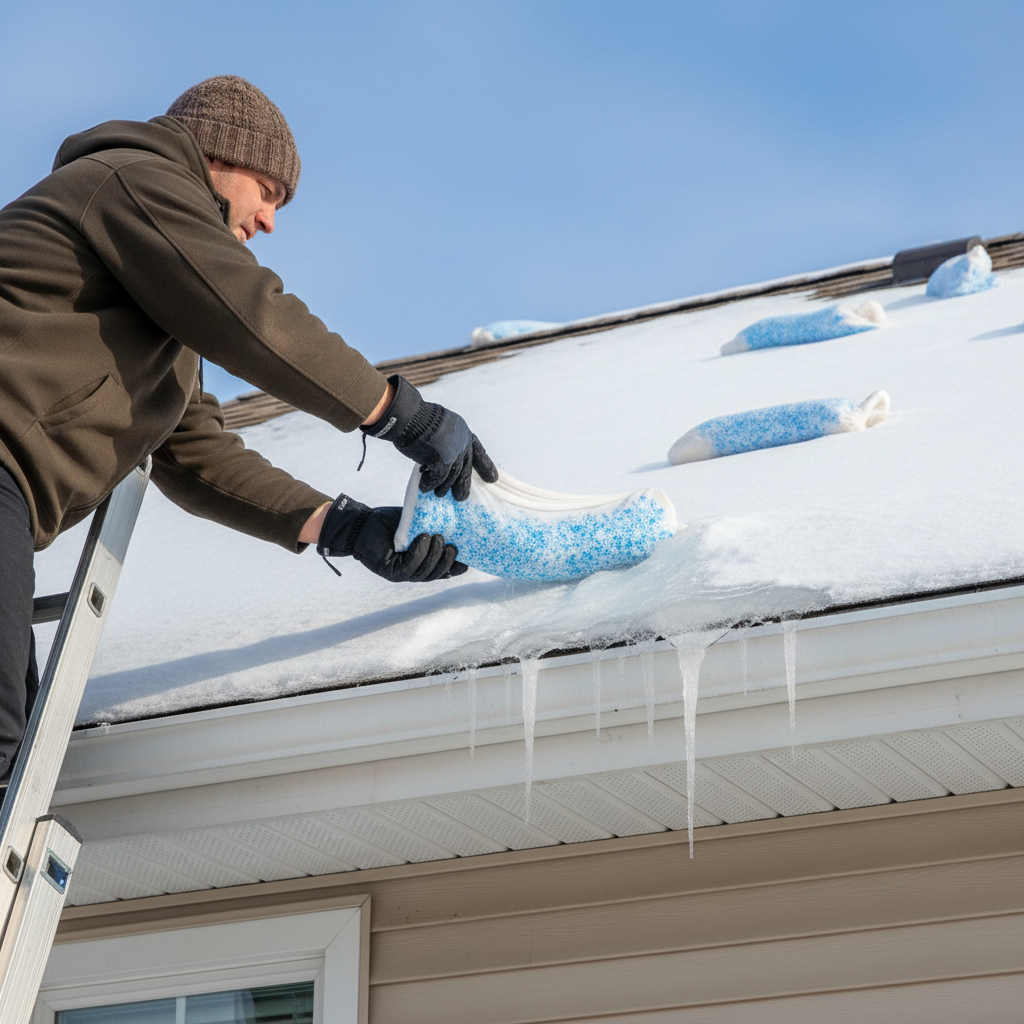
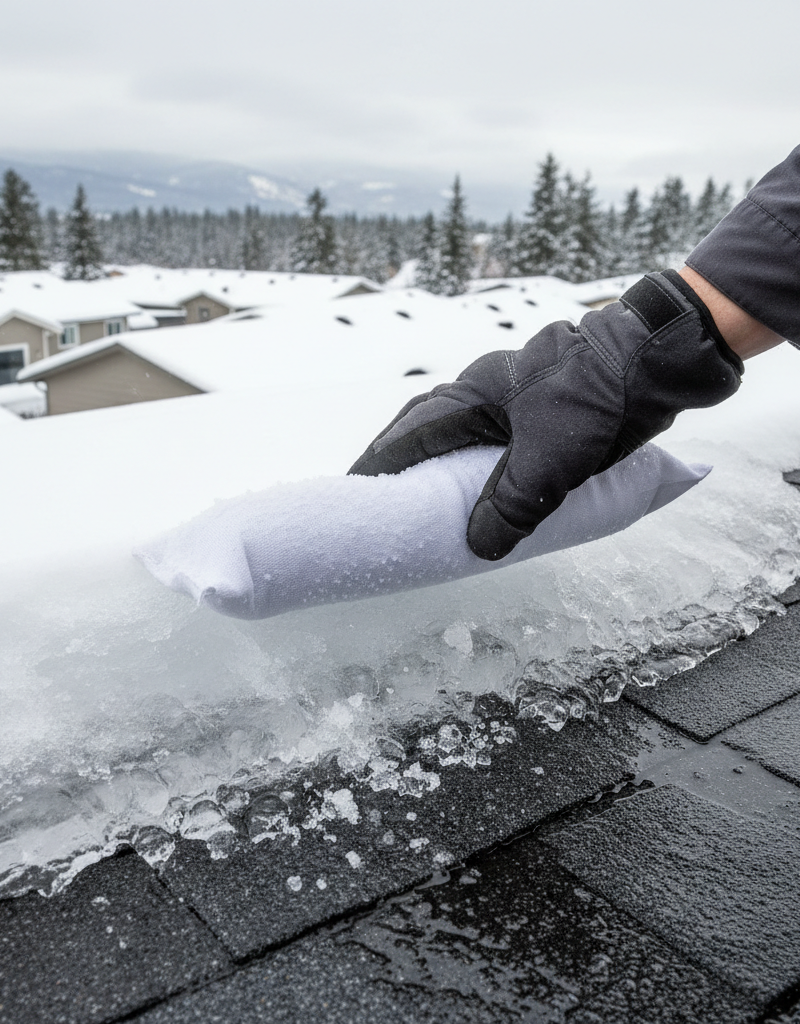
Fill Nylon Stockings with Ice Melt – Create targeted melting tools. Pour about 1-2 cups of your granular calcium chloride ice melt into old nylon stockings or socks. Tie a knot at the end to secure the granules. The nylon allows the melting agent to slowly release and dissolve the ice.
-
Position the Ice Melt Stockings – Create channels for water. Carefully place the filled stockings across the ice dam, perpendicular to the eave. The goal is to create channels through the ice, allowing the trapped water behind the dam to drain off the roof. Space them every 2-3 feet along the length of the dam. If the ice dam is high up the roof, use a roof rake or a sturdy extension pole with a hook to gently push the stockings into place.
- If this doesn't work: If the dam is too thick, you may need more stockings or a different approach.
-
Monitor and Repeat (If Necessary) – Allow time for the ice melt to work. The ice melt will begin to melt channels through the dam immediately, though larger dams may take several hours or even a day, depending on temperature. Check on the progress. Once channels are established and water is flowing freely, the trapped water should drain. You may need to reposition stockings or add new ones if the dam remains substantial.
-
Alternative Method: Hot Water/Steamer (Use Extreme Caution) – For faster, but riskier, removal. This method can be faster but also carries more risk of injury (burns, slips) and potential damage if not done carefully. Use a steamer, like a wallpaper steamer, or carefully pour warm (not boiling) water from a bucket or hose with a spray nozzle. The goal is to melt narrow channels through the dam, not to melt the entire dam at once.
- Tool: Wallpaper steamer with nozzle, or bucket/hose with warm water.
- Safety: Wear heavy gloves, safety glasses, and waterproof clothing. Have a spotter. Do not use extremely hot or boiling water, as it can shock and damage shingles.
- If this isn't working: Stop and revert to chemical ice melt. Do not force the issue with hot water.
-
NEVER Chip or Pry – Avoid significant roof damage. Resist the urge to use hammers, chisels, axes, or other sharp tools to break up ice dams. This is a common mistake that almost invariably leads to damaged shingles, gutters, and underlying roof structures. The cost of repairing a damaged roof far outweighs the inconvenience of an ice dam.
-
Clear Underlying Snow (Once Dam is Addressed) – Reduce future dam formation. Once the ice dam has been managed and water can drain, consider carefully using a roof rake to remove any heavy snow load from the lower several feet of your roof. This reduces the amount of snow that can melt and contribute to future ice dams. Do not clear snow from directly above the ice dam if it’s still substantial.
- Tool: Aluminum or plastic roof rake with an extendable pole.
- Safety: Never stand on a ladder and attempt to clear snow high up the roof. Work from the ground.
Common Causes
- Poor Attic Insulation: The most common culprit. Inadequate insulation in your attic allows heat from your living space to rise and escape into the attic, warming the roof deck. The average attic should have at least 12-15 inches of insulation (R-38 to R-49).
- Inadequate Attic Ventilation: Even with good insulation, poor ventilation traps warm air in the attic. Without proper soffit and ridge vents, warm air can't escape, leading to a warmer roof surface. A good ventilation system should provide 1 square foot of net free area for every 300 square feet of attic floor space, with a 50/50 split between intake (soffit) and exhaust (ridge/gable) vents.
- Recessed Lighting/Attic Hatches: Unsealed recessed lights, attic access panels, and even bathroom exhaust fans that vent into the attic can create direct pathways for warm, moist air to escape and warm the roof deck. Each recessed light can lose as much heat as a small open window in winter.
- Clogged Gutters: While not a direct cause, clogged gutters can exacerbate ice dam problems by preventing meltwater from draining properly, leading to water backing up and freezing.
- Uneven Heating: Architectural elements like dormers or valleys can create areas where snow accumulates more, or where heat loss is greater, predisposing those areas to ice dam formation.
Common Mistakes
- Chipping with a Hammer or Axe: This is the most damaging mistake. Using blunt force almost guarantees you'll damage shingles, tear roofing membranes, or dent gutters. The cost of roof repair vastly exceeds the issue of the ice dam.
- Using Rock Salt (Sodium Chloride): Standard rock salt (the kind used on driveways) is corrosive to metals (gutters, flashing) and can damage asphalt shingles over time. It can also harm landscaping and pets. Always use calcium chloride specifically formulated for roofs.
- Over-relying on Heat Cables: While useful for prevention, installing heat cables after a large ice dam has formed is less effective for active removal and can be dangerous if installed improperly around existing ice.
- Pouring Boiling Water: Extremely hot water can cause thermal shock to cold shingles, potentially cracking them. It also poses a burn risk and can refreeze quickly, creating more ice.
- Ignoring the Underlying Cause: Simply removing an ice dam without addressing the root cause (attic heat loss/poor ventilation) means it will likely return with the next snowfall. This leads to a cycle of repeated emergency removal.
- Standing on a Slippery Roof: Never attempt to clear ice or snow by walking on a frozen or snow-covered roof. It's incredibly dangerous and can lead to severe injury. Use a ladder and a roof rake from the ground whenever possible.
Cost & Time Breakdown
| Task | DIY Cost | Pro Cost | Time |
|---|---|---|---|
| Calcium Chloride Ice Melt | $15–$30 | Included | 30–60 min |
| Nylon Stockings | $0 (repurpose) | Included | 5 min |
| Roof Rake (if needed) | $40–$70 | N/A | N/A |
| Professional Ice Dam Removal | N/A | $200–$1,000+ | 1–4 hours |
| Attic Insulation Upgrade | $500–$2,500 | $1,000–$4,000+ | 1–2 days |
| Attic Ventilation Install | $300–$1,500 | $800–$3,000+ | 1 day |
Tips & Prevention
- Check Attic Insulation Annually: In late fall, inspect your attic insulation. Ensure it's evenly distributed and meets recommended R-values for your climate zone (typically R-38 to R-60). Look for compacted areas or gaps. The cost of a few bags of blown-in insulation is minimal compared to ice dam damage.
- Ensure Proper Attic Ventilation: Verify that soffit vents are not blocked by insulation and that ridge or gable vents are clear. Good airflow keeps the attic cold, matching the outdoor temperature. A simple smoke test near vents can show airflow.
- Seal Air Leaks: Use expanding foam sealant or caulk to seal any air leaks that allow warm air into the attic. Common culprits include penetrations for plumbing stacks, electrical wires, ceiling light fixtures, and gaps around attic hatches. A thermal camera can reveal hidden leaks.
- Clear Gutters Regularly: Keep gutters free of leaves and debris year-round, but especially before winter. Clogged gutters can prevent water from draining properly, exacerbating ice dam formation.
- Consider Heat Cables (for problem areas): If you have a persistent ice dam problem in a specific trouble spot despite proper insulation and ventilation, consider installing self-regulating heat cables along the eaves and in gutters. These should be installed by a qualified electrician and used only as a last resort, not as a primary solution. These cables are designed to melt channels, not the entire eave.
- Remove Heavy Snow: After a significant snowfall, use a roof rake to carefully remove the bottom 3-4 feet of snow from your roof, especially over the eaves. This proactive step can prevent ice dams from forming in the first place.
When to Call a Professional
While DIY methods can address many ice dams, it's crucial to know when to call a professional. If an ice dam is exceptionally large, extends far up your roof (more than 2-3 feet from the eave), or if you discover active leaks inside your home, contact a licensed roofing contractor immediately. Professionals have specialized tools like industrial steamers that can safely and efficiently remove large dams without damaging your roof. Also, if your roof is steep, multi-storied, or has complex architectural features that make ladder work unsafe, always defer to a professional with proper safety equipment and training. Attempting to tackle a dangerous ice dam yourself can lead to severe injury or further costly damage to your home.
Related Articles
Keep troubleshooting with these hand-picked guides from FixlyGuide:
- The #1 Mistake Homeowners Make Removing Ice Dams (And 3 Safer Fixes) — Discover the safest and most effective ways to remove ice dams from your roof, avoiding common mistakes that can cause severe damage to you…
- The 3 Hidden Reasons Your Roof Gets Ice Dams (and the Easy Fixes) — Ice dams are a common winter problem that can cause significant damage to your roof and home if not addressed safely and effectively.
- The #1 Mistake Homeowners Make with Ice Dams (and How to Fix It SAFELY) — Most homeowners approach ice dam removal incorrectly, creating more damage or safety risks. Learn the right, safe methods to protect your r…
- The $30 Trick to Melting Ice Dams (Before They Destroy Your Roof) — Discover how to safely remove ice dams from your roof instantly with common household items, preventing costly damage. Stay safe while tack…
- The $30 Secret to Banishing Ice Dams From Your Roof (Before They Destroy It) — Learn safe and effective methods to remove ice dams from your roof and prevent costly damage to your home's structure and interior.
- The 3 Hidden Drywall Mistakes That Can Send Your Heavy Mirror Crashing Down — Discover the crucial steps to safely hang a heavy mirror on drywall, avoiding common mistakes that can lead to damage or disaster.
Get the print-ready PDF of this guide
A clean, ad-free, printable version you can keep on your phone or pin to the workshop wall. We'll also send occasional weekly tips matched to your home situation.
- Print-optimized layout
- Tools, materials & every step included
- Unsubscribe anytime
Recommended for DIYers & woodworkers
Sponsored
The Top 20 Tools for Workshops of Any Budget
No stationary machines or power tools required — plus 3 fundamental tools that can't be bought at any price.
Get the free guide
Ted's Woodworking — The #1 Woodworking Resource
Detailed instructions, dimensioned drawings, materials & cutting lists, and 3D schematics for every skill level.
See the plansSponsored: links above are affiliate links. FixlyGuide may earn a commission on qualifying purchases — at no extra cost to you.
Frequently asked questions
What is the best way to remove ice dams safely?+
The safest DIY method involves using calcium chloride ice melt placed in nylon stockings to create channels through the ice. For larger, more stubborn dams, a professional steamer is often the best solution.
Can I use rock salt to melt ice dams?+
No, avoid using rock salt (sodium chloride) on your roof. It can be corrosive to metal flashing and gutters, and can damage asphalt shingles over time. Always opt for roof-safe calcium chloride products.
How do ice dams form in the first place?+
Ice dams form when heat from your home's attic warms the roof deck, melting snow. This meltwater then refreezes at the colder eaves, creating a barrier that traps more water behind it.
Is it safe to chip away at an ice dam with a hammer?+
Absolutely not. Chipping or prying at ice dams with sharp or blunt tools is a common mistake that almost guarantees damage to your shingles, gutters, and underlying roof structure, leading to expensive repairs.


Discussion
Loading comments…