- The Hidden Danger in Your Old Light Switch Wiring (and How to Spot It) — Discover the crucial, often-misunderstood safety hazard hidden in older light switch wiring, where white wires can be live, and learn how t…
- The Hidden Reason Your GFCI Trips (It's Not Always a Faulty Outlet) — A continuously tripping GFCI outlet is a critical safety warning, often indicating moisture, a faulty appliance, or a wiring problem that r…
- The Hidden Reason Your GFCI Trips (It’s Not Always a Bad Outlet) — A tripping GFCI outlet is a safety mechanism doing its job, often indicating a problem like moisture, a faulty appliance, or a wiring issue…
- The Hidden Reason Your GFCI Trips — And Why Most Homeowners Get It Wrong — A continuously tripping GFCI outlet is a safety warning, often indicating a problem like moisture, a faulty appliance, or a wiring issue th…
- 7 Hidden Equity Drains Costing You Thousands Annually — Your home is an asset, but silent problems like minor leaks, poor insulation, and deferred maintenance can drain its value. Discover the se…
Published May 21, 2026Last updated August 17, 2026
Tools & materials you'll need
Affiliate linksAs an Amazon Associate FixlyGuide earns from qualifying purchases — at no extra cost to you. Prices and availability are accurate as of publication and subject to change.
Quick Answer
An old switch loop uses a single two-conductor cable to bring power down to a light switch and back up to the fixture. The critical safety concern for homeowners is that the white wire in these older setups is often used as a 'hot' conductor, rather than a neutral, violating modern color codes. This can create confusion for DIYers, leading to improper wiring, short circuits, or even electrical shock if not identified correctly.
The Problem
You're changing a light fixture, installing a smart switch, or even just replacing an old, worn-out switch. You open the electrical box, and there it is: a white wire connected to the switch alongside a black wire, with no bare copper or green ground wire. Your instinct, based on most modern electrical knowledge, tells you white is neutral. But in older homes, specifically those wired before the 2000s, this white wire is often not a neutral at all. It's actually a 'hot' conductor, carrying live electrical current. This setup, known as an 'old switch loop,' can be a genuine head-scratcher and a significant safety hazard. Misidentifying this hot white wire as a neutral can lead to improper splices, short circuits, damaged electronics, or, most critically, a severe electrical shock if you assume it's safe to touch. Understanding this particular wiring quirk is crucial for anyone working on residential electrical systems built in the mid-20th century.
How It Works
To understand old switch loops, let's first quickly review how a simple light circuit typically works. Power from your electrical panel (the 'hot' wire, usually black or red) flows to the light fixture, then to the switch, and finally back to the panel via the 'neutral' wire (white) to complete the circuit. A ground wire (bare copper or green) provides a safe path for fault current.
In modern wiring, a 'switch leg' or 'switch loop' setup brings power to the switch box first, then sends it to the light fixture. This typically means the incoming hot, neutral, and ground are all present at the switch. When you flip the switch, it interrupts or completes the hot circuit to the light.
An old switch loop, however, operates differently to conserve wire. Imagine the power (incoming hot and neutral) goes directly to the light fixture box. From the light fixture, a single two-conductor cable (one black, one white, no ground) runs down to the wall switch. Here's where it gets tricky: to get power to the switch, the incoming hot wire at the light fixture is connected to the black wire of the two-conductor cable. This black wire then carries the constant hot power down to the switch. The switch acts as an on/off gate for this power. When the switch is flipped 'on,' it sends that power back up the white wire of the same two-conductor cable to the light fixture. The light fixture's neutral is then connected back to the main incoming neutral for the circuit. In essence, the white wire in the switch loop becomes the switched hot, carrying power from the switch to the light, while the black wire carries constant hot to the switch. This configuration uses a white wire as a hot conductor, which directly contradicts modern wiring color codes and is the source of much confusion and potential danger for unsuspecting homeowners.
Step-by-Step Fix
Safety First—Always turn off power at the circuit breaker before beginning any electrical work. Verify with a non-contact voltage tester.
-
Preparation—Gather your tools and materials. Ensure the power is OFF at the breaker for the circuit you'll be working on. Use a reliable non-contact voltage tester to confirm no power is present at the switch or fixture box before touching any wires.
- If your home has knob-and-tube wiring or aluminum wiring: Do NOT proceed. These systems require specialized knowledge and present unique hazards. Call a licensed electrician immediately.
-
Access the Switch Box—Carefully remove the cover plate and then unscrew the light switch from the electrical box. Gently pull the switch out to expose the wiring.
-
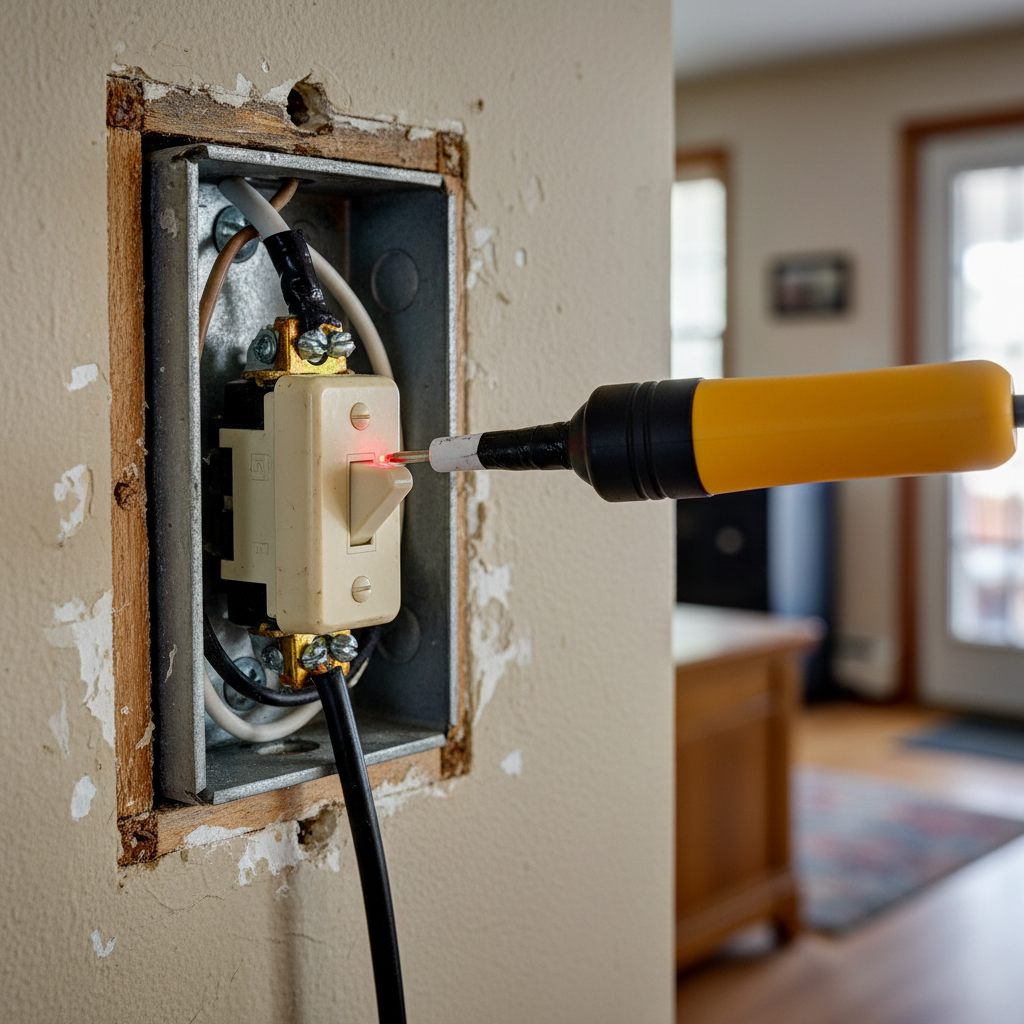
Identify the Wires—You should see a two-conductor cable (one black, one white) entering the box, connected to the switch terminals. There might also be other cables if the box is part of a larger circuit. Focus on the wires directly connected to the switch for now. In an old switch loop, there will typically be no bare copper or green grounding wire connected to the switch or present in the box. One wire (likely black) will bring constant hot power to the switch, and the other (likely white) will be the 'switched hot' carrying power from the switch to the light fixture.
- Look for warning signs: Any discoloration, frayed insulation, or brittle wires indicate old, potentially dangerous wiring. Call a pro if you see these issues.
-
Confirm the 'Hot' Wires (After Power is ON Briefly)—With the wires still connected to the switch, and being extremely careful NOT to touch any exposed conductors, momentarily turn the power back ON at the breaker. Use your non-contact voltage tester to touch each wire connected to the switch. Both wires should register as 'hot' when the switch is in the 'on' position if it's an old switch loop. When the switch is in the 'off' position, only one wire (the constant hot) should register as live. Immediately turn the power OFF again at the breaker.
- Safety Note: This step is critical but also introduces momentary risk. If you are uncomfortable or unsure, DO NOT proceed. Call a professional.
-
Mark the White Hot Wire—According to current electrical code (NEC 200.7(C)(1)), if a white wire is used as a hot conductor, it must be re-identified. Use a piece of black or red electrical tape to wrap around the white wire near the ends where it connects to the switch. This visually marks it as a hot conductor, preventing future confusion.
-
Replace the Switch (If Needed)—If you are replacing a faulty switch, connect the wires to the new switch's terminals in the same configuration. Typically, the incoming constant hot (black) goes to one terminal, and the re-identified switched hot (white with black tape) goes to the other. If your new switch requires a neutral (e.g., smart switches), and no neutral is present in the box, you CANNOT install it without running a new cable from the fixture box or power source. Most simple toggle switches do not require a neutral.
-
Address Grounding Issues (If Possible)—If your electrical box is metal and properly grounded via a metal conduit, you might be able to pick up a ground from the box itself. However, in many old switch loop scenarios, especially those with non-metallic sheathed cable (Romex without a ground wire) and plastic boxes, there will be no ground available. If your new switch has a ground terminal, connect it to the bare copper wire present in the box, or if the box is metal, pig-tail to the box. If no ground is present at all, you can replace the switch but must use a GFCI (Ground Fault Circuit Interrupter) circuit breaker for that circuit or a GFCI outlet upstream and label
Related Articles
Keep troubleshooting with these hand-picked guides from FixlyGuide:
- The Hidden Danger in Your Old Light Switch Wiring (and How to Spot It) — Discover the crucial, often-misunderstood safety hazard hidden in older light switch wiring, where white wires can be live, and learn how t…
- The Hidden Reason Your GFCI Trips (It's Not Always a Faulty Outlet) — A continuously tripping GFCI outlet is a critical safety warning, often indicating moisture, a faulty appliance, or a wiring problem that r…
- The Hidden Reason Your GFCI Trips (It’s Not Always a Bad Outlet) — A tripping GFCI outlet is a safety mechanism doing its job, often indicating a problem like moisture, a faulty appliance, or a wiring issue…
- The Hidden Reason Your GFCI Trips — And Why Most Homeowners Get It Wrong — A continuously tripping GFCI outlet is a safety warning, often indicating a problem like moisture, a faulty appliance, or a wiring issue th…
- 7 Hidden Equity Drains Costing You Thousands Annually — Your home is an asset, but silent problems like minor leaks, poor insulation, and deferred maintenance can drain its value. Discover the se…
- Why Your Wall Switch Feels Hot: The Hidden Danger Most Homeowners Miss — A hot light switch isn't just uncomfortable; it's a critical warning sign of potential electrical hazards that demand immediate attention.
Should you do this yourself?
Answer five quick questions before you start. Safety outranks savings every time.
Your experience with work like this
How high do you have to work?
Does the job involve any of these?
Will it need a permit?
Specialty tools
Free and instant. Educational guidance only — not a quote, inspection, or professional diagnosis.
What should this project cost?
Enter your project details for a realistic cost range before you call anyone.
Outlet and switch work usually $150–$400; panel upgrades commonly $1,800–$4,200.
- Regional adjustment
- National average
- Labor share (typical)
- ~$709
- Quotes to collect
- 3 written estimates
Educational estimate based on national averages — not a binding quote. Always confirm with written local estimates.
Before you start
Check the difficulty, permits, and safety risk — then decide whether to call a pro.
- Estimate this projectGet a cost range for your scope and ZIP before you call anyone.Open
- Get local estimatesSend one request and compare written estimates from vetted pros.Open
Free, no signup required. Estimates are educational guidance, not a quote or an inspection.
Get the print-ready PDF of this guide
A clean, ad-free, printable version you can keep on your phone or pin to the workshop wall. Free with a FixlyGuide account.
- Print-optimized layout
- Tools, materials & every step included
- Saved to your account
This article was independently written by FixlyGuide based on the source topic.
Frequently asked questions
Why is the white wire hot in old switch loops?+
In older wiring practices, to save on cable, a single two-conductor cable (black and white) was run from the light fixture (where power originated) down to the switch. The black wire brought constant hot power to the switch, and the white wire carried the 'switched hot' back up to the light. This made the white wire a live conductor, contrary to modern expectations.
How can I tell if I have an old switch loop?+
The most common indicator is a switch box containing only one two-conductor cable (black and white wires), with no neutral wires (other white wires twisted together) and no bare copper or green ground wire. Both the black and white wires connected to the switch will test hot when the switch is on.
Is an old switch loop dangerous?+
It can be, primarily due to confusion. If a homeowner or untrained individual assumes the white wire is neutral and touches it while the power is on, or incorrectly splices into it, it can lead to electrical shock or short circuits. The lack of a ground wire also means devices aren't protected against ground faults.
Can I install a smart switch with an old switch loop?+
Generally, no, unless it's a specific smart switch designed for no-neutral applications. Most smart switches require a neutral wire to power their internal electronics. If your old switch loop box lacks a neutral, you'll need to run new wiring to install a standard neutral-requiring smart switch, which is a job for a qualified electrician.
What's the best way to upgrade old switch loop wiring?+
The ideal upgrade involves running new 3-conductor (or more) cable from the power source (usually the light fixture box) to the switch box. This brings a dedicated hot, neutral, and ground to the switch, allowing for modern switches and devices to be safely installed. This is typically a job for a licensed electrician.


Discussion
Loading comments…