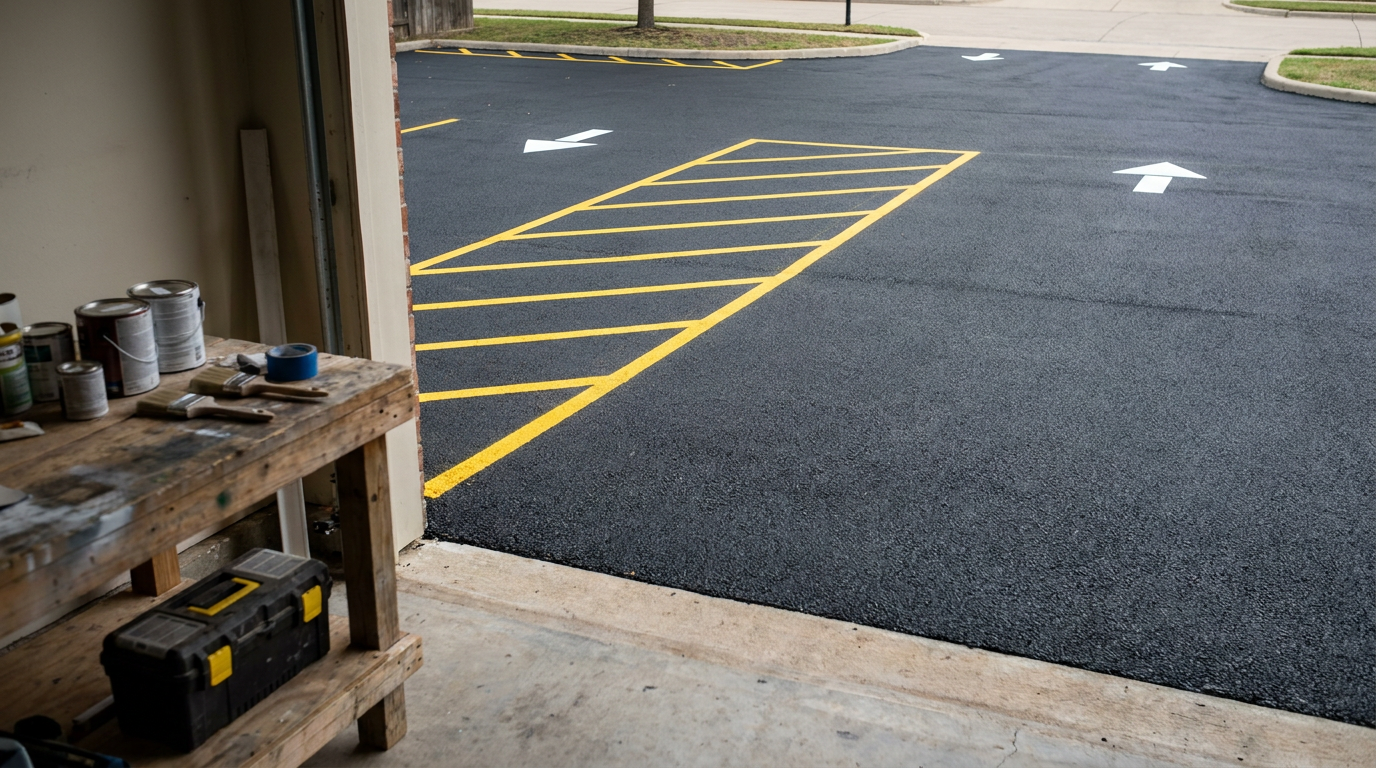
- Measure your total available footprint — Pull a 100-foot fiberglass tape across the whole width and length of your asphalt or concrete pad. Mark fixed obstacles like retaining walls, garage doors, downspouts, and property line setbacks.
- If your lot width is under 28 feet: A two-sided perpendicular layout won’t work; you’ve got to use angled parking with a single one-way drive aisle.
- Tools required: 100-ft fiberglass tape measure, contractor marking chalk.
Published November 19, 2026Last updated November 19, 2026
Tools & materials you'll need
Affiliate links- Amazon100-foot fiberglass measuring tape
- AmazonBlue chalk line reelAvoid red chalk; it stains pavement permanently
- AmazonInverted aerosol striping machineFor crisp 4-inch lines
- Amazon3,000-PSI pressure washer
- AmazonFraming square or angle protractor tool
- AmazonDirectional arrow stencil kit6-foot one-way arrow format
As an Amazon Associate FixlyGuide earns from qualifying purchases — at no extra cost to you. Prices and availability are accurate as of publication and subject to change.
Quick Answer
Angled parking spaces exist because they cut the turning radius you need to get in, which lets you run narrower drive aisles and keep traffic moving one way. A 45-degree or 60-degree stall can get by with as little as 12 to 14 feet of aisle width, while standard 90-degree straight spaces need 24 feet. So yeah, angled parking helps reduce fender benders and speeds up turnover, but it gives up some total capacity and it does require one-way circulation.
The Problem
Trying to nose into a tight 90-degree parking stall on a busy Saturday morning? That’s a little stress machine. You swing wide into oncoming traffic, crane your neck, creep forward, and hope you don’t tag the quarter panel of the extended-cab pickup parked across from you. Getting out’s usually worse. Backing blind out of a perpendicular spot into an active two-way drive aisle leads to thousands of low-speed collisions every year. No surprise there.
For commercial properties, churches, and homeowners with circular driveways or multi-vehicle outbuildings, stall design isn’t just paint and pretty lines. It’s geometry, turning clearance, and plain old human error. Pick the wrong angle, and drivers’ll scrape fenders, run over turf, or back out right into blind spots. I pulled a water heater in Frisco last month where the owner had a homemade parking pad laid out wrong, and every truck on the place had door dents from folks fighting the space.
How It Works
Vehicle steering geometry drives the whole parking layout. Front wheels pivot; rear wheels track a tighter arc, which cuts corners through something called off-tracking. When you pull into a standard 90-degree stall, your vehicle’s got to swing through a full quarter-turn. To clear adjacent vehicles, passenger cars need a minimum drive aisle of 24 feet between rows for two-way traffic, or 20 feet for one-way traffic.
90-Degree (Perpendicular)         45-Degree (Angled)
-------------------------         -------------------------
|       |       |       |          /       /       /       /
| Stall | Stall | Stall |         / Stall / Stall / Stall /
|       |       |       |        /       /       /       /
-------------------------         -------------------------
Two-way Aisle: 24 ft              One-way Aisle: 12-14 ft
Angled spaces—usually striped at 45 or 60 degrees—cut that turning angle in half or more. Since the car rolls into the stall along a natural steering arc, the driver barely needs any counter-steer. That’s why the drive aisle can shrink from 24 feet down to just 12 to 14 feet for a single one-way travel lane.
But geometry always wants its cut. Angled stalls create triangular dead zones at the curb and along the aisle edge. In a 100-foot run of asphalt, 90-degree striping gives you roughly 11 stalls, assuming 9-foot widths. A 45-degree angle over that same run gives you only 8 or 9 stalls, because each stall eats about 12.7 linear feet of curb line. So you’re trading vehicle capacity for more aisle room and a whole lot less wrestling with the wheel.
Step-by-Step Fix
Whether you’re managing an HOA lot, running a home business, or striping a dedicated parking pad for your utility trailers and vehicles, lay out the parking geometry like this.
-
Measure your total available footprint — Pull a 100-foot fiberglass tape across the whole width and length of your asphalt or concrete pad. Mark fixed obstacles like retaining walls, garage doors, downspouts, and property line setbacks.
- If your lot width is under 28 feet: A two-sided perpendicular layout won’t work; you’ve got to use angled parking with a single one-way drive aisle.
- Tools required: 100-ft fiberglass tape measure, contractor marking chalk.
-
Calculate your stall angle and aisle width — Pick 45 degrees, 60 degrees, or 90 degrees based on the physical width you’ve got to work with.
- 45-degree spaces: Need a stall depth of roughly 17.5 to 19 feet, measured perpendicular to the curb, and an aisle width of only 12 to 13 feet.
- 60-degree spaces: Need a stall depth of 19 to 20.5 feet and an aisle width of 16 to 18 feet.
- 90-degree spaces: Need an 18 to 19-foot depth and a 24-foot two-way drive aisle.
-
Check local zoning and accessibility codes — Look over your municipality’s site plan ordinances before you put down permanent markings. Most commercial and multi-family codes require standard stalls to measure at least 9 feet wide by 18 feet long.
- Accessible (ADA) stalls require an 8-foot width with an adjacent 5-foot access aisle, or 8-foot access aisle for van accessibility.
- If this is private residential land, make sure the layout changes don’t cross side-yard setbacks or utility easements.
-
Establish your baseline and offset curb line — Snap a clean chalk line using blue chalk parallel to your perimeter curb or boundary line. That baseline is the head of your stalls.
- Warning: Avoid red marking chalk; it contains permanent pigments that’ll bleed through paint and stain concrete for years.
-
Mark your stall intervals along the curb — For 90-degree parking, mark tick marks every 9 feet along your baseline. For 60-degree stalls, space your marks about 10 feet 5 inches apart. For 45-degree stalls, space your marks exactly 12 feet 9 inches apart along the curb so you keep an actual 9-foot stall width measured perpendicular to the stripes.
- Double-check your math: Measure the perpendicular distance between stripes. If it’s under 8 feet 6 inches, full-size SUVs will ding doors when parking.
-
Set your stripe angle with a framing square or transit — Set a carpenter’s angle tool or framing square on your first curb mark to lock in your entry angle (45° or 60°).
- Extend a chalk line out into the lot to the calculated stall length, like 25 feet 6 inches along the painted stripe line for a 45-degree angle.
- Snap the line and repeat at each interval, keeping all lines strictly parallel.
-
Clean and prep the paved surface — Power-wash the asphalt or concrete with a 3,000-PSI pressure washer to blast away dirt, embedded oil, and crumbling aggregate.
- Let the pavement dry completely for at least 24 hours under direct sun.
- Sweep the surface with a stiff wire broom right before striping. Paint over road dust and you’ll be watching it peel in three months.
-
Apply commercial-grade traffic paint — Load an inverted aerosol striping machine or an airless line striper with solvent-based acrylic or 100% acrylic waterborne traffic paint.
- Run the machine smoothly along your chalk lines at a steady walking pace to lay down a crisp 4-inch-wide line.
- Target a wet film thickness of 15 mils, which is roughly one gallon per 300 to 400 linear feet of 4-inch line.
- Safety check: Set out reflective traffic cones and barricade tape; keep traffic off the lines for at least 60 minutes in 70°F weather.
-
Install directional arrows and signage — Angled stalls need one-way traffic, plain and simple. Driving the wrong way down a 45-degree aisle makes pulling into a spot almost impossible.
- Stencil bold 6-foot directional arrows in the center of the drive aisle using high-durability white traffic paint.
- Post metal "DO NOT ENTER" and "ONE WAY" reflective signs at the exit and entry throat so nobody meets head-on.
-
Anchor wheel stops or curb blocks — Keep vehicles from overhanging sidewalks or punching into building walls by installing recycled rubber or precast concrete car stops.
- Set each stop 36 inches back from the front edge of the stall.
- Drill through the asphalt into the subbase with a 1/2-inch masonry bit and drive 12-inch rebar spikes flush to secure them.
Common Causes
Why do properties use angled spaces instead of straight ones? Here are the real engineering reasons:
- Narrow site envelopes: When a building site or side driveway is only 30 to 35 feet wide, 90-degree stalls just don’t fit. Two rows of perpendicular parking plus a 24-foot aisle need 60 to 62 feet of total width. A 45-degree single-row layout fits into 30 feet total width comfortably.
- Pedestrian and driver visibility: Backing out of a 90-degree space makes a driver reverse blind until the vehicle’s rear axle clears the bumper of the truck next door. With angled parking—especially 45-degree—the car’s already turned toward traffic. Your peripheral vision and backup camera cover the incoming lane with a lot less neck-craning.
- High turnover velocity: Convenience stores, banks, and post offices care more about fast stall turnover than raw vehicle count. Angled spots let drivers glide in with an easy 45-degree steering flick and back out along the one-way travel path, clearing spaces 20% to 30% faster than straight stalls.
- Traffic calming and flow enforcement: Perpendicular lots invite that wildcatting behavior—drivers cutting diagonally across empty stalls. Angled stalls paired with narrow one-way aisles physically force vehicles into orderly, predictable paths, which cuts parking lot pedestrian injuries.
Common Mistakes
- Forgetting to compensate for the skew on curb spacing. If you want a 9-foot-wide stall at a 45-degree angle, you can’t place your curb marks 9 feet apart. Do that, and your actual stall width shrinks to an unusable 6 feet 4 inches. You’ve got to divide the desired stall width by the sine of the angle (9 / sin(45°) = 12.73 feet, or roughly 12 feet 9 inches along the curb).
- Installing angled stalls with a two-way drive aisle. That’s a mess. Angled stalls are directional. If two vehicles meet heading opposite directions down a 14-foot aisle, one’s backing up. Worse, drivers trying to turn against the angle to enter a stall block the whole aisle and scrape bumper covers.
- Using cheap latex wall paint for striping. Homeowners painting private pads often grab leftover exterior house paint. It’ll flake off asphalt after three heavy rainstorms. Use actual acrylic or chlorinated-rubber traffic paint rated for tire shear and automotive fluids.
- Skipping directional pavement arrows. Drivers default to two-way traffic unless the site gives them a hard visual cue. If you don’t paint big directional arrows in the aisle, somebody’ll enter from the wrong end within hours.
- Miscalculating end-island transitions. At the ends of an angled parking row, the angled lines create awkward, protruding triangles. If you don’t taper the end curb or stripe out a buffer zone with yellow diagonal hash marks, drivers turning the corner will ride their rear tires over the curb or clip parked cars.
Cost & Time Breakdown
| Task | DIY Cost | Pro Cost | Time |
|---|---|---|---|
| Site Layout, Math & Chalking (10-20 stalls) | $25–$50 (chalk, lines, tape) | $200–$400 | 2–3 hours |
| Pressure Washing & Pavement Prep | $40–$80 (fuel/cleaner) | $150–$350 | 1–2 hours |
| Line Striping Paint & Application | $75–$150 (spray cart & paint) | $300–$600 | 1–2 hours |
| Directional Stencils & Arrow Markings | $30–$60 (stencils & paint) | $100–$250 | 1 hour |
| Rubber Wheel Stop Installation (per pair) | $80–$140 (stops & spikes) | $200–$350 | 1 hour |
Tips & Prevention
- Inspect your line reflectivity every six months: Walk your parking area at night with vehicle headlights on. When traffic paint wears thin, down to under 8 mils thickness, road grime fills the microscopic texture and the lines disappear on rainy nights.
- Sealcoat asphalt before you stripe: Don’t lay fresh parking lines on oxidized, cracked asphalt. Put down a coal-tar or asphalt-emulsion sealcoat first, let it cure for 48 hours, and then lay your paint. The lines’ll look sharper and bond a whole lot better.
- Keep stall widths at 9 feet minimum for residential properties: Sure, commercial retail lots sometimes squeeze stalls down to 8 feet 6 inches to pack in inventory, but modern residential trucks and full-size SUVs like Suburbans or F-150s measure up to 80 inches wide without mirrors. Go under 9 feet and you’re asking for door dings.
- Wash down chemical spills immediately: Gasoline, brake fluid, and steering fluid work like solvents on both acrylic paint and asphalt binder. Keep a bag of diatomaceous earth or clay absorbent handy to soak up drips before they chew up your markings.
When to Call a Professional
If you’re striping a simple three-car parking pad behind your shop, a chalk line and an aerosol striper are plenty. But call an insured commercial line-striping and paving contractor if your property falls under municipal code oversight.
Specifically, bring in a pro when you’ve got to meet federal ADA (Americans with Disabilities Act) standards. ADA compliance controls slope ratios, where surfaces can’t exceed a 1:48 or 2.08% slope in any direction, sign mounting heights, which need a minimum 60 inches to bottom of sign, and specific crosshatch spacing. Failing an ADA compliance inspection can trigger steep civil fines and expensive restriping orders.
You should also hire out the work if the existing layout has to come out. Removing old paint takes high-pressure water blasting (40,000 PSI) or scarification grinding, and DIY gear can leave the pavement looking rough if you don’t know what you’re doing.
Related Articles
Keep troubleshooting with these hand-picked guides from FixlyGuide:
- Hidden Water Leak in Your House? 5 Spots Homeowners Miss and the Fix for Each — Hidden water leaks can quietly destroy your home and drive up bills. Here are five concealed leak zones, how to test them, and step-by-step…
- The Shocking Truth About GFCIs vs. AFCIs: Are You Really Protected? — GFCIs prevent electrocution from ground faults, while AFCIs stop fires from dangerous electrical arcs. Understanding their distinct roles i…
- Paint Peeling in an Old House? Lead Dust Safety for DIY Repairs — If your home was built before 1978, repairs that disturb painted surfaces can create hazardous lead dust—here's how to test and work safely.
- Traffic Light Has a Yellow Border? Here’s What It Means for Drivers — Ever notice a traffic light with a bright yellow border? It's not just decoration—it’s a visibility feature with a specific purpose for roa…
- How to Use Smart Lights for Amazing Halloween Decorations — Want to take your Halloween decorations to the next level? Here's how to use smart lights to create spooky, cinematic effects that will be…
- The Hidden Reason Your Furnace Short Cycles (and the $15 Fix) — Furnace short cycling can drive up energy bills and wear out your system prematurely; often, a simple fix like a dirty filter or miscalibra…
What should this project cost?
Enter your project details for a realistic cost range before you call anyone.
Cost depends heavily on which system turns out to be the source.
- Regional adjustment
- National average
- Labor share (typical)
- ~$1,620
- Quotes to collect
- 3 written estimates
Educational estimate based on national averages — not a binding quote. Always confirm with written local estimates.
Get the print-ready PDF of this guide
A clean, ad-free, printable version you can keep on your phone or pin to the workshop wall. Free with a FixlyGuide account.
- Print-optimized layout
- Tools, materials & every step included
- Saved to your account
This article was independently written by FixlyGuide based on the source topic.
Frequently asked questions
Why do lots use angled parking spaces instead of straight ones?+
Angled parking cuts down the required turning angle, letting cars slide into stalls on a natural arc. This allows drive aisles to be as narrow as 12 to 14 feet, compared to the 24 feet needed for 90-degree spaces. It also dramatically cuts down low-speed backing collisions.
Do angled parking spaces fit more cars than straight spaces?+
Straight 90-degree spaces hold roughly 10% to 15% more cars along a given curb length because angled spaces create unusable triangular dead zones at both ends of each stall. However, angled lots make up for this footprint loss by requiring narrower drive lanes between rows.
What is the best angle for a parking space?+
A 60-degree angle is widely considered the sweet spot for commercial retail. It provides an effortless entry angle for drivers, keeps the drive aisle down to a reasonable 16 to 18 feet, and preserves more parking capacity than a flat 45-degree layout.
Can angled parking spaces have two-way traffic?+
No, angled parking stalls should almost never be two-way. Because the stalls lean in one direction, entering from the opposite way requires an impossible 135-degree turn that blocks the drive aisle and leads to fender benders. Angled spaces require strictly signed one-way lanes.
How wide should an angled parking space be marked at the curb?+
You cannot simply mark 9 feet along the curb line. For a 45-degree angle, you must space marks roughly 12 feet 9 inches apart along the curb to ensure the actual width between the parallel lines is 9 feet (width divided by the sine of the angle).
What is reverse angled parking and why is it used?+
Back-in angled parking requires drivers to signal, stop, and reverse into an angled spot. While it takes slightly more effort initially, it allows drivers to pull straight out into traffic with an unobstructed field of view. It is especially popular for on-street city parking and bicycle-heavy corridors.
How much driveway space is required behind angled parking?+
Standard 45-degree angled stalls need an aisle width of 12 to 14 feet for a one-way lane. For 60-degree spaces, the drive aisle must be at least 16 to 18 feet wide to give drivers enough clearance to steer into the stall smoothly.
How often do painted parking lines need to be redone?+
High-traffic commercial lots typically restripe every 1 to 2 years. For light residential or private shop use, a properly prepped acrylic or solvent-based paint applied at 15 mils wet thickness will last 3 to 5 years before fading and requiring a recoat.

Discussion
Loading comments…